
Attrib Command: Recover Deleted Files Step by Step
Accidentally deleted important files? You can try attrib command to recover deleted files or hidden files from USB drives, SD cards, and other storage devices when they’ve been affected by viruses or mistakenly made invisible. This guide explains how to recover deleted files using the attrib command, step-by-step.
By Emma / Updated on March 12, 2026
About Attrib Command
The "attrib" command is a built-in Windows utility used in Command Prompt (CMD) to view and modify file or folder attributes. It is particularly helpful when dealing with hidden, read-only, system, or archive files, which are often affected by viruses or human error. Using "attrib", you can:
- Reveal and recover hidden files made invisible by malware or users
- Remove system or read-only flags from files/folders
- Restore access to files that appear to be missing but are still present on the drive
How to Use Attrib Command to Recover Deleted Files
While the "attrib" command cannot recover permanently deleted files, it is an effective way to restore files that have been hidden or flagged as system files by viruses or user actions. If your files seem to have disappeared, they may still exist, just hidden. You can follow the steps of using attrib to recover files:
Step 1: Connect Your Device
Insert the affected USB drive, memory card, or external drive into your PC. Make sure it is detected by your system successfully.
Step 2: Open Command Prompt
1. Press "Windows + R", type "cmd", then press "Enter".
2. Or, click "Start", search for "Command Prompt", and right-click it to choose "Run as administrator".

Step 3: Locate the Drive Letter
Check the drive letter assigned to your external device (e.g., "E:\", "F:\"). You can find it in "File Explorer" under "This PC".
Step 4: Run the Attrib Command
Type the command and press "Enter": attrib -h -r -s /s /d E:\*.* (Replace "E:" with your actual drive letter.)
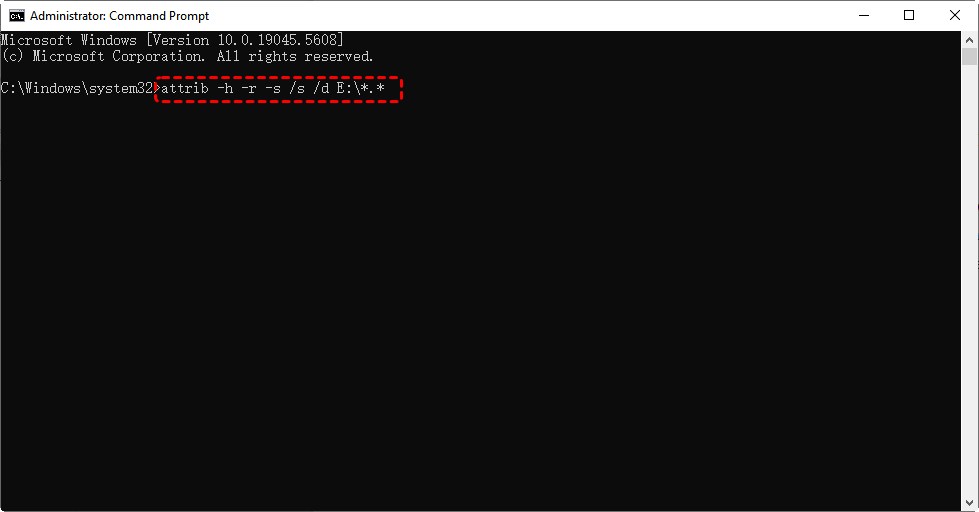
- Explanation:✎...
- -h: Removes the hidden attribute
- -r: Removes the read-only attribute
- -s: Removes the system attribute
- /s: Applies changes to all files in subfolders
- /d: Applies changes to folders as well
Step 5: Check Your Files
After running the command, go back to File Explorer and check if the previously hidden or missing files have reappeared.
-
The "attrib" command cannot recover permanently deleted files or data erased from the Recycle Bin. It only works when the files are still on the drive but hidden or flagged.
Other Commands to Recover Lost Files in Different Situtions
As emphasized above, while the "attrib" command is useful for recovering hidden files, it cannot restore permanently deleted or corrupted files. Here are some alternative CMD commands and methods to recover lost data in different scenarios:
1. CHKDSK Command-Fix Disk Errors & Recover Lost Files
If your files are lost due to file system corruption or bad sectors, the "chkdsk"(Check Disk) command can help repair the drive and recover readable data.
Step 1. Open "Command Prompt as Administrator".
Step 2. Type the command and press "Enter": chkdsk G: /f /r (Replace "G:"with your drive letter.)

- Explanation:✎...
- "/f`"– Fixes errors on the disk.
- "/r"– Locates bad sectors and recovers readable data.
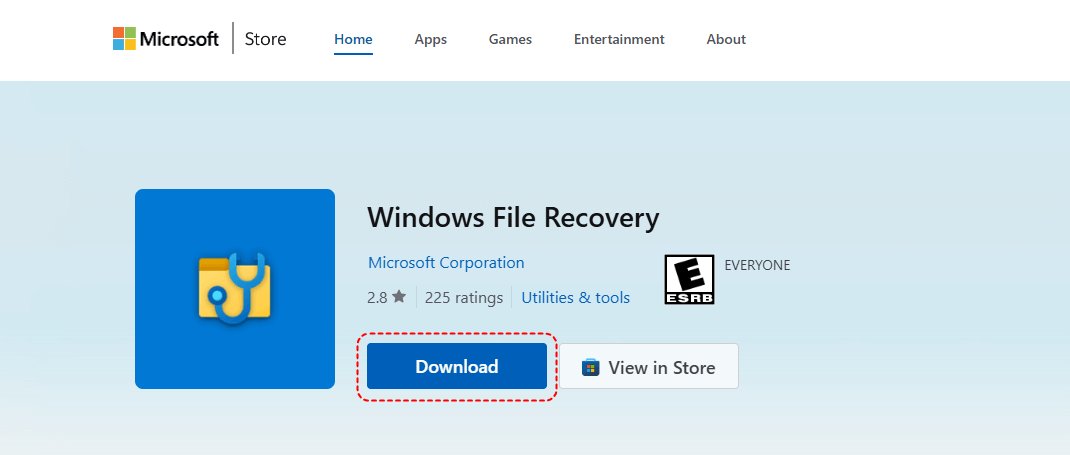
2. Windows File Recovery Command-Recover (permanently) Deleted Files
If files are permanently deleted and unrecoverable via attrib or chkdsk, you can use Windows File Recovery (winfr)—a free, official Microsoft tool designed for file recovery in Windows 10/11.
Step 1: Download Windows File Recovery from the Microsoft Store and install it.
Step 2: Open Command Promptas Administrator.
Step3: Input proper command. The general syntax is:winfr source-drive: destination-drive: [/switches] [/mode:recovery-mode]
Example: winfr H: D: /regular /n *.jpg /n *.png
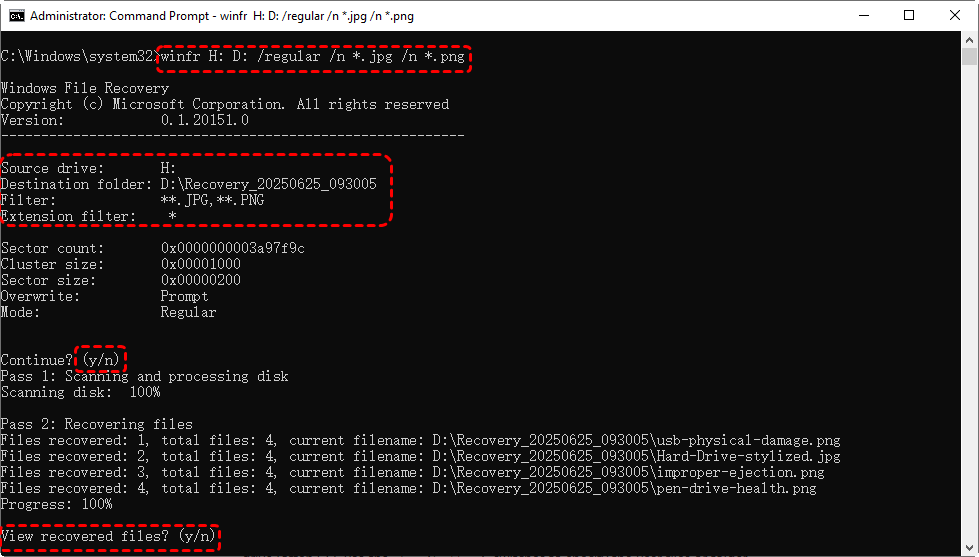
(This command recovers .jpg and .png files from drive H: to drive D: in Regular mode, which is best for recently deleted files on NTFS drives.)
If the Drive is Formatted, Corrupted, or FAT/exFAT, replace "/regular"with "/extensive": winfr H: D: /extensive /n *.jpg /n *.png
(This uses Extensive mode, which performs a deeper scan for lost files on damaged or non-NTFS file systems.)
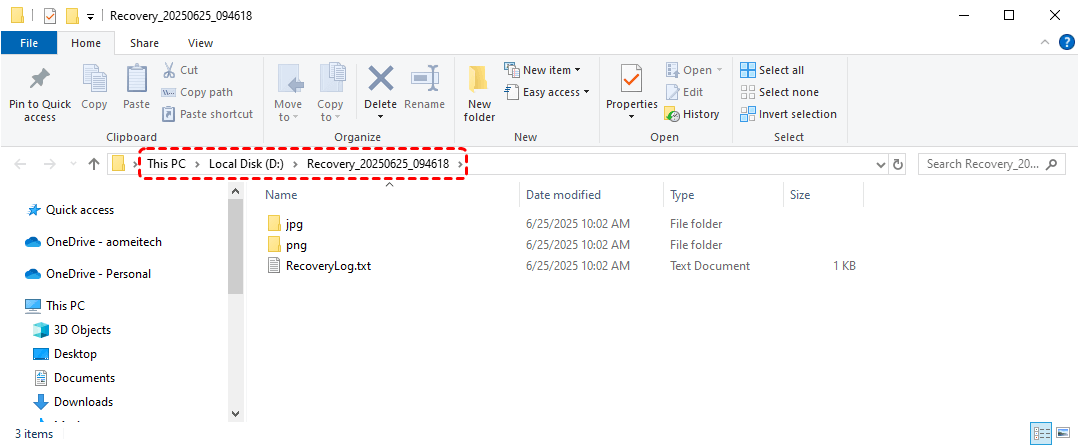
Step 4: Check Recovered Files
When the recovery process is completed, recovered files will be saved in a folder like "Recovery_[Date]_[Time]" on the destination drive.
When to Use Professional Data Recovery Software?
If you fail to recover deleted files using Command Prompt,consider specialized data recovery tools like MyRecover. Whether you're dealing with a RAW drive, corrupted partition, accidental formatting, or even an OS crash, MyRecover provides advanced scanning and recovery capabilities that go beyond basic Windows utilities.

- No technical skills required – simple point-and-click recovery.
- Preview files before recovery (unlike CMD tools).
- Filter results by file type, size, or date for faster retrieval.
- Recovers deleted, formatted, or lost files from HDDs, SSDs, USB drives, SD cards, and more.
- Supports NTFS, FAT32, exFAT, ReFS and Ext file systems.
- Retrieves photos, videos, documents, archives, emails, and other file types.
Step 1: Download the software, run the installer and follow the on-screen instructions to complete the installation process. After successful installation, launch the MyRecover application to begin the recovery process.
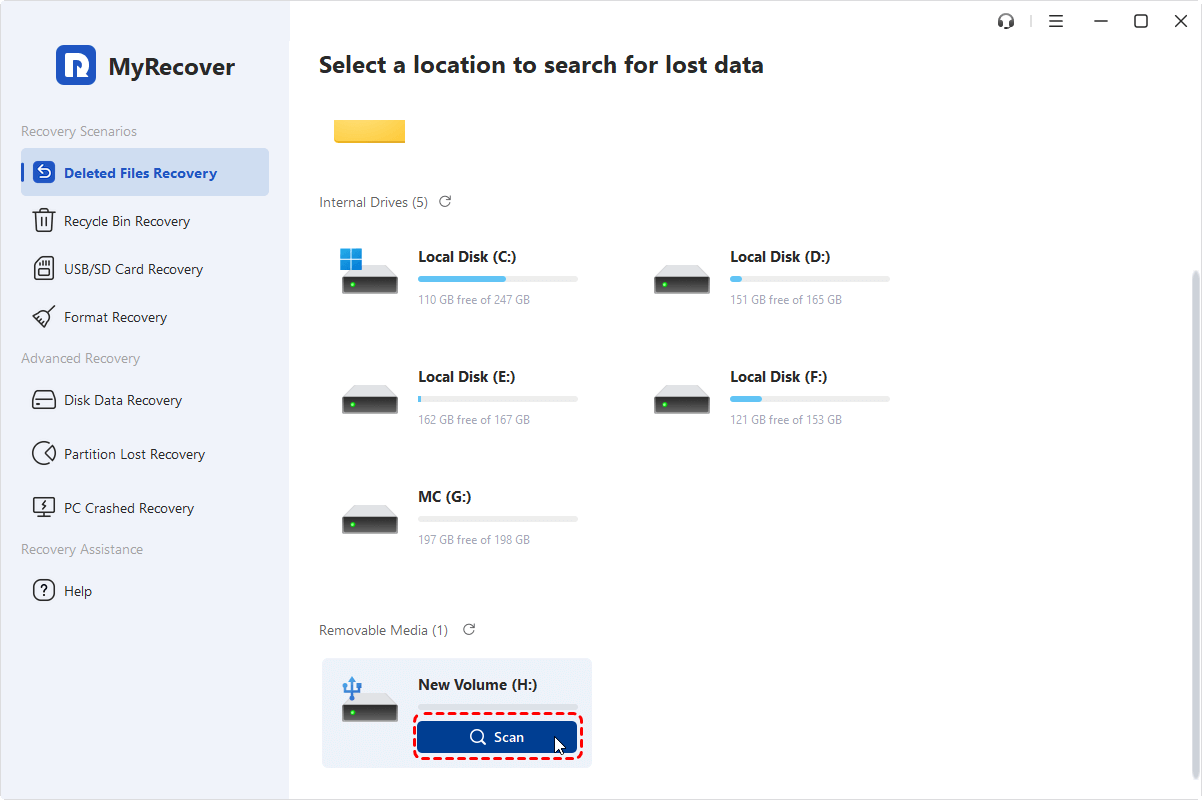
Step 2: Upon launching MyRecover, you'll see a list of available storage devices. Carefully identify and select the specific drive, partition, or external storage device where your lost files were originally stored. Click "Scan".
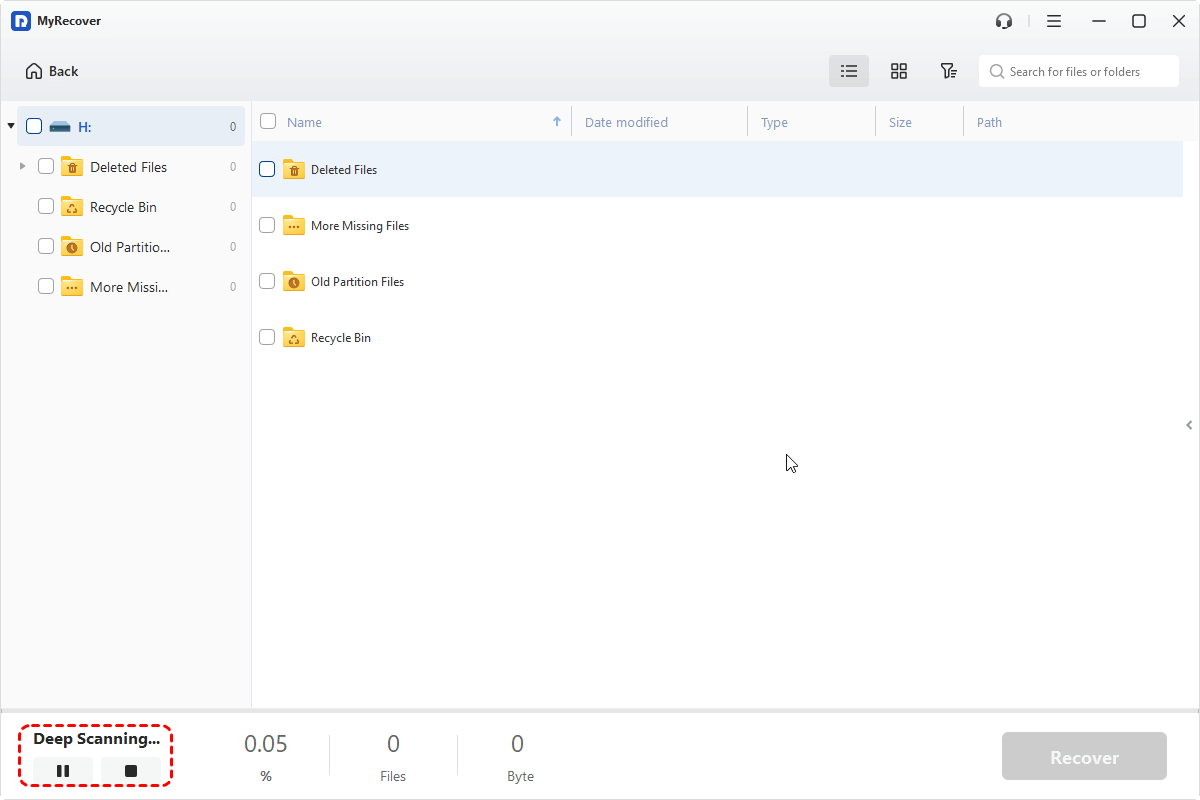
Step 3: MyRecover will automatcially initiate a scanning mode. For files deleted recently, the "Quick Scan" mode provides fast results. When dealing with formatted drives or corrupted partitions, "Deep Scan" will be performed instead. If your storage device is not appearing due to partition loss, select the "Partition Lost Recovery" to recover data from deleted or lost partitions.
Step 4: After the scan completes, MyRecover will display all recoverable files in an organized interface. Take advantage of the "filter" and "preview" functions to quickly locate and verify important files before recovery. When ready, select the files you wish to restore and click the "Recover" button.

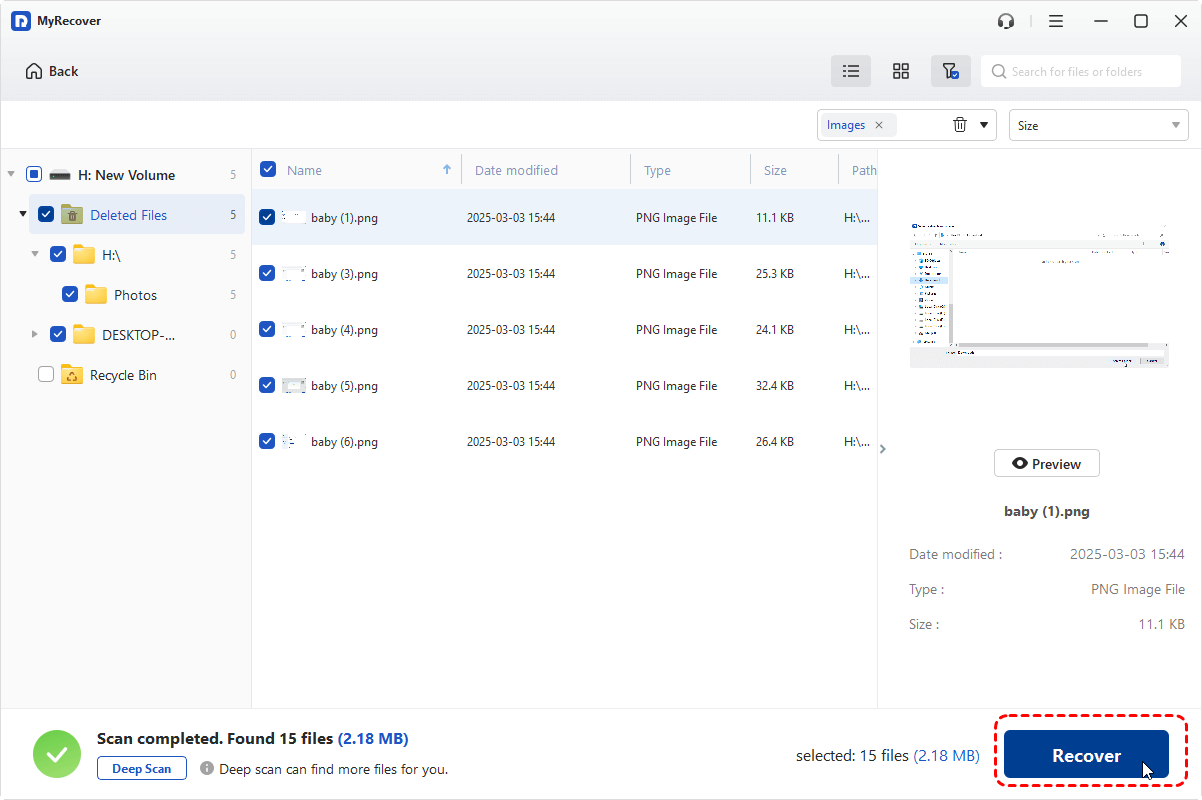
Step 5: For safety, always save recovered files to a different storage location than the original to prevent potential data overwriting.

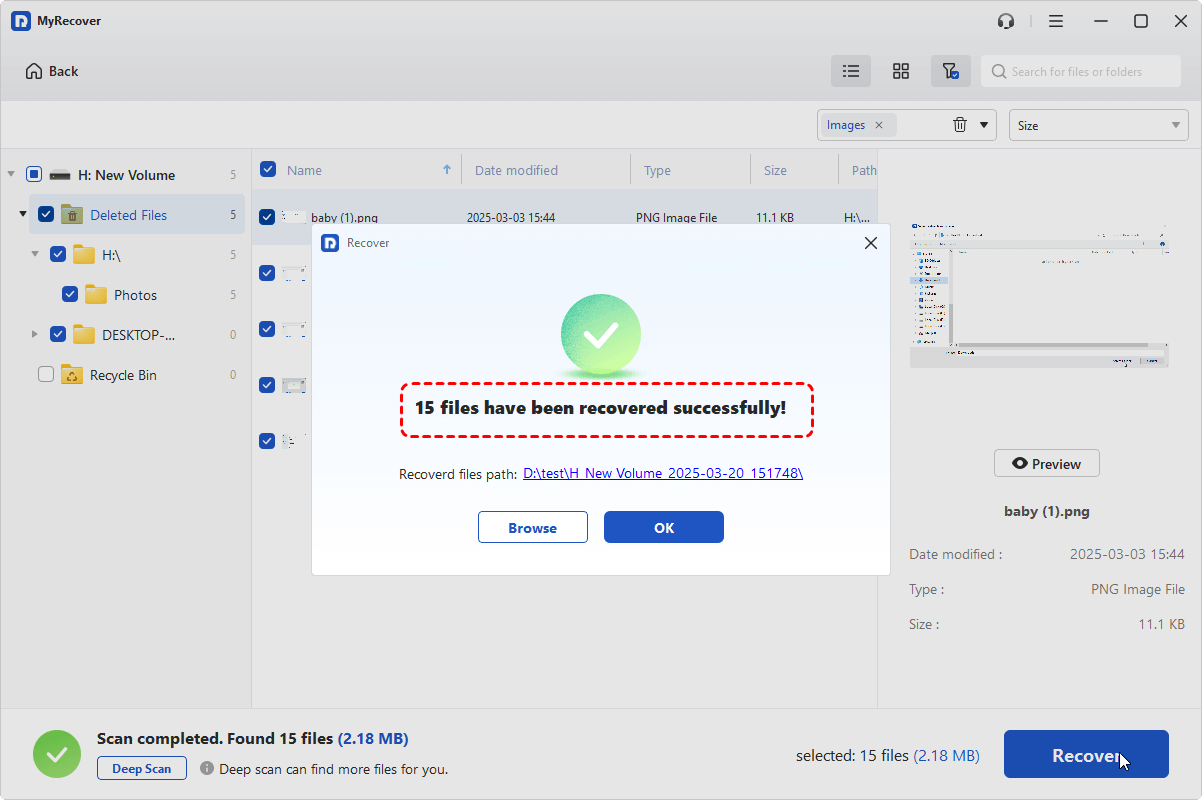
If you are recovering few files, the process will be done in seconds. Once completion, it will pop out a summary window, which indicates the total number of recovered files and their new path.
In the End
While Windows built-in tools like "attrib", "chkdsk", and "winfr" can help recover files in certain scenarios, they each have limitations in handling complex data loss situations. The "attrib" command is excellent for revealing hidden files, "chkdsk" can repair disk errors, and "winfr" helps recover permanently deleted files, but none offer the comprehensive recovery capabilities.
If your data is extremely valuable and Command Prompt recovery attempts are unsuccessful, consider using a professional data recovery tool like MyRecover. It specializes in recovering data from tough cases, even including retrieving files from computers that won’t boot.


Stay Updated With Our
Latest Tips
Add us as a preferred source on Google to never miss helpful guides.