
Can CHKDSK Recover Deleted Files? What to Do When CHKDSK Deleted Everything?
This article explores the role of CHKDSK in data recovery, its limitations in recovering deleted or lost files, and what to do when data loss occurs. You'll also learn about alternative methods and tools to recover files that may have been removed or affected during the CHKDSK process.
By Emma / Updated on July 15, 2025
Can CHKDSK Recover Deleted Files?
CHKDSK (short for Check Disk) is a command-line utility built into Windows, designed to check the integrity of file systems and fix logical file system errors. It scans the drive for problems like bad sectors, corrupted files, or directory structure issues, and attempts to repair them automatically.

Many users turn to CHKDSK when their computer shows signs of disk failure—slow performance, inaccessible partition or files, system crashes, or boot issues. So, can CHKDSK recover deleted files? In most cases, NO.
CHKDSK does not have the ability to undelete files or restore intentionally or accidentally deleted data. In fact, it can sometimes make matters worse by removing or isolating corrupted files it deems unrecoverable, often moving them into a hidden folder called FOUND.000 as fragmented ".chk" files.
CHKDSK Deleted My Windows Folder! Can I restore it?
Recently, I noticed my older laptop kept crashing with blue screen errors. Suspecting file system corruption, i decided to run the following command in an attempt to fix the issue: chkdsk C: /f /r
The scan took nearly an hour to complete. After it finished, the system rebooted, seemingly repaired. However, once reboot, entire Windows folder was gone. User profiles, desktop files, installed programs everything had vanished. The computer couldn’t even boot properly anymore.
Unfortunately, this isn’t an uncommon scenario. As mentioned eariler, in some cases, CHKDSK may flag severely corrupted files as lost and either delete them or move them to a hidden Found.000 directory as recovered fragments. This often gives users the impression that files were deleted.
So, is it possible to recover your Windows folder or important files after CHKDSK? The answer is yes. The next section will show you how to deal with data loss caused by CHKDSK.
How to Recover Data Deleted by CHKDSK?
If CHKDSK caused unexpected data loss, don’t panic. Although CHKDSK itself can’t recover deleted or lost files, there are several effective methods you can try to get your data back, some built into Windows, and others offered by third-party tools. Below are four commonly used solutions. Take a closer look and choose what you prefer.
1. Use Windows File Recovery (Command-Line Tool)
Windows File Recovery is a free command-line tool provided by Microsoft for recovering deleted files from local drives. It supports NTFS, FAT, and exFAT file systems.
-
Windows File Recovery only works on Windows 10 (version 2004 and above) and Windows 11. It also requires some familiarity with command-line usage.
Step 1. Download it from the Microsoft Store and follow the prompts to install it on your computer.

Step 2. Press Win+X at the same time, select Command Prompt (Admin) to open Command Prompt as an administrator.

Step 3. Run a command like winfr F: E: /regular (This command tries to recover deleted files from F: and save them to E:.
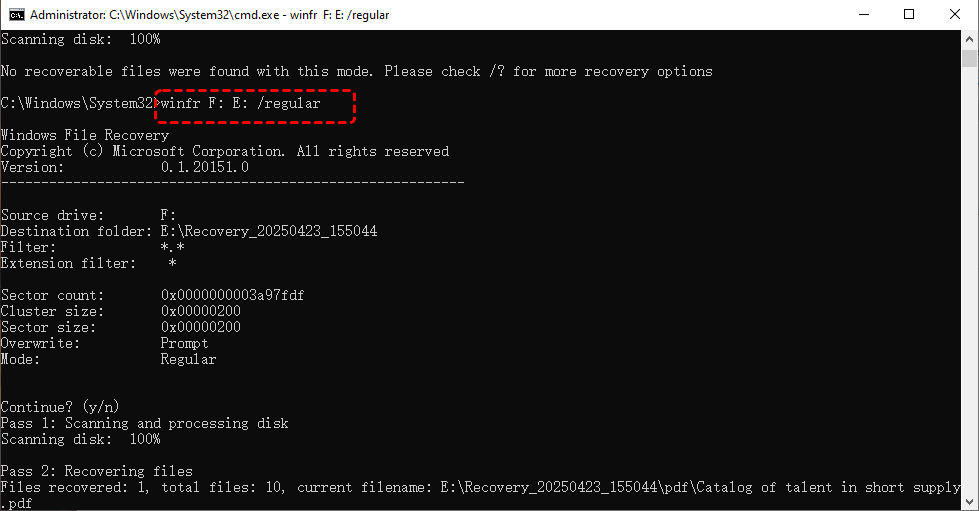
If you want to recover a specific type of files from some folders, you can apply "n" parameter like winfr C: D: /regular /n \Users\username\Downloads\*.xlsx (This command looks specifically for Excel files (.xlsx) in the Downloads folder of the specified user from C: drive and save to D: drive.)

2. Recover from File History
If you had File History enabled before CHKDSK deleted everything, you may be able to restore previous versions of files or folders.
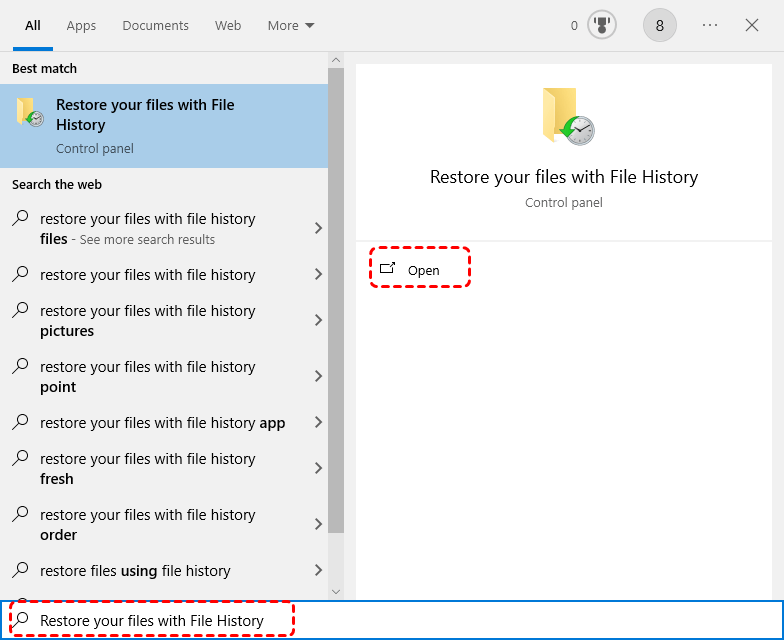
Step 1. Press Win+S, enter "Restore your files with File History" and click on "Open".
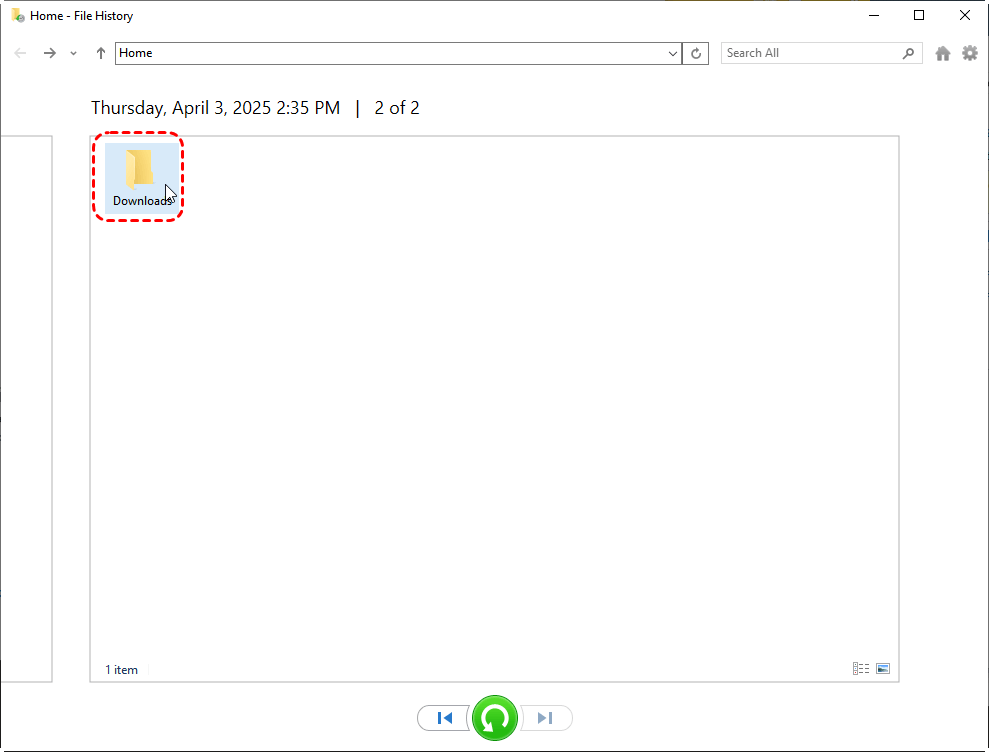
Step 2. In the File History control panel, look through all available backups.
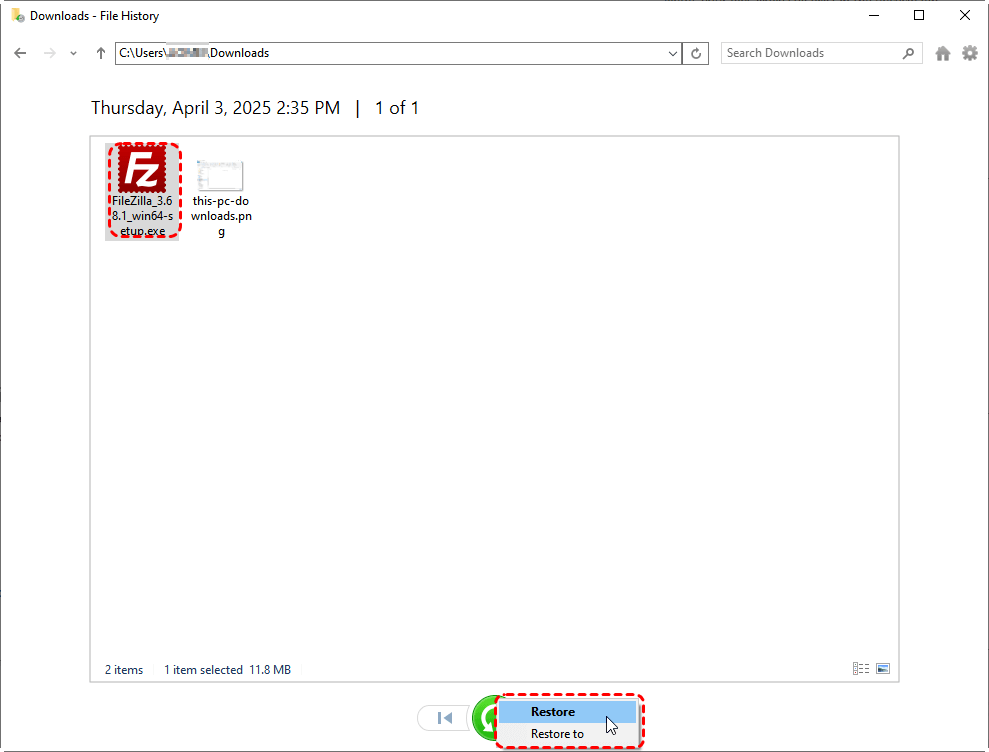
Step 3. Choose the target files and click "Restore" button. To save it to another location different from the original, select "Restore to" instead.
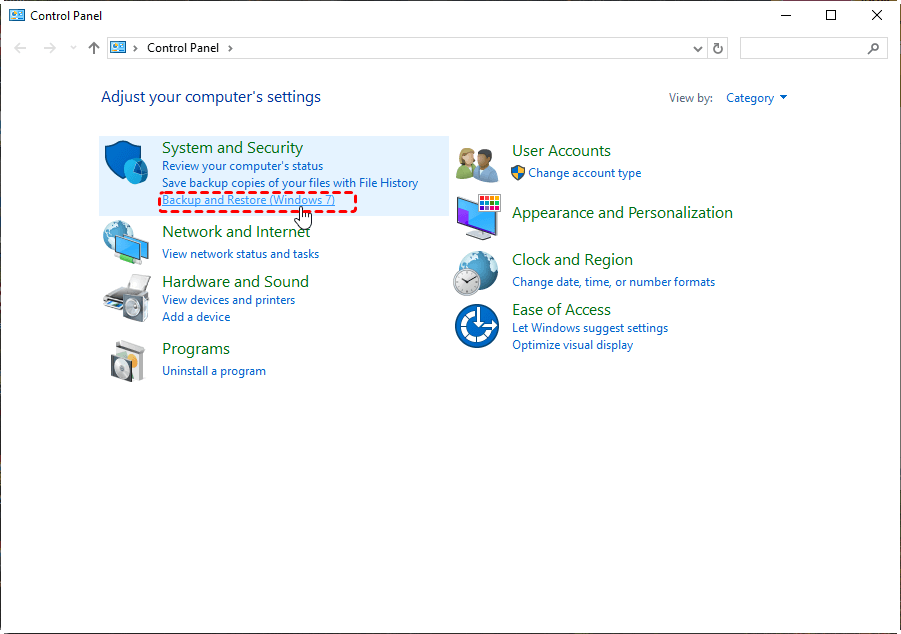
3. Use Backup and Restore (Windows 7)
This legacy backup feature is still available in modern Windows versions and can restore user profiles, entire folders, user profiles, or even system images.
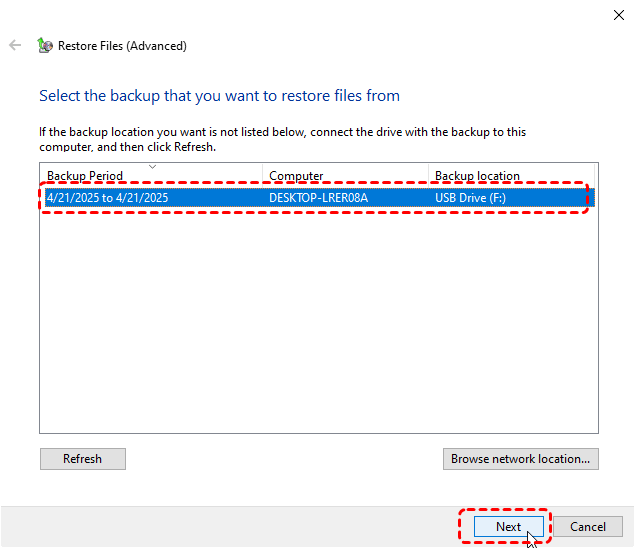
Step 1. Go to "Control Panel > Backup and Restore (Windows 7)".
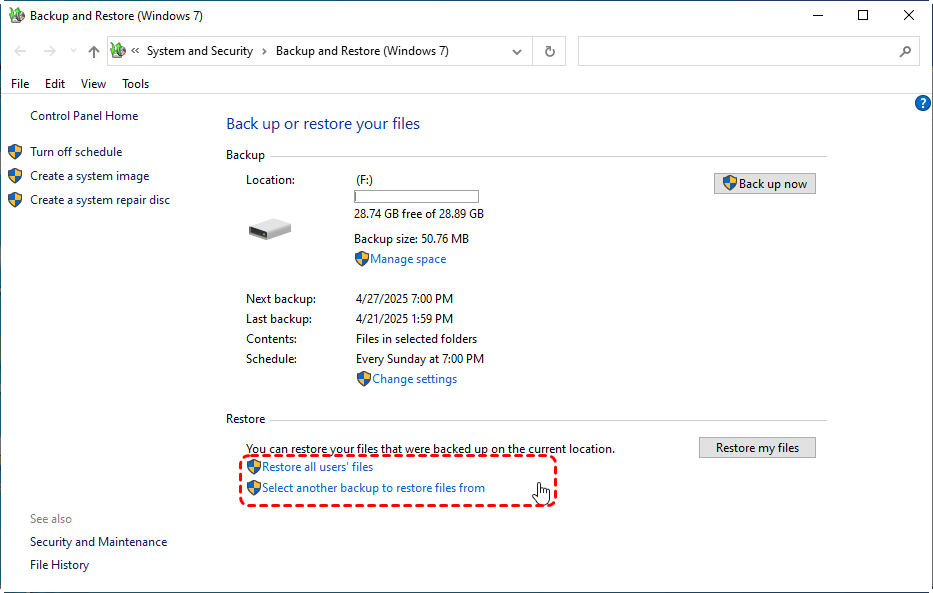
Step 2. Click "Restore my files" or "Restore all users’ files".
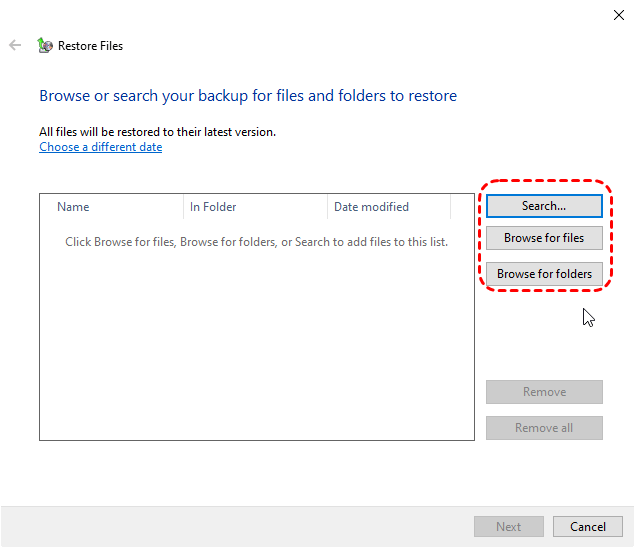
Step 3. In the pop-up window, click "Browse for files" or "Browse for folders" to locate the backup you want to restore. You can also use the Search function to find specific filenames.
Step 4. Select the files or folders you want to recover, then click "Next".
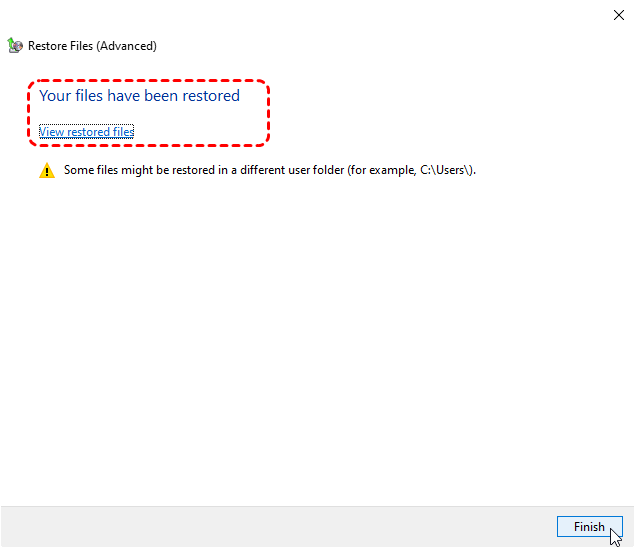
Step 5: Choose where to restore the files: Original location (overwrite current files); New location (keep both old and restored versions).
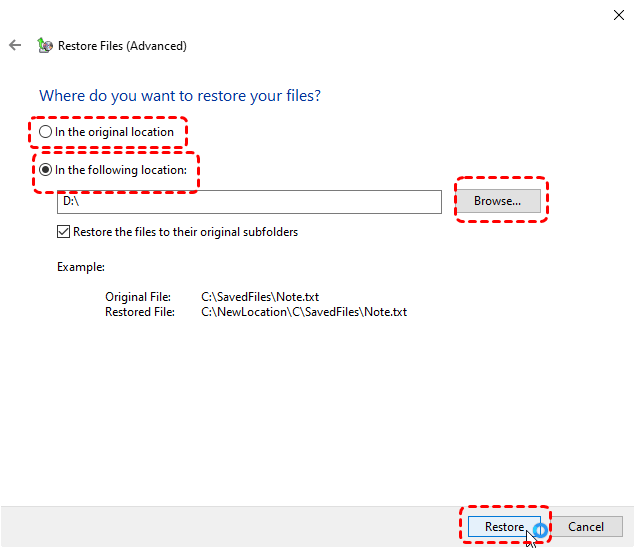
Step 6: Click "Restore" to begin the process. Wait for it to complete.
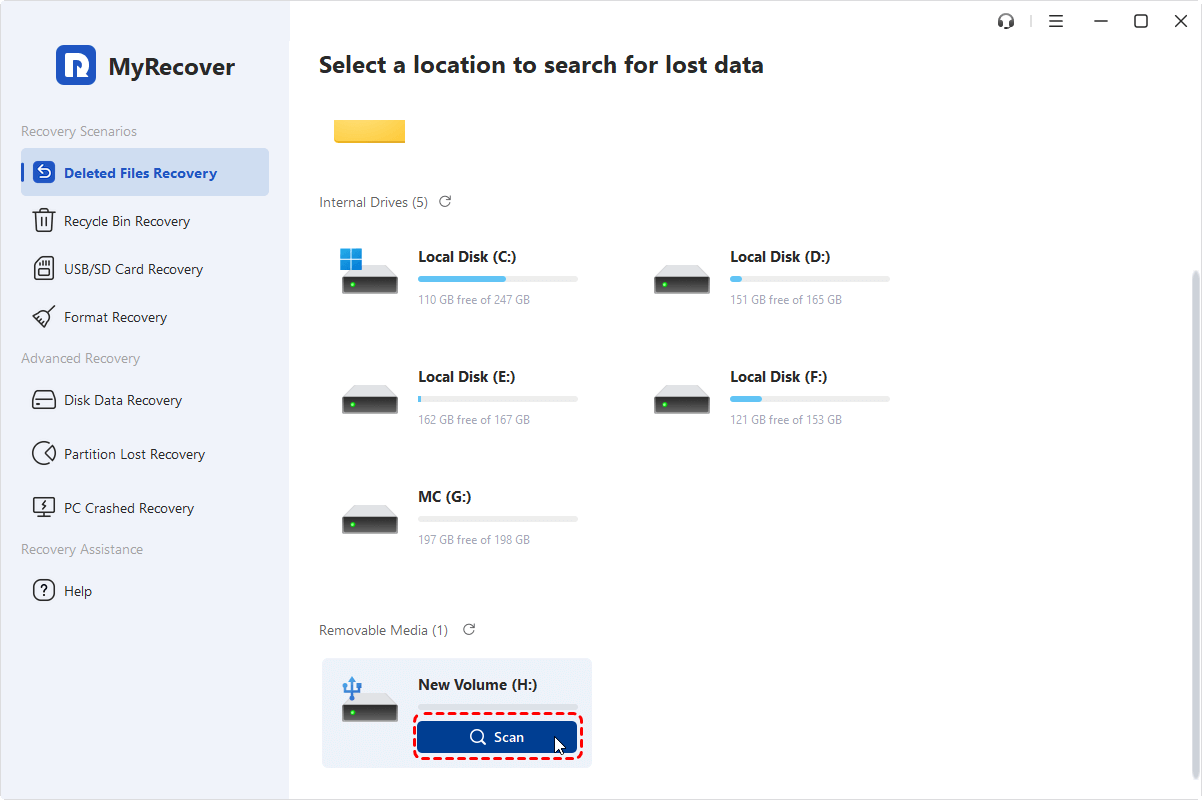
4. Try MyRecover (Professional Data Recovery Tool)
If you don’t have any backups or are not familar with running complex Winfr commands, Free MyRecover is a great third-party option. It’s easy to use, works on internal/external drives, and can recover a wide range of file types, even from formatted or corrupted partitions.

- Easy to use, no technical skills required
- Supports a wide range of data loss scenarios (deletion, formatting, os crash, etc).
- "Deep Scan" for recently deleted files while "Deep Scan" for thoroughly searching lost data from formatted, corrupted, or inaccessible drives.
- Supports over 1000+ file types recovery, including documents (Word, Excel, PDF), photos and videos (JPG, PNG, MP4, etc.), emails, compressed files, and more.
- Works on all modern windows versions like Windows 11, 10, 8, 7 and Server 2025, 2022, 2019, 2016.
Step 1: Download and install MyRecover on your computer.
Step 2: Launch the program and select the affected drive. Click "Scan" button.
Step 3: After the scanning process finishes,browse all recoverable files, select what you need and click "Recover". (To preview files before recovery to ensure they are what you need, please upgrade to Professional Edition).
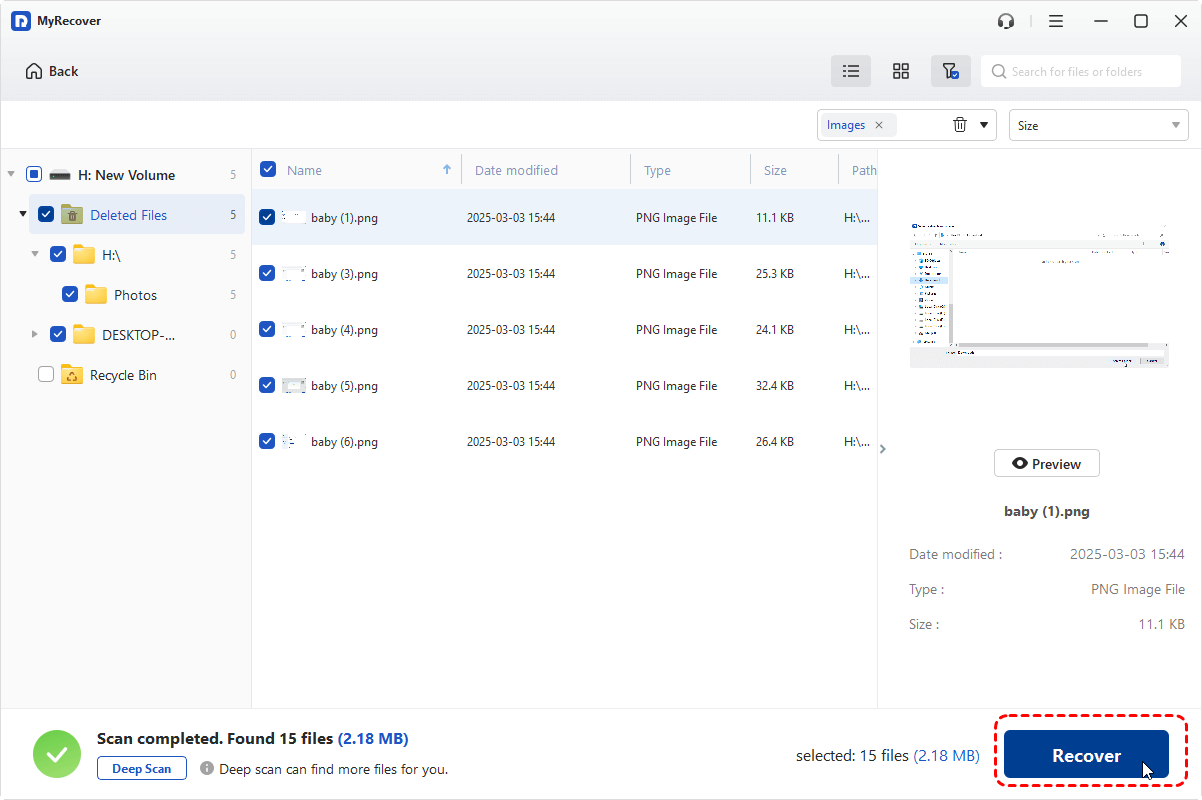
Step 4: Save them to another safe location.

Conclusion
While CHKDSK is meant to fix disk issues, and not designed to recover deleted files. In fact, it can sometimes lead to unexpected file loss, especially when corrupted files are removed or isolated during the repair process.
Fortunately, with tools like Windows File Recovery, File History, Backup and Restore, or MyRecover, you still have a good chance of retrieving files deleted or affected by CHKDSK. For those without any backups, both Windows File Recovery and MyRecover are worth trying. Choose one based on your needs. If you need to tackle with more complex data loss case like creating a bootable rescue media and restoring data from unbootable computers, use MyRecover advanced editions.


Stay Updated With Our
Latest Tips
Add us as a preferred source on Google to never miss helpful guides.