
exFAT File Recovery: The Complete Guide
Need a trusted data restoration option? Try our exFAT file recovery freeware to recover lost, deleted, or formatted files from exFAT storage devices. This free software provides reliable, quick, and simple recovery for personal or business data needs.
By Vera / Updated on September 17, 2025
What is exFAT and Why it Matters

exFAT (Extended File Allocation Table) is a lightweight filesystem developed by Microsoft to bridge older FAT32 limits and more advanced filesystems like NTFS. It’s popular because it supports large single files (over 4GB), works across Windows and macOS without the full overhead of NTFS, and is widely used on flash media and external drives. But that cross-platform convenience comes with particular failure modes: improper unmounting, incompatible device drivers, or corruption can make exFAT volumes inaccessible or cause file loss.
Common Causes of exFAT Data Loss
Files disappear from exFAT drives for many reasons. Knowing the cause helps pick the right recovery approach.
Accidental Deletion
We delete files all the time—sometimes intentionally, sometimes by mistake. On external exFAT drives, deleted files often bypass a system recycle bin and require a recovery tool to restore them.
Formatting and Reformatting
Reformatting (whether intended or accidental) overwrites partition metadata. If you format a drive quickly, the data often remains physically present until overwritten—so recovery is frequently possible.
File System Corruption from Unsafe Ejection
Pulling a drive without safe-eject can corrupt the allocation tables. It's like yanking a bookmark from a book while the pages are being written—information is left half-updated.
Virus and Malware
Malware can delete or hide files, change extensions, or corrupt the file table. Sometimes files are not gone but hidden or renamed.
Physical/Hardware Failure
If a flash chip or USB controller is failing, logical recovery methods may not work. Physical problems often need specialist labs.
Initial Steps: What to Do Immediately After Data Loss
Time and usage matter. Act carefully and deliberately.
1. Stop Using the Drive
This is the single most important rule. Continuing to copy, write, or save to the drive increases the chance that lost data will be overwritten forever. Think of the drive as an archaeological site: every new file is a shovel.
2. Make a Disk Image or Backup
If the data is valuable, make a bit-for-bit clone (a disk image) before attempting any fixes. Tools like dd on Linux/macOS or dedicated imaging utilities will create a snapshot you can try recovery on—so you always have the original to fall back to.
4 Manual Methods for exFAT File Recovery
Before moving to recovery software, try these built-in or manual approaches. They’re free, but always work from a disk image if your data is valuable.
Method 1. Check Disk Errors (chkdsk)
Windows includes a built-in repair tool called chkdsk that can fix file system errors and sometimes restore lost file visibility. However, because it writes to the drive, you should image the drive first.
Steps (Windows):
1. Connect the Drive and ensure Windows recognizes it with a drive letter.
2. Open Command Prompt as Administrator (search "cmd" → right-click → Run as Administrator).
3. Type: chkdsk X: /f. Replace X with your drive letter.
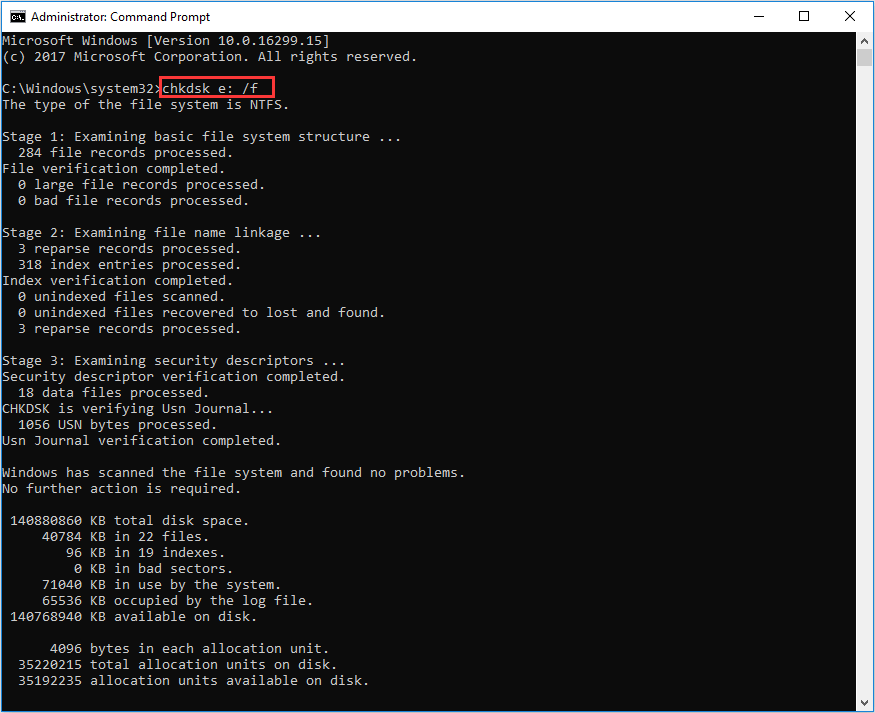
4. Press Enter and wait while Windows scans and fixes errors.
5. Check the Drive in File Explorer once complete.
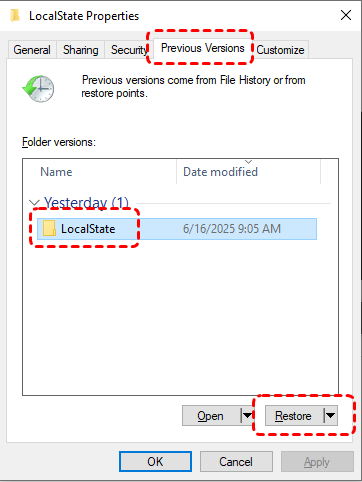
Method 2. Restore with Windows Previous Versions or MAC Time Machine
If File History or System Protection was enabled, you can roll back to earlier copies of files or folders.
Steps (Windows):
1. Right-click the folder where your files used to be.
2. Choose "Properties" → "Previous Versions".
3. Select a version before the data loss occurred.
4. Click "Restore" to bring the folder back, or Copy to another location to preserve the current state.
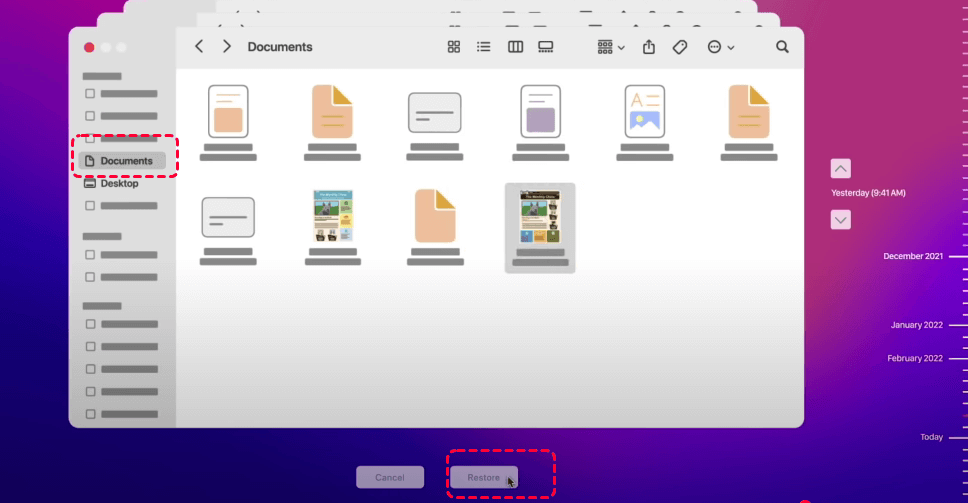
macOS Users (Time Machine):
1. Open Time Machine from the menu bar.
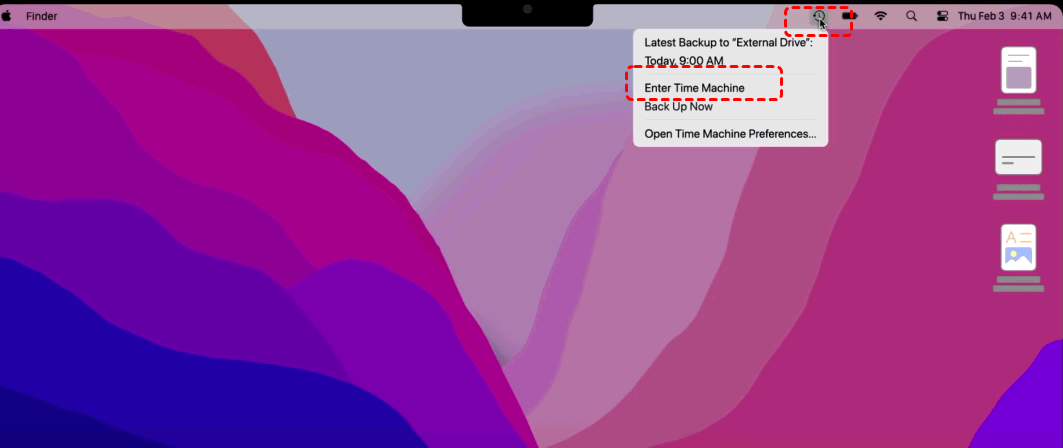
2. Navigate to the drive or folder in question.
3. Go back in Time to a date before the loss.
4. Click "Restore".
Method 3. Unhide Files with Command-Line Tools (Attrib)
Sometimes files aren’t deleted — they’re just hidden. The Windows attrib command can unhide them.
Steps (Windows):
1. Open Command Prompt as Administrator.
2. Type: attrib -h -r -s X:\*.* /s /d. Replace X with your drive letter.
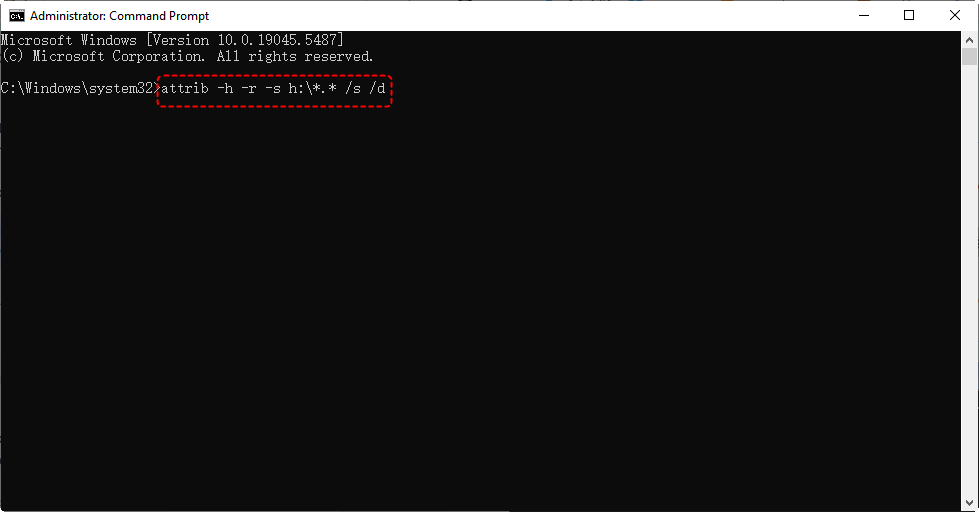
3. Press Enter and wait. This removes hidden, read-only, and system attributes recursively.
4. Check the Drive again in File Explorer.
Method 4. Assign a Drive Letter or Rebuild Partition (Diskpart Basics)
If your exFAT drive appears as "unallocated" or without a drive letter, assign one using Disk Management or Diskpart.
Steps:
1. Right-click "This PC" → "Manage" → "Disk Management".
2. Find your external drive. If it says "Healthy" but no letter, right-click → "Change Drive Letter and Paths" → "Add".
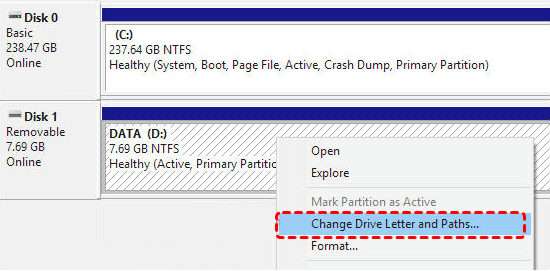
3. Choose a letter and press OK.
If using diskpart:
1. Open Command Prompt as Administrator.
2. Type:
diskpart
list volume
select volume #
create partition primary
format fs=ntfs quick
assign letter=X
exit
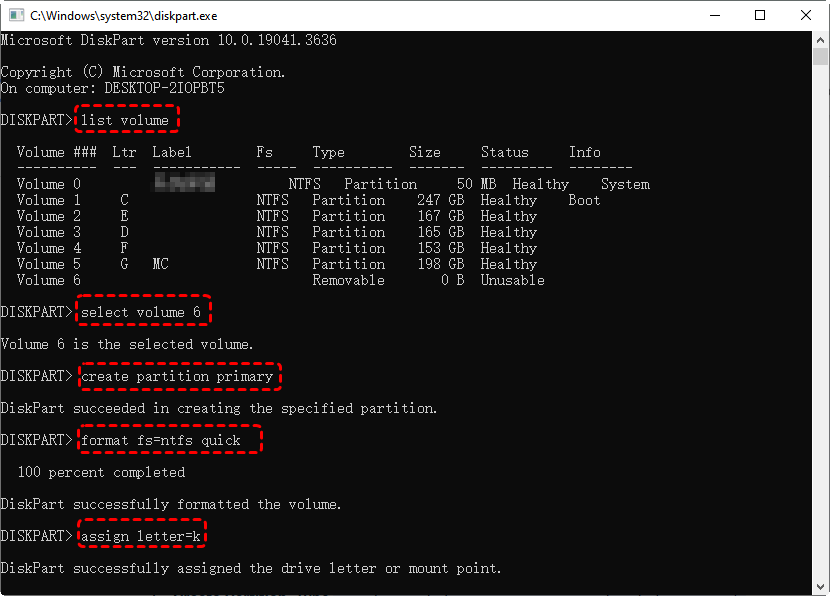
3. Check the drive again in File Explorer.
- ✅ Summary of Manual Methods:
- Start with read-only actions (checking attributes, backups).
- Only run repair utilities like chkdsk after imaging or if you accept the risk.
- If manual methods don’t restore files, move on to recovery software such as MyRecover.
Using Recovery Software for exFAT File Recovery (Recommended)
If manual steps don’t help, recovery software is the next practical step. These tools scan the filesystem and disk sectors to find recoverable files. One reliable and user-friendly option is MyRecover, which is designed specifically for recovering deleted or lost files from exFAT, NTFS, FAT32, and other file systems.
- ✅Beginner-Friendly: Intuitive interface for quick scanning.
- ✅Deep Scan Technology: Finds files other tools might miss.
- ✅Flexible Recovery: Works with external drives, SD cards, USB sticks, and more.
- ✅Preview Before Recovery: See which files are recoverable before restoring them.
1. Download MyRecover and install it on a different drive (not the one you’re recovering).
2. Open the software and select the exFAT drive to scan. Choose to deep scan if needed.
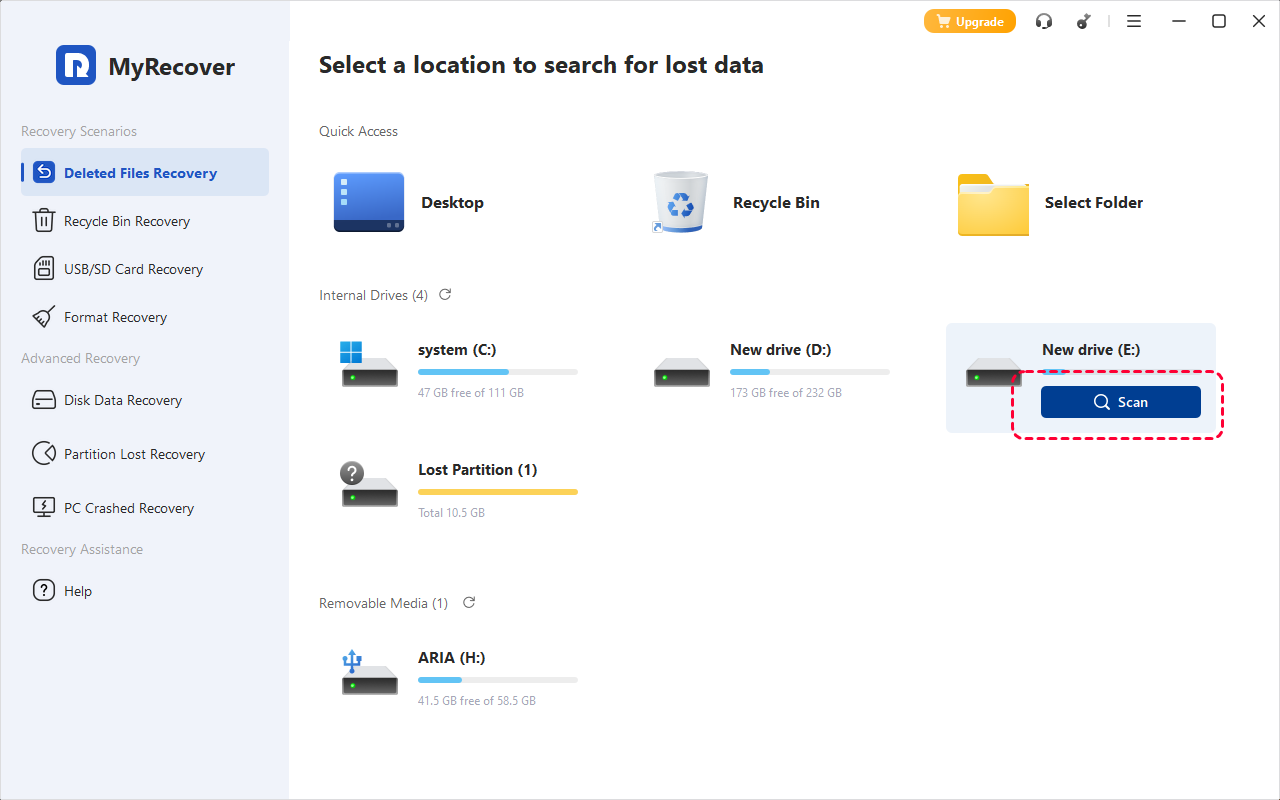
3. Preview recoverable files (images, videos, documents). Confirm readability in the preview window.
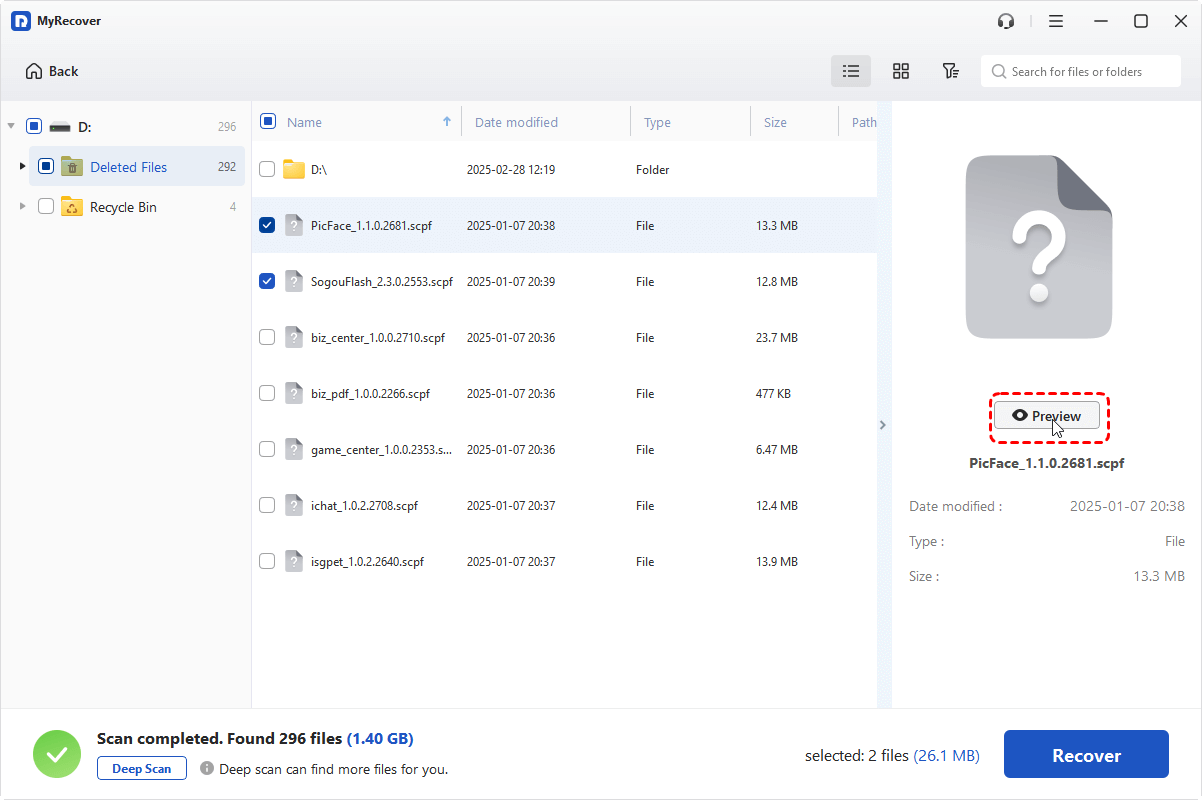
4. Select files and recover to a different drive (never recover to the same failing drive).

5. Verify recovered files and then create backups.
Repairing exFAT Partition and File System
If the partition table or exFAT boot sector is damaged or lost, you may be able to repair it without full file recovery.
1. Repair Partition Table (AOMEI Partition Assistant Example)
Tools like AOMEI Partition Assistant offers partition recovery that can restore lost partitions. Use it if you see "unallocated space" where a partition used to be. As always: image first, then attempt repair.
2. Using TestDisk for Partition Recovery
TestDisk is a powerful open-source utility that can find and restore lost partitions and repair boot sectors. It’s command-line based but extremely effective. It doesn’t recover files as cleanly as PhotoRec, but it can restore access to the whole partition and its files if the partition metadata is salvageable.
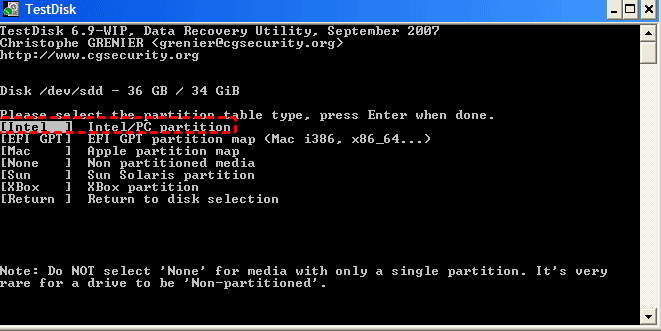
1. Download and run TestDisk as an administrator. Select your affected disk.
2. Choose the partition table type (usually Intel/PC).
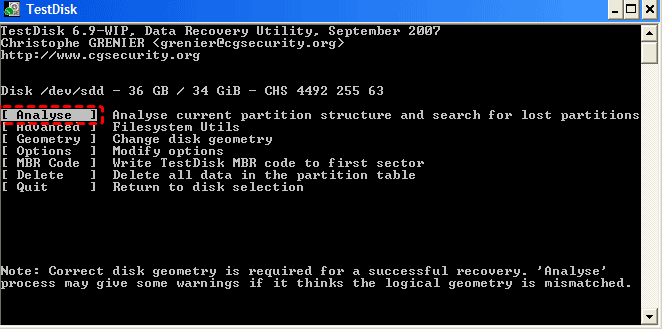
3. Start with Analyse and then Quick Search to find lost partitions. If your exFAT partition isn’t found, use Deeper Search.
4. Preview found partitions by pressing P to verify files.
5. Write the recovered partition table by selecting Write.
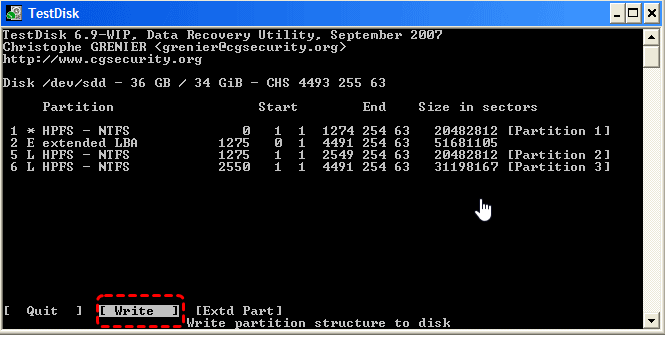
Restart your computer. Once done, your exFAT partition should reappear and be accessible again.
Prevention: Keeping exFAT Drives Healthy
Recovery is good, prevention is better. Simple habits significantly lower your risk of exFAT problems.
Safe Ejection and Power Habits
Always use “Safely Remove Hardware” or eject functions before unplugging. For cameras and mobile devices, power them off before removing cards.
Regular Backups and Versioning
Keep at least two copies of important files—one local and one offsite/cloud. Use versioned backups or incremental backups so you can roll back accidental edits or deletions.
Use Reliable Hardware and Adapters
Cheap card readers and faulty USB hubs cause corruption. Use known-good cables, readers, and powered hubs when necessary. Periodically check drive health with vendor tools and replace aging media proactively.
Conclusion
Losing files on an exFAT drive is stressful, but with the right sequence—stop, image, evaluate, and then recover—you maximize chances of success. Start with non-destructive checks and backups, try manual fixes if appropriate, then use quality recovery software (such as MyRecover-style tools) to perform safe scans and recoveries. If hardware failure is suspected, seek professionals. Finally, invest time in prevention: safe ejecting, good hardware, and automated backups will save you heartache and work down the road.


Stay Updated With Our
Latest Tips
Add us as a preferred source on Google to never miss helpful guides.