
Hard Drive Shows Up in BIOS But Not Windows: 7 Fixes to Try Now
When a hard drive appears in BIOS but not in Windows, the problem is usually related to system configuration rather than hardware failure. This article analyzes the most common causes behind this issue and presents several proven solutions to help Windows recognize the drive properly. For situations where data access is at risk, the guide also highlights safe recovery considerations to protect important files before applying fixes.
By Aria / Updated on March 16, 2026
Overview
Hello, I have a hard drive that is only showing up in BIOS. And is nowhere to be found in Windows. Not in disk management and not in device manager. I have it plugged into the first SATA port on my Asus ROG Strix B-560 A Gaming WIFI Motherboard if that matters. If anyone who might know how to fix this please do. Is there a setting in Bios that might cause this? Something else? Let me know.
- Question from Thopmson
When your hard drive doesn’t show up in Windows, many users will check the BIOS to see if the drive can be detected. However, if you find that the hard drive is recognized in the BIOS but not in Windows, it can be confusing and frustrating. On the one hand, BIOS recognition usually indicates that the hardware itself is not completely dead; on the other hand, the absence of the drive in Windows makes it inaccessible for daily use.
This article will explain why this problem occurs, how to recover important files safely if needed, and how to fix the issue step by step so the drive can be used normally again.
Why Hard Drive Shows up in BIOS But Not Windows
If the drive is visible in BIOS, it means the motherboard can communicate with the hard drive. The problem usually lies at the operating system level including driver or controller issues. Common reasons include:
- The drive is not initialized or has no partition table,
- No drive letter is assigned, so Windows cannot display it,
- The file system is incompatible or corrupted (e.g., Linux EXT or damaged NTFS),
- The disk driver is outdated, missing, or malfunctioning,
- RAID mode is enabled in BIOS, hiding the disk from Windows,
- The drive is disabled in BIOS settings or partially misconfigured.
How to Recover Files from the Hard Drive Not Showing in Windows
When Windows cannot access the drive, files may still be intact. Attempting repairs without a backup can cause permanent data loss. A safer approach is to recover files from the hard drive first using a professional recovery tool like MyRecover. It is designed for situations where drives are inaccessible, unallocated, or not showing in Windows. Its intuitive interface allows users of all skill levels to complete data recovery with just a few clicks.

- Intuitive interface requiring no technical expertise.
- Support 1,000+ file types, including documents, images, videos, emails, and more.
- Handle with more complex data loss cases like OS crash, formatted, RAW, corrupted or deleted drive.
- Compatible with all storage devices: USB drives, HDDs, SSDs, SD cards, etc.
- Combined scanning method: Quick Scan for speed, Deep Scan for thorough recovery.
Step 1. Download and install MyRecover on your computer from Microsoft Store.
Step 2. Run the program and select the drive to scan for lost files, then click "Scan" to search for recoverable files.

Step 3. After the scan is completed, choose the files you wish to recover from the lists under the "Path" or "Type" tab and click "Recover".

Step 4. Save the recovered files to a safe location (not the original drive).

Once the process is done, the message "Files have been recovered successfully" will pop out. Then, you can access the recovered files by clicking on the destination folder path or the "Browse" button.

How to Fix the Hard Drive Shows up in BIOS But Not Windows
Once your data is fully recovered, you can start addressing the underlying issue. This section will provide several practical methods to make your hard drive visible in Windows, and you can choose the right one based on your specific situation. Let's dive into the detailed steps.
1. Initialize the Hard Drive
If you’re connecting a brand-new disk, Windows might fail to recognize it. The disk needs to be initialized before it can work properly in Windows. Open Disk Management to check if your disk is in this state. If it is, follow these steps to initialize the hard drive.
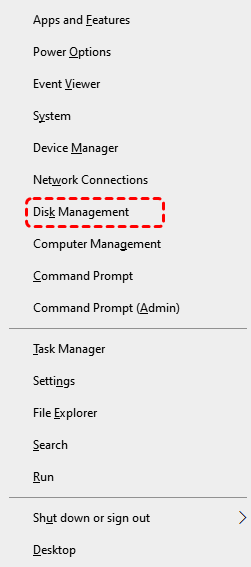
Step 1. Press "Win" + "X" and choose "Disk Management" to open it.
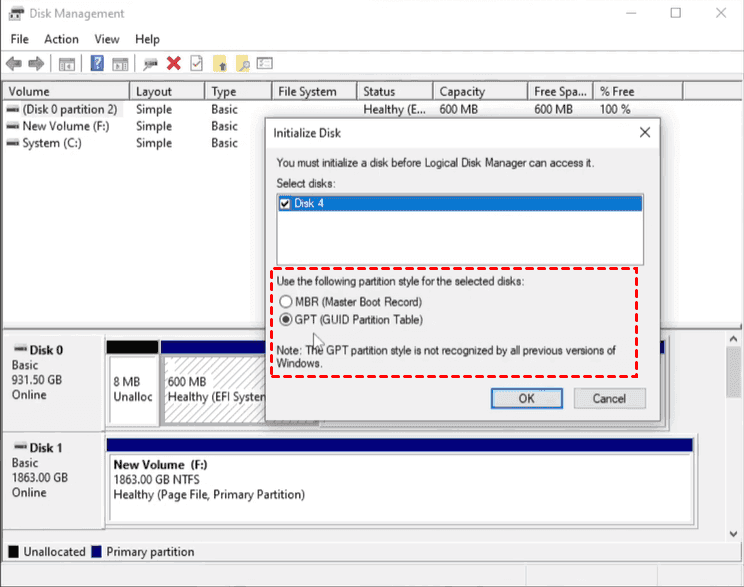
Step 2. Right click on the not initialized disk and choose "Initialize Disk".

Step 3. Choose MBR or GPT as the disk partition table as your needs and click "OK" to start.
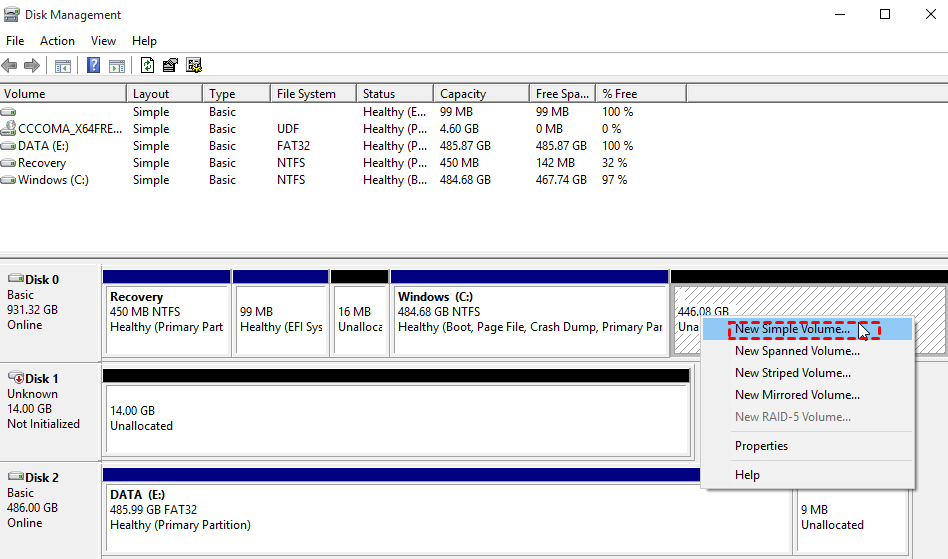
Step 4. Then, you will find the hard drive shows as "Unallocated". Right click on the unallocated drive and click "New Simple Volume".
Step 5. Choose a drive letter for the drive and click "Next".
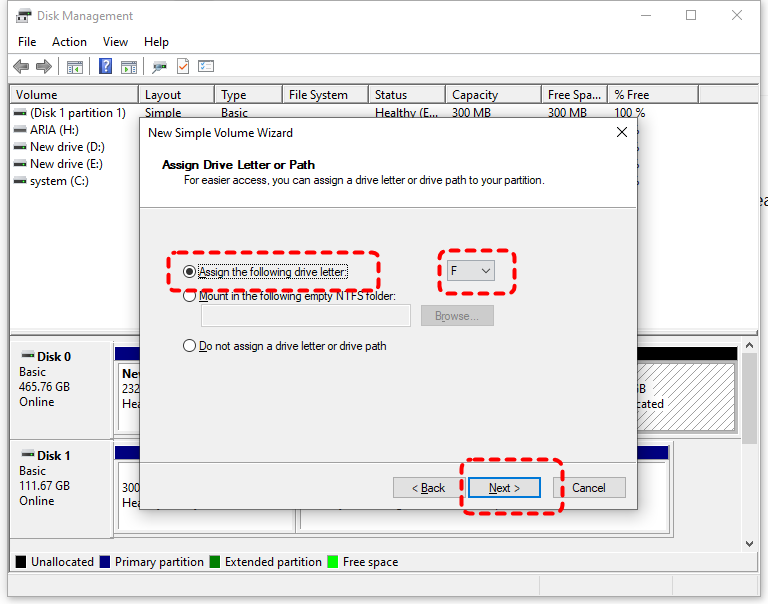
Step 6. Click "Format the volume with the following settings" and choose a file system like NTFS, then check the "Perform a quick scan" option to make the drive usable again.

2. Online the Disk
If the connected drive was removed from another computer, Windows will detect that it originates from a different device and force it into an offline state. This can also cause the drive to be recognized in the BIOS but not show up in Windows.
Step 1. Open Disk Management like mentioned above.
Step 2. Right click on the "Offline" disk and choose "Online".
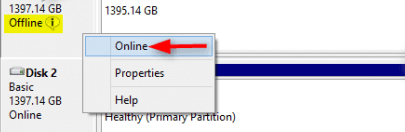
Step 3. Click "OK" to save the change.
3. Assign a New Drive Letter
After the drive is set to online, you still need to assign a drive letter to make it show up in File Explorer. This method can also be used to fix the issue of the drive not appearing in Windows due to a missing or conflicting drive letter.
Step 1. Open Disk Management and locate the drive not showing in Windows.
Step 2. Right click on it and choose "Change Drive Letter and Paths".
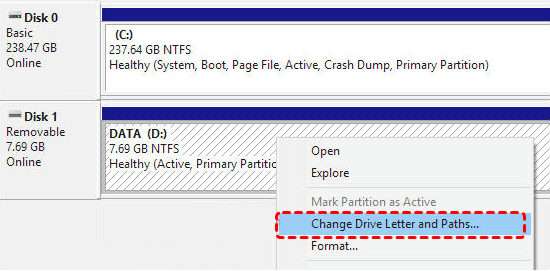
Step 3. Choose a different drive letter for the drive and confirm.
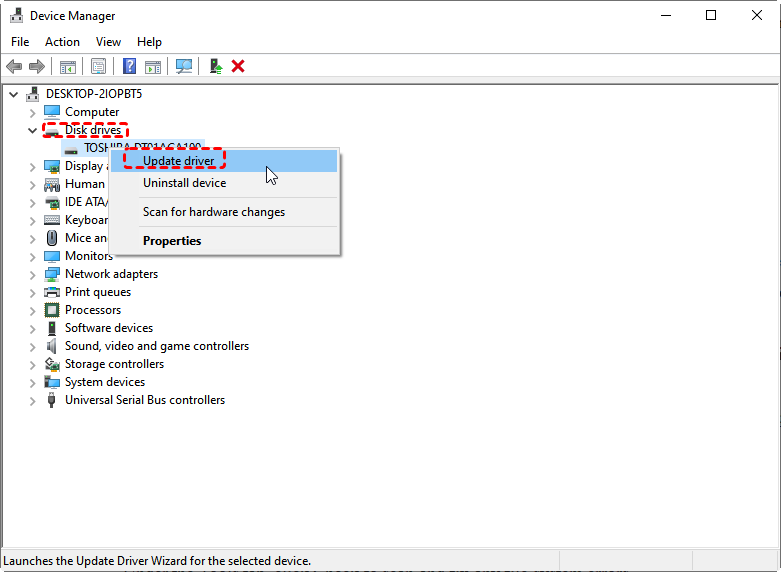
4. Update the Disk and Storage Controller Drivers
Outdated or corrupted disk and storage controller drivers can prevent Windows from mounting the disk, even if the device is detected in BIOS. Updating these drivers ensures that the operating system can correctly manage the disk interface. Installing the latest drivers may resolve detection problems and allow the drive to appear normally in Windows.
Step 1. Press "Win" + "X" and choose "Device Manager" to open it.
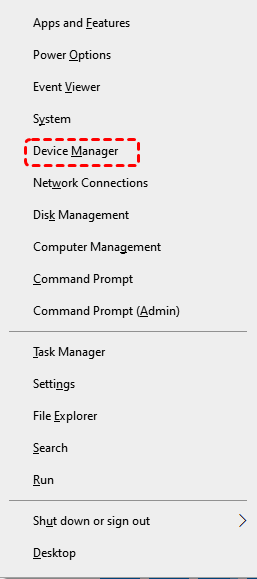
Step 2. Expand "Disk drives" or "Storage controllers" and right click on the hard drive not showing up in Windows, choose "Update driver".
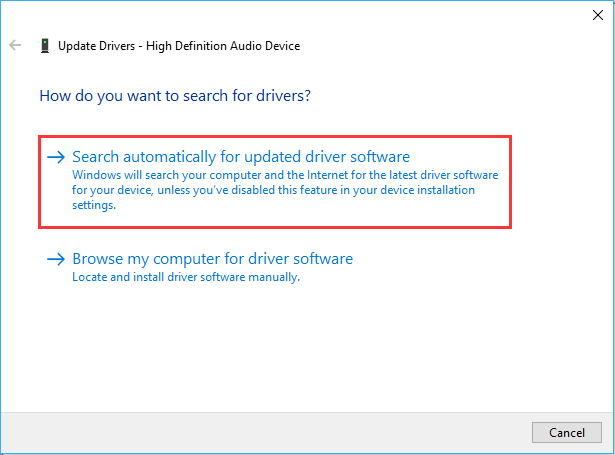
Step 3. Choose "Search automatically for updated driver software" to continue the process.
5. Enable the Drive in BIOS
If the hard drive is accidentally disabled in BIOS, it will still show up in BIOS but become inaccessible to the operating system. So, it won’t appear in Windows. Change BIOS settings and reboot your computer to see if Windows detects the drive.
Step 1. Restart your computer. As soon as it boots up, repeatedly press F1, F2, or Del (depending on your computer brand) to enter BIOS.
Step 2. Under "Advanced" menu, locate the "SATA Controller" or "Integarted Peripherals" and select the drive.
Step 3. Change the statue from "Disable" to "Enable".
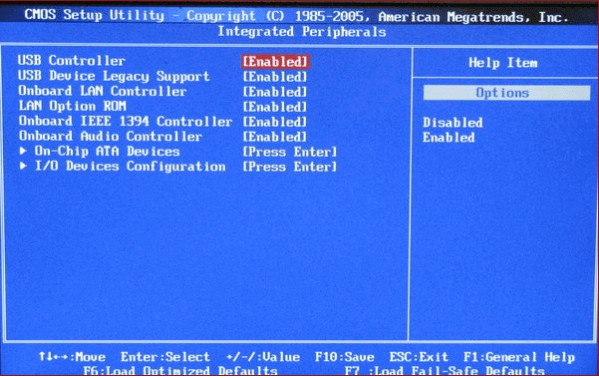
Step 4. Press F10 to save the changes and exit.
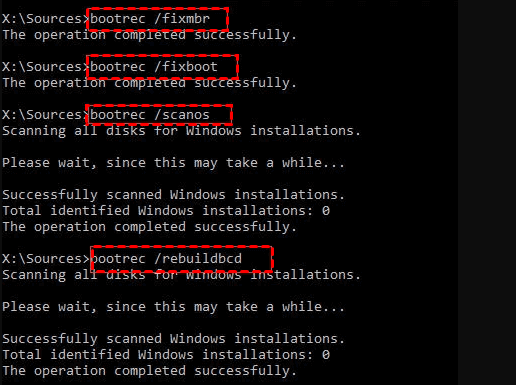
6. Rebuild MBR with Command Prompt
If a hard drive appears in BIOS but not in Windows, the problem may be related to a corrupted Master Boot Record (MBR). The MBR contains essential boot information that helps the operating system locate and access the disk. When this structure becomes damaged due to improper shutdowns, disk errors, or malware, Windows may fail to recognize the drive properly. Rebuilding the MBR using Command Prompt can repair the boot structure and restore the drive’s accessibility.
Step 1. Boot your computer into the Windows Recovery Environment (WinRE) by interrupting startup three times.
Step 2. Select "Troubleshoot" > "Advanced options" > "Command Prompt".
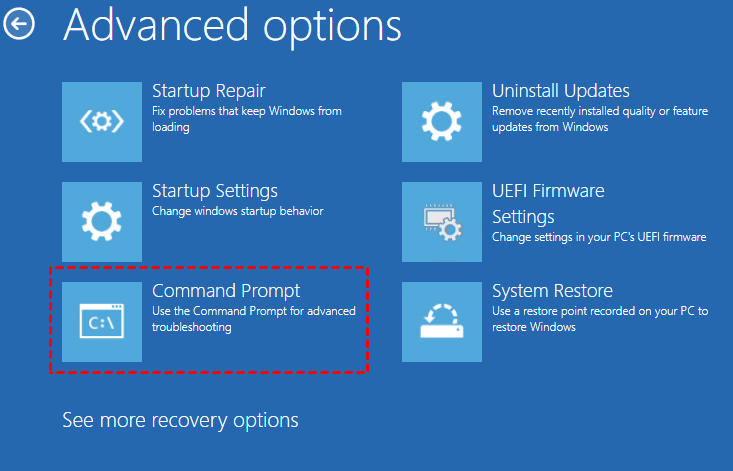
Step 3. In the Command Prompt window, type the following command and hit "Enter".
bootrec /fixmbr
bootrec /fixboot
bootrec /scanos
bootrec /rebuildbcd
Then restart the computer to check if the drive appears in Windows.
7. Format the Drive
If the drive uses a Windows unsupported or corrupted file system, Windows may prevent it shows in File Explorer. Open Disk Management to check the drive’s file system. If it is incompatible with Windows, format it to NTFS or other Windows-compatible file system. However, this method will erase all data on the drive, which is why it is crucial to recover the data beforehand.
Step 1. Press "Win" + "X" and choose "Disk Management" to open it.
Step 2. Right click on the drive to choose "Format".
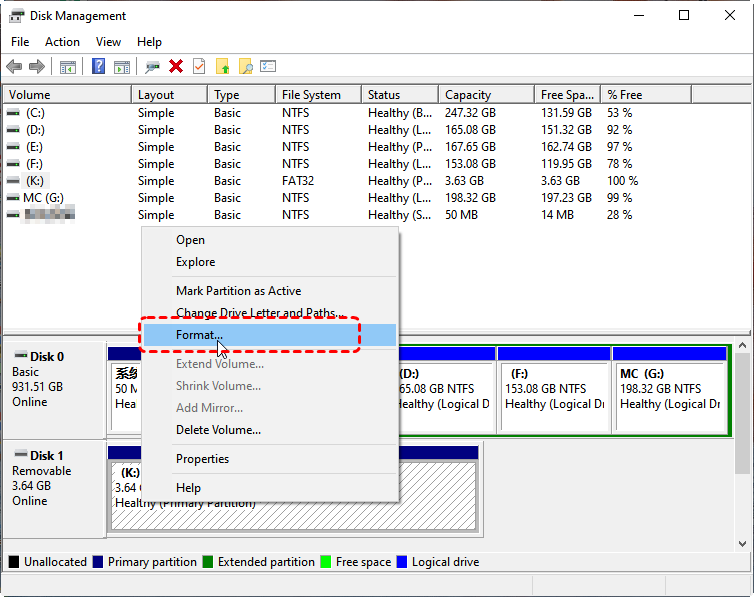
Step 3. Select a file system like NTFS and check "Perform a quick scan" option, then click "Finish" to start the process.
Even if you haven’t recovered your data in advance, it doesn’t matter. MyRecover also supports recovering your data from formatted drives.
The End
When a hard drive is visible in BIOS but missing in Windows, it doesn’t necessarily mean the drive has failed. In most cases, the issue is related to initialization, drivers, file systems, or BIOS settings. By first fixing the issue, recovering your files from the drive to avoid permanent loss. After that, applying the appropriate fix mentioned above can usually restore full access to the drive.
For users who want more advanced features and support for more complex disk issues, the MyRecover Professional edition offers greater flexibility, making it a reliable choice when standard Windows tools fall short.


Stay Updated With Our
Latest Tips
Add us as a preferred source on Google to never miss helpful guides.