
How to Recover Deleted Steam Screenshots on Windows | Full Tutorial
When you unlock rare achievements while playing games on Steam, you can immediately press F12 to take a screenshot and capture the moment. However, these screenshots may not get saved to a visible location on Steam and they just seem to disappear. This article will guide you through how to access Steam’s screenshot folder and recover deleted screenshots. Get your game memories back in minutes!
By Aria / Updated on September 8, 2025
Where is Steam Screenshots Folder?
Steam’s built-in screenshot feature (default key: F12) allows you to capture epic gaming moments. Then, they may seem to disappear. In fact, Steam has automatically saved your in-game screenshots to your local folder. When you exit the game, you can choose to upload them to Steam’s cloud servers.

By default, the local file path for storing Steam screenshots is:
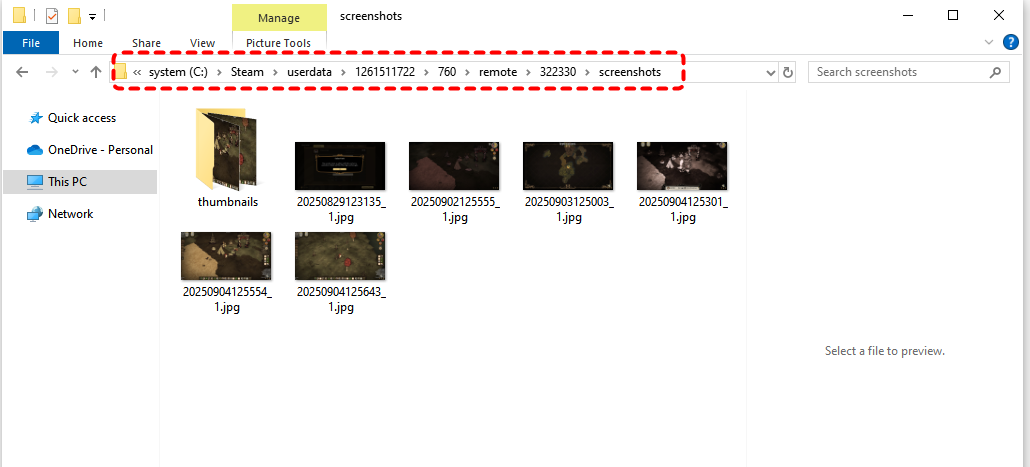
[On Windows]: C:\Program Files (x86)\Steam\userdata[Your Steam ID]\760\remote[Game App ID]\screenshots
[On Mac]: Users/[your Mac username] /Library/Application Support/Steam/userdata
These screenshots may be deleted due to reasons like formatting hard drive, while those uploaded to the cloud servers will be retained in your Steam account. But don’t worry, even if these screenshots have been deleted, this article will also introduce effective recovery methods to help you retrieve your lost Steam game screenshots.
How to Access Steam Screenshots Folder
For some users, they just don’t know where Steam screenshots are stored. Steam offers a couple of ways allowing you to access your screenshots, such as local folders, screenshots manager in Steam, and Steam cloud. You can choose your preferred method to access your game screenshots.
Option 1. Locate via File Explorer
As mentioned earlier, Steam automatically saves screenshots to a local folder on your computer. You can find the captured screenshots by accessing this file path directly. This is the simplest way to access your Steam screenshots.
Step 1. Open File Explorer by press "Win + E".
Step 2. Navigate to the default path where screenshots are stored. By default, all your Steam game screenshots are stored here, and you can manage them in the way you prefer.
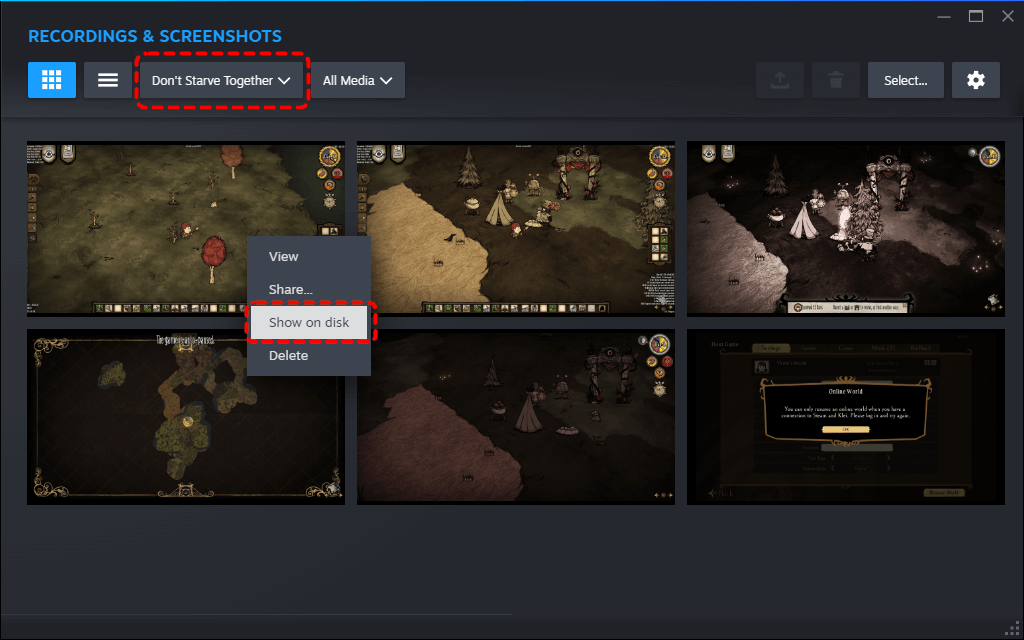
Option 2. Using Screenshot Manager
A built-in Screenshot Manager is available on Steam, enabling you to conveniently view and manage all your captured screenshots. With this feature, you can access your screenshot folder effortlessly, without having to navigate your computer’s complex directory structure.
Step 1. Launch your Steam app on your computer.
Step 2. Select "View" tab in the top-left menu and select "Recordings & Screenshots" from the dropdown lists to open Screenshot Manager.

Step 3. Choose a game to view its screenshots.
Step 4. Right click on a screenshots and choose "Show on disk" to open it in the local folder.
Option 3. Check Steam Screenshot Online
If you have already uploaded these screenshots to Steam Cloud, you can access them online. Steam Cloud also allows you to share these images with your family and friends via links.
Step 1. Launch the Steam app on your computer.
Step 2. Click your account "View my profile". Under "Current Online", click "Screenshots".
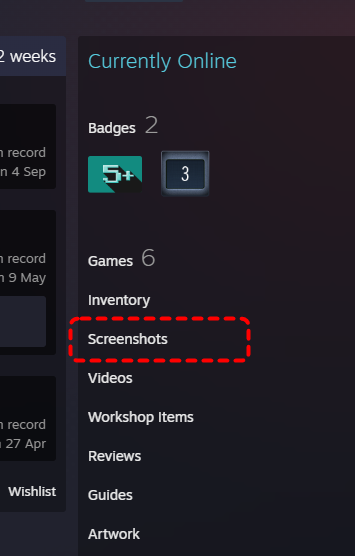
Step 3. Browse your uploaded screenshots by game or date.
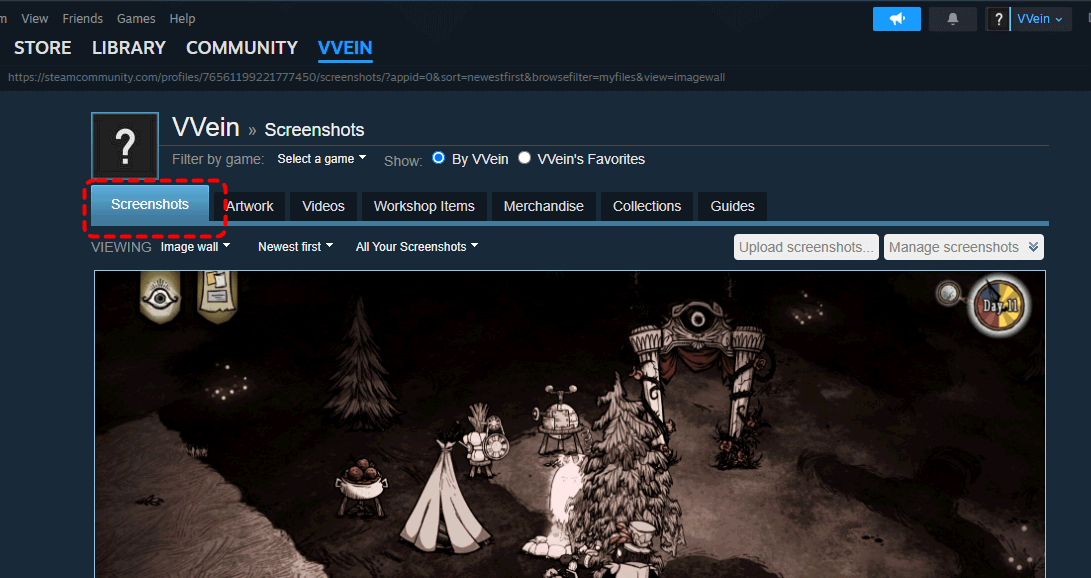
If you can’t see your screenshots online, they may not have been uploaded or synced yet.
How to Recover Deleted Steam Screenshots
If you accidentally delete your precious in-game screenshots, don’t panic too much—this section will walk you through several reliable methods to get back the deleted Steam screenshots. We’ll provide two built-in Windows tools and one professional data recovery tool for you.
Method 1. Check the Recycle Bin
If you manually deleted game screenshots from the local folder, checking the Recycle Bin is the simplest and fastest way to retrieve the deleted screenshots. If the deleted files are not in the Recycle Bin, please move on to the other methods.
Step 1. Double click "Recycle Bin" icon to open it.
Step 2. Browse through the deleted items or search ".jpg" or ".png" files in the search bar.
Step 3. Choose the files you want to recover and right click on it, then click "Restore" from the context menu.

Method 2. Restore Previous Versions
Windows offers a built-in backup tool, File History, which can back up versions of your screenshots folder and allow you to restore desired version from the backup when you need. If you have enabled File History on Windows and add the screenshot folder to backup plan before data loss, you can restore older versions with this feature.
Step 1. Open File Explorer and locate to the screenshots folder.
Step 2. Right click on it and choose "Restore previous versions" from the context menu.
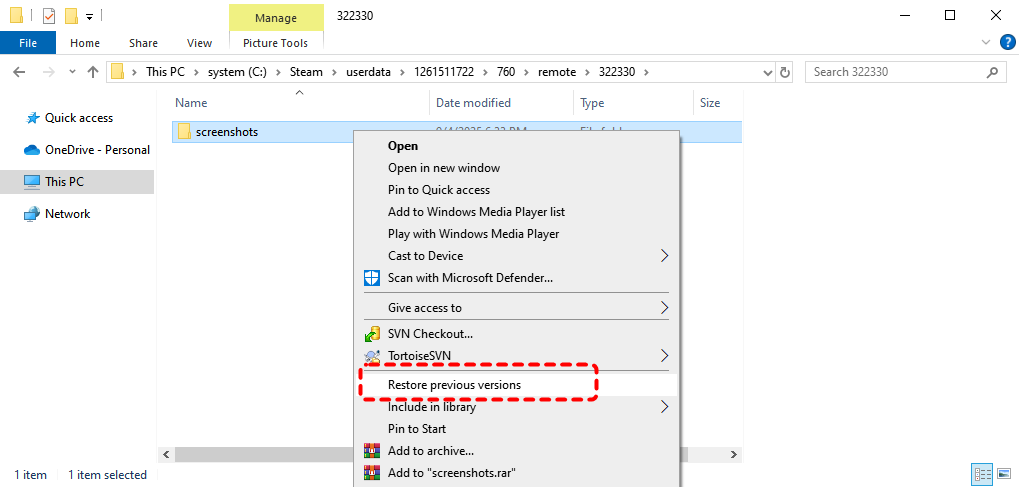
Step 3. A list of old versions will be displayed. Choose a desired version before the data loss and click "Restore" to recover it.

Method 3. Recover Deleted Steam Screenshots with MyRecover
If your precious Steam screenshots are permanently deleted due to formatting or disk space management, the two methods mentioned above will no longer work. In such cases, you’ll need a professional data recovery software like MyRecover to help you retrieve the lost screenshot files. MyRecover features a visual interface that simplifies the data recovery process, allowing even beginners to easily complete data recovery.
Here are the standout features of MyRecover.
✅Support 1,000+ file types, including documents, images, videos, emails, archives and more.
✅Compatible with all storage devices: USB drives, HDDs, SSDs, SD cards, etc.
✅Handle with more complex data loss cases like OS crash, formatted, RAW, corrupted or deleted drive.
✅Support NTFS, FAT32, exFAT, ReFS in Windows 11/10/8/7 & Windows Server.
✅Dual scan modes: Quick Scan for speed, Deep Scan for thorough recovery.
4 steps to recover deleted Steam screenshots
Step 1. Download and install MyRecover on your computer from a secure channel, avoid installing it on the drive with lost files.
Step 2. Launch it and select the drive or folder where the screenshots were stored to scan, then click "Scan".

Step 3. Click the "Type" section, select the file type you want to recover, then search by the file directory hierarchy. Choose the files you wish to recover from the recoverable lists and click "Recover". You can also select the "Path" section and use the "Filter" function to achieve the same result.
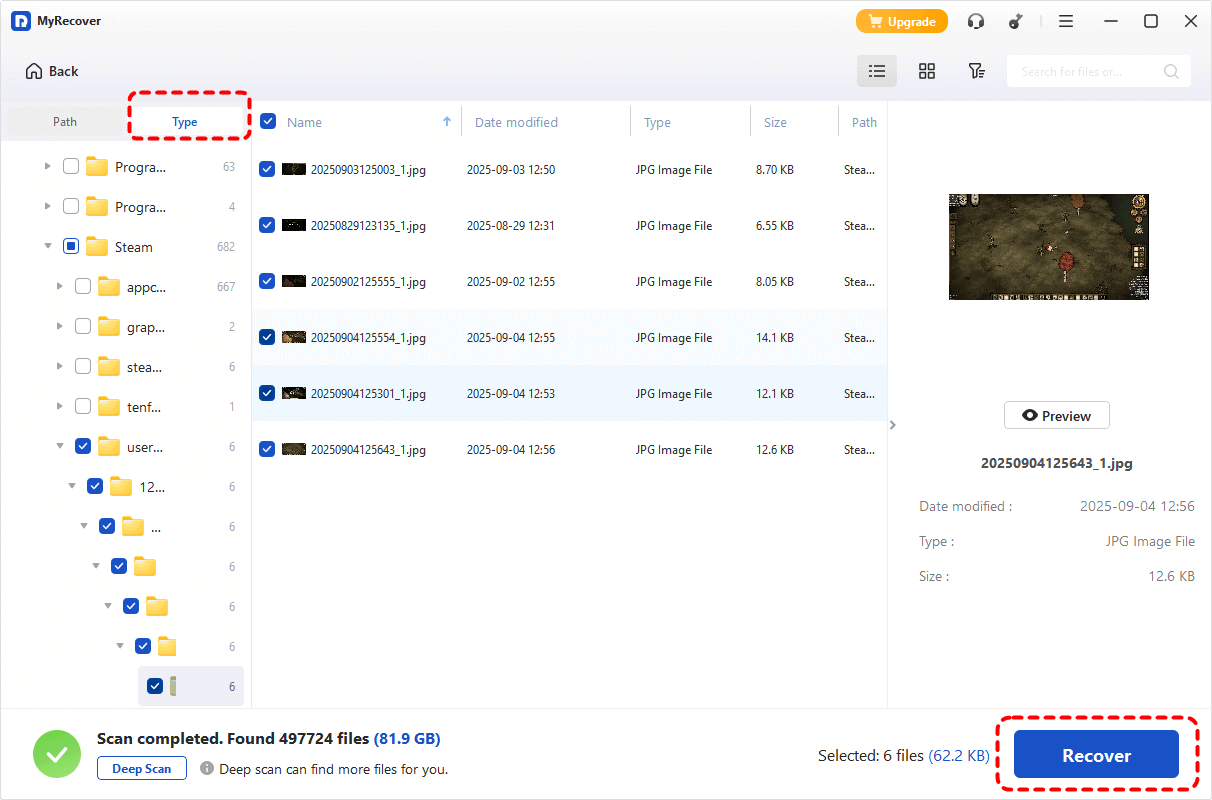
Options in the Filter feature:
- Type: Different file types, such as images, videos, documents, mails, webpage, compressed files, etc. are included.
- Data Modified: You can choose to list them from most recent to oldest or from oldest to most recent.
- Size: It allows you to filter file size from less than 512KB to 512KB ~10MB to 10MB~100MB and above.
- Keyword: Type the keywords of the file name you want to recover into the search box.
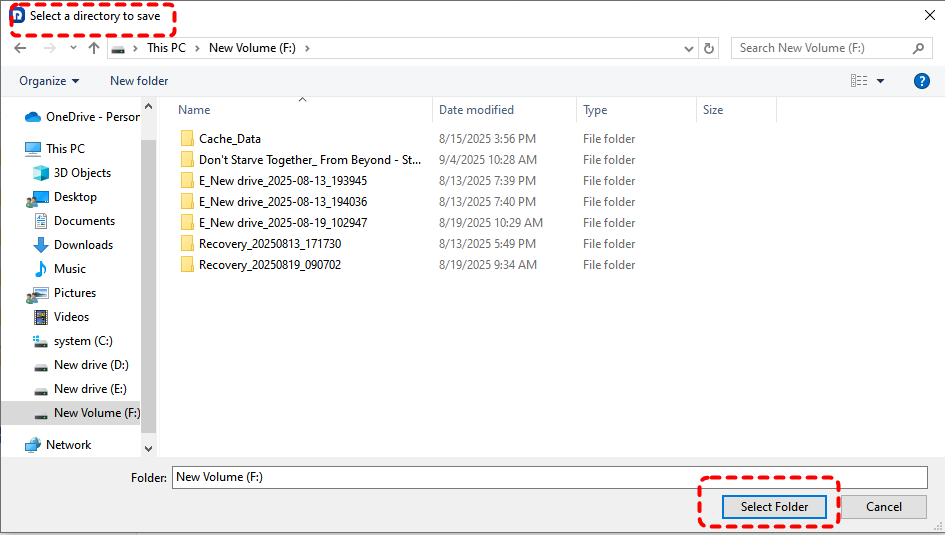
Step 4. Select a safe location (not the original one) to save the recovered files.
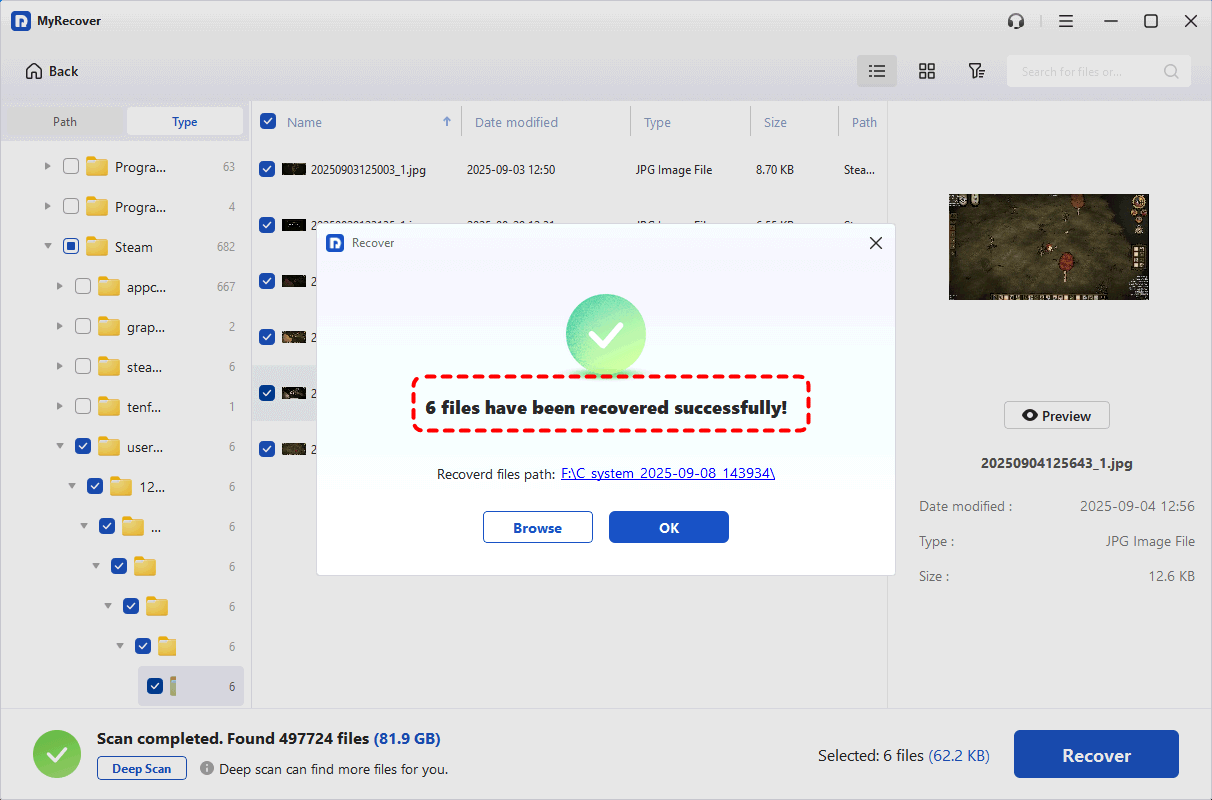
Once the process is completed, the message indicating successful recovery will pop up. You can check the recovered files by clicking on the destination folder path or "Browse" button.
Final Words
Now you know how to find your Steam screenshots and recover them if they go missing. Whether you prefer manual methods like checking the Recycle Bin or want a reliable recovery solution like MyRecover, there’s always a way to get your memories back.
For users who have advanced requirements, like unlimited data recovery, file preview, try the MyRecover's Professional edition. It even supports data recovery from unbootable Windows system. It's a smart choice for any gamer who never wants to lose their screenshots again.


Stay Updated With Our
Latest Tips
Add us as a preferred source on Google to never miss helpful guides.