
How to Recover Replaced Files on Windows &Mac: Top 5 Methods Revealed
Data loss due to file replacement is a common yet distressing issue for users across various platforms. This guide presents a comprehensive overview of strategies to recover replaced files, addressing both technical and non-technical approaches.
By Aria / Updated on July 6, 2025
Can you Recover Files that have been Replaced?
Accidentally replacing a file is a scenario that most computer users have encountered at least once. Whether you accidentally overwrite a document or save an older version of a file over a newer one, the result is the same—important data can seem to be lost. In fact, when a file is replaced, it doesn’t always mean the old version is gone for good. So, can you recover files that have been replaced?

The answer is completely yes! Both Windows and Mac provide built-in tools designed to help users recover previous versions of files that have been replaced or overwritten. Additionally, some third-party tools can also provide assistance to recover replaced files.
How to Recover Replaced Files on Windows 10
When you accidentally replace a file on Windows, chances are good that there are several built-in options available in Windows to help you recover it. Below, we’ll provide the step-by-step process to recover replaced files on Windows 10.
Restore your Files with File History
File History is a built-in feature in Windows that automatically backs up versions of your files over time. If you have enabled File History in Windows 10, you can recover a previously saved version of the file that was replaced.
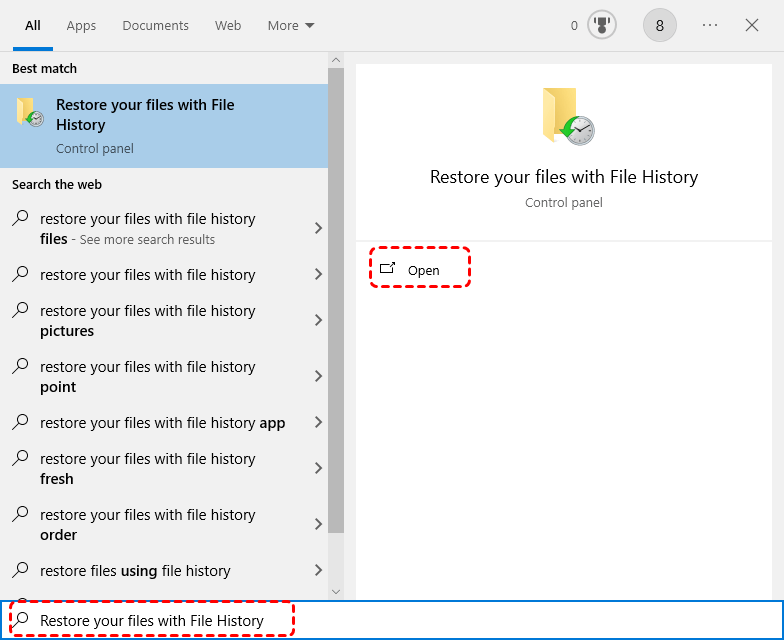
Step 1. Type "Restore your files with File History" in the Start menu and open it.
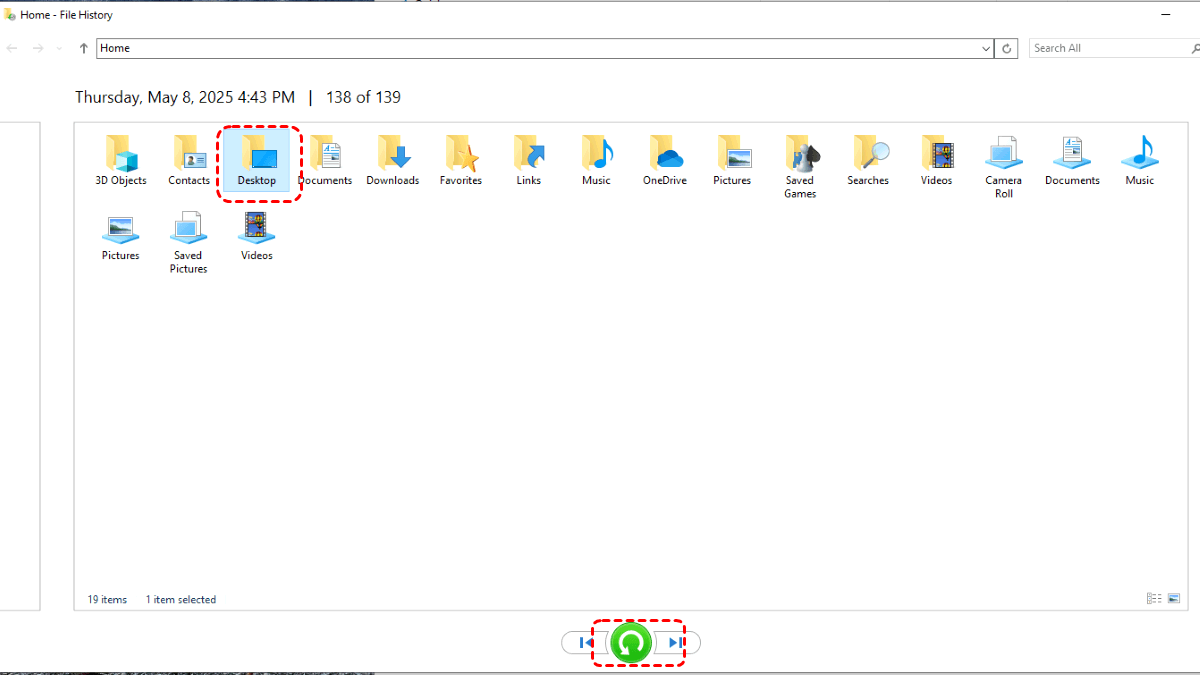
Step 2. Browse through the folder with the replaced files, select a desired version based on the backup time.
Step 3. Click the green "Restore" button to recover the replaced files to its original location.
Alternatively, you can restore the replaced files in File Explorer with the same feature.
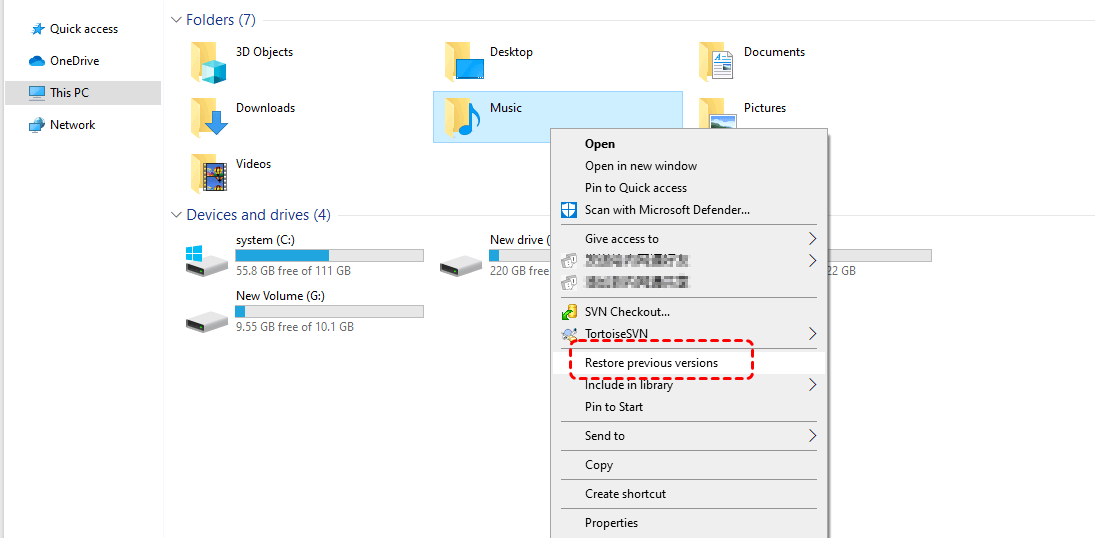
Step 1. Navigate to the folder that contained the replaced file in the File Explorer.
Step 2. Right click the folder and choose "Restore previous versions". Then all available versions of the folder will be displayed.
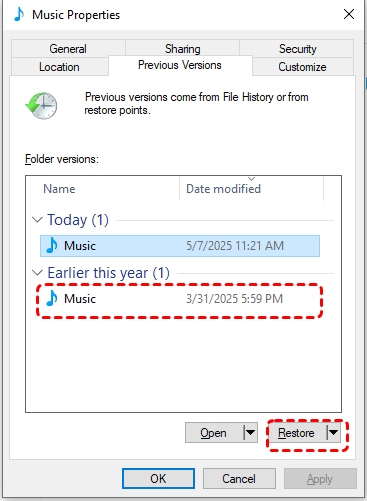
Step 3. Select a desired version and click "Restore" to recover it.
Restore form Cloud Backup
Many users rely on cloud storage services like OneDrive, Google Drive, or Dropbox, which offer version history for files. These services allow you to roll back to an earlier version of a file if it’s been replaced or modified. Take OneDrive as an example here, if you've synced local files to OneDrive, especially Office documents, you can restore the version that existed before it was replaced.
Step 1. Sign in to OneDrive with your account.
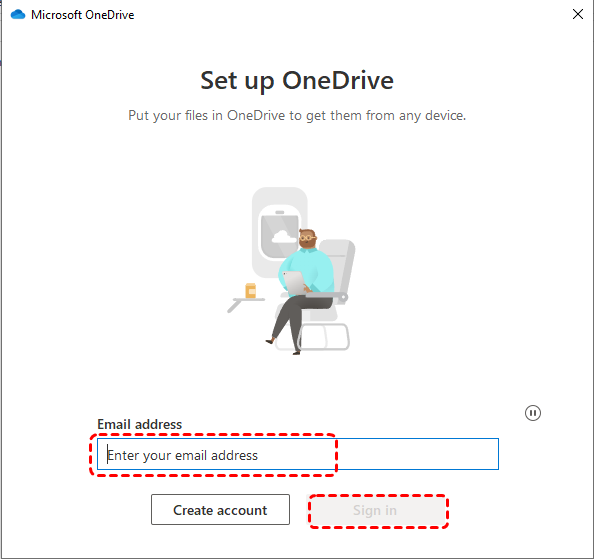
Step 2. Locate the file you want to recover.
Step 3. Click the vertical three-dots menu and choose "Version history".
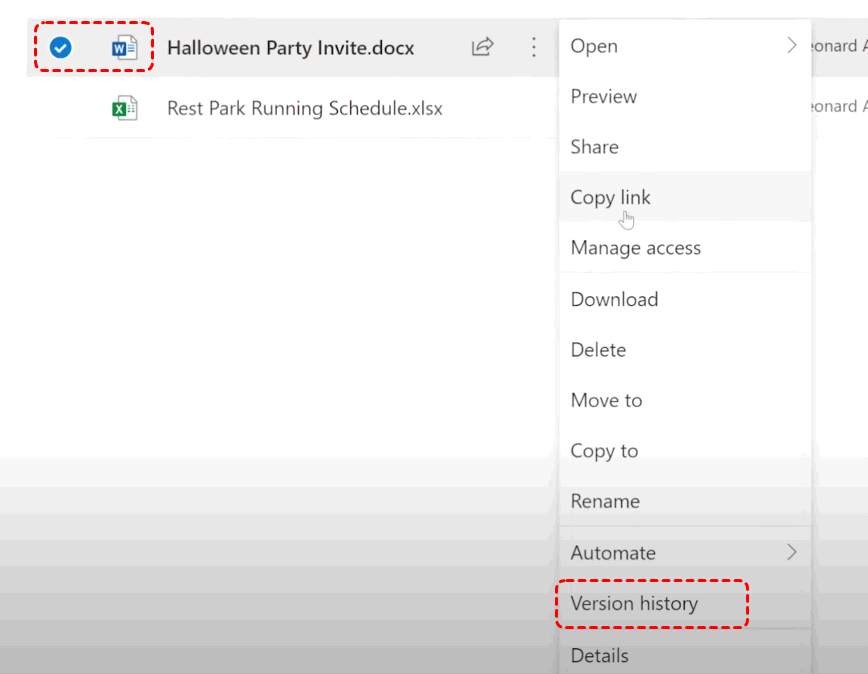
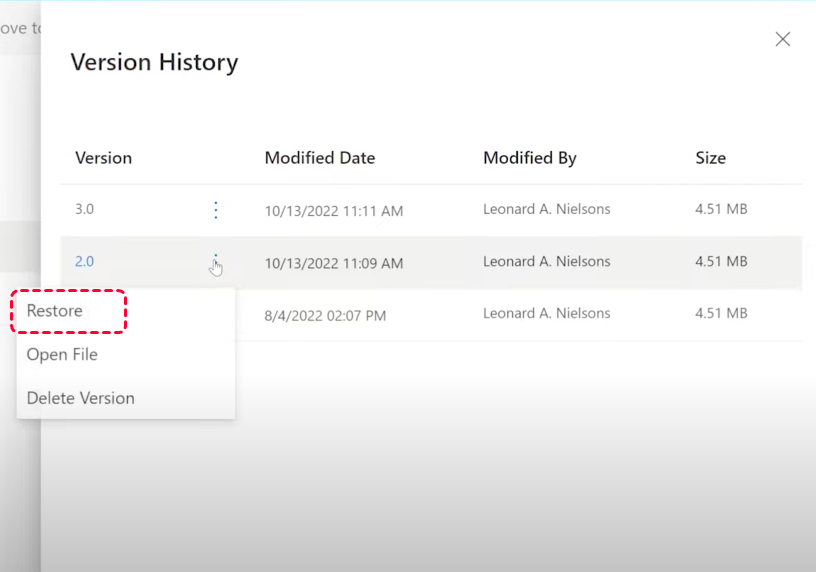
Step 4. Select a desired version from the available lists and click the vertical three-dots menu, then choose "Restore" to recover it. You can click "Open File" to check its contents.
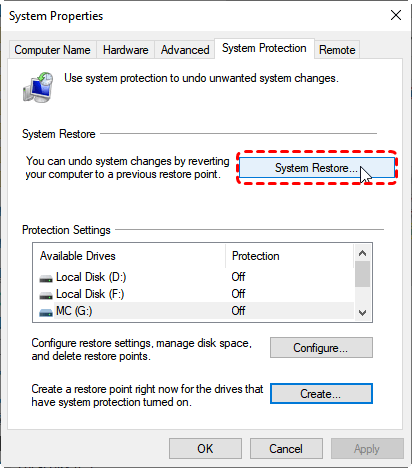
Perform System Restore
System Restore in Windows allows you to roll back your computer’s settings and system files to a previous state, which could potentially restore any replaced system-related files. However, it's important to note that before performing this operation, System Restore cannot restore personal files to their previous state, such as documents, videos, photos, etc.
Step 1. Type "Create a restore point" in the Start bar and open it.
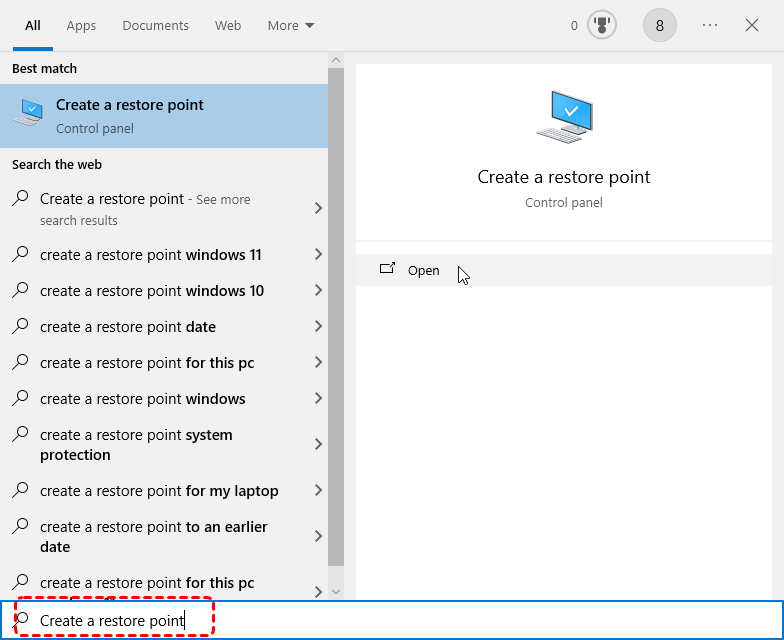
Step 2. Click "System Restore" under the "System Protection" tab and click "Next".
Step 3. Choose a created restore point to restore your computer to a previous state and click "Next".
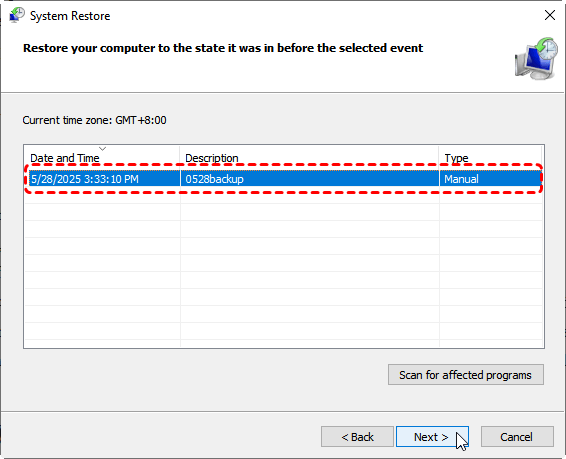
Step 4. Click "Finish" to start the process.
- ★Tips:
- Before performing a system restore, it's advisable to back up important personal files first to avoid data loss.
Recover Lost Files using MyRecover
If none of the above methods work and you have no backup, the last viable option is to try third-party data recovery software like MyRecover. It specializes in recovering lost files from formatted hard drives, deleted partitions, and crashed systems (only available for paid versions). If there are truly no other alternatives, give MyRecover a try. Even if it fails to recover the replaced files, it won't overwrite them.

- No Command Line Needed – Simple GUI (graphical interface) for easy file recovery.
- 500+ Devices Supported – SSD, HDD, USB Flash Drive, SD Sard, etc.
- 1000+ File Formats Supported – PNG, MP4, MP3, TXT, ZIP, MSG, etc.
- 500+ Data Loss Scenarios – Deletion, Format, System Crash, Virus Attack, etc.
Step 1. Download and install MyRecover on your computer, avoid installing it on the drive with lost files.
Step 2. Select the drive where the preplaced files were stored and click "Scan".

Step 3. Choose the files you wish to recover and click "Recover". You can preview the contents to check if it's the version you needed.

Step 4. Select a safe location (not the original location) to save the recovered files.

When the process is finished, the message "Files have been recovered successfully" will pop out. You can click the destination folder to access and check them.

How to Recover Replaced Files on Mac
When it comes to macOS, recovering replaced files is often a straightforward process thanks to built-in utilities like Time Machine. Time Machine works similarly to Windows’ File History, but it offers a few unique advantages that make it a go-to option for Mac users.
Time Machine is a comprehensive backup solution that automatically saves copies of your files and system settings. If you have Time Machine enabled, you can quickly recover an accidentally replaced file by browsing through backup snapshots.
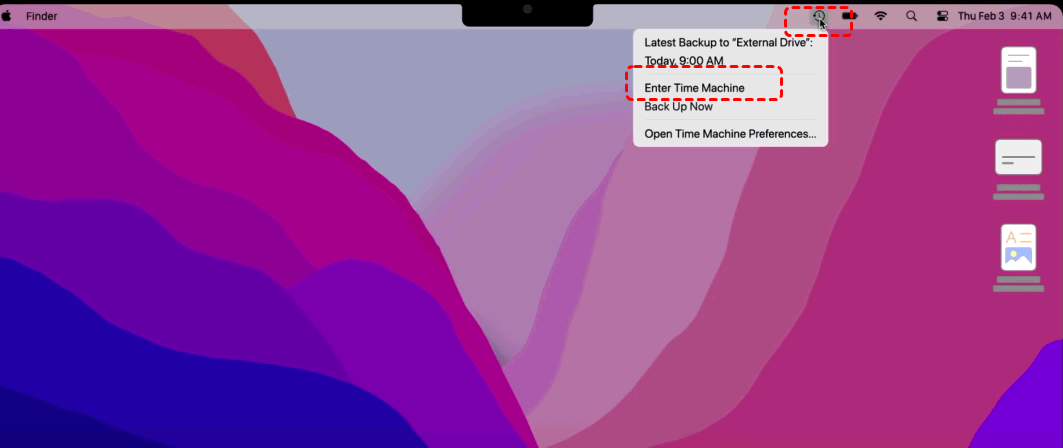
Step 1. Connect the external drive with backups and connect it to your Mac.
Step 2. Open the folder containing your lost files, click the time machine icon in the menu bar and choose "Enter Time Machine".
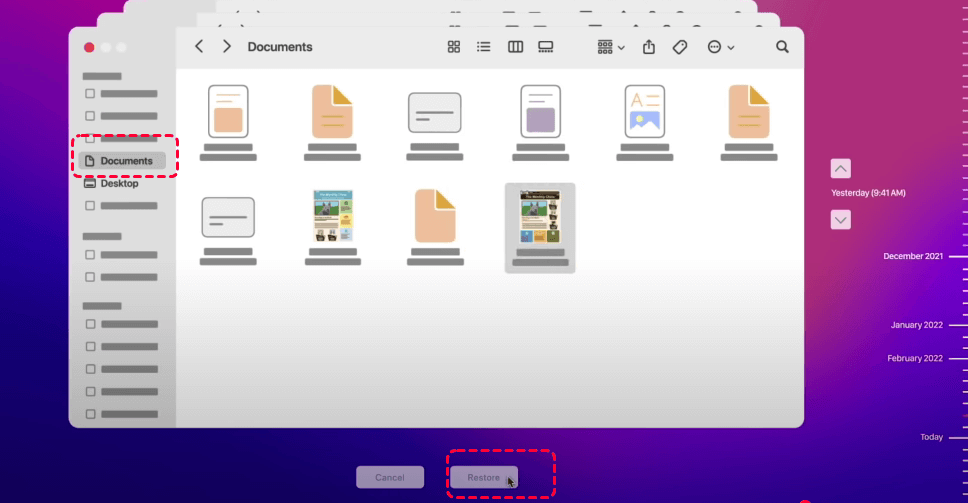
Step 3. Locate the folder where the replaced files were stored.
Step 4. Use the timeline on the right side to scroll back to a date before the file was replaced.
Step 4. Find the file in the timeline and click "Restore" to recover it.
Summary
By following the steps above, you can easily recover files that were replaced, even if you didn’t realize the mistake until much later. And remember—frequent backups are always your best defense against losing valuable data in the future.
MyRecover, a professional data recovery software, supports the recovery of over 1,000 file formats, including documents, videos, images, emails, and compressed files, etc. You can try using it to recover overwritten files, as it causes no data loss. Home users or enterprises intending to deploy the software across multiple systems can leverage the Technician Edition, which offers single license support for unlimited-device.


Stay Updated With Our
Latest Tips
Add us as a preferred source on Google to never miss helpful guides.