
[8 Ways] How to Remove Write Protection on USB Drive Windows 11 & 10?
A USB drive showing "The disk is write protected" can prevent you from copying, deleting, or formatting files. This article explains multiple ways to remove write protection on USB drives for Windows 11, Windows 10, and older versions. Step-by-step instructions ensure you can unlock your drive without data loss.
By Emma / Updated on May 11, 2026
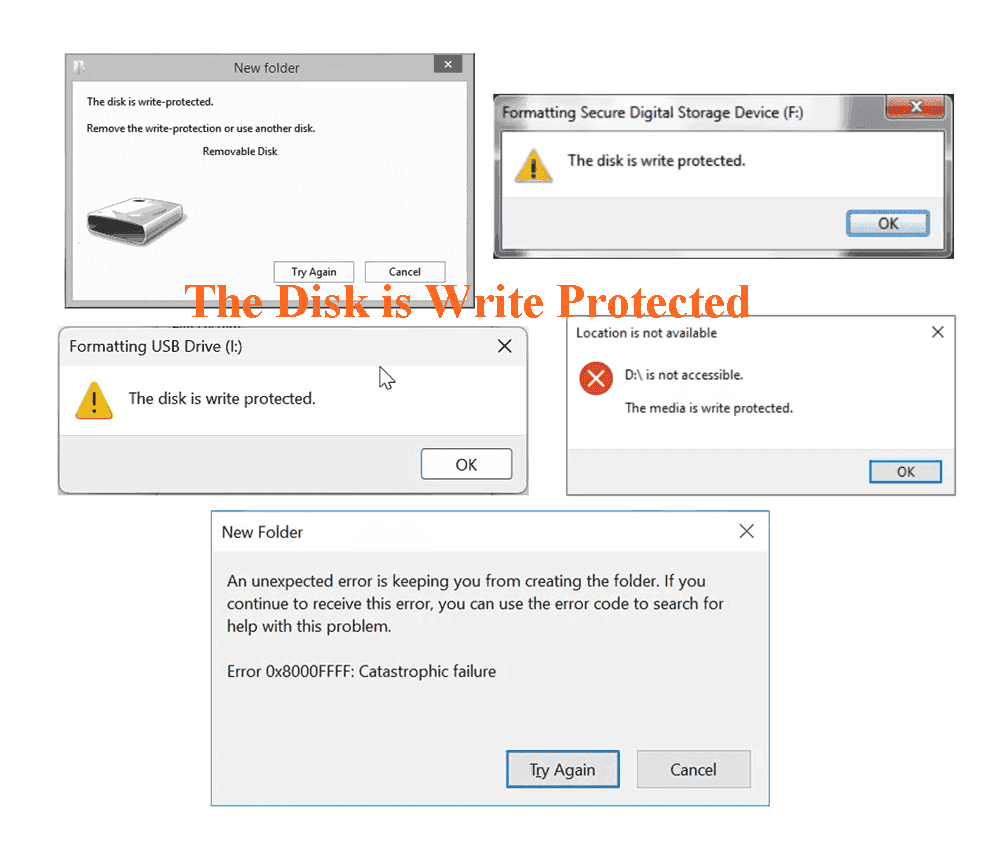
"The disk is write protected"
Hello everyone! I’m having trouble with my SanDisk card—it’s showing as write-protected, and I can’t add or delete files. Any advice on how to remove this write protection on Sandisk? Thanks in advance for any help!”
- Question from forums.sandisk.com

What is "write protection" on USB disks and Why it Occurs?
Write protection is a safety feature on USB flash drives and other storage devices that prevents data from being modified, deleted, or written to the drive. When a USB is write-protected, you can read files normally, but any attempt to copy new files, delete existing ones, or format the drive will be blocked. Windows often shows the error: "The disk is write-protected."
Major Causes of Write Protection
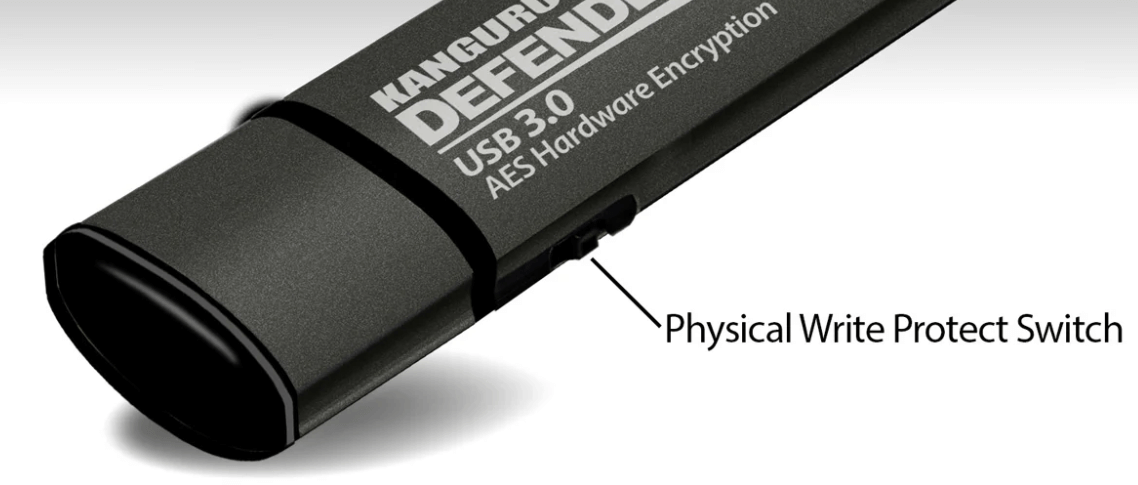
⭕Physical write-protect switch: Some USB drives have a small switch on the side that enables write protection. If switched on, the drive cannot be written to.
⭕File system errors or corruption: Damaged or corrupted file systems can trigger Windows to set the drive as read-only to prevent further data loss.
⭕Registry or OS-level restrictions: Windows may block writing to removable drives due to system settings or group policies.
⭕Drive is full or locked by software: Some drives or security programs can enforce temporary write protection to prevent accidental modification.
⭕Manufacturer or firmware-level protection: Certain USB drives, including some SanDisk models, have built-in protection that activates when the drive detects errors or is in a protected mode.
How to Remove Write Protection on USB Drive?
If your SanDisk card or USB stick is write-protected, you can try the following fixes depending on the cause. Start with the simple checks before moving to advanced methods.
1️⃣Check the Physical Write-Protect Switch
Some USB drives and SD cards are designed with a small physical switch on the side. This switch controls whether the device is write-protected or not. If you find that your drive is locked, simply slide the switch to the opposite position to disable write protection. Once adjusted, reconnect the drive to your computer and test it by copying a file to ensure the issue has been resolved.
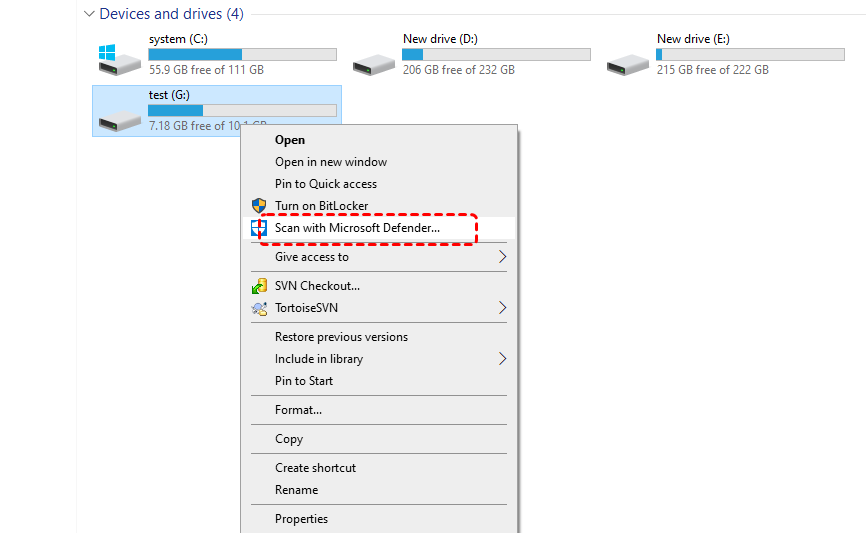
2️⃣Scan for Malware or Security Restrictions
If there is no swicth when applying the above method of how to remove write protection on usb drive, you can then run a virus scan. Some malware or overly strict security software may force your USB into read-only mode. Run a full antivirus scan (e.g using Windows Defender) and temporarily disable security tools to test if the issue goes away.
3️⃣Edit the Registry
You can also remove write protection from USB flash drive through the Windows Registry if the issue is caused by system-level settings. To do this, take the following steps:
Before proceeding, export (In Registry Editor go to File → Export….) and back up the Registry since editing the Registry can affect your system. This gives you a chance to recover Registry data in case something goes wrong.
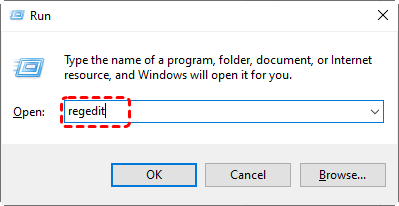
Step 1. Press "Win + R", type "regedit", press Enter, and accept the UAC prompt.
Step 2. In the left pane expand the folders to navigate to the target key:
HKEY_LOCAL_MACHINE\SYSTEM\CurrentControlSet\Control.
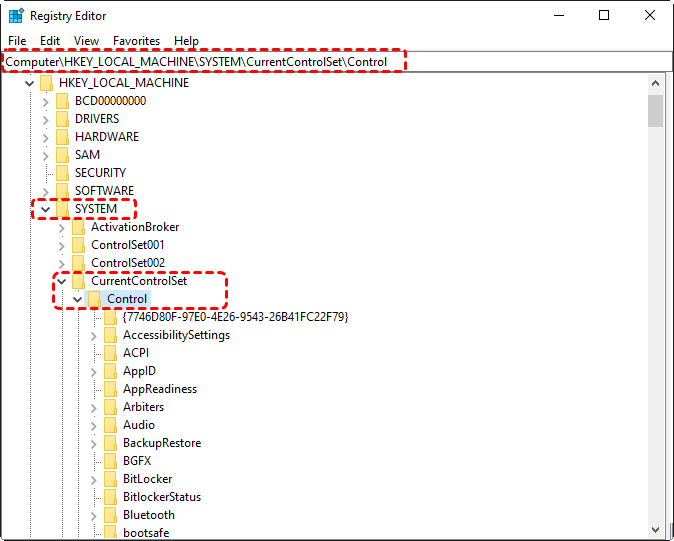
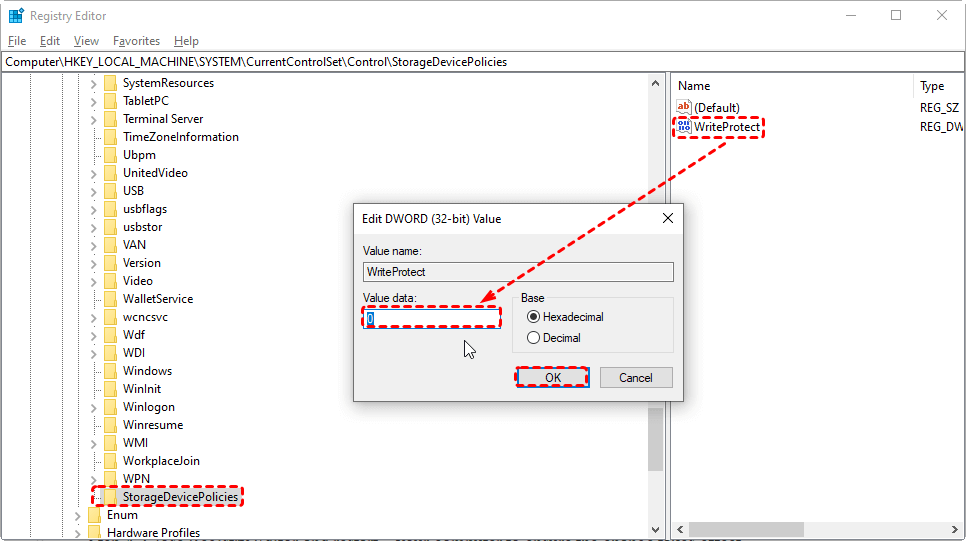
Step 3. Click the Control key. Look for and click StorageDevicePolicies. In the right pane:
- If there is a value named WriteProtect, double-click it.
- If it’s not there, right-click empty area → New → DWORD (32-bit) Value → name it WriteProtect.
Step 4. Double-click WriteProtect and set Value data to 0. (Base can be Hex or Decimal — 0 is the same either way.). Click OK.
Step 5. Close Registry Editor and restartyour computer to ensure the change takes effect.
If you don’t find StorageDevicePolicies in the Step 3, create one and then change the value data.
- Right-click Control → New → Key.
- Name the new key: StorageDevicePolicies (exact spelling, no spaces).
4️⃣Repair Possible File System Error
Sometimes a SanDisk USB drive or SD card may show as write-protected because of file system errors or corruption. When Windows detects potential damage, it can automatically set the drive to read-only mode to prevent further data loss. Repairing the file system can often restore normal functionality.
To repair errors, you can use Windows built-in SD card repair tool - Check Disk (chkdsk) tool:
Step 1. Press "Win + S", type "cmd", right-click "Command Prompt", and choose "Run as administrator".

Step 2. In the Command Prompt window, type the following command and press Enter:
chkdsk X: /f /r (Replace X: with the drive letter of your USB drive.)

Wait for Windows to scan and fix detected issues. This may take a few minutes depending on the drive size and error level. Once the process completes, safely eject and reconnect the drive, then test if the write protection has been removed.
5️⃣Remove Read Only Attribute
In some cases, a (SanDisk) USB drive or SD card may become write-protected because the device has been set to read-only mode at the disk level. This prevents any changes from being made, including adding, deleting, or formatting files. Fortunately, Windows provides the Diskpart tool, which can be used to clear the read-only attribute and restore normal access.
Just open Command Prompt as admin, and input one by one, pressing Enter after each:
- diskpart (This will launch DiskPart tool)
- list disk
- select disk X (replace X with the number of your USB drive)
- attributes disk clear readonly
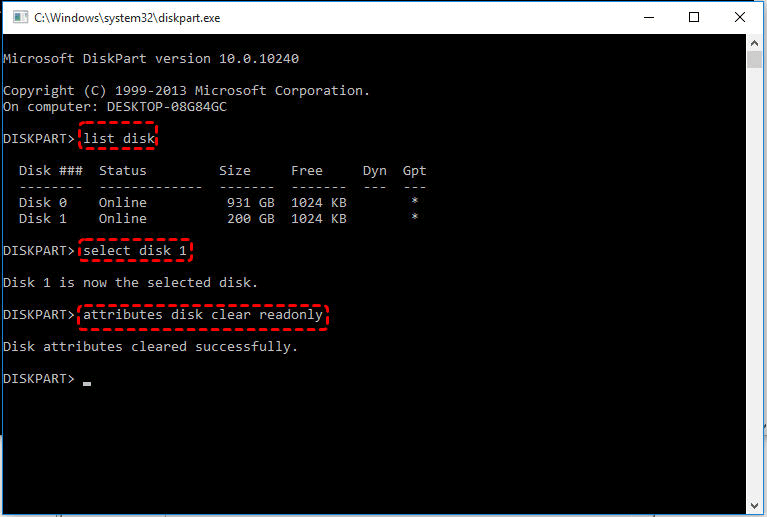
Once done, close the Command Promptby typing "exit". Reconnect your SanDisk drive and try copying or deleting files to confirm the restriction has been lifted.
6️⃣Check the USB Free Space
When the drive is full, you won’t be able to add new files, and in certain cases, the system may treat it as if it were locked in read-only mode.In this case, you can make a quick check by the following steps:
Step 1. Open File Explorer and locate the USB drive.Right-click on it and select "Properties".
Step 2. Under the General tab, look for the pie chart that shows "Used space"and "Free space".
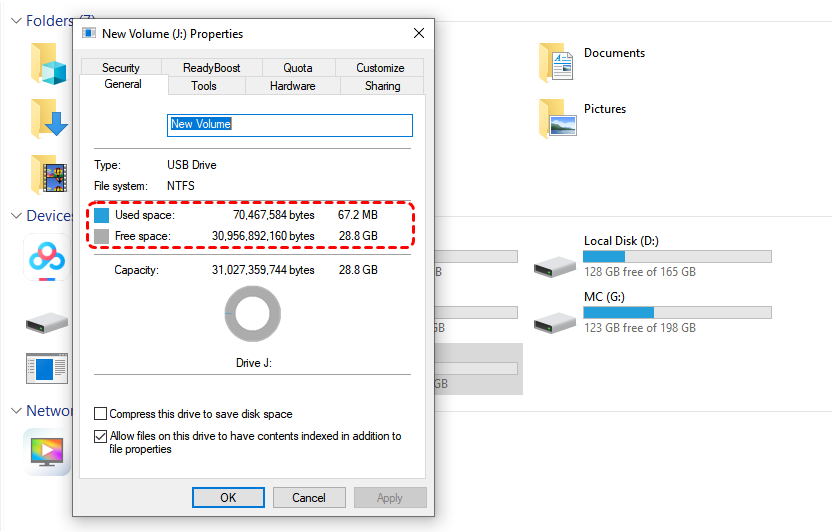
If the drive is full, try moving unnecessary files to another location or deleting them if they are no longer needed.
7️⃣Check Group Policy Settings
Sometimes, write protection on a USB drive or SD card is not caused by the device itself, but by Windows system policies. In Windows Pro and Enterprise editions, administrators can use "Group Policy" to restrict write access to removable storage devices. If this setting is enabled, the USB drive will appear as read-only even if it is functioning normally.
To check and adjust the Group Policy settings:
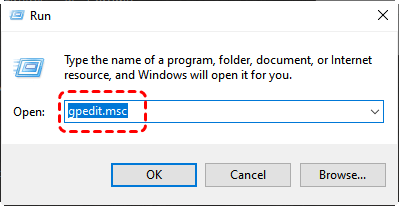
Step 1. Press "Win + R", type "gpedit.msc", and press "Enter" to open the Local Group Policy Editor.
Step 2. In the left pane, navigate to:
Computer Configuration → Administrative Templates → System → Removable Storage Access
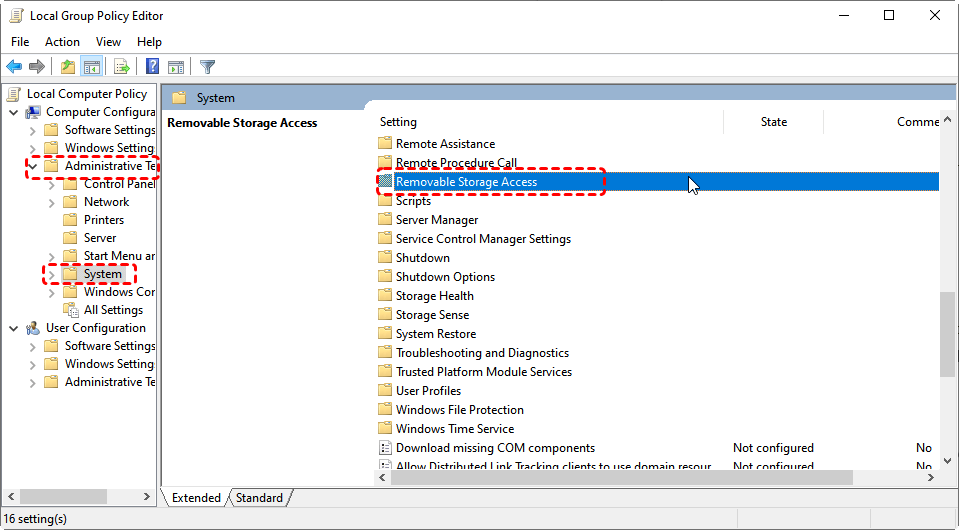
Step 3. On the right-hand side, locate "Removable Disks: Deny write access" and check if it is enabled.
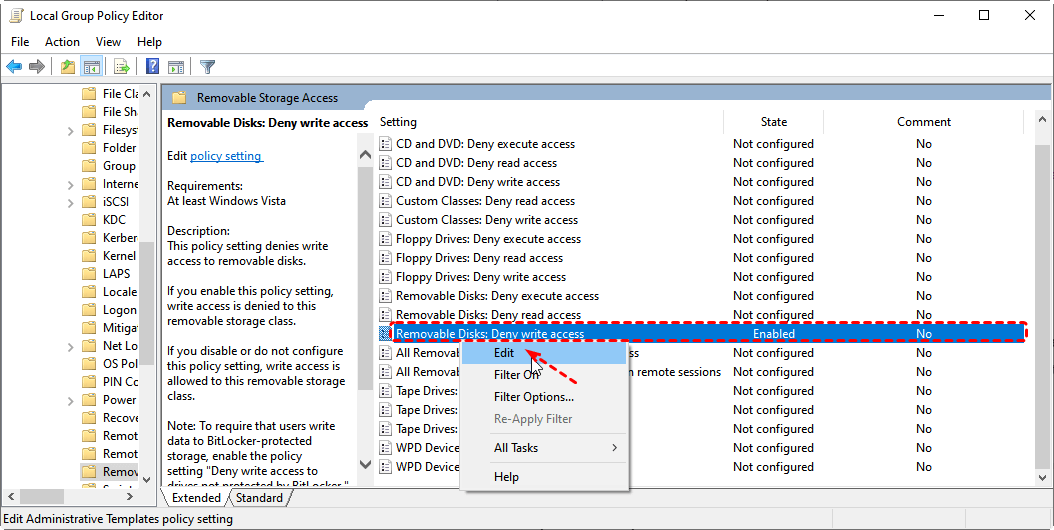
Step 4. Right click it and choose "Edit", then set the policy to "Disabled"or "Not Configured".
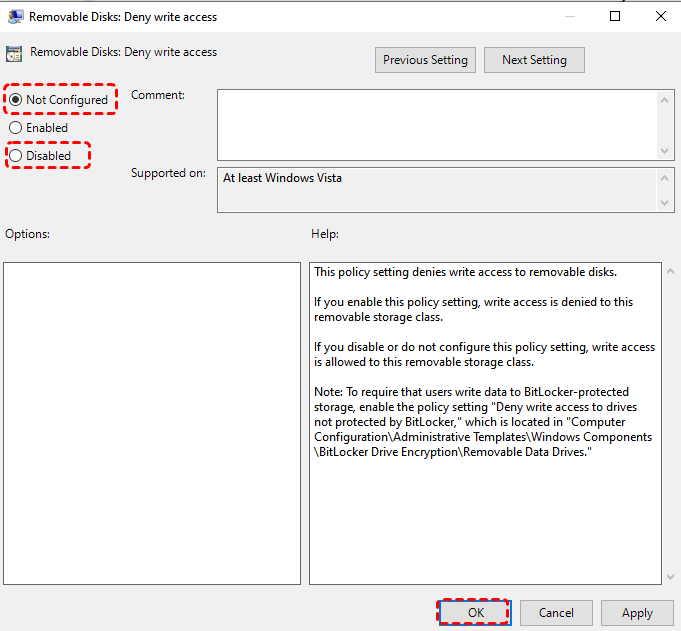
Step 5. Click "Apply" and "OK", then restart your computer to let the changes take effect.
By reviewing Group Policy settings, you can ensure that write protection is not being enforced by the operating system itself. Once this restriction is disabled, your SanDisk USB drive should regain normal write permissions unless other issues exist.
8️⃣Recover Files and Format the USB Drive
If the USB drive remains write-protected after trying all other methods, it may be necessary to recover your files and then format the drive. Formatting removes all data and resets the file system, which often clears persistent write protection caused by corruption or logical errors.
Recover Files First
Since formatting will delete all files on the USB drive, it is essential to scan the write-protected drive and recover files to another storage device. To ensure high recovery success rate, you can try MyRecover.

- 500+ Devices Supported | SSD, HDD, USB Flash Drive, SD Sard, etc.
- 1000+ File Formats Supported | PNG, MP4, MP3, TXT, ZIP, MSG, etc.
- 500+ Data Loss Scenarios | Deletion, Format, System Crash, Virus Attack, etc.
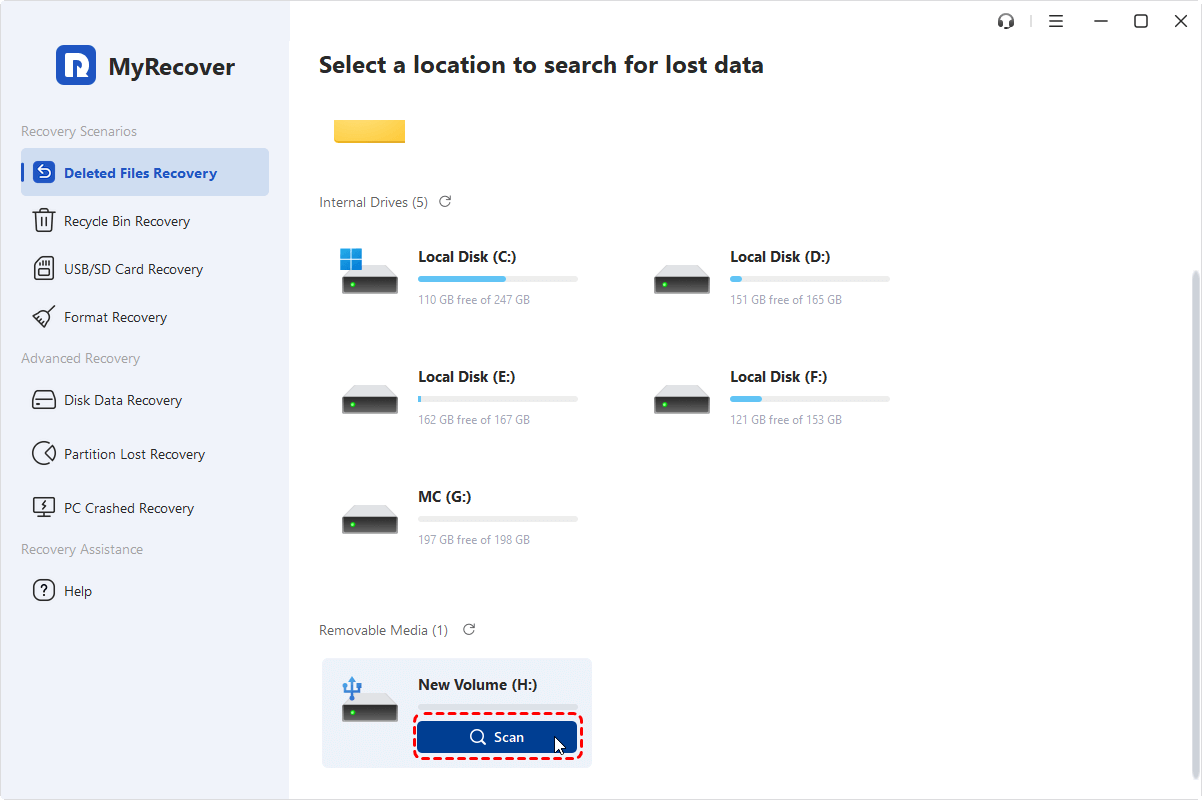
Step 1. Launch MyRecover, select the write protection USB drive and click on "Scan".
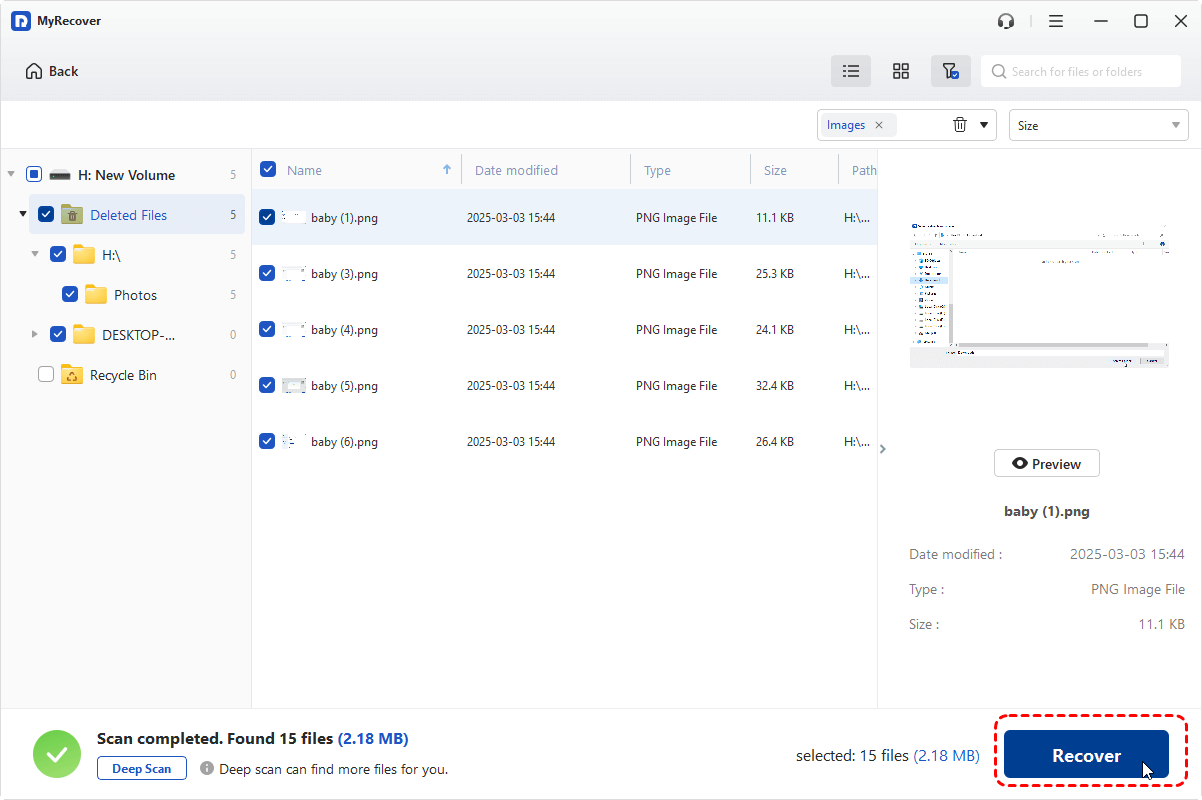
Step 2. After scanning is done, you can browse the result by type or directly locate files using Search bar.

Step 3. Select what you need and click "Recover". Save them to another different location.
Format the Drive Now
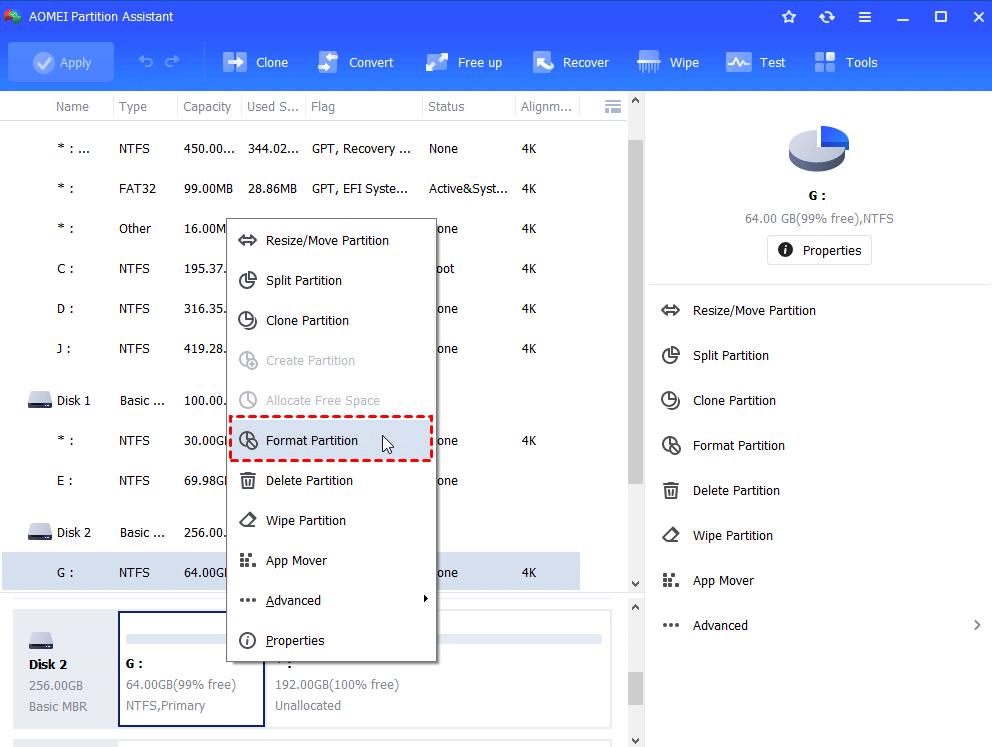
Generally, you can format a drive using File Explorer, Disk Management, or even the Diskpart tool. However, if you are unable to remove the write protection and want to resolve the issue by reformatting, it’s recommended to use a third-party tool such as Free AOMEI Partition Assistant. This software can perform a force format on the drive when Windows built-in tools fail, effectively clearing write protection and restoring normal access.
Summary
So, to remove write protection from USB drive or SD card, you can start with simple checks such as inspecting the physical write-protect switch and scanning for malware. If the problem persists, more advanced methods like editing the Windows Registry, clearing the read-only attribute with Diskpart, repairing file system errors with chkdsk, reviewing Group Policy settings, or checking available storage space may be required.
If all software-based solutions fail, recovering important files from USB drive through MyRecover and performing a full format—preferably with a reliable third-party tool like AOMEI Partition Assistant—can often restore the drive to normal functionality.


Stay Updated With Our
Latest Tips
Add us as a preferred source on Google to never miss helpful guides.