
Fixed: Non System Disk or Disk Error in Windows 11, 10, 8, 7
This article explains why the "Non-system disk or disk " error occurs on HP, Lenovo or other computers, and provides practical solutions. Discover how to fix disk boot issues, replace faulty drives, and follow step-by-step instructions to restore normal system startup, including tips for recovering personal files after resolving the boot problem.
By Emma / Updated on October 21, 2025
What Does the Error "Non System Disk or Disk Error" Mean?
The error "Non-System disk or disk error" appears when your computer cannot find a valid operating system to boot from. This usually happens during startup and prevents your system from loading Windows (or any installed OS).
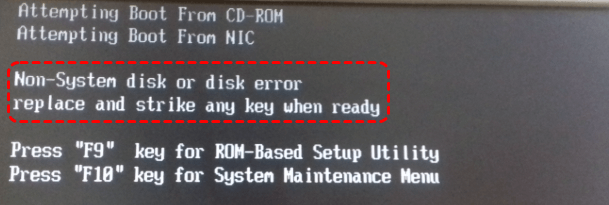
In simpler terms, it means your computer is trying to start from a disk that does not contain the necessary system files or the disk cannot be read properly.
Why Does The Error Occur?
The "Non-System disk or disk error" can occur for several reasons, including:
- ⭕Incorrect Boot Order – Your BIOS or UEFI settings might be trying to boot from a USB drive, CD/DVD, or external storage instead of your primary system drive.
- ⭕Loose or Faulty Connections – A poorly connected or failing hard drive/SSD can prevent the system from reading essential files.
- ⭕Corrupted or Missing System Files – Critical operating system files may be damaged or accidentally deleted, making the drive unbootable.
- ⭕Damaged or Failing Drive – Physical issues with the hard disk or SSD can trigger this error.
- ⭕Removable Media Inserted – Non-bootable media, such as a USB stick or CD/DVD, may be in the drive when the system starts.
How to Fix the "Non-System disk or disk error" Issue?
The "Non-System Disk or Disk, replace and strike any key when ready" usually occurs when your computer cannot find a valid operating system to boot from. To resolve this issue, follow these practical steps to troubleshoot, repair, or replace your hard drive while protecting your data.
Fix 1: Remove All External Drives
When your computer shows the "Non-System disk or disk error," one of the simplest causes could be that it is trying to boot from an external drive or removable media instead of the internal system drive. Removing these devices can often solve the problem immediately.
Step 1. Power off your computer completely.
Step 2. Disconnect all external storage devices, including:
- USB flash drives
- External hard drives or SSDs
- CDs or DVDs in the optical drive
- Any floppy disks (if applicable)
Step 3. Double-check that no external media is connected. Turn on your computer and see if it boots normally.
Fix 2: Check Your HDD’s IDE or SATA Cable
Hard drives rely on IDE or SATA cables to communicate with the motherboard. If the cable is loose, damaged, or not fully seated, the BIOS/UEFI may fail to recognize the drive, causing boot errors including "Non-System disk or disk error". So, make a check to verifythe cables are properly connected.
Step 1. Power off your computer completely and unplug it from the power source.
Step 2. Open your computer case (or laptop panel) to access the hard drive.
Step 3. Locate the IDE or SATA cable connecting the drive to the motherboard.
Step 4. Ensure the cable is firmly and securely connected at both ends (drive and motherboard).
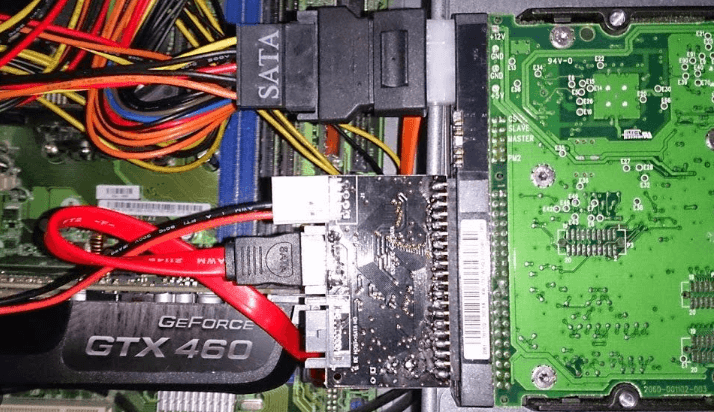
If possible, try using a different IDE/SATA cable to rule out a faulty cable. Close the case, reconnect power, and restart your computer.
Fix 3: Check the Boot Order in BIOS/UEFI
If a USB drive, CD/DVD, or secondary storage is prioritized in the boot sequence, the system may fail to find the correct OS, causing the "Non-System disk or disk error" problem. Ensuring that your primary hard drive or SSD is set as the first boot device in the BIOS/UEFI can often fix the problem.
Step 1. Restart your computer.
Step 2. Immediately press the BIOS/UEFI key during startup (commonly F2, F10, DEL, or ESC – check your computer’s manual if unsure).
Step 3. Once inside BIOS/UEFI, navigate to the Boot menu. Locate the boot priority list and ensure your primary hard drive or SSD is listed as the first boot device.
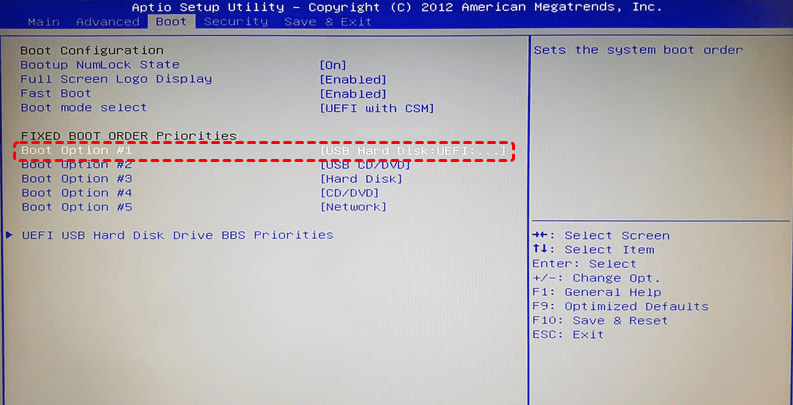
Step 4. Save your changes and exit the BIOS/UEFI. Your computer will restart.
Fix 4: Repair the Master Boot Record (MBR)
If your computer still shows the "Non-System disk or disk error" after checking cables and boot order, the Master Boot Record (MBR) on your system drive might be corrupted. The MBR is a crucial part of your hard drive that tells the computer where to find and load the operating system. Repairing it can often restore your system’s ability to boot normally.
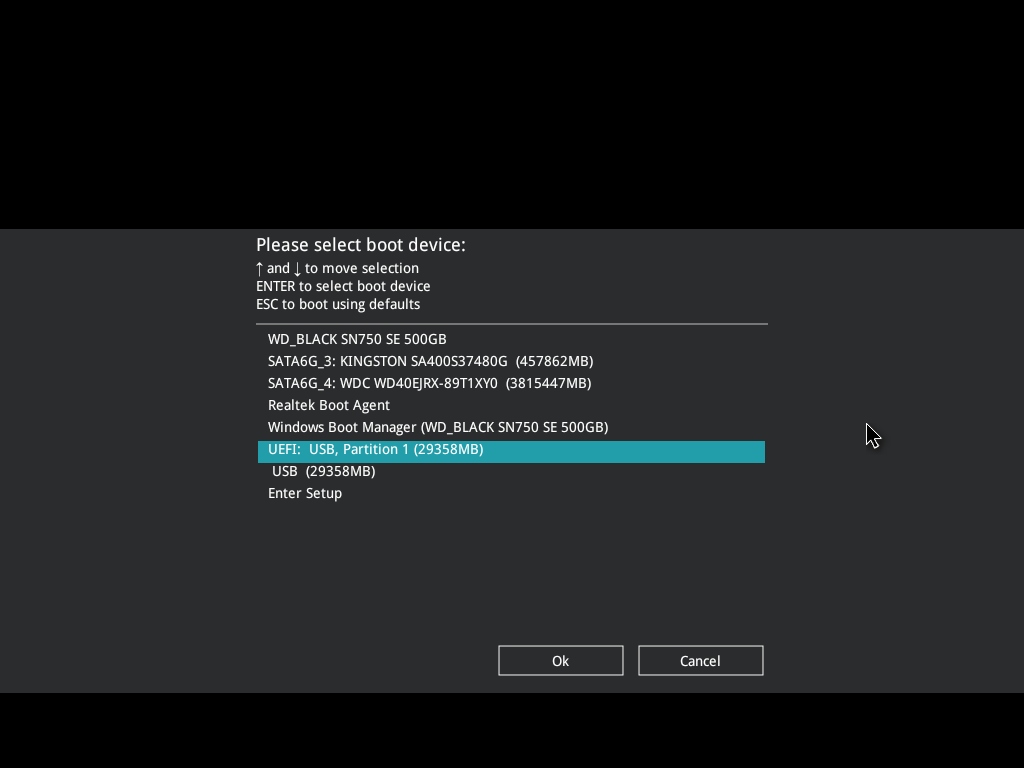
Step 1. Insert a bootable media. If you don’t have one, you can create a bootable USB drive with Windows installation ISO files using Microsoft’s Media Creation Tool.

Step 2. Restart the computer and press the BIOS/UEFI key (such as F2, F12, DEL, or ESC) to open the boot menu. Select your installation media as the temporary boot device.
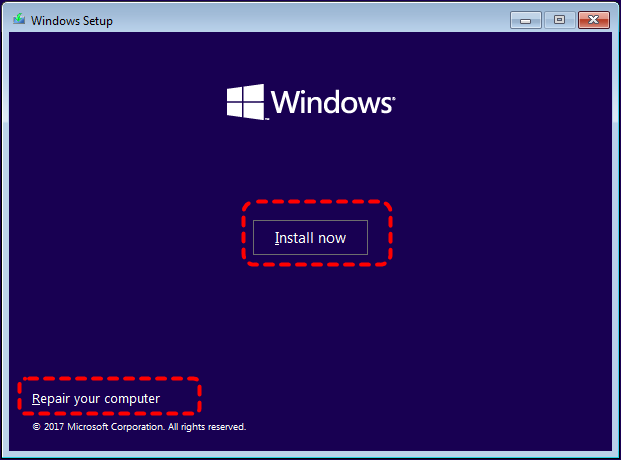
Step 3. On the Windows Setup screen, choose your language and click Next. Click "Repair your computer" (don’t select "Install now").
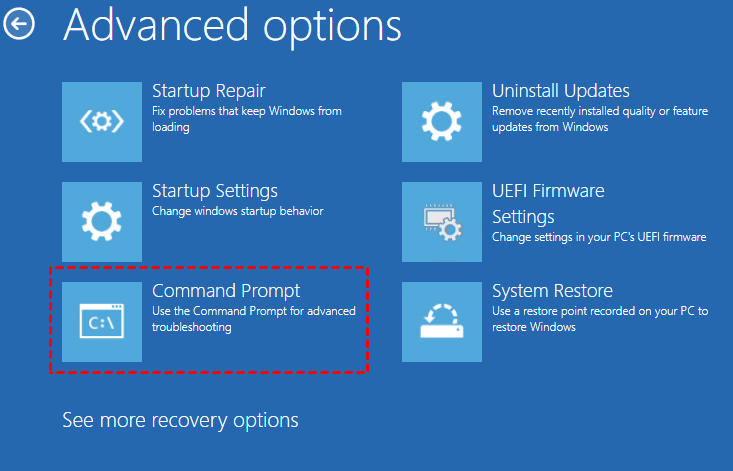
Step 4. Go to "Troubleshoot > Advanced options > Command Prompt".
Step 5. Run MBR repair commands. Type the following commands one by one, pressing Enter after each:
- bootrec /fixmbr
- bootrec /fixboot
- bootrec /rebuildbcd
- bootrec /scanos
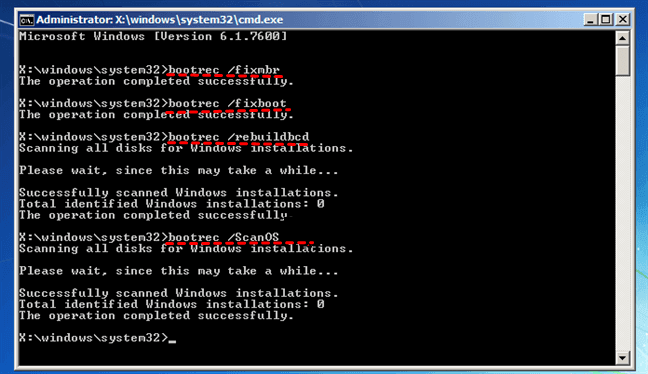
These commands fix the MBR, repair the boot sector, scan for Windows installations, and rebuild the boot configuration data. Close the Command Prompt and remove the installation media. Reboot your PC to check if Windows loads successfully.
Fix 5: Run System File Checker (SFC) and DISM Tools
When key Windows files are damaged or deleted, your system can’t start correctly and results in "Non-system disk or disk error, replace and strike any key when ready" issue. The SFC and DISM tools can scan and repair corrupted files automatically.
Boot from a Windows installation media or a recovery USB. Open Command Prompt from the Advanced options menu. Just like we do in the Fix 4. Type the following command and press Enter:
- sfc /scannow /offbootdir=C:\ /offwindir=C:\Windows
- dism /image:C:\ /cleanup-image /restorehealth
(Replace C: with the actual drive letter where Windows is installed if different.)
When finished, close Command Prompt and restart your computer. If the system files were the problem, Windows should now boot normally.
Fix 6: Test Hard Drive Health
If the error persists, it might indicate a failing drive. You can use tools like CHKDSK to check for logical and physical errors. Access Command Prompt window using the bootable media, execute the command and press Enter: chkdsk c: /f /r
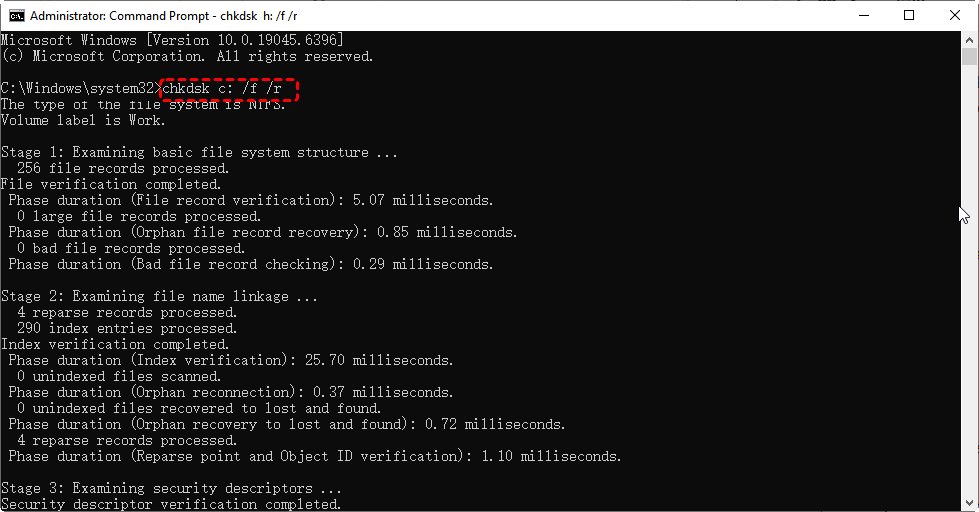
- /f fixes errors automatically.
- /r locates bad sectors and attempts readable information recovery.
Wait for the scan to complete — this may take some time depending on drive size. If serious errors or bad sectors are found, consider replacing your drive immediately.
Fix 7: Reinstall the OS
As the last resort, you can reinstall Windows and restore your files from backup.
Step 1. Remove the damaged drive and install a new HDD or SSD.
Step 2. Insert your Windows installation USB or DVD.
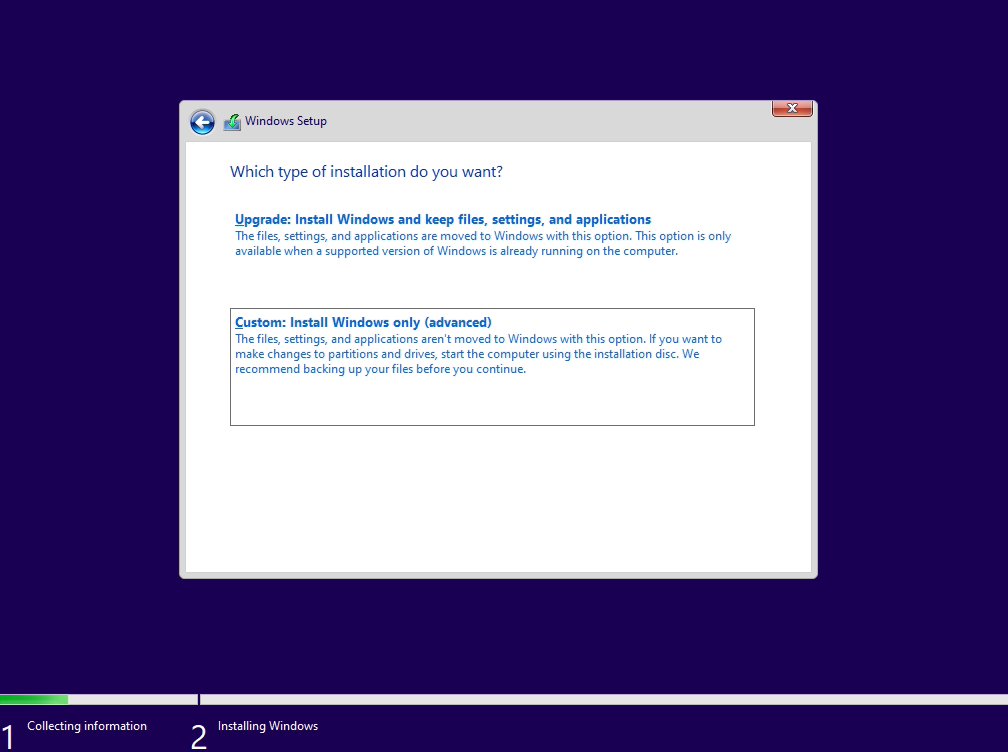
Step 3. Boot into the installer, choose Custom: Install Windows only (advanced), and follow the prompts.
Once Windows is installed, restore your personal files from backup.If you don’t have any backup, turn to professional data recovery software. Among all available options, MyRecover is a nice choice for its ease of use and high recovery success rate.

- ✨500+ Devices Supported | SSD, HDD, USB Flash Drive, SD Sard, etc.
- ✨1000+ File Formats Supported | PNG, MP4, MP3, TXT, ZIP, MSG, etc.
- ✨500+ Data Loss Scenarios | Deletion, Format, System Crash, Virus Attack, etc.
👉How to Recover Lost Data with MyRecover
MyRecover can help you recover files from a corrupted, formatted, or restore data from inaccessible drive before or after reinstalling Windows.
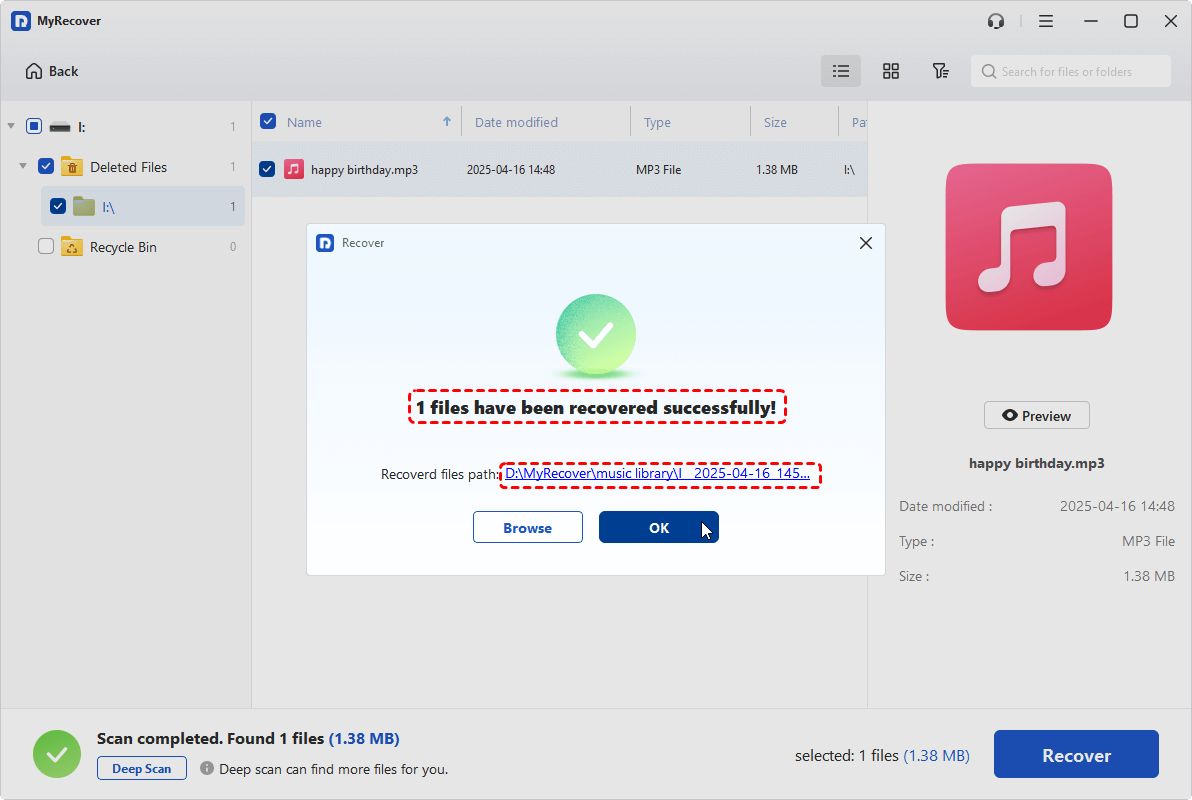
Step 1. Download and install MyRecover on a working computer.
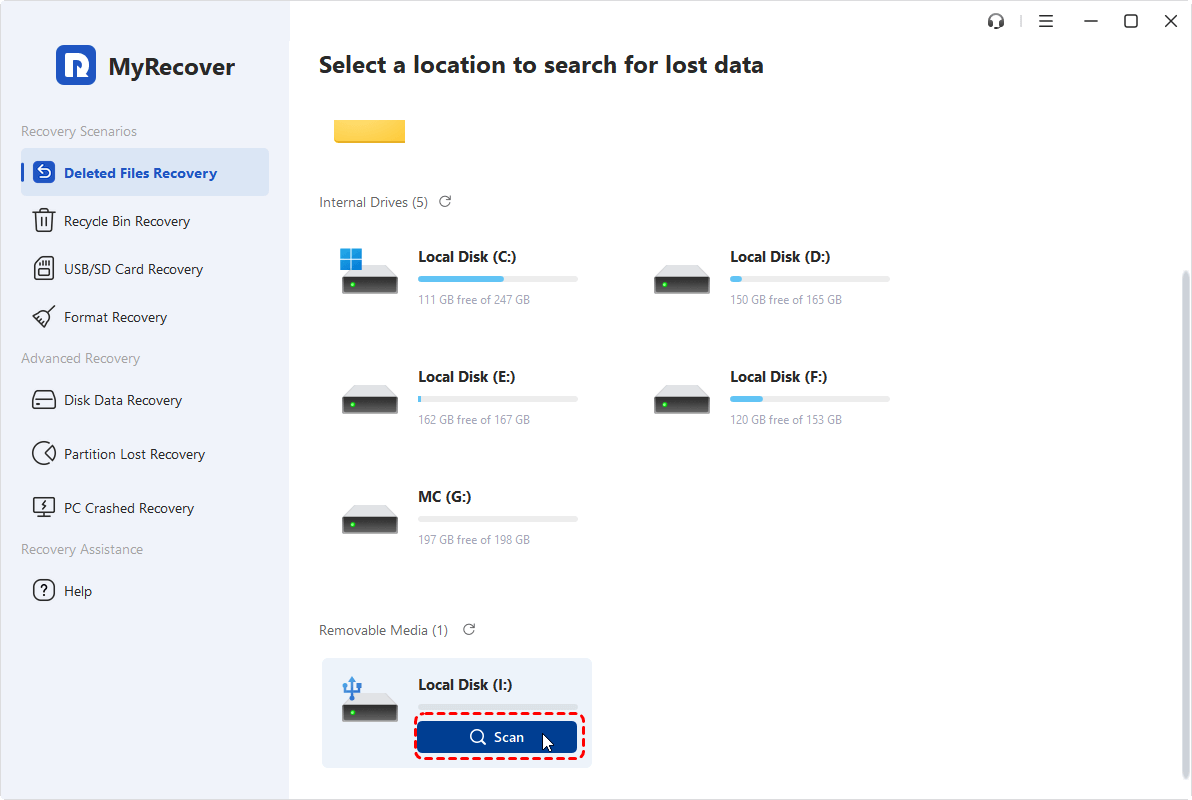
Ste[ 2. Connect your problematic drive (if removable) or select the drive you want to recover fromand click on "Scan".
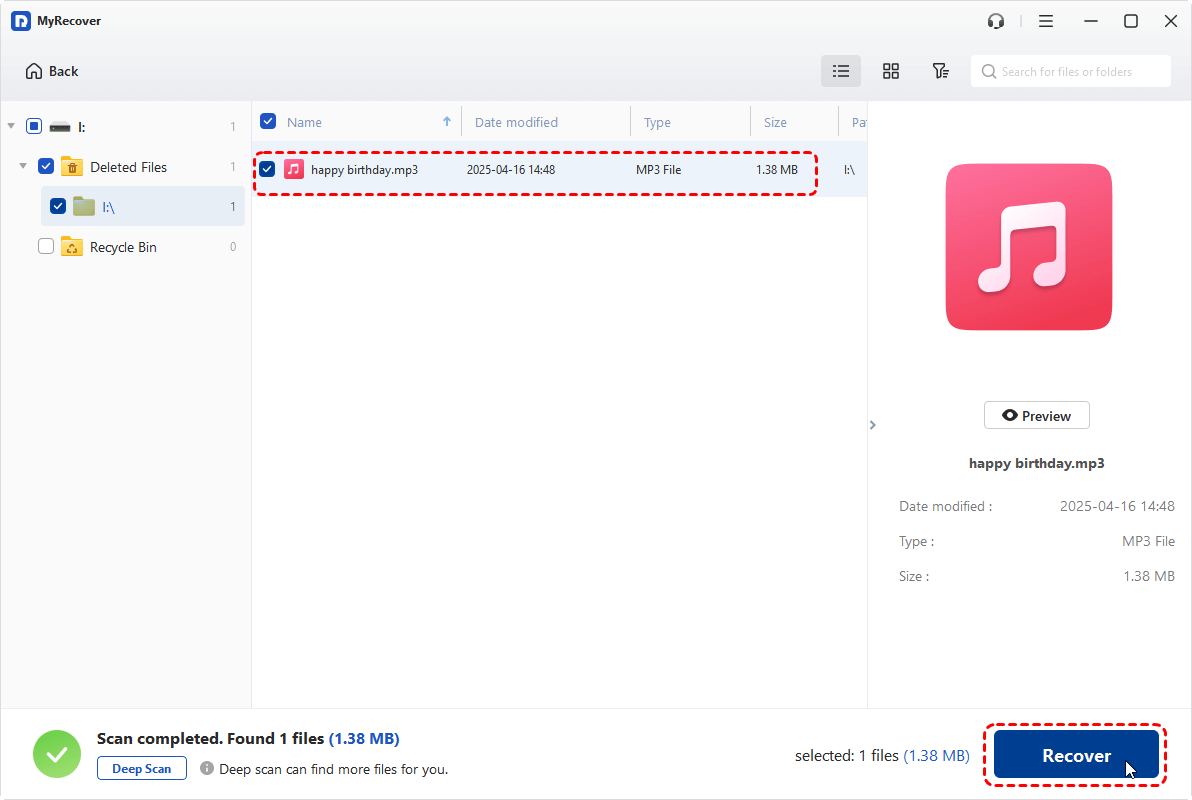
Step 3. MyRecover will automatically perform a quick scanora deep scan to locate all recoverable files.
Step 4. After the scanning, you can preview and select files you want to restore.Click "Recover" button.
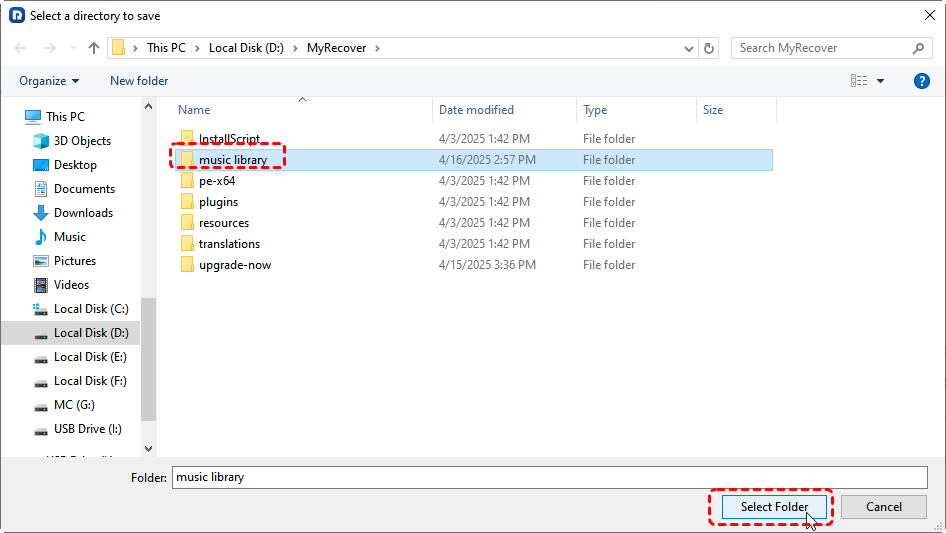
Step 5. Choose a safe location (different from the original drive) to save your recovered data.
To prevent data loss in the future, always maintain regular backups using Windows Backup and Restore, File History, or cloud storage services like OneDrive.
Final Thoughts
The "Non-system disk or disk error" on HP, Lenovo and other computes can seem alarming, but in most cases, it’s caused by a simple issue such as a wrong boot order, a loose cable, or a connected external drive. By carefully following the troubleshooting methods above,you can often get your computer back to normal without losing your data.
If your system is corrupted and you have to perform a clean reinstallation, remember that data recovery is still possible. Tools like MyRecover make it easy to retrieve important files even from unbootable computer, inaccessible partition, deleted drive, formatted drives, virus attack.


Stay Updated With Our
Latest Tips
Add us as a preferred source on Google to never miss helpful guides.