
How to Recover Android SD Card Format As Internal Storage?
Accidentally formatted your Android SD card as internal storage and lost important data? No need to panic. This tutorial explains how to recover your files safely using effective recovery tools and techniques. Whether it’s photos, videos, or documents, you’ll learn how to retrieve data from formatted internal SD cards storage on Samsung and other Android phones.
By Emma / Updated on November 3, 2025
User Query
I configured a Kingston 128GB SD card as internal storageon my Samsung phone that I use mainly for multimedia..A few weeks ago, the phone began showing connection issues with the SD card, and it eventually stopped recognizing it.
Interestingly, the card works fine on my computer.Now, when I insert the SD card into the computer, it prompts me to format it because it’s in EFI GPT format.Can i recover Android SD card format as internal storage.
Why User Format SD Card as Internal Storage?
Many Android users choose to format an SD card as internal storage to expand the device’s usable memory. This allows apps, photos, videos, and other files to be stored directly on the SD card, making it appear as part of the internal memory.
How to Format SD Card as Android Internal Storage?
Step 1. Insert the SD card into your Android device. Make sure it’s recognized by the system.
Step 2. Go to Settings > Storage > Device Name>.
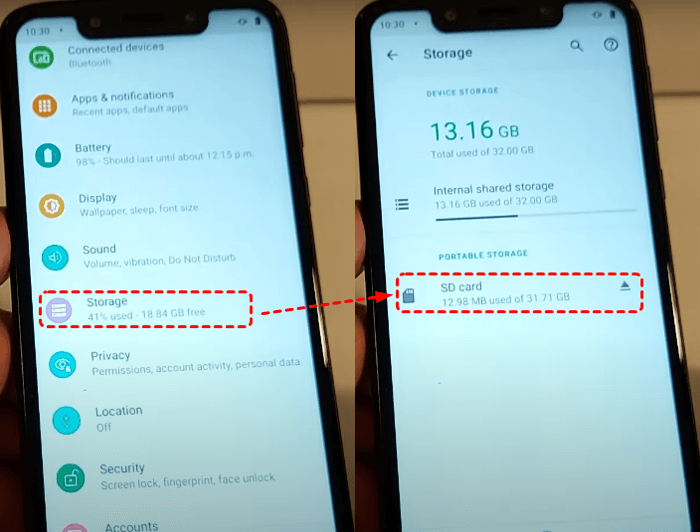
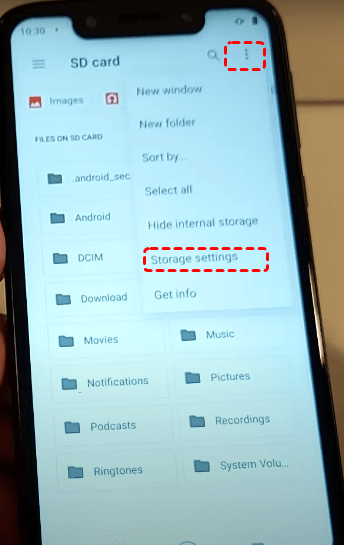
Step 3. Tap the three-dot menu in the upper-right corner. Select “Storage setting”.
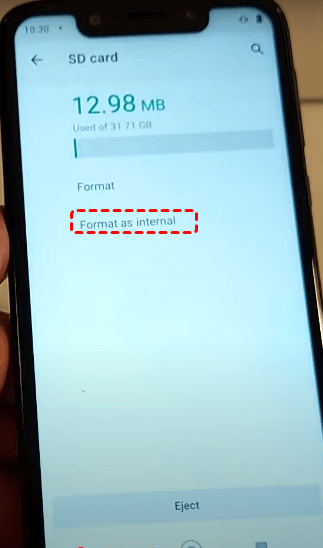
Step 4. Tap on “Format as internal” and confirm your operation.
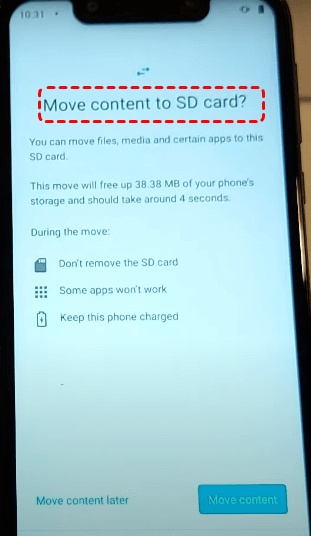
After formatting, you can choose to move apps and data to the SD card to free up internal storage. Wait for the process to complete. The SD card is now treated as part of your device’s internal storage.
- Note:✎...
- Once formatted as internal storage, the SD card is encrypted and can only be used with the device it was formatted on. Removing it may cause apps and data stored on it to become inaccessible.
How to Recover Android SD Card Format as Internal Storage
Recovering data from an SD card formatted as internal storage is more complicated than with a regular SD card because the data is encrypted and tied to the original device. So, we need to first make the SD card back to normal and then perform data recovery.
Preparation: Make an SD Card No Longer Internal Storage
First of all, we need to convert the internal SD card storage as a portable storage so it can be used like a normal SD card:
Step 1. Go to Settings > Storage (or Settings > Device Care > Storage on some devices).
Step 2: Tap on your SD card from the list of storage devices.
Step 3: Tap the three dots in the upper-right corner. Select “Format as portable” (or Use as portable storage on some devices).
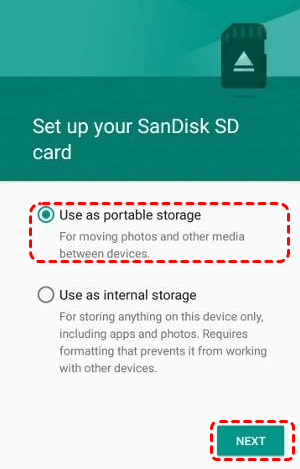
Step 4. Confirm the actionand wait for the process to complete
The SD card will be reformatted and now functions as portable storage. You can now access the data from other devices like computers.
Tools to Recover Android SD Card Formatted as Internal Storage
Once the SD card is recognized as portable storage, you can connect it to a working computer and use reliable recovery tools to scan and retrieve files, including photos, videos, documents, and backups. Make sure the SD card is detected by your operating system.
Popular SD card recovery options include:
A: TestDisk
B: Windows File Recovery Command
C: MyRecover
TestDisk
TestDisk is a free, open-source data recovery tool that can recover lost partition and files from SD cards, USB drives, and other storage devices.
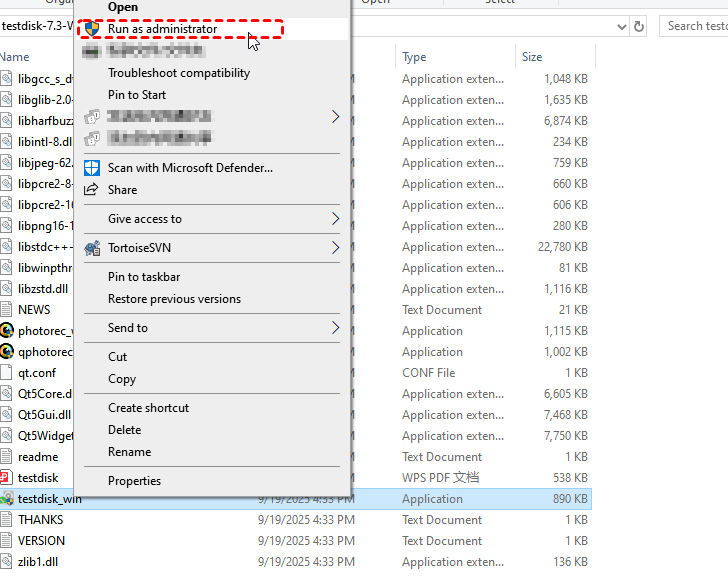
Step 1. Download TestDisk based on your operating system (Windows, Mac, and Linux). Here we are running Windows.
Step 2. Unzip and extract TestDisk, open the folder where the files are located. Right click the TestDisk.exe and choose “Run as Administrator”.
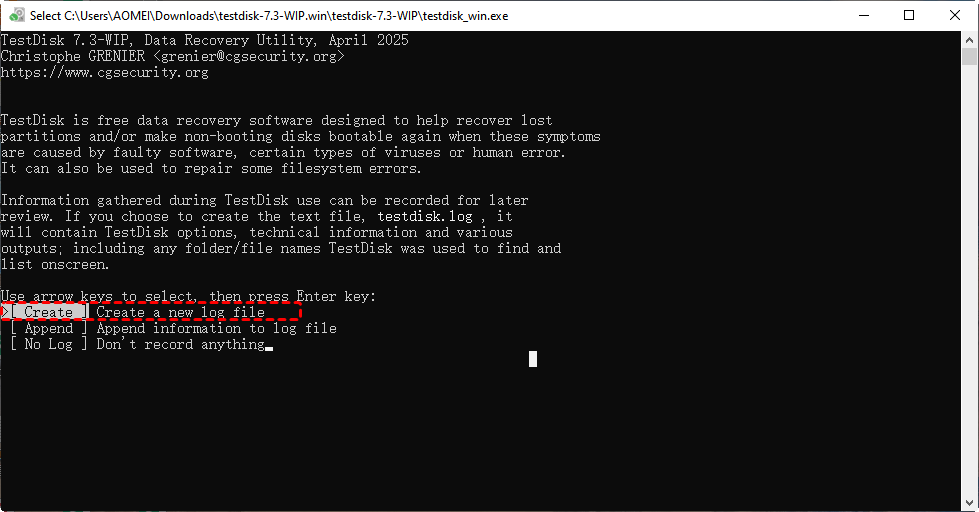
Step 3. Select “Create” to start a new log.
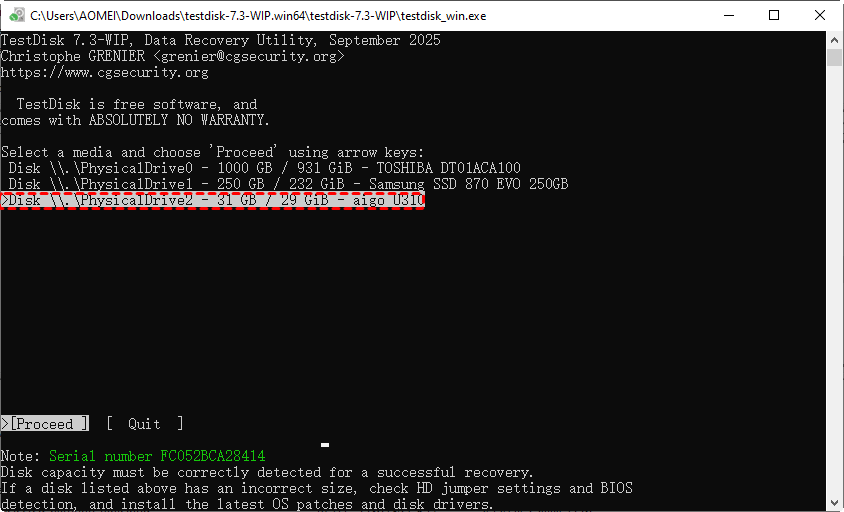
Step 4: Use up/down arrow keys to select your SD card from the list of drives. Press “Enter” to Proceed.
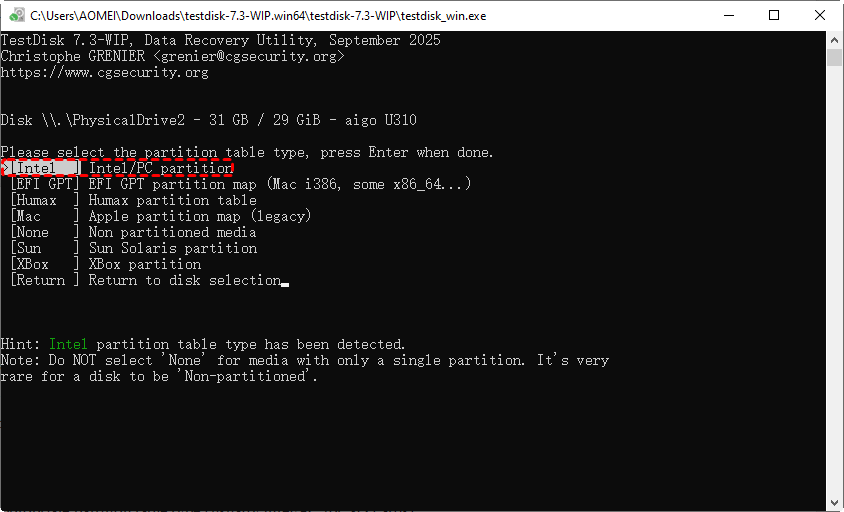
Step 5. Select the appropriate partition table type (usually the default value is the correct one as TestDisk auto-detects the partition table type.Intel/PC for SD cards). Press “Enter”to Proceed.
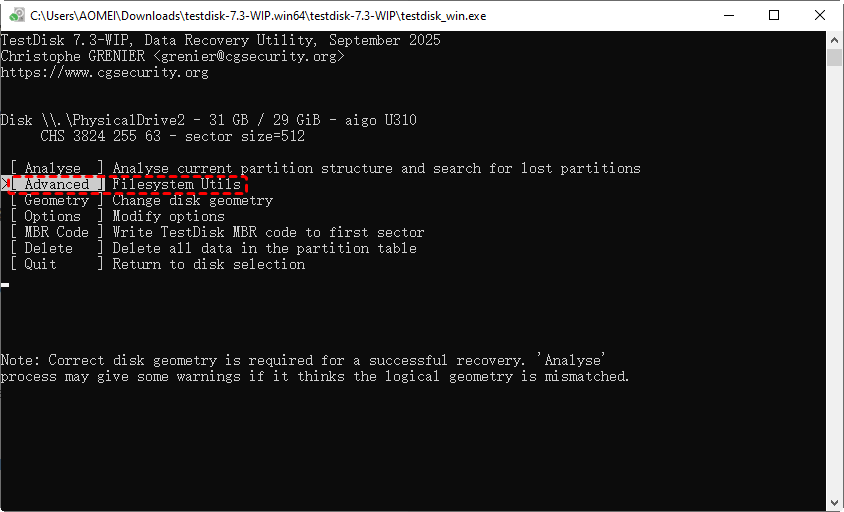
Step 6. Then choose “Advanced”.
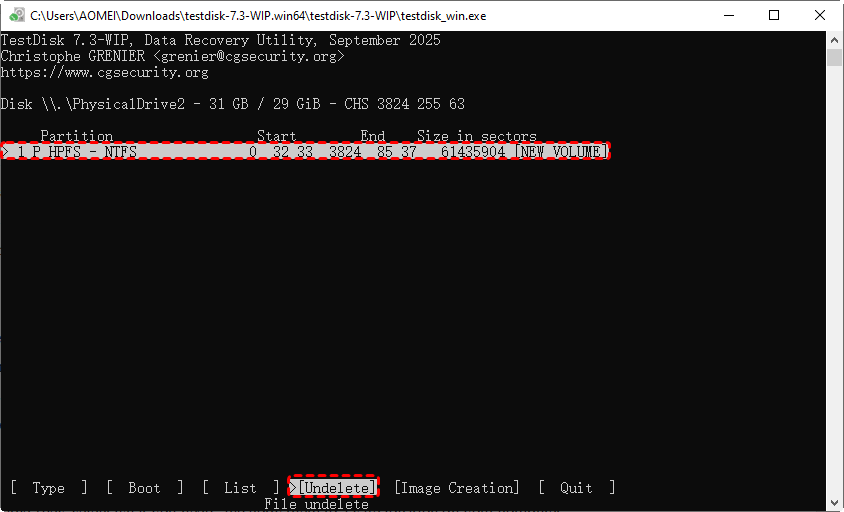
Step 7. Select the partition that was holding the lost files and choose “Undelete”.
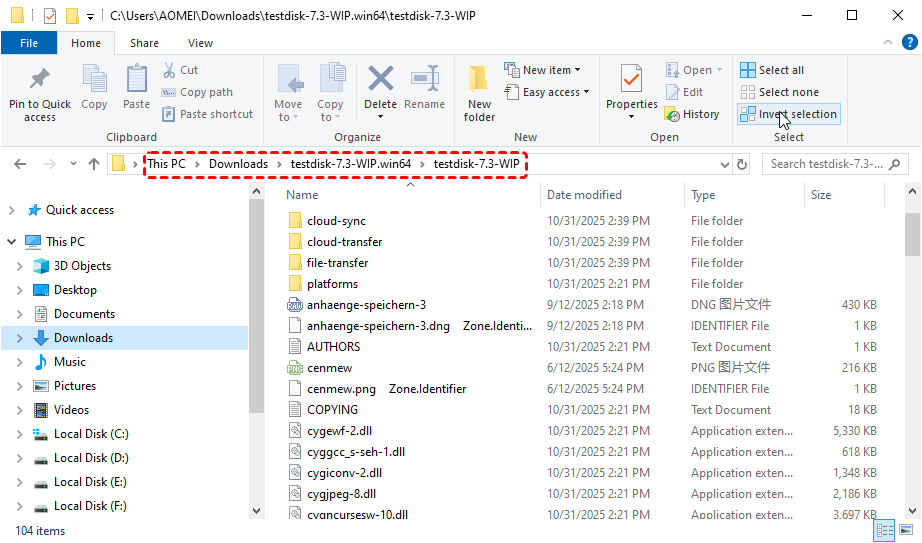
Step 8. Browse the recoverable files, you can select all of them by typing “a”, and copy them to a safe locationby typing “c” on your computer.
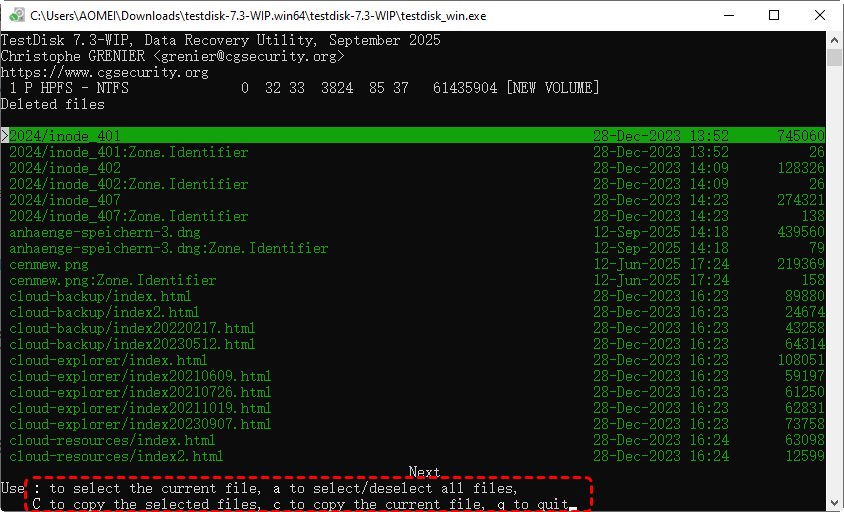
Step 9. Select where recovered files to be saved. When the copying process completes, use “q” to exit. Then go to the destination to check the recovered data from Android SD card format as internal storage.
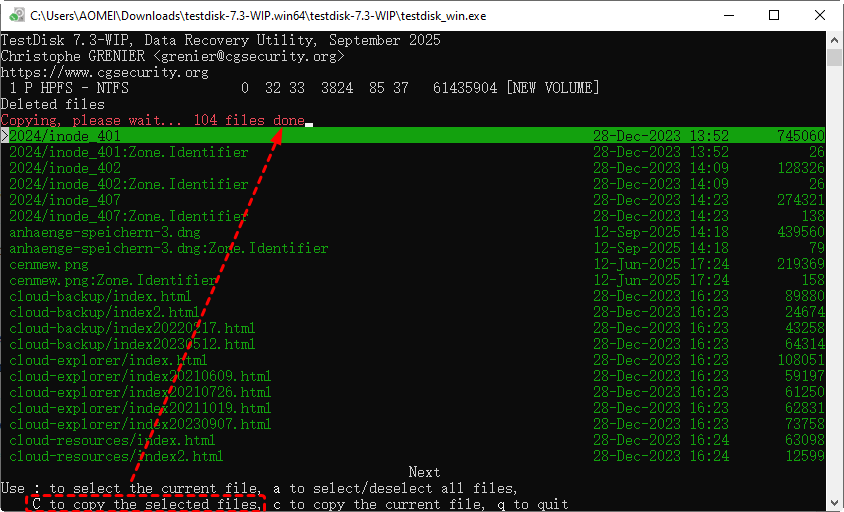
When you start recovering files, TestDisk opens the current working directory — usually the folder where the testdisk_win.exe program is located (C:\Users\YourName\Downloads\testdisk-7.2-WIP\). So unless you manually navigate elsewhere, TestDisk saves the recovered files in the same folder.
Windows File Recovery Command
Windows File Recovery is also a command-line tool (developed by Microsoft), aiming to help users recover deleted or lost files from local drives, USB drives, and SD cards. It’s available for Windows 10 (version 2004 and later) and Windows 11 through the Microsoft Store.
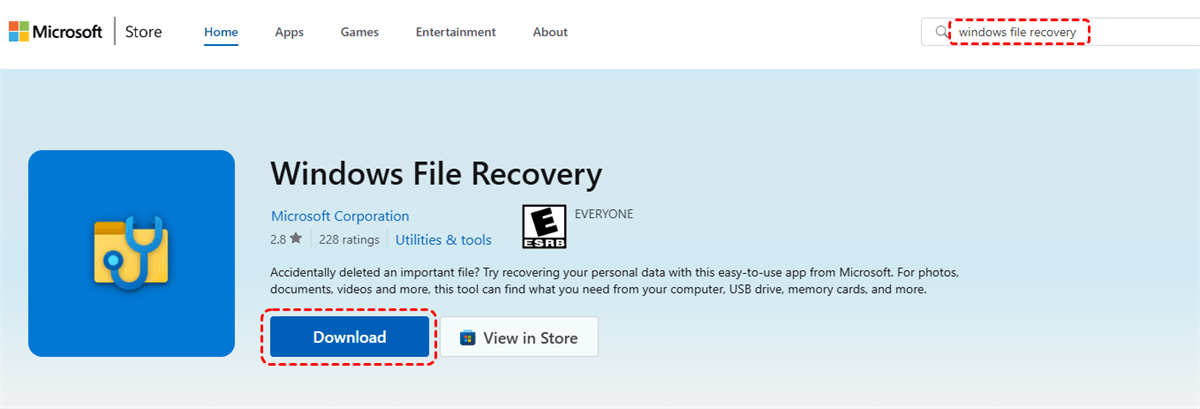
Step 1. Open Microsoft Store, search for Windows File Recovery, download and install it on your computer.
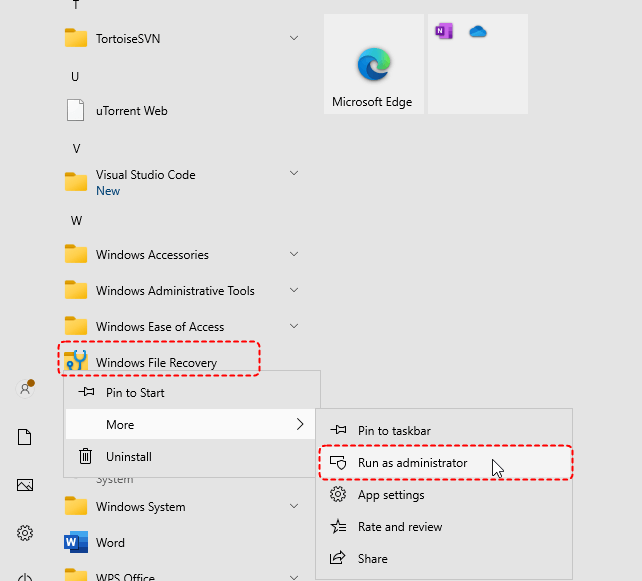
Step 2. Press “Windows + S”, search for “Windows File Recovery”, right-click it, and choose “Run as administrator”.
Step 3. Use the basic syntax: winfr source-drive: destination-drive: [/mode] [/switches].
For example, run winfr E: F: /extensive /n *.mp4 to recover all mp4 files from your SD card (E:) to another drive (F:).
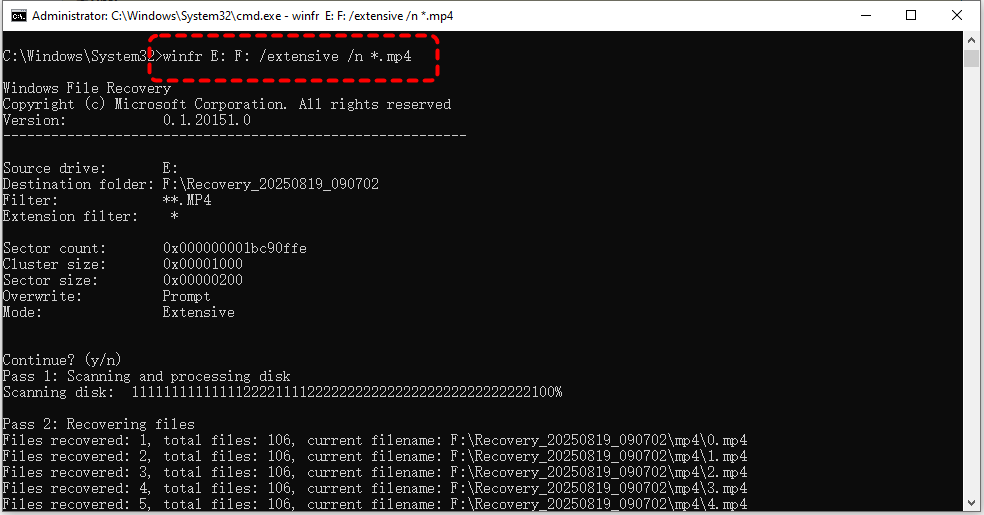
Step 4. Choose the appropriate mode. Regular mode works for recently deleted files, while Extensive mode is better for formatted or corrupted SD cards.
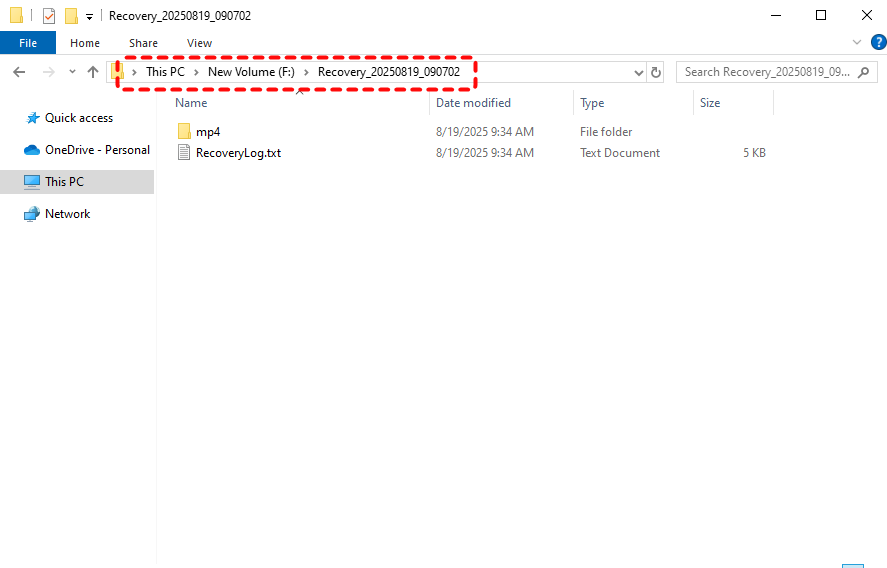
Step 5. Wait for the scan to finish. The recovered data will be saved automatically in a folder named “Recovery_[date]” on your destination drive after the recovery completes.
MyRecover
The two tools mentioned above are powerful but rely heavily on command-line operations, making them more suitable for users who are comfortable with technical tools or familiar with command-line interfaces. In contrast, MyRecover is highly recommended for both beginners and professionals thanks to its intuitive interface, broad compatibility, and convenient file preview feature before recovery.

- 💖High Success Rate– Achieves up to 99% recovery success,.
- 💖AI-Powered Recovery– Uses AI recognition and deep scanning technology.
- 💖Broad Compatibility – Supports 1000+ file formats and 500+ storage devices.
- 💖Versatile Functionality – Handles 500+ data loss scenarios.
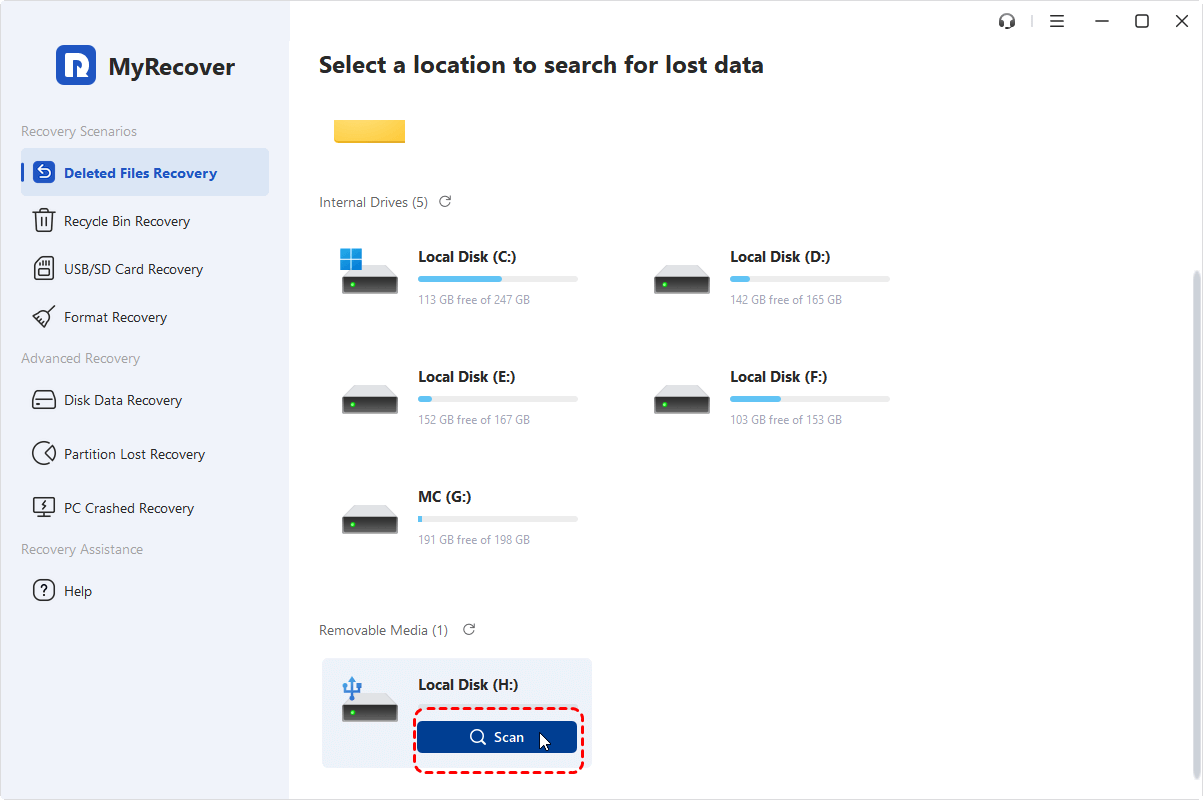
Step 1: Download and install MyRecover from the official website, then launch the program.
Step 2: Select the target drive from the list of detected disks and click “Scan” to begin scanning for lost files.
Step 3: Wait for MyRecover to perform a quick or deep scan automatically.
Step 4: After the scan, use the search or filter options to locate specific itemsand preview the recoverable files if you want. Select the target files, click “Recover”.
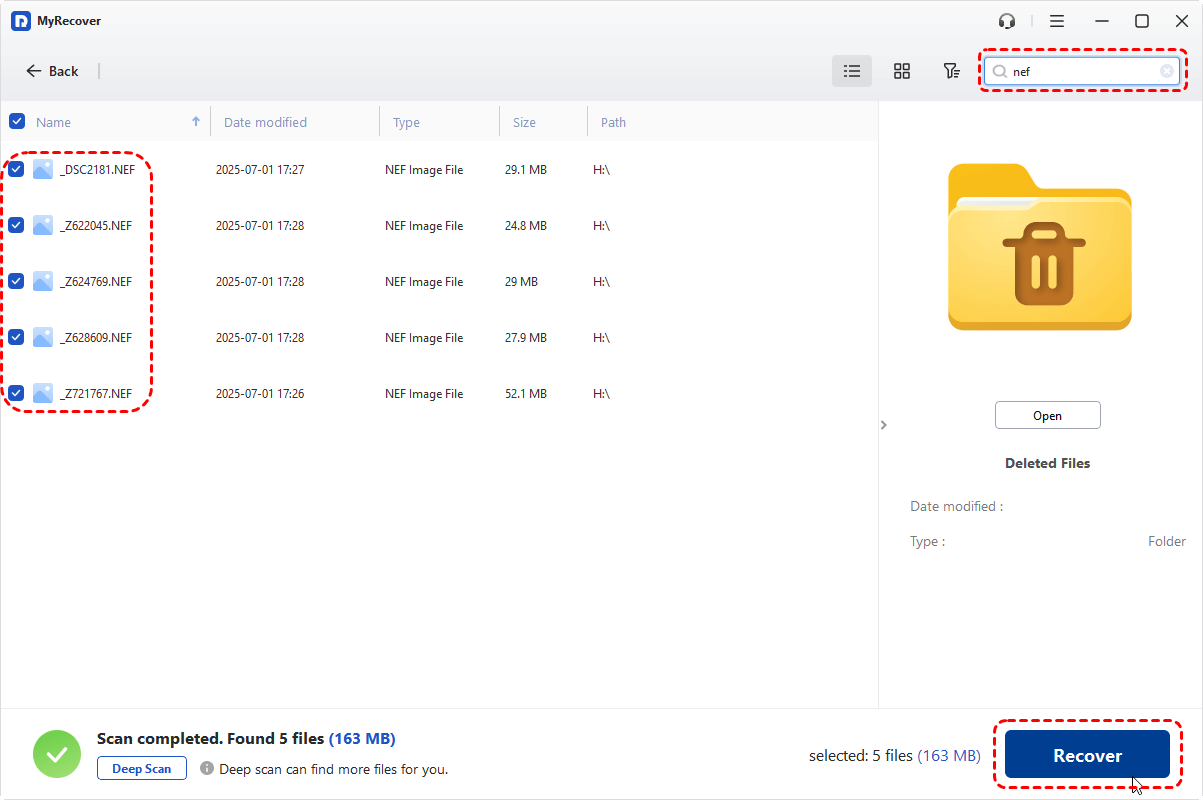
Step 5: Save them to a different location instead of the original SD card to prevent data overwriting.
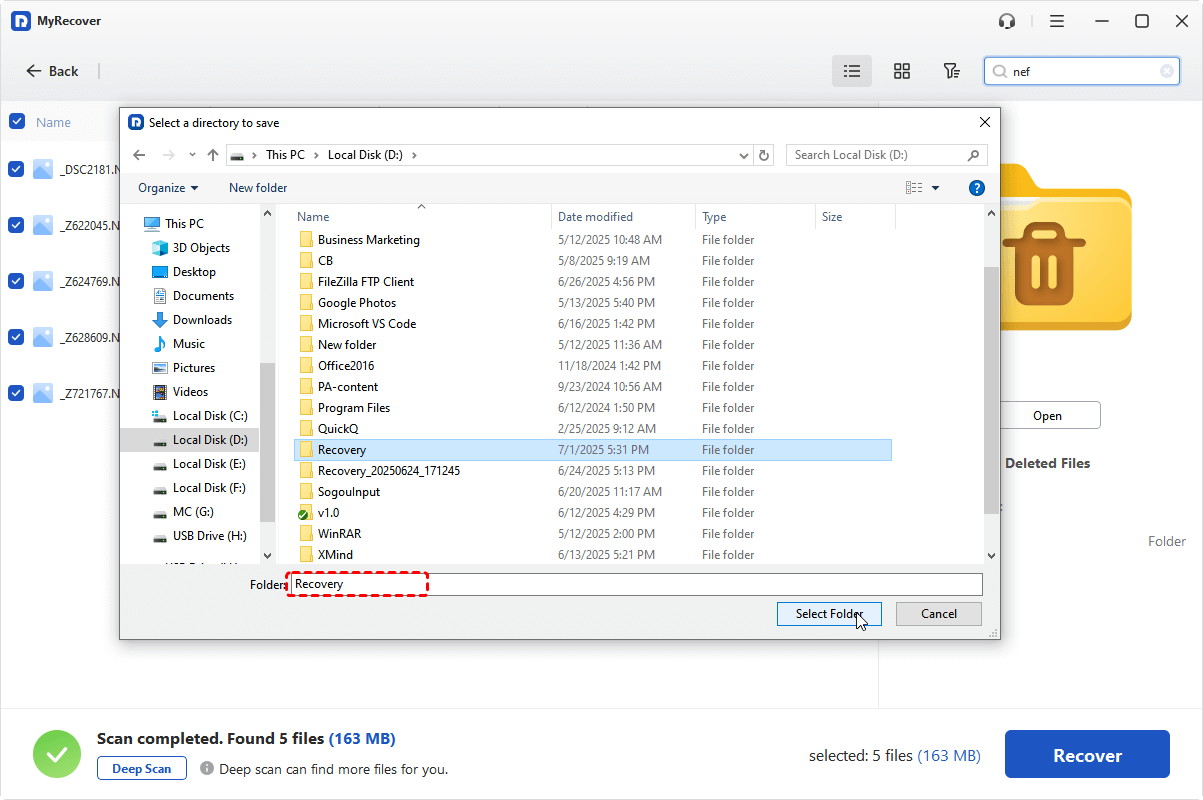
Step 6. When the process of recovering Android SD card format as internal storage completes, you will see a mini window indicating how many files have been successfully restores and where they are saved.
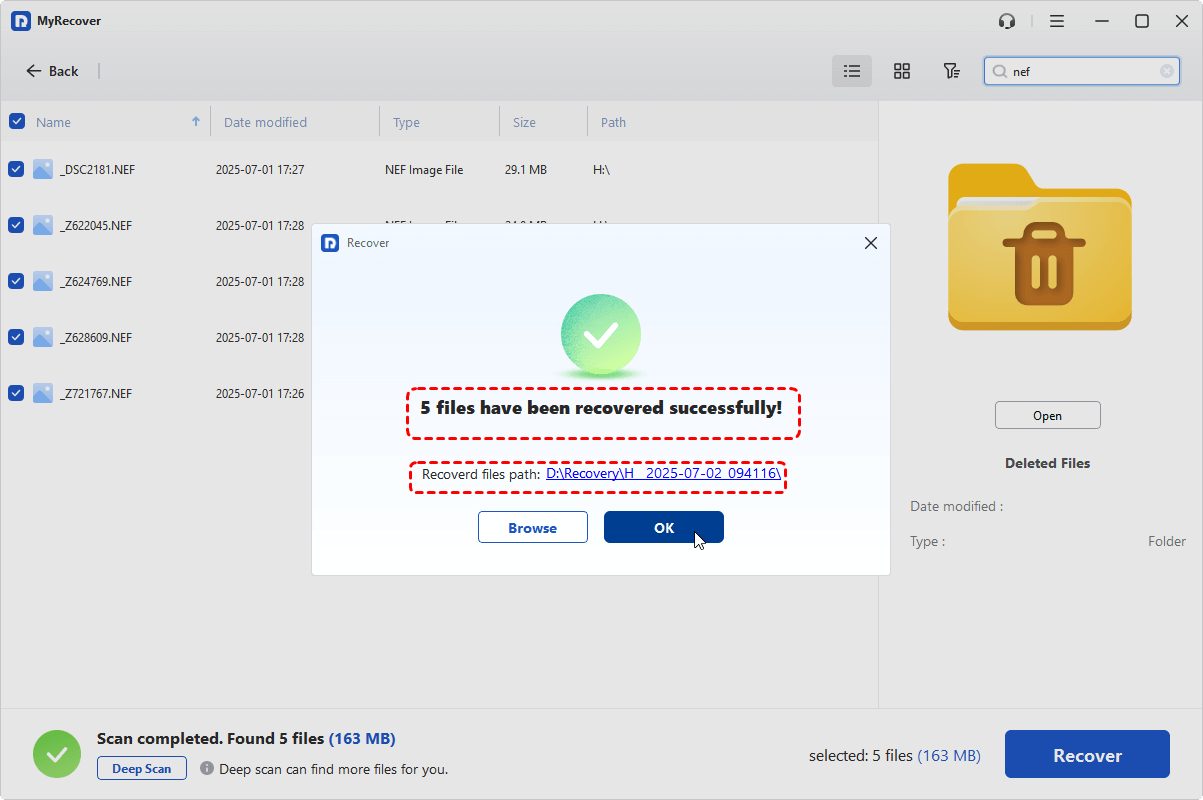
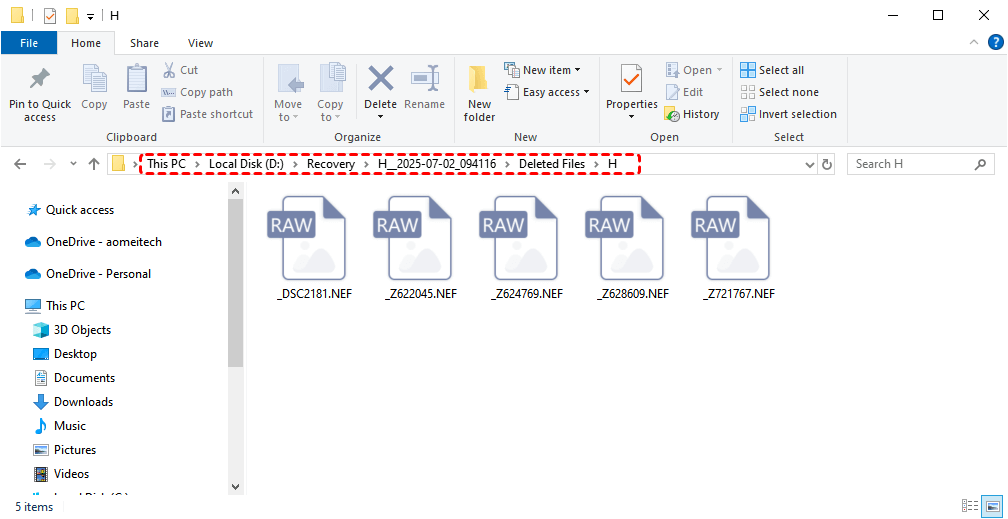
To check the recovered files, click on the blue path link or “Browse” button.
In the End
Recovering data from an Android SD card formatted as internal storage can be challenging because the data is encrypted and tied to the original device. However, by first converting the card back to portable storage, it becomes possible to scan and recover accessible files using specialized tools.
While TestDisk and Windows File Recovery provide powerful recovery capabilities, they require command-line expertise and are best suited for advanced users. MyRecover, on the other hand, offers an easier and more intuitive recovery experience for both beginners and professionals. To use this powerful tool on unlimited devices or offer professional data recovery services to your clients, consider upgrading to Technician.


Stay Updated With Our
Latest Tips
Add us as a preferred source on Google to never miss helpful guides.