
How to Recover BMP File That Was Accidentally Deleted: 5 Easy Methods
Losing a BMP file can be frustrating, especially when it contains important images or graphics. This article outlines five simple ways to recover your BMP file. Each method is explained step-by-step, making it easy for both beginners and experienced users to follow.
By Aria / Updated on November 20, 2025
Overview of BMP File
A BMP (Bitmap) file is one of the most widely used image formats for storing raster graphics. Developed by Microsoft, the BMP format is often used in Windows environments for its simplicity and lossless quality. It stores image data as a grid of individual pixels, which is why BMP files can become quite large, especially for high-resolution images.

Despite the large file sizes, BMP files offer several benefits, such as high-quality image storage without compression, making them ideal for editing or printing. However, due to their size and lack of compression, they can easily be lost or damaged if not backed up properly.
How to Recover Deleted BMP Files on Windows
Losing BMP files, whether accidentally deleted or lost due to a system issue, can be frustrating. However, Windows offers several recovery methods which can help you restore your lost images. Below are some methods to retrieve BMP files on Windows, let's explore them one by one.
1. Restore from Recycle Bin
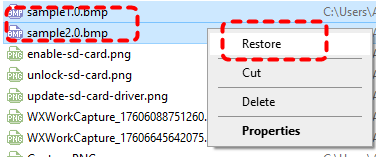
The first step in recovering any deleted file, including BMP files, is to check the Recycle Bin. Windows temporarily stores deleted files here, and if the file hasn’t been permanently deleted, you can easily restore it.
Step 1. Double click on the Recycle Bin icon on the desktop to open it.
Step 2. Browse through the deleted items and select the BMP files you wish to recover.
Step 3. Right click on them and choose "Restore" to return them to their original location.
If the deleted files fail to be moved to the Recycle Bin, it means they may have been permanently deleted. In this case, if you have any backups, you can still restore them in just a few simple steps.
2. Restore Your Files in File History
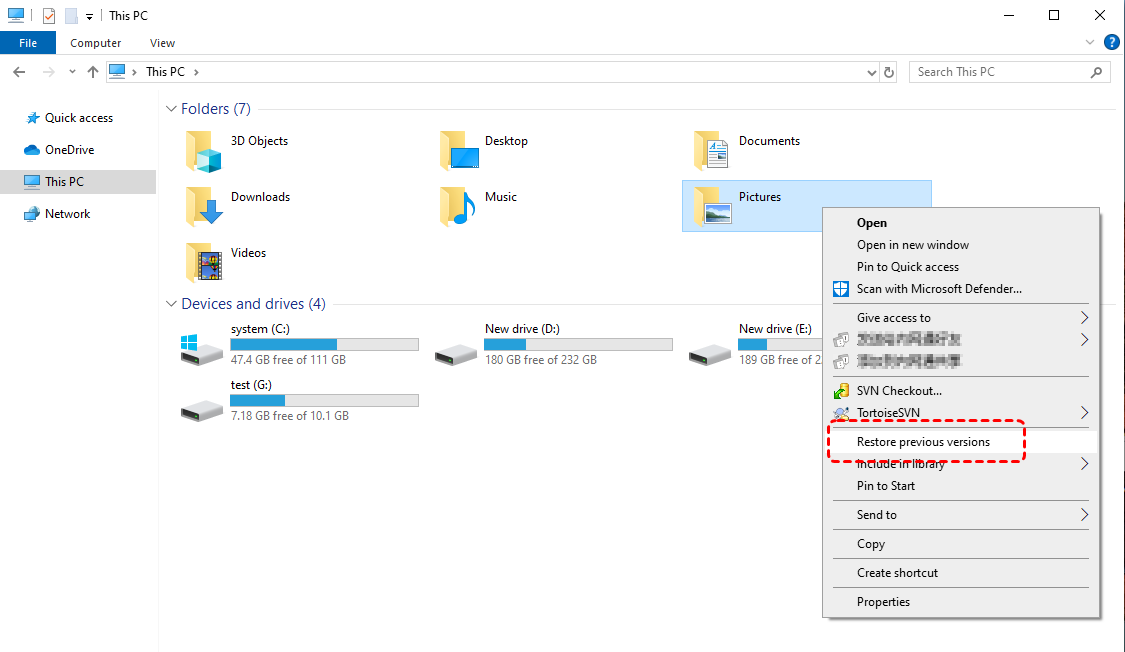
File History is a feature in Windows that automatically backs up files stored in certain directories. If you’ve enabled File History on Windows before the file loss, you can easily recover the lost BMP file from previous versions.
Step 1. Locate the folder or drive where the deleted BMP files were stored in File Explorer.
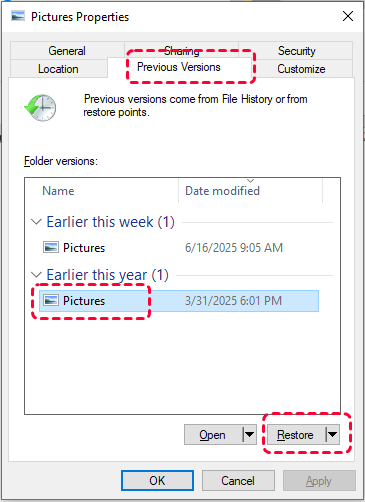
Step 2. Right click on it and choose "Restore previous versions" from the context menu. A list of versions will be displayed.
Step 3. Browse through previous versions of your files, select a version you want based on the backup time and click "Restore" to retrieve it.
3. Recover from Backup and Restore (Windows 7)
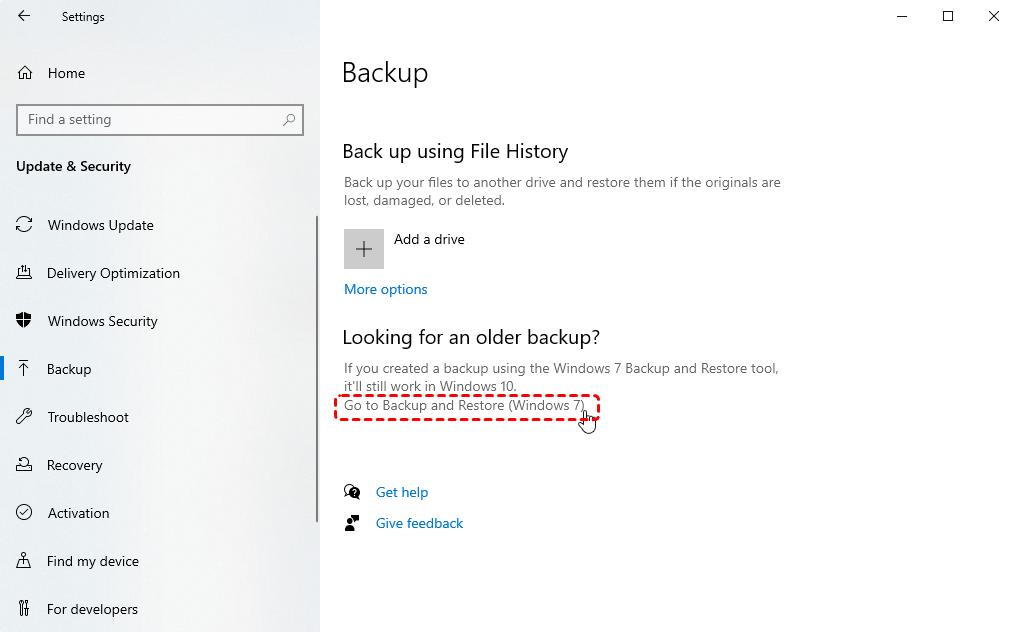
Backup and Restore (Windows 7) is a built-in backup tool which allow you to create copies of your files, folders and system image. When the need arises, you may directly restore these files from the backups that you have made. Here's the steps:
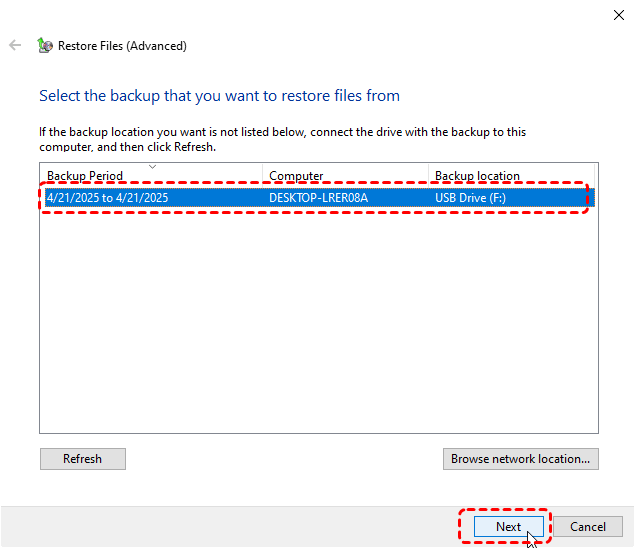
Step 1. Open "Backup Settings" in the Start menu and click on "Go to Backup and Restore (Windows 7)" to open it.
Step 2. Click "Restore my files" and choose a backup including your deleted BMP files to restore files from.
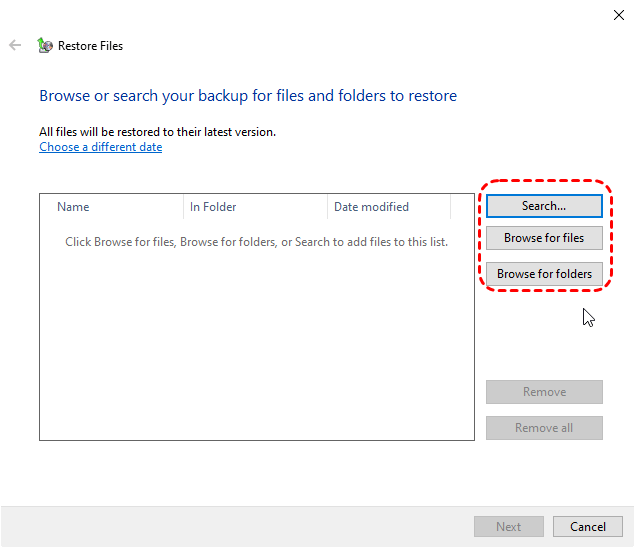
Step 3. Select the files you wish to recover by clicking on "Browse for files/folders" and click "Next".
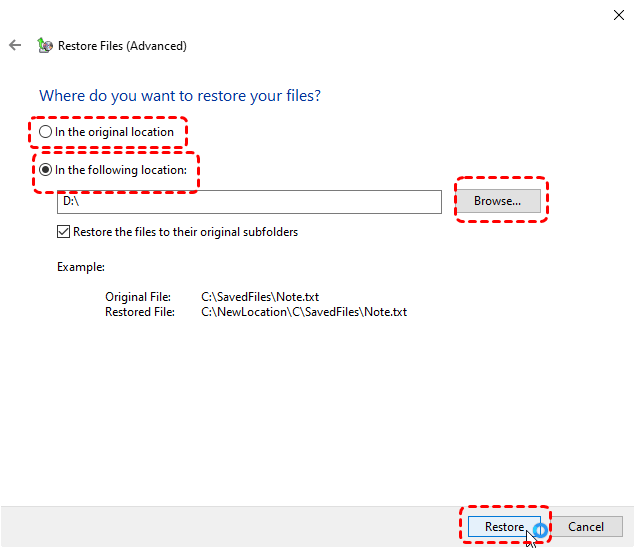
Step 4. Choose a safe destination folder and click "Restore" to start the process.
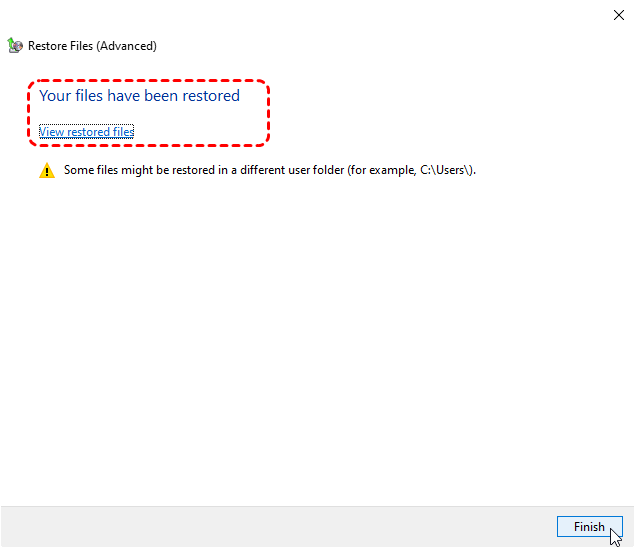
When the process is completed, the message "Your files have been restored" will pop out. You can check the recovered files by clicking on "View restored files".
4. Run Windows File Recovery Command
Windows File Recovery is a free tool provided by Microsoft that helps recover permanently deleted files from various types of drives, including hard drives, USB flash drives, and SD cards. The tool works by scanning the drive for lost files and trying to recover them. But note that it's only compatible with Windows 10 and later versions.
Step 1. Download and install Windows File Recovery on your computer from Microsoft official website.

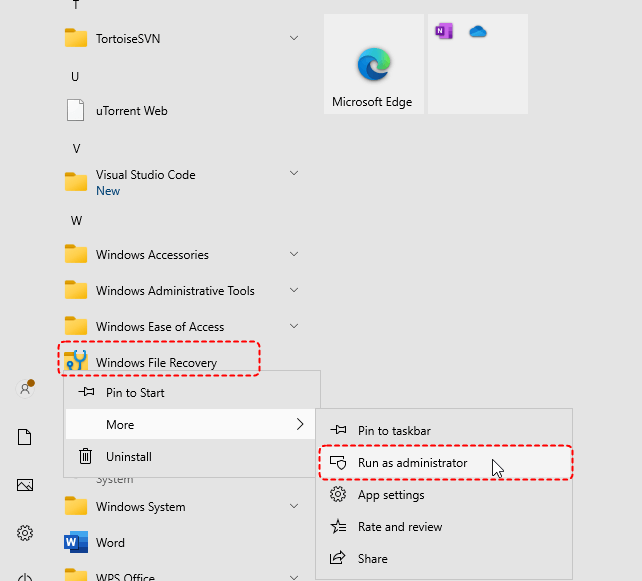
Step 2. Locate Windows File Recovery in the Start menu and right click on it, choose "Run as administrator".
Step 3. Type the following command "winfr F: E: /regular /n *.bmp" and hit "Enter" key. Replace the drive letters "F" and "E" with your actual drive letters.
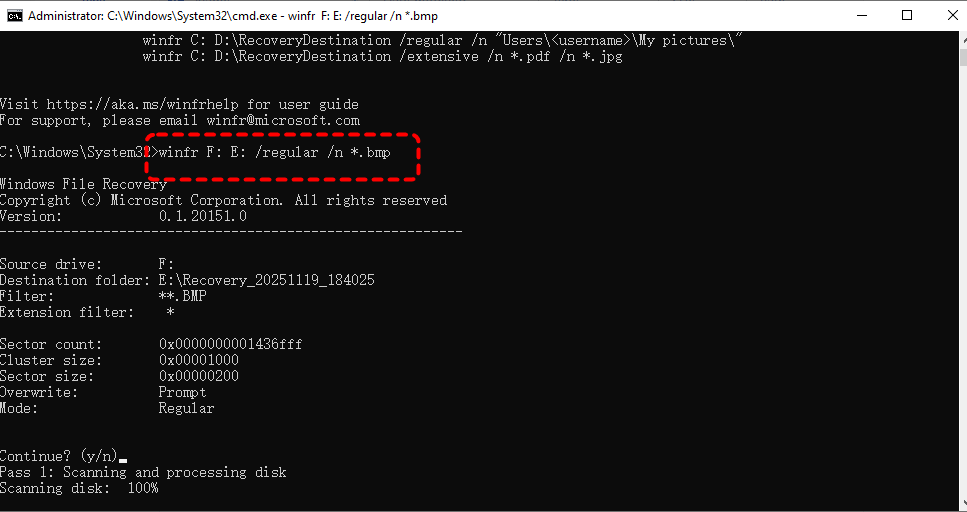
- Notes:✎...
- F: the source drive letter.
- E: the destination drive letter.
- /regular: the scan mode. It means to perform a quick scan for the target drive. If your drive uses FAT or exFAT file system, please switch to "extensive" mode.
- /n *.bmp: the filter command. Only recover the files with ".bmp" extension.
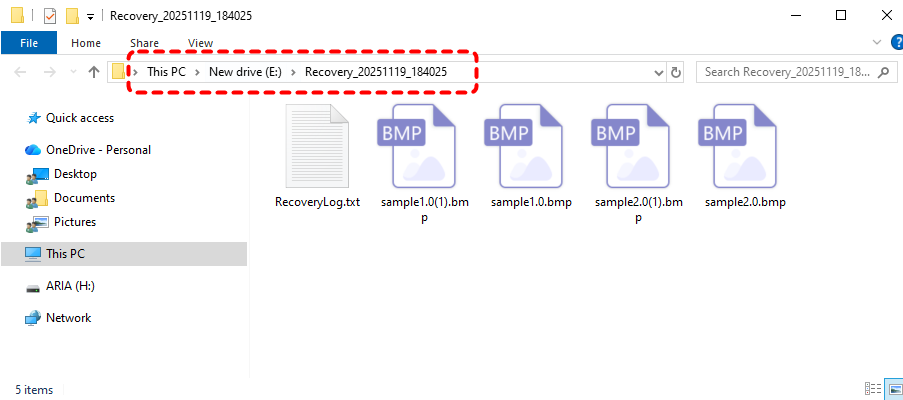
Wait for the process to complete, you can check the recovered files by pressing "y".
Obviously, great caution must be exercised when utilizing Windows File Recovery. This tool requires users to possess basic proficiency in the command line. In the absence of such proficiency, minor errors including spelling mistakes and omitted spaces will result in the failure of data recovery, and may even generate the error such as "there was an error parsing your command".
5. Recover Deleted BMP File with MyRecover
While Windows File Recovery is a great free option, MyRecover provides a more comprehensive and user-friendly solution for recovering lost BMP files, especially for those who prefer an easy-to-use interface and greater reliability. Here’s why MyRecover stands out as the best BMP file recovery tool:
✅User-Friendly Interface: It simplifies the recovery process with a clear, step-by-step interface that even beginners can follow.
✅Supports 1000+ File Formats: Unlike basic recovery tools, MyRecover can recover a variety of file types, including BMP, RAR, PNG, ARW and more.
✅Deep Scan: It performs a deep scan of your drive, increasing the likelihood of recovering files even after the drive has been formatted or corrupted.
✅Recover Files 500+ Data Loss Scenarios: MyRecover can recover files from unrecognized or inaccessible drives, emptied Recycle Bin, deleted partition, etc. making it ideal for data recovery.
Step 1. Download and install MyRecover on your computer from Microsoft Store, avoid installing it on the drive with lost files.
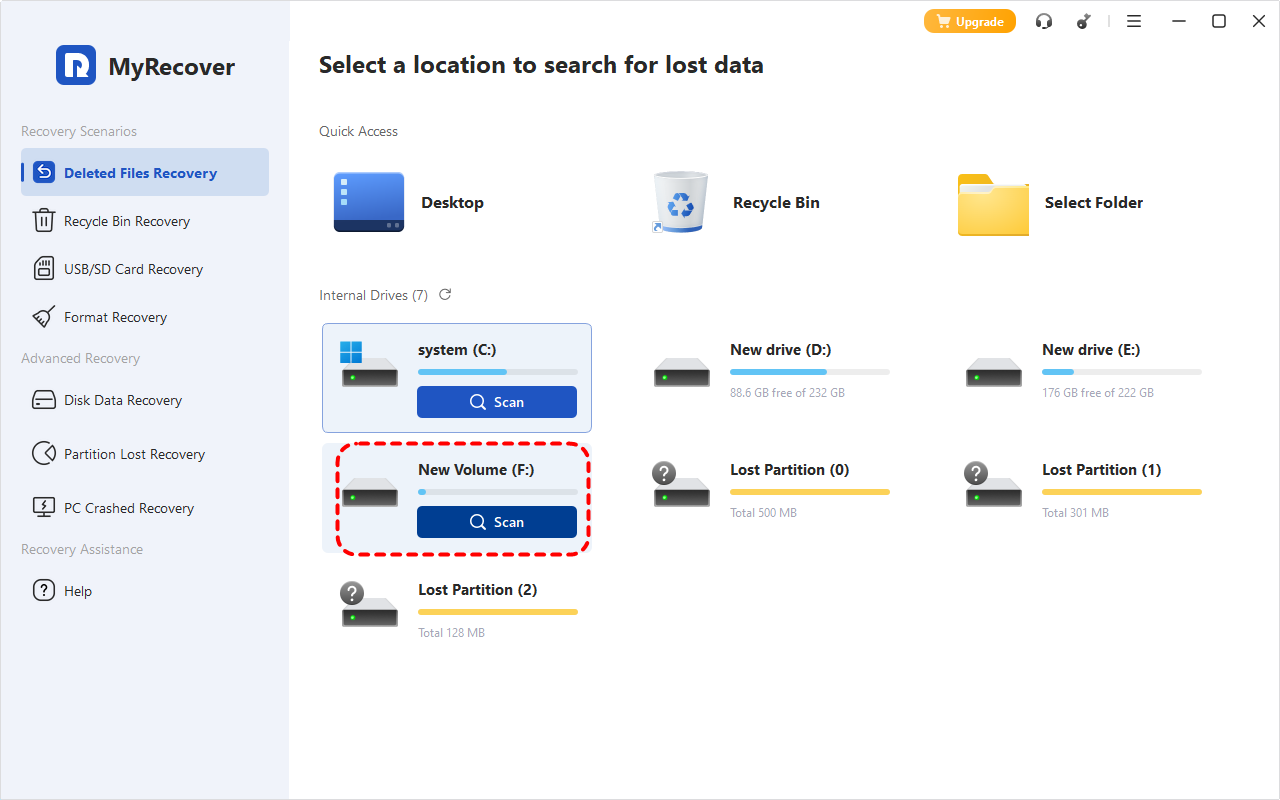
Step 2. Run the program and select the drive to scan for lost files, then click "Scan".
Step 3. Under the "Type" tab, locate the "bmp" folder where stores all the files with "bmp" extension and click "Recover".
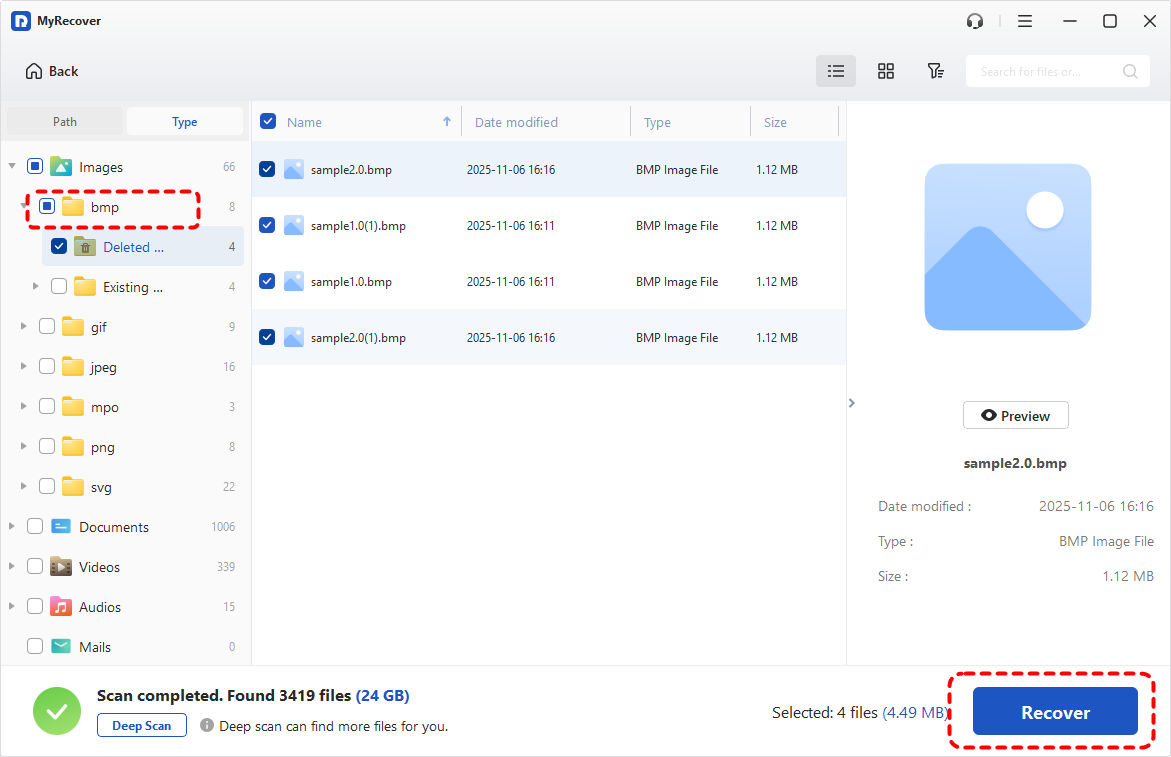
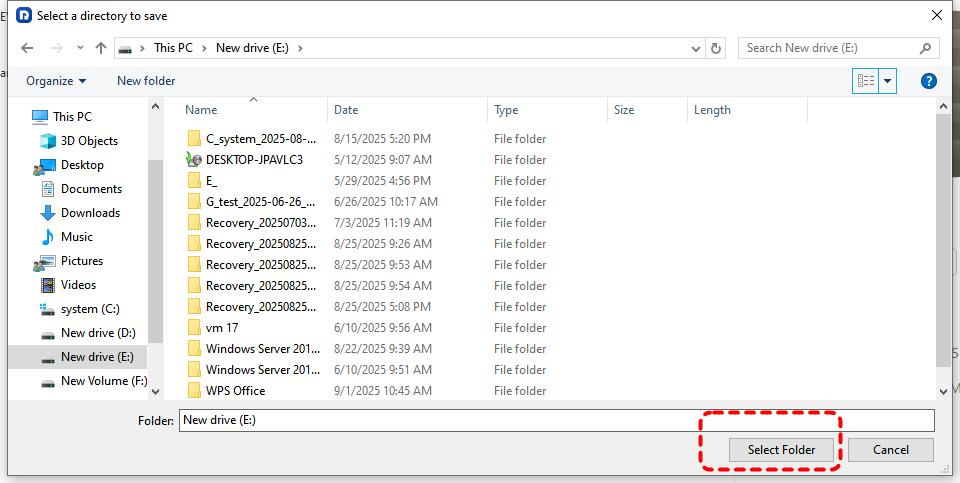
Step 4. Select a safe location to save the recovered files.
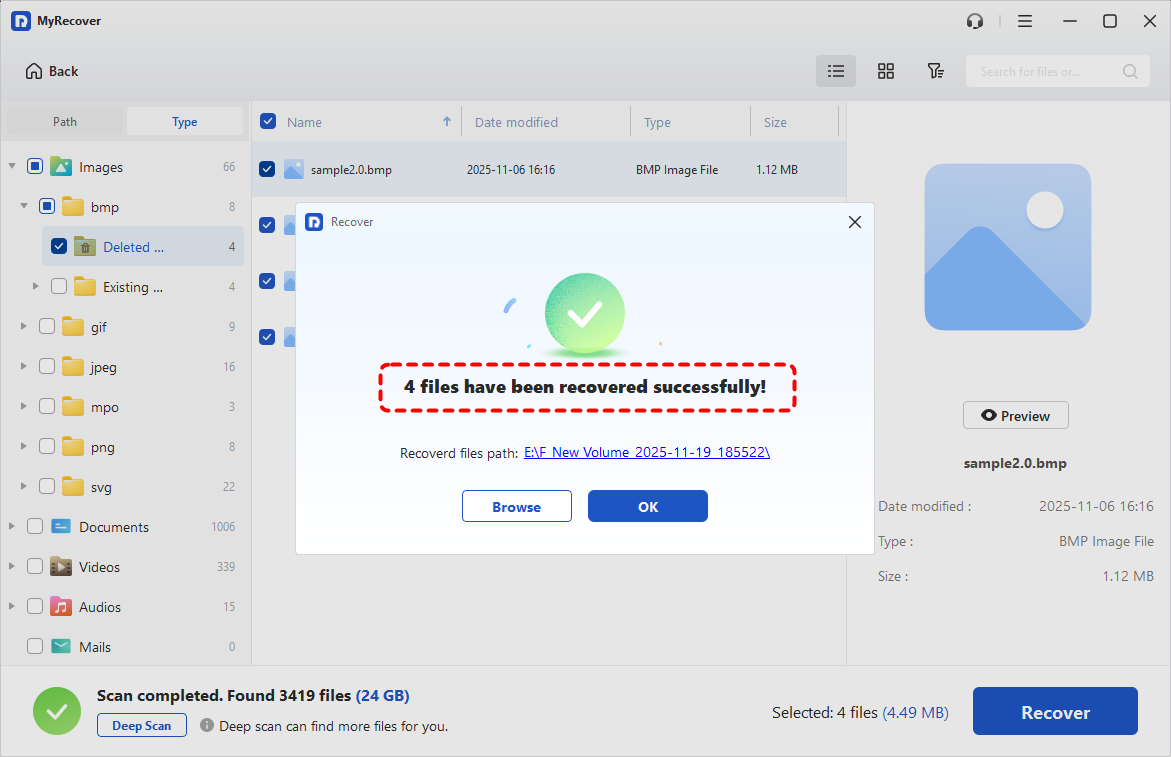
Once the process is done, you'll see the message "Files have been recovered successfully". Then you can view and verify the recovered files by clicking on the destination folder path or "Browse" button.
Summary
Losing important BMP files can be irritating, but there are several recovery methods available on Windows, including checking the Recycle Bin, using File History, restoring from a backup, or utilizing Windows File Recovery. If these methods don’t work, third-party tools like MyRecover offer a more efficient and user-friendly way to recover BMP files.
To prevent future data loss, it’s always a good idea to implement regular backup routines and make use of cloud storage. For professionals and those handling valuable image files, MyRecover’s Professional version offers unlimited recovery and the ability to preview files, and even powerful data recovery from the unbootable system.


Stay Updated With Our
Latest Tips
Add us as a preferred source on Google to never miss helpful guides.