
How to Recover Files from Temp Folder in Windows 11 or Windows 10?
Discover effective ways to recover deleted or unsaved files from the temp folder in Windows 10 and Windows 11. This comprehensive guide walks you through step-by-step methods to locate and restore temporary files, including Word and Excel documents, helping you retrieve lost data quickly and easily.
By Emma / Updated on July 22, 2025
What Is the Temp Folder?
Temporary folders in Windows are hidden directories where the system and applications like Microsoft Word or Excel store unsaved, auto-recovery, cached, and installation-related files. These temporary files can often be recovered after a system crash, app error, or accidental closure, making the Temp folder a valuable location when you’ve lost a Word document, Excel spreadsheet, or accidentally deleted other important data.
Where can You Find Temporary saved files?
Before you begin recovering files from the Temp folder in Windows 11 or Windows 10, it's important to know where these temporary files are stored. By default, Windows stores them in the following location: C:\Users\\AppData\Local\Temp
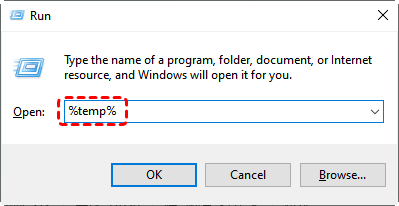
You can quickly access this folder by pressing "Win + R", typing "%temp%", and hitting "Enter". This will open the Temp folder directly, where you can search for unsaved Word, Excel, or other temporary files.
How to Recover Files from Temp Folder?
Once you've accessed the Temp folder as the above mentioned, recovering your lost or unsaved files involves a few simple steps. Here’s how to proceed:
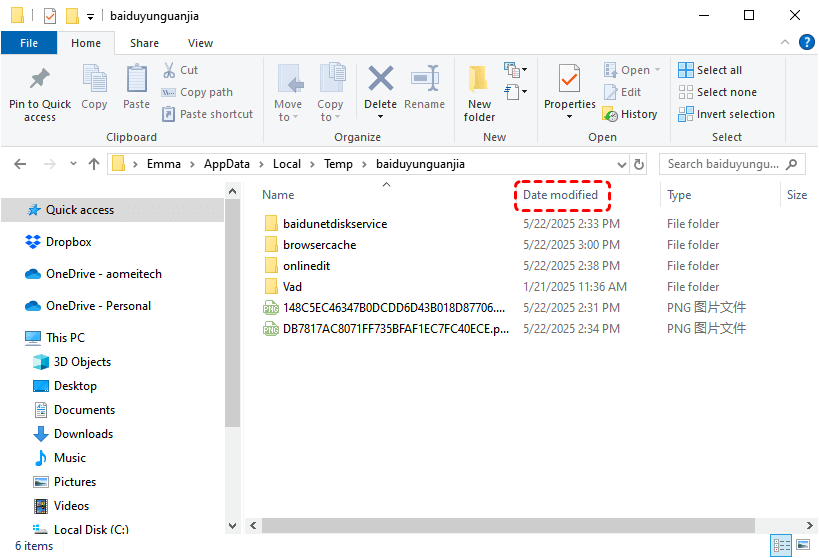
✅ Step 1: Sort by Date Modified
In the Temp folder, click on the "Date modified" column to sort files. This helps you quickly find recently created or edited files—especially useful if you just experienced a crash or accidentally closed a document.
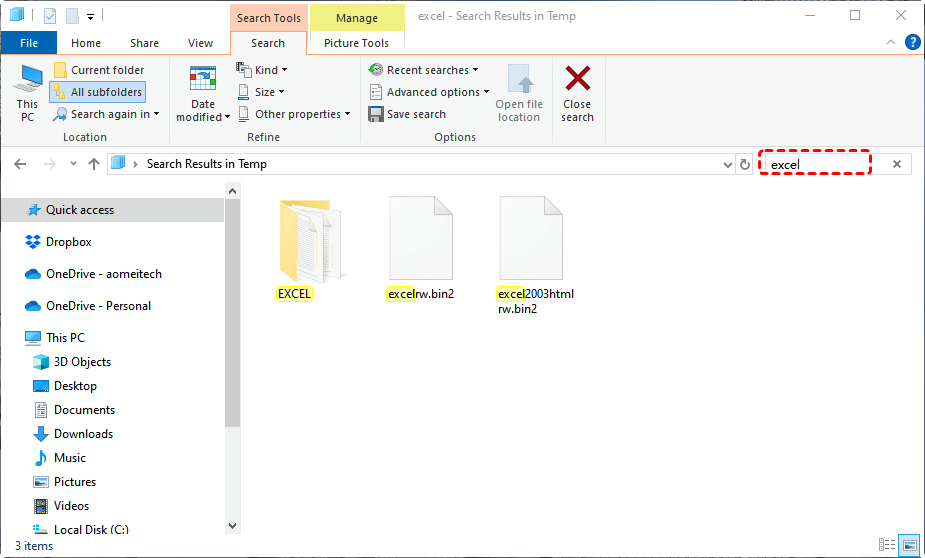
✅ Step 2: Identify the File Type
Look for files that match the type you're recovering:
- To recover word files from Temp folder, search for files starting with "~WRL".
- To recover excel file from Temp folder, searching for files including names like "~Excel" or similar.
✅ Step 3: Rename the File Extension
If the file is found but has a ".tmp" extension, try renaming it:
- Change ".tmp" to ".docx" for Word
- Change ".tmp" to ".xlsx" for Excel
Then open it with the corresponding application.
✅ Step 4: Move to a Safe Location
Once verified, copy the recovered file to another folder (e.g., Desktop or Documents) to prevent it from being deleted automatically by Windows.
What if You Failed to Recover Files from Temp Folder?
If you can’t find or open the lost files in the Temp folder, don’t worry—there are still other effective ways to recover your data. Below are a few reliable methods to try when recovery from the temp folder fails:
1. Check AutoRecover or Unsaved Files in Microsoft Office
If you tried to recover Word or Excel filesfrom Temp folder but failed, alternatively, you can turn to their AutoRecover feature. In some cases, the program itself will suggest recently auto-recovered files.
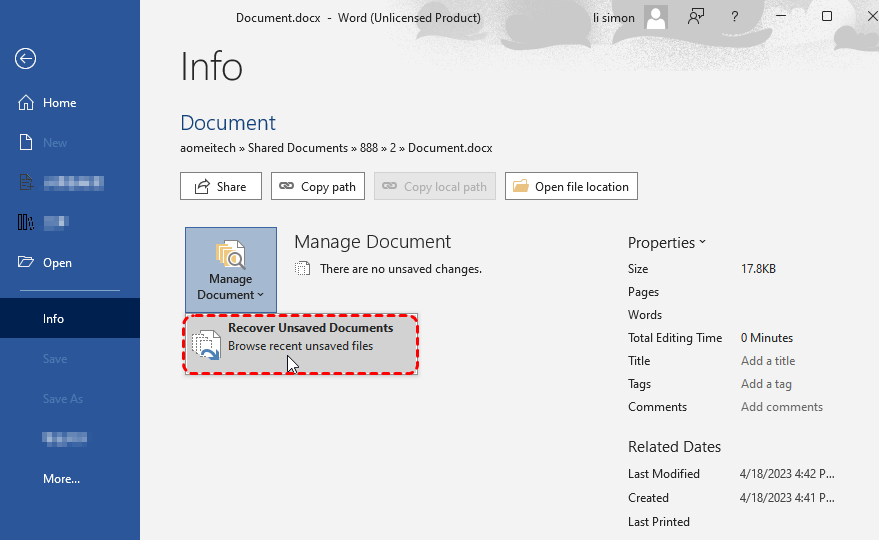
1. Open Word or Excel.
2. Go to "File > Info > Manage Document"(Word) or "Manage Workbook"(Excel).
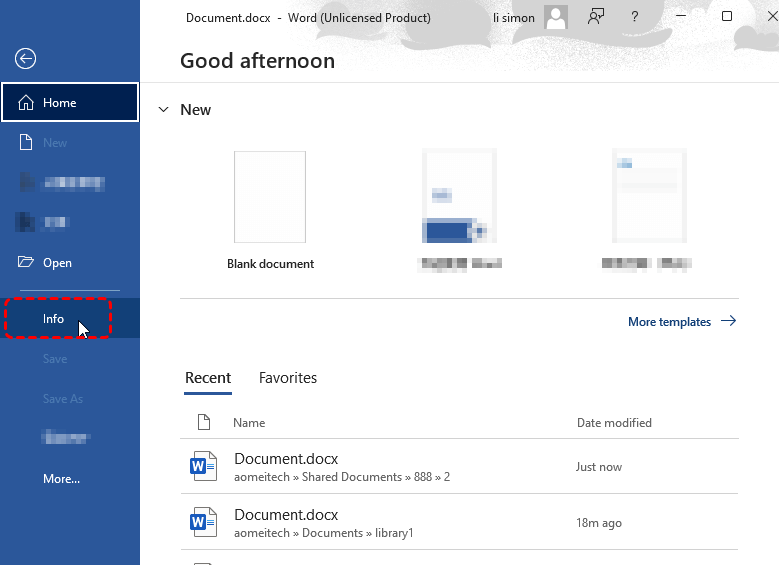
3. Click "Recover Unsaved Documents" or "Recover Unsaved Workbooks".
4. Browse the list and open any available autosaved .asd files (which is an AutoRecover file automatically created by Microsoft Word to temporarily save your work in case of unexpected shutdowns).
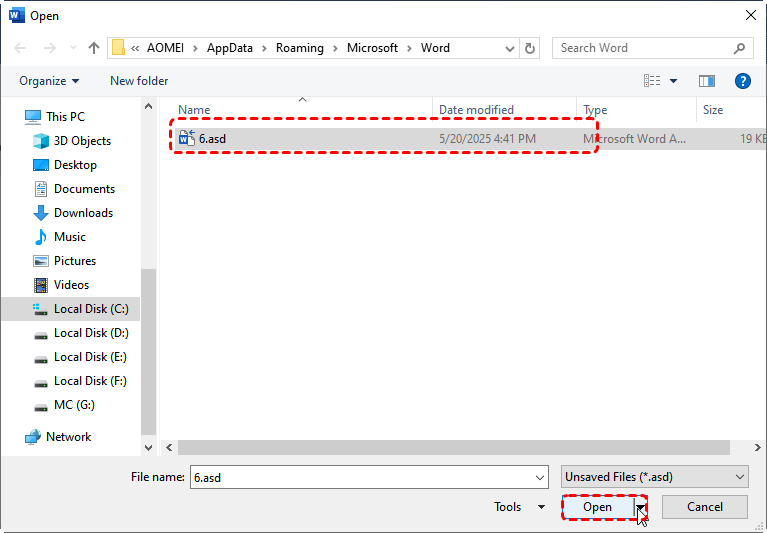
5. Save it immediately as a .doc or docx file to a secure location.
2. Restore from File History or Previous Versions
If you failed to recover files from the Temp folder, and File History or System Protection was enabled on your device, you may still be able to restore previous versions of the folder where the file was originally saved.
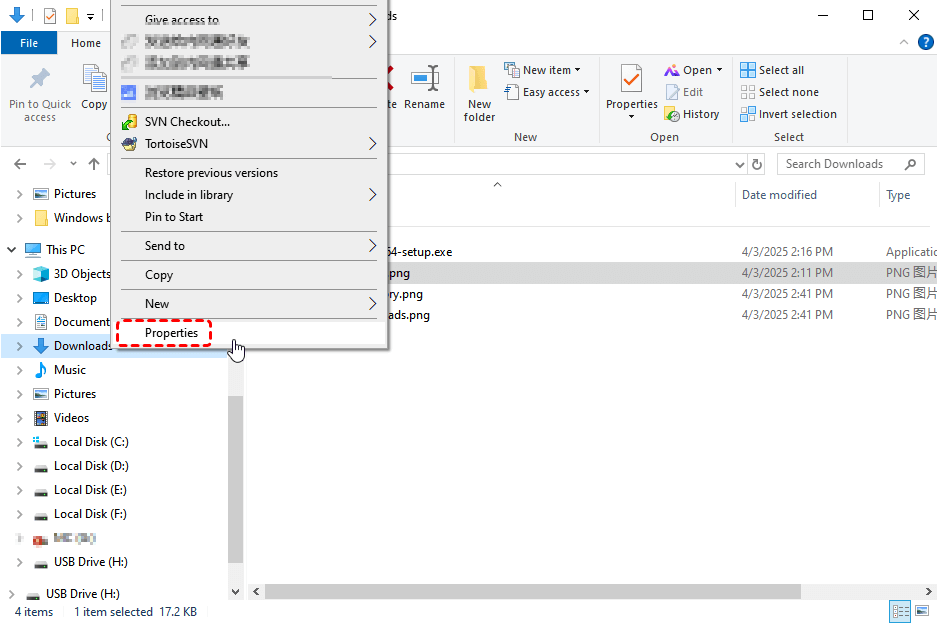
1. Go to the folder where the file was saved before it was lost or deleted. For example, Documents, Downloads, or any custom path you were working in.
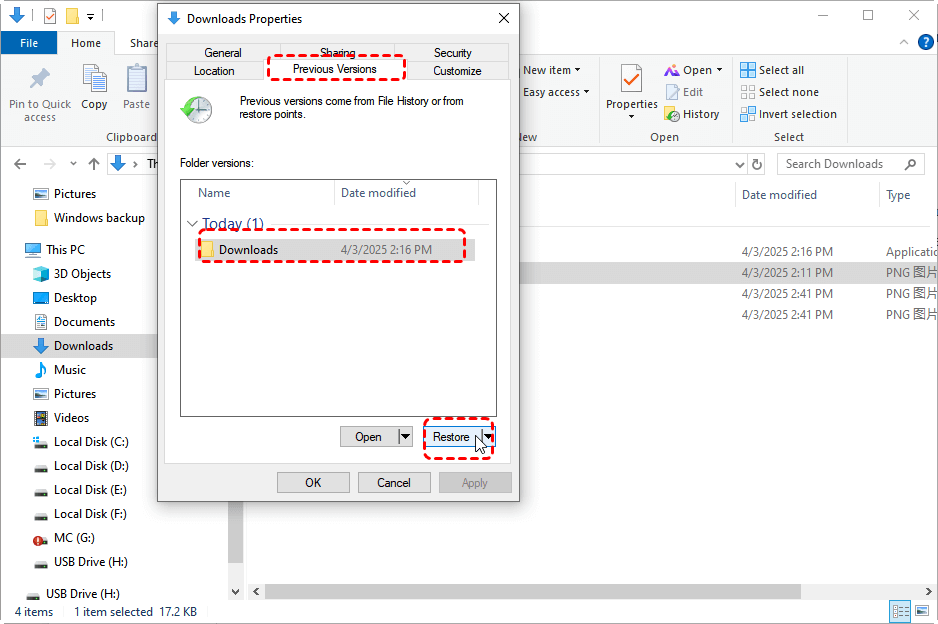
2. Right-click on the folder > "Properties"> "Previous Versions"tab.
3. Choose a version dated before the file was lost. Click "Open" to preview the folder and confirm your file exists in that version.
4. Click “Restore” to replace the current version with the selected one.
3. Use Windows File Recovery
If no previous versions are available and the file is permanently deleted, another solution is to use the Windows File Recovery tool. This is a free command-line utility provided by Microsoft that helps recover deleted files from hard drives, USB drives, and SD cards, even after formatting.
- Note:✎...
- Only work on Windows 10 and later.
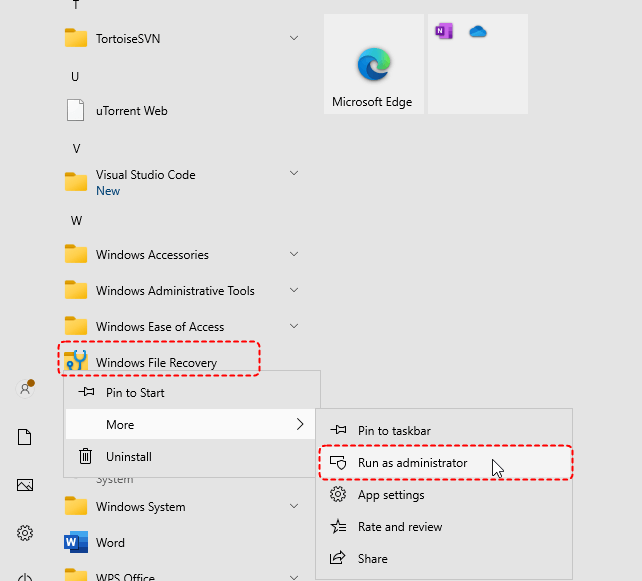
1. To install the tool, open the Microsoft Store, search for "Windows File Recovery," and click "Download".

2. After installation, open it as an administrator by searching for "Windows File Recovery," right-clicking it, and selecting "Run as administrator."
3. Use the command format: winfr source-drive: destination-drive: /mode /switches where you replace source and destination drives with your actual drives.
For example, to recover picturesfrom drive H: to drive D:, type winfr H: D: /regular /n *.jpg /n *.png and press Enter.
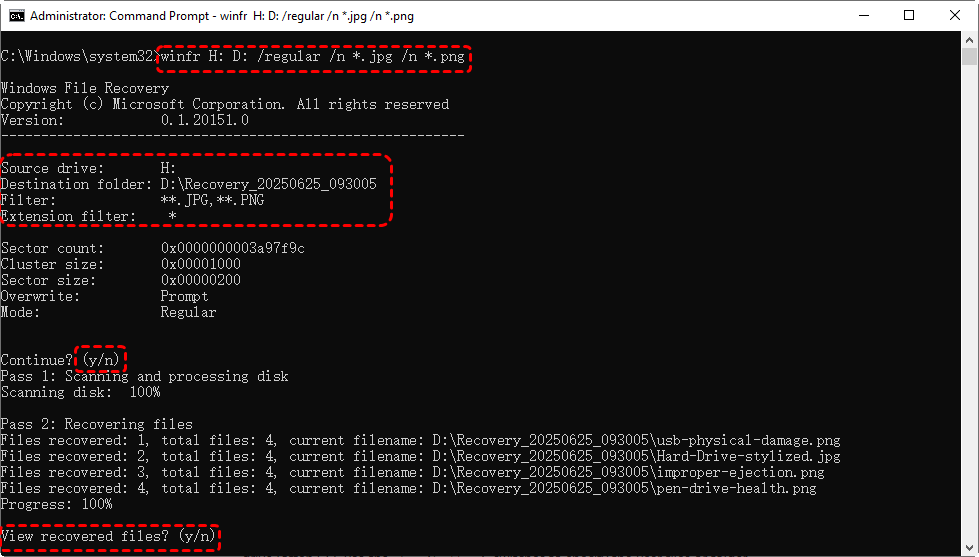
The /regular mode is for recently deleted files on NTFS drives, while /extensive is for formatted or corrupted drives. Make sure the destination drive is different from the source drive to avoid overwriting files during recovery.
Please remember this tool runs in the command line without a graphical interface, and recovery success depends on how much new data has been written to the drive since deletion.
4. Apply a Professional File Recovery Tool
If you prefer a user-friendly, graphical interface and faster recovery without dealing with complex command lines, try a professional recovery tool like MyRecover.Itsupports recovering over 1000 types of files, including Word, Excel, photos, videos, and more—from system folders, formatted partitions, or even emptied Recycle Bin.
It offers a clean interface, preview-before-recovery, fast scanning, and high success rates—making it ideal for beginners and advanced users alike. Simply download, scan your drive, preview found files, and recover them with one click—no commands needed.
Recover Anything, Anywhere — 1,000+ File Types, 500+ Devices, 500+ Data Loss Scenarios
1. Download and install MyRecover on your Windows computer. Run the software, select the drive where you lost files and click on "Scan".

2. It will start a "Quick Scan" or "Deep Scan" on the drive. Once the scanning process is finished, you can filter specific type of files and choose target files to recover.

3. Before recovering, you can preview so as to make sure it is what you are trying to restore.
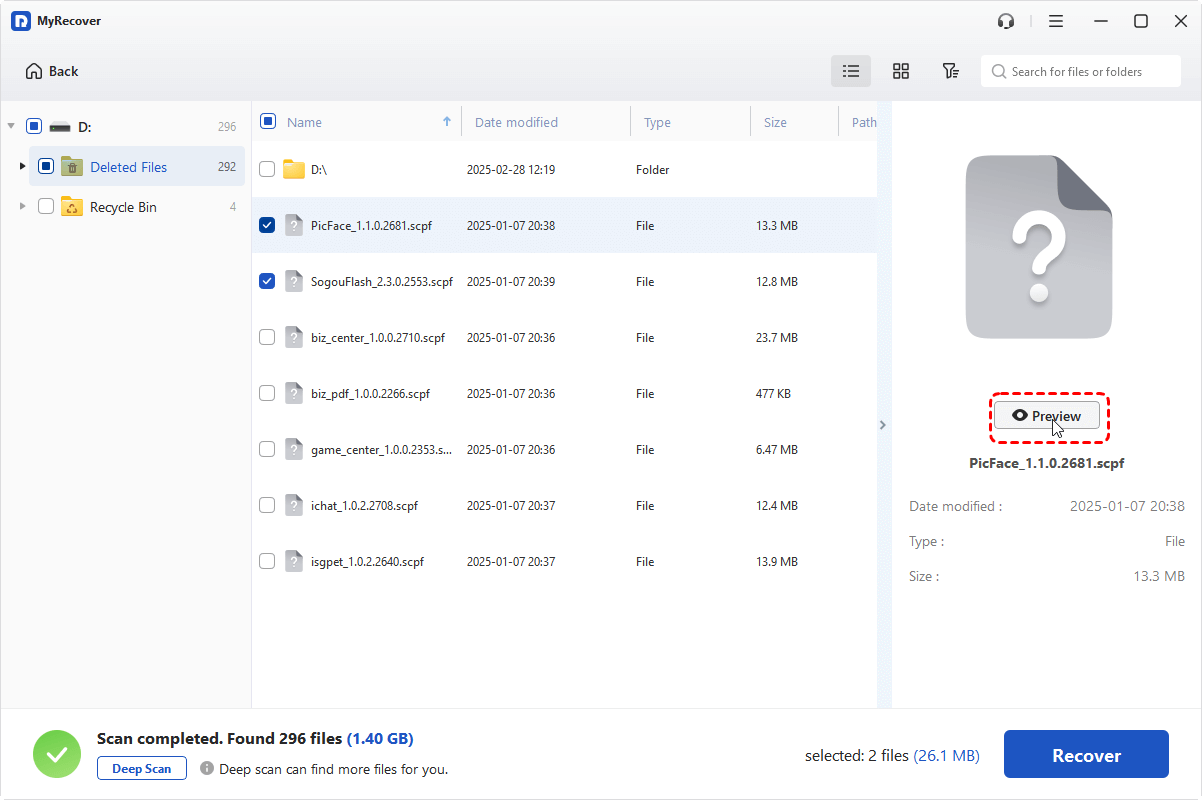
4. Once the files are confirmed, you can click on "Recover" button. Save them to another safe location.

Wait for a while, the recovery process will be accomplished. If you are recovering few files, it is usually done in seconds.

Bottom Line
Recovering files from the Temp folder in Windows 10 or Windows 11 is possible, especially if you act quickly. Whether you're retrieving Word or Excel documents, or other unsaved or deleted files, methods like checking AutoRecover, using File History, Windows File Recovery, or a professional tool like MyRecover can all help.
For a fast recovery process and reliable results, MyRecover is highly recommended. It’s beginner-friendly and handles over 500 data loss scenarios, even when you want to recover files after Windows factory reset, installtion, update, or crash.


Stay Updated With Our
Latest Tips
Add us as a preferred source on Google to never miss helpful guides.