
Solved: Why Is My SanDisk Cruzer Not Recognized in Windows 10/11?
Struggling with SanDisk Cruzer not recognized on your PC? Our comprehensive guide addresses detection failures for all Cruzer variants. From simple port changes to advanced diskpart commands, and what to do when your Cruzer glide usb flash drive not working properly.
By Delores / Updated on March 3, 2026
SanDisk Cruzer Is Not Recognized in Windows 11/10!
You plug in your SanDisk Cruzer, wait for the familiar chime and the pop-up window, but nothing happens. No sound, no new drive showing up in File Explorer, nothing but silence. You try a different port, maybe even a different computer, but that little flash drive remains stubbornly invisible.
If you're dealing with a SanDisk Cruzer not recognized by your Windows PC right now, take a deep breath. This is one of the most common issues with USB flash drives, and in most cases, it's fixable without losing your data.
The SanDisk Cruzer series—whether it's the Blade, Glide, or the higher-capacity 64GB models—are reliable little workhorse for most people. If your SanDisk Cruzer flash drive is not recognized, don't panic. We will show you all the effective solutions to fix it quickly. And we will recover files first before fixing.
Why Your SanDisk Cruzer Is Not Recognized by Windows?
The most common culprits include:
- USB port issues: One possible cause of your SanDisk Cruzer not being recognized is a faulty USB port. The port may be damaged, loose, or experiencing a connection issue. This can prevent your computer from detecting the USB drive.
- Driver issues: Outdated, corrupted, or missing drivers can prevent communication between Windows and your drive.
- Drive letter conflicts: Sometimes Windows assigns a letter that's already in use, making the drive invisible in File Explorer.
- File system corruption: If the drive's file system gets corrupted, Windows may not recognize it at all.
- Power management settings: Windows may turn off USB ports to save power, cutting off your drive.
- Virus or malware infection: Malicious software can interfere with USB functionality.
- Physical damage: The drive itself may be damaged, especially if it's been dropped or exposed to moisture.
Important: If you've got important data on that drive, stop using it immediately. Don't try random fixes that might write to the drive and overwrite your files. We'll cover data recovery first.
Data Recovery WhenSanDisk CruzerIs Not Recognized
Here's the golden rule of drive troubleshooting: recover your data first, fix the drive second. If you've got important files on that SanDisk Cruzer, attempting fixes that write to the drive could overwrite and permanently lose those files.
Data recovery software can often pull files from drives that Windows won't recognize properly. These tools scan the drive at a low level, bypassing file system issues to find and reconstruct your data.
MyRecover is an excellent choice for SanDisk Cruzer recovery. It's designed specifically for scenarios like this—when your drive isn't detected normally, but the data is still physically present. Let's walk through the process step by step.
Here is how to recover files from a SanDisk Cruzer that is not recognized:
1. Download and installMyRecover, then connect your SanDisk Cruzer flash drive to your computer.
2. Run MyRecover, tap USB/SD Card Recovery, choose your SanDisk Cruzer (it might be listed without a drive letter or with an unusual label), and hit Scan. Wait for it to complete.
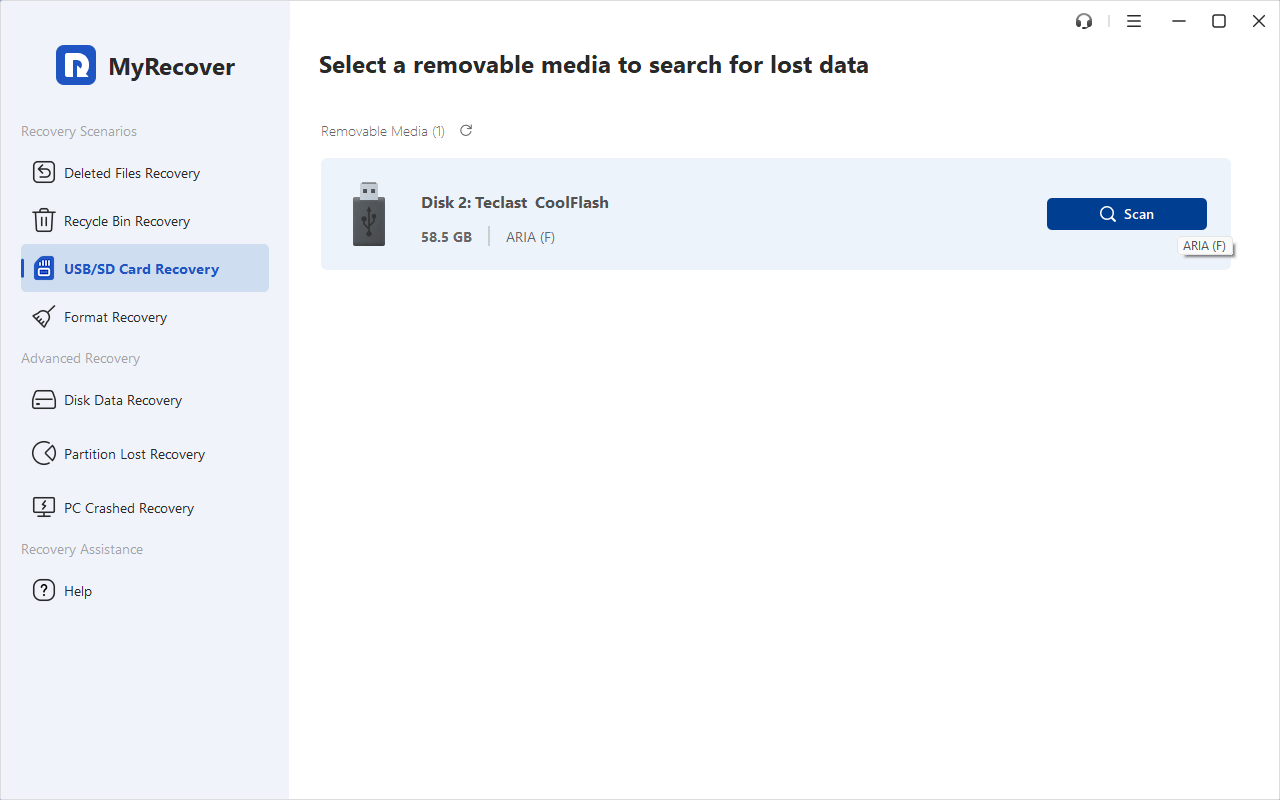
3. Preview and select the files, and hit Recover.

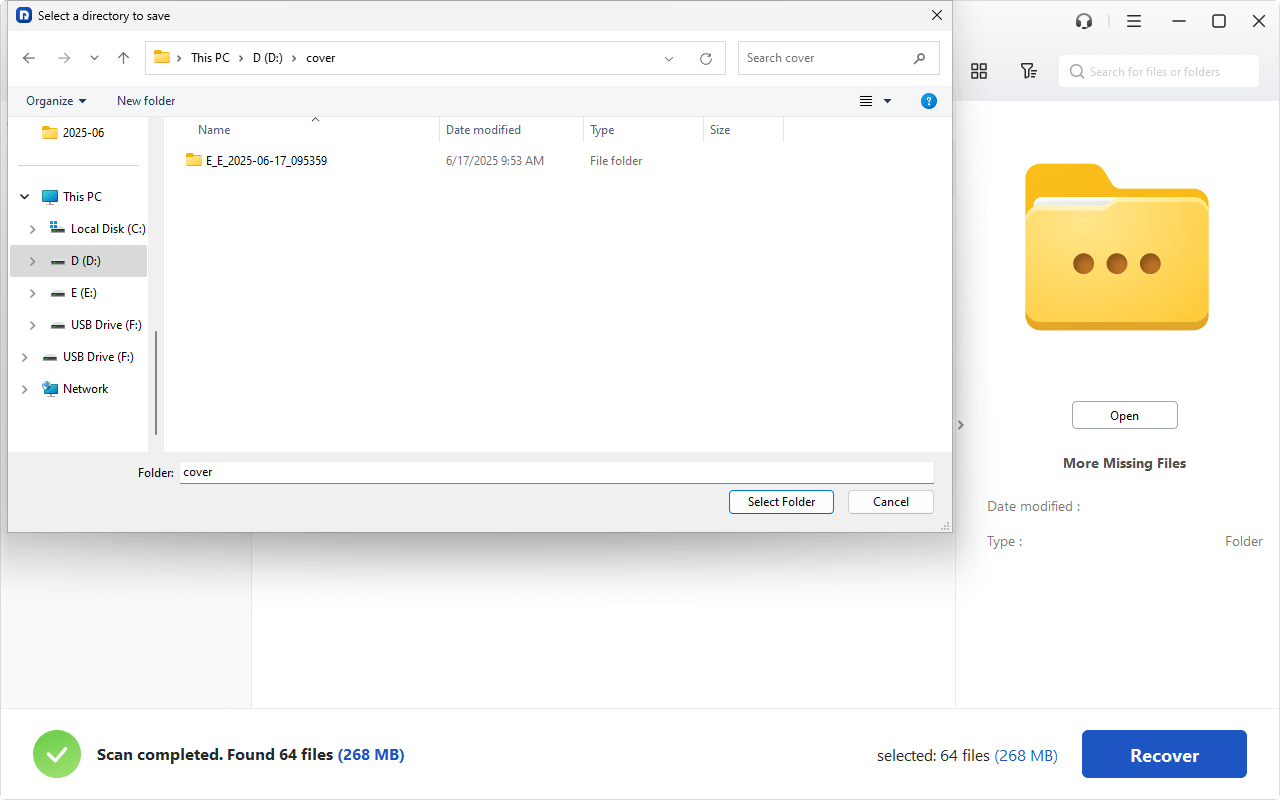
4. Choose a target folder, and click Select Folder to save these files.
- Notes:✎...
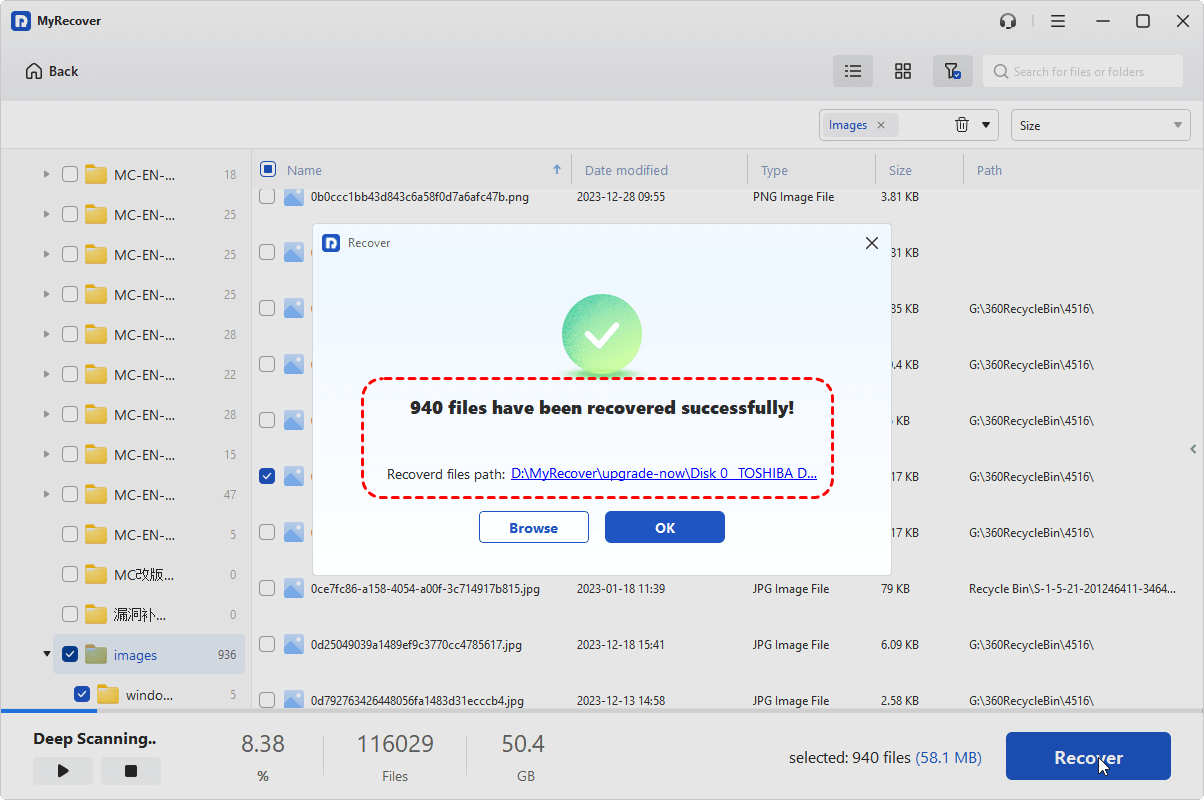
- Once the scan completes, you'll see a list of recoverable files organized by file type, tap Path to show them by folder structure. Use the filter and search functions to locate specific files. MyRecover lets you preview many file types before recovery—double-click a photo, document, or video to see if it's intact and the right version.
- Upgrading to MyRecover Technician is your best choice to recover files from unlimited computers.
- With MyRecover, you can also create a bootable media, recover files from a formatted SSD, etc.

- Recover Deleted Files Easily with Simple Clicks
- 1000+ File Formats Supported
- Support HDD, SSD, External Hard Drive, USB Drive, SD Card, etc.
- Quickly Find Files Using File Types, Name, Size, etc.
- Preview Files Before Recovering
- Recover Unlimited Data
Fixes for SanDisk Cruzer Not Recognized
Way 1. Try Different USB Ports and Computers
Disconnect your SanDisk Cruzer from its current port and try a different one. If you're using a desktop, try the ports on the back of the case—they're connected directly to the motherboard and often provide more stable power than front-panel ports.
Also, avoid using USB hubs; plug directly into the computer.
If the drive still isn't detected, try it on another computer altogether. This tells you whether the problem is with the drive itself or with your specific system.
Way 2. Check for Physical Damage on Cruzer Blade Models
The SanDisk Cruzer Blade has a distinctive sliding mechanism that exposes the USB connector. This mechanism can sometimes get stuck or dirty, preventing a proper connection. Inspect the connector carefully. Look for bent pins, debris, or corrosion. If it looks dirty, clean it.
For Cruzer Glide models, check the swivel mechanism and the connector for any signs of damage.
Way 3. Restart Your Computer with the Drive Connected
Here's a trick that works more often than you'd expect: shut down your computer completely (not restart, but full shutdown), leave the SanDisk Cruzer plugged in, and then start the computer back up. Sometimes the drive initializes during boot and becomes accessible once Windows loads.
Way 4. Update USB Controllers in Device Manager
Outdated or corrupted USB controllers are a frequent culprit when your SanDisk Cruzer is not recognized by Windows 10/11or acts up. Here's how to check and update them :
1. Right-click the Start button and select "Device Manager".
2. Expand the "Universal Serial Bus controllers" section. Look for any entries with yellow exclamation marks—these indicate problems.
4. Right-click on each USB controller and select "Update driver".

5. Choose "Search automatically for updated driver software".
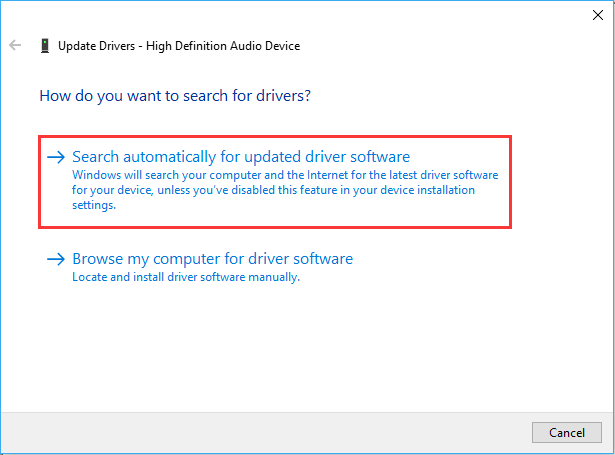
6. Let Windows search and install any available updates.
7. Repeat for all USB controllers, then restart your computer.
After the restart, plug in your SanDisk Cruzer and see if it's detected.
Way 5. Reinstall USB Drivers
If updating drivers doesn't work, sometimes a clean reinstall does the trick. This forces Windows to reload fresh copies of the drivers :
1. Open Device Manager again.
2. Expand "Universal Serial Bus controllers".
3. Right-click on each USB Root Hub and select "Uninstall device".
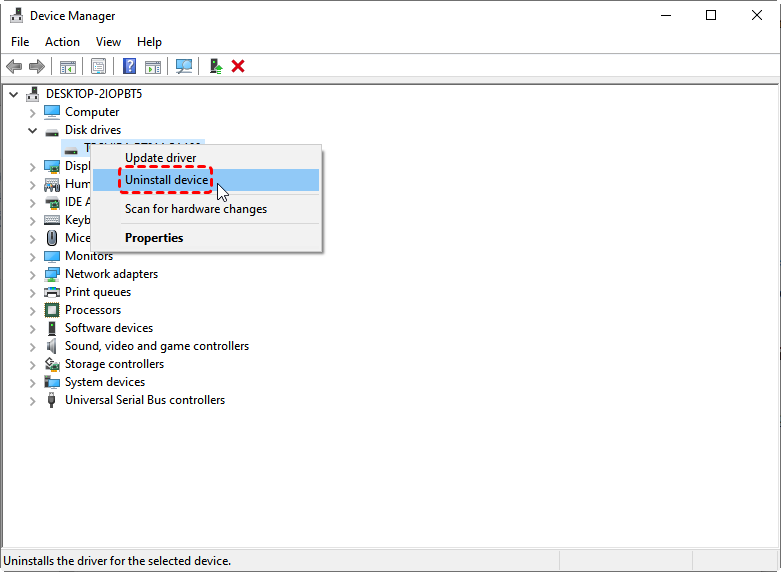
After uninstalling them all, restart your computer. Windows will automatically reinstall the drivers during boot. This process clears out any corrupted driver data and gives you a fresh start. After the restart, test your SanDisk Cruzer again.
Way 6. Change Power Management Settings
Windows has a nasty habit of turning off USB ports to save power, which can cause your SanDisk Cruzer Blade not detected. Here's how to stop that:
1. Open Device Manager.
2. Expand "Universal Serial Bus controllers".
3. Double-click on the first "USB Root Hub" in the list.
4. Go to the "Power Management" tab, uncheck "Allow the computer to turn off this device to save power", and hit OK.
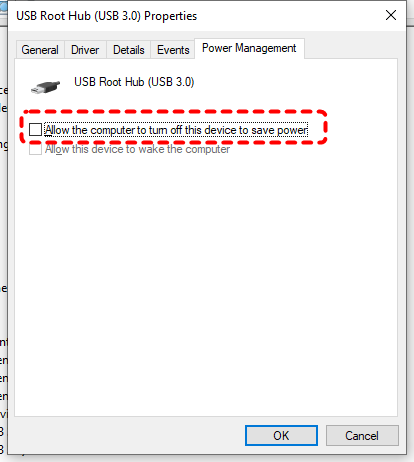
5. Repeat these steps for every USB Root Hub in the list.
This ensures your USB ports stay active and ready to detect your drive at all times.
Way 7. Run Windows Automatic Hardware Troubleshooter
Windows includes a built-in troubleshooter that can automatically detect and fix USB problems:
1. Open Settings (Windows key + I).
2. Go to "System" > "Troubleshoot".
3. Select "Other troubleshooters".
4. Choose a troubleshooter based on the type of issue you are trying to resolve, and tap Run.
The troubleshooter will scan for issues and apply fixes automatically.
Way 8. Assign A New Drive Letter to SanDisk Cruzer Flash Drive
Sometimes, the SanDisk Cruzer USB flash drive is not detected in File Explorer, but it shows in Disk Management. Because it lacks a drive letter due to the conflict. Here is how to make the SanDisk Cruzer drive visible:
1. Right-click the Start button and select "Disk Management".
2. Find your SanDisk Cruzer (look for a drive with the correct size), and right-click on it and select "Change Drive Letter and Paths".
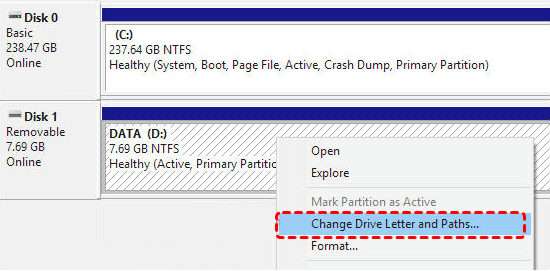
3. If no letter is assigned, click "Add"; if a letter is already there, click "Change".
4. Choose a new letter from the dropdown menu (pick something not already in use, like Z or X), and click OK.
5. Close Disk Management.
Now open File Explorer and check if your drive appears. This fix works in about 30 seconds and resolves a huge percentage of detection problems.
Way 9. Re-enable Plug and Play Service
The Plug and Play service is responsible for automatically detecting new hardware. If it's not running correctly, your Cruzer Glide USB flash drive not working issue might persist :
1. Press Windows key + R, type services.msc, and press Enter
2. Scroll down and find "Plug and Play" in the list, right-click it, and select "Properties".
3. Make sure "Startup type" is set to "Automatic".
4. If the service isn't running, click "Start", click "Apply", and "OK".
5. Restart your computer.
enable-plug-and-play-service.png
Way 10. Format SanDisk Cruzer
If your drive shows up in Disk Management but you still can't access it, you might need to format the SanDisk Cruzer using DiskPart.
Warning: This will erase all data on the drive. Only do this after recovering your files or if you're sure there's nothing important on it:
1. Right-click Start, select "Windows Terminal (Admin)" or "Command Prompt (Admin)".
2. Run the following commands one by one, and each command is followed by enter.
diskpart
list disk
select disk X (replace X with your disk number of SanDisk Cruzer)
clean
create partition primary
format fs=fat32 quick
assign
exit
Your drive should now appear in File Explorer with a fresh, clean file system.
You can also format through Disk Management instead :
1. Open Disk Management.
2. Right-click your SanDisk Cruzer and select "Format".
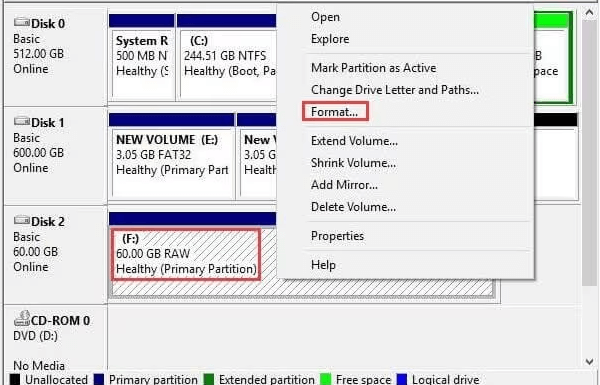
3. Choose a file system—FAT32 works best for compatibility with most devices, exFAT for larger files.
4. Enter a volume label (name for the drive), check "Quick Format" to save time.
5. Click OK and confirm.
Preventive Measures to Avoid Future Detection Problems
Once your SanDisk Cruzer is back up and running, a few simple habits can prevent issues down the road:
- Always eject safely – Avoid just pulling it out. Use "Safely Remove Hardware" or right-click and select "Eject" to prevent file corruption.
- Keep drivers updated – Enable automatic Windows updates or check Device Manager and the SanDisk support site for driver or firmware updates.
- Handle with care – Be gentle with sliding or swivel designs. Avoid physical stress, extreme temps, and moisture. Use a protective case when not in use.
- Back up regularly – Don’t rely on one drive. Keep copies on your computer, cloud, or another external drive so data loss isn't devastating.
FAQsAbout SanDisk Cruzer Not Recognized
Can I recover files from a SanDisk Cruzer that won't show up?
A: Yes. Use recovery software like MyRecover—it can access the drive even if Windows can’t. Recover files first, then try fixes like formatting.
How do I fix the SanDisk Cruzer not recognized in Windows 10?
A: Try different ports, update USB drivers in Device Manager, disable USB power saving, and assign a new drive letter in Disk Management.
Why is my SanDisk Cruzer 64GB not recognized, but smaller drives work?
A: Older systems may not support larger drives. Try formatting to FAT32 for better compatibility, or update your BIOS/USB drivers.
How do I know if my SanDisk Cruzer is physically damaged?
A:Signs: no LED, not detected on any device, strange noises, or visible damage. If so, stop using it—professional recovery may be needed.
Can a virus cause my SanDisk Cruzer to not be recognized?
A: Yes. Malware can hide or block USB drives. Run a full antivirus scan, especially if the drive works on other computers.
How long do SanDisk Cruzer drives typically last?
A: They typically last several years, depending on usage. Always back up important data—failure can happen unexpectedly.
Conclusion
A SanDisk Cruzer that isn’t recognized can be frustrating, but most issues are fixable. Start with simple steps like changing USB ports, then move to DiskPart commands or driver updates if needed.
If your drive contains important data, use a tool like MyRecover before attempting fixes that may write to the drive. Work through solutions step-by-step, and once resolved, always eject safely, update drivers, and back up regularly.
If nothing works, the drive may have physical damage requiring professional help. In most cases, though, one of these methods will bring your Cruzer—and your files—back.


Stay Updated With Our
Latest Tips
Add us as a preferred source on Google to never miss helpful guides.