
How to Pin Recycle Bin to Taskbar on Windows 11 Easily
In this guide, we'll walk you through how to pin the Recycle Bin to the taskbar on Windows 11/10 for easy and efficient access. This step-by-step process will help you customize your taskbar and make file management quicker than ever. Whether you're restoring files or simply emptying the bin, having the Recycle Bin on your taskbar can save you time and hassle.
By Aria / Updated on November 17, 2025
Introduction
The Recycle Bin is an essential feature in Windows, allowing users to temporarily store deleted files before they are permanently erased from the system. However, for some users, quickly accessing the Recycle Bin becomes a challenge. This is especially true for those who have a cluttered desktop or want quick access to their deleted items without navigating through folders.
![]()
Actually, Windows doesn’t directly offer an option to pin the Recycle Bin to the taskbar. Many users have even suggested to Microsoft that they should add a feature to pin the Recycle Bin to Windows taskbar for easier access, just like on Mac. Is there a way to pin the Recycle Bin to the taskbar here? Of course! This article will provide a method to pin the Recycle Bin to Windows taskbar on Windows 11 and 10, allowing you to manage deleted files quickly and effectively.
How to Pin Recycle Bin to Taskbar on Windows 11/10
The pinning feature on the Windows taskbar is designed for applications like Chrome and Word, each of which have an executable ".exe" file. When you pin them to the taskbar, you’re essentially saving a shortcut that points to this ".exe" file. The Recycle Bin, however, doesn’t have such an executable file; it’s just a system virtual folder created and managed by Windows File Explorer.
Therefore, you can pin the Recycle Bin to the taskbar by creating a shortcut that links to the Recycle Bin’s system location. It makes the Recycle Bin accessible with just a click. It only takes two main steps to get it done, follow these steps:
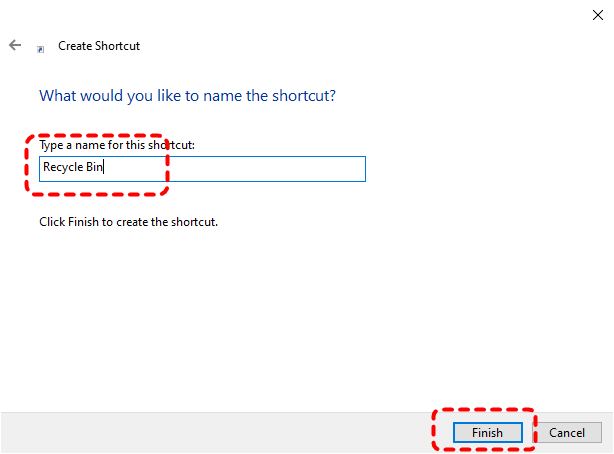
Step 1. Create a Shortcut
1️⃣Right click on the blank space on the desktop and select "New" > "Shortcut".
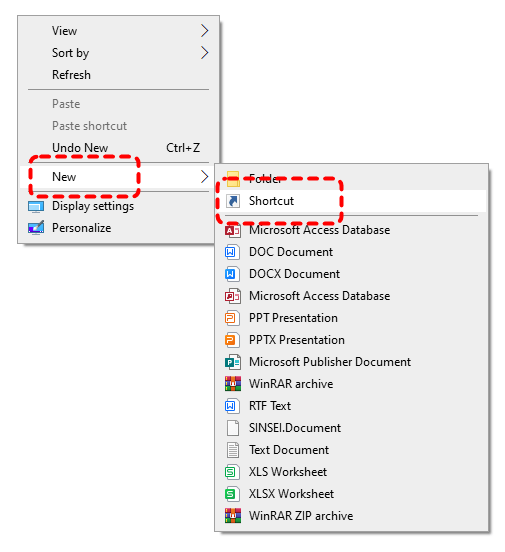
2️⃣Enter the following command on the opened window and hit "Enter" key:
explorer.exe shell:RecycleBinFolder
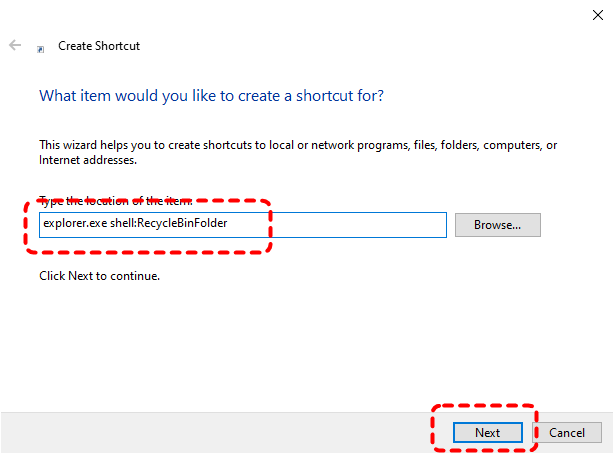
3️⃣Give the shortcut a name like "Recycle Bin" and click "Finish".
Step 2. Change the Shortcut Icon (Optional)
Since the icon of the newly created shortcut is a regular folder icon, you can change it to the actual Recycle Bin icon for better visibility.
1️⃣Right click on the created Shortcut on the desktop and select "Properties" > "Change Icon".
![]()
2️⃣Select a Recycle Bin icon and click "OK" to save the changes. If the Recycle Bin icon isn’t showing up in the list, type the following path and press "Enter", it will appear again:
%SystemRoot%\System32\SHELL32.dll.
![]()
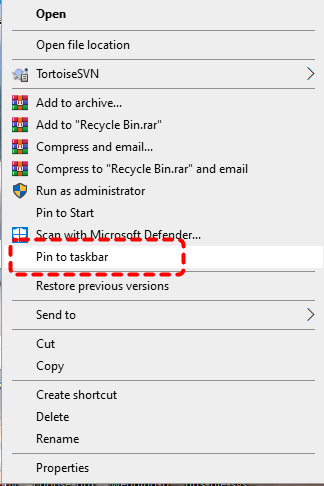
Step 3. Pin to Taskbar
Right click on the new Shortcut you created on desktop and select "Pin to taskbar". Now, your Recycle Bin will be pinned to your Taskbar for easy access.

MyRecover: Recover Permanently Deleted Files
While pinning the Recycle Bin to the taskbar makes it easier to manage files temporarily stored in it, it won’t help with deleted files that didn’t go into the Recycle Bin. Fortunately, there's no need to panic. Deleted files can still be recovered especially with the right tools.
One of the best tools for recovering permanently deleted files from the Recycle Bin is MyRecover, a powerful and user-friendly data recovery software. MyRecover can help you retrieve lost data, even after it’s been emptied from the Recycle Bin, by scanning your hard drive for recoverable files.
- ✎How MyRecover Helps:
- Easy Recovery Process: Simply download and install MyRecover, select the drive where your deleted files were stored, and let it scan for recoverable files.
- Deep Scan Mode: Even if files have been deleted for some time, MyRecover can perform a deep scan to find files that might still be recoverable.
- Support for 1000+ File Types: Whether it’s documents (DOCX, PPTX, XLSX, etc.), photos (PNG, JPG, RAW, etc.), videos (MP4, WebM, MOV, etc.) or system files, it can recover a wide variety of data types.
- Handle 500+ Data Loss Scenarios: Recover from deleted partition, formatted hard drive, emptied Recycle Bin, system crash, virus attack, etc.
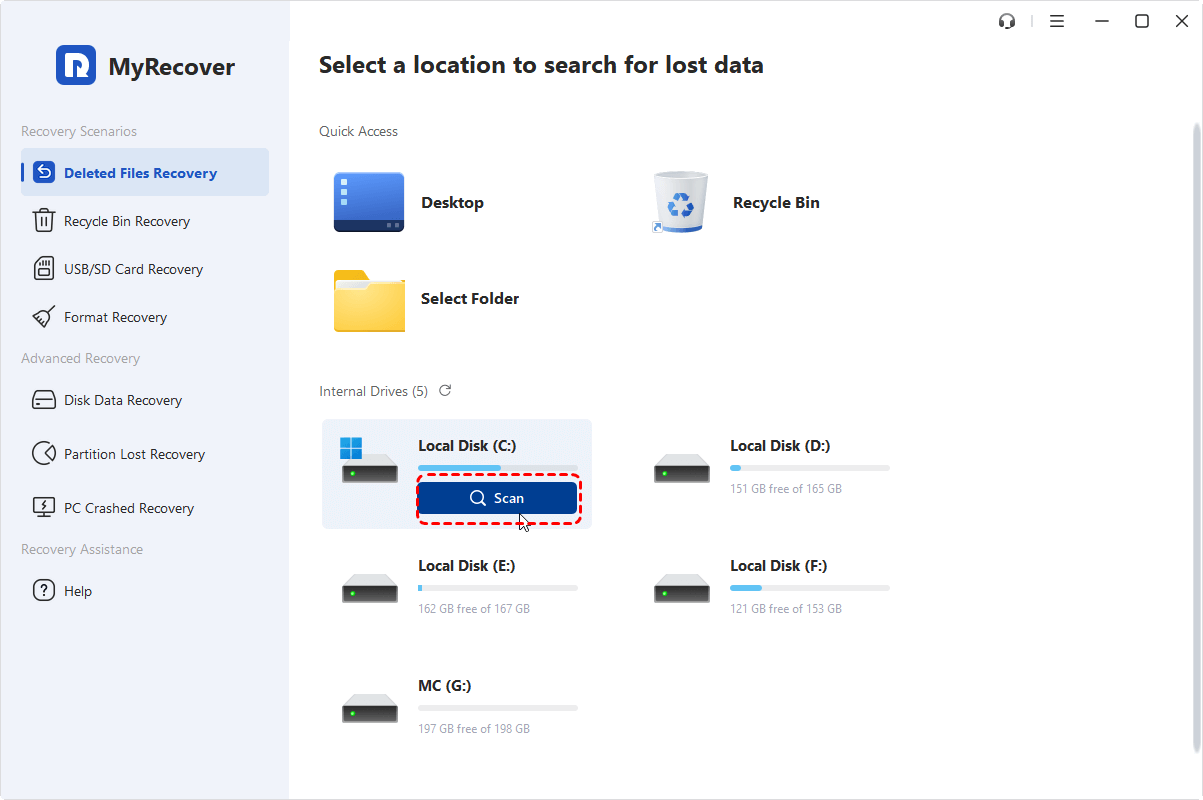
Step 1. Download and install MyRecover on your computer from Microsoft Store, avoid installing it on the drive with lost files.
Step 2. Run the program and select a drive to scan for lost files, then click "Scan".
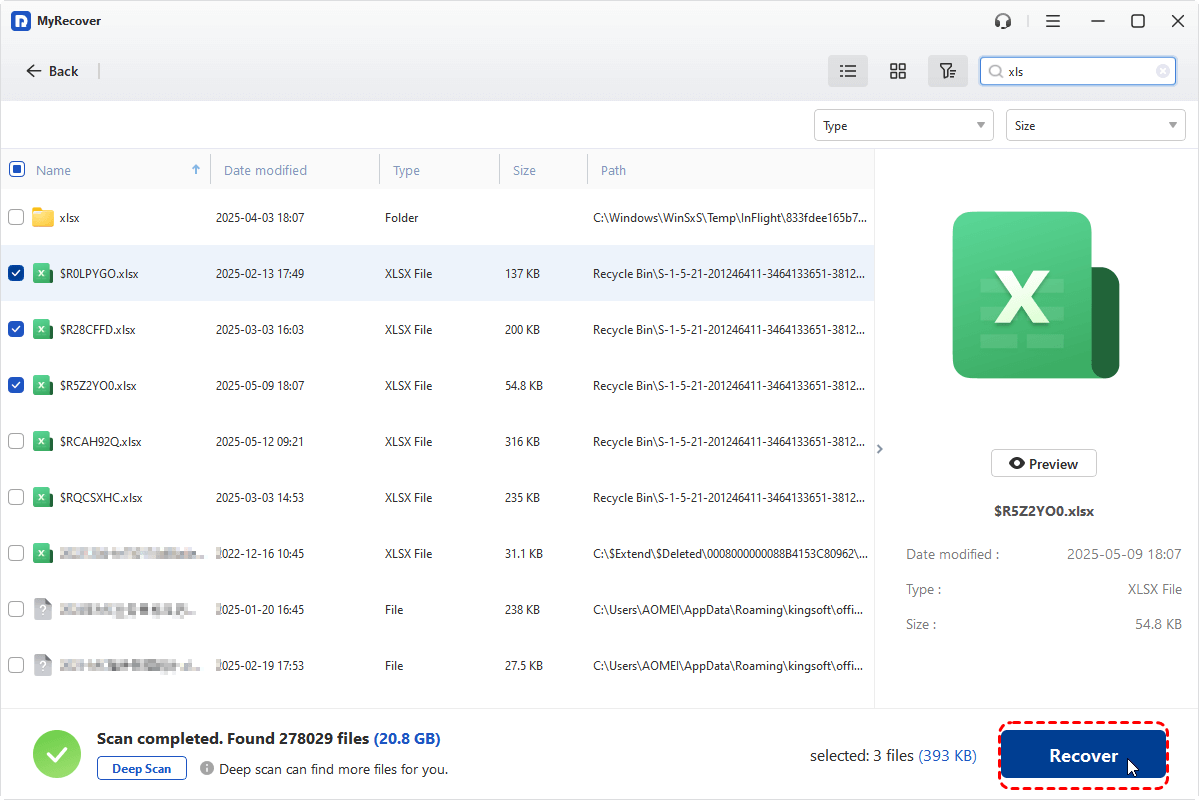
Step 3. Choose the files you attempt to recover from the recoverable lists and click "Recover".
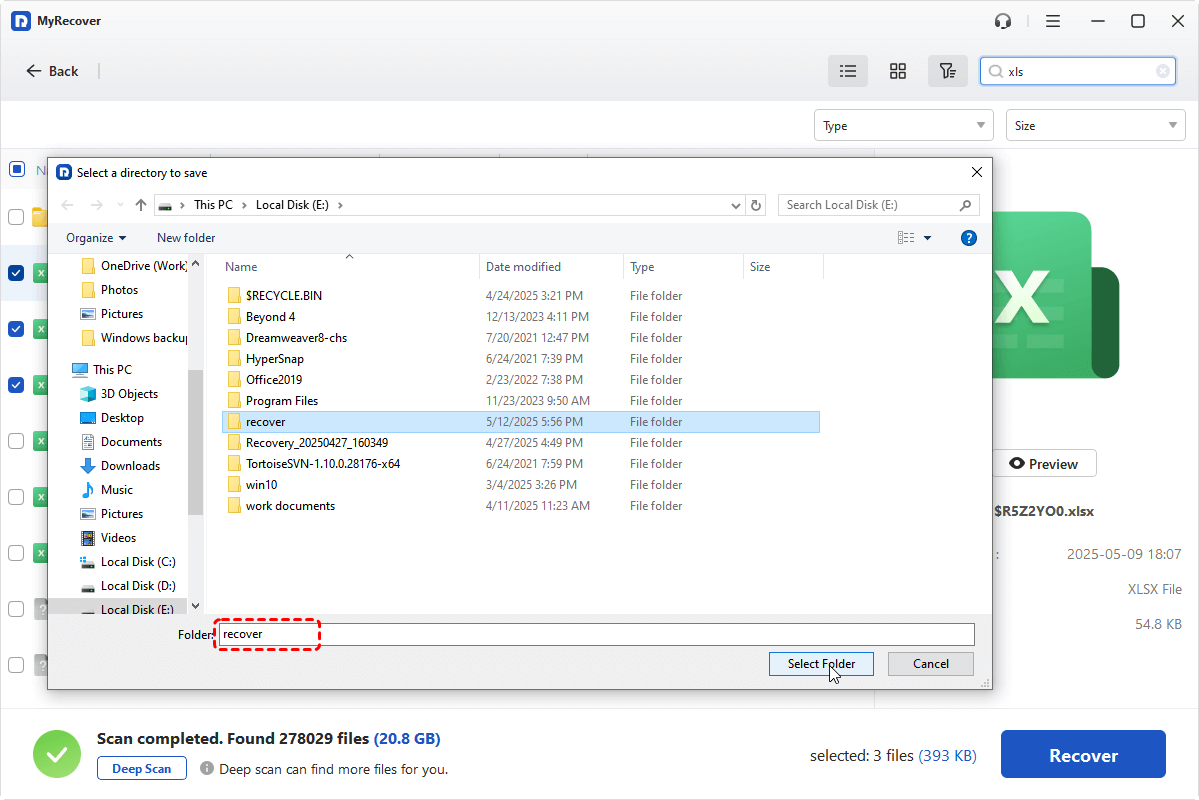
Step 4. Select a safe location (not the original one) to save the recovered files.
Once the process is completed, the message "Files have been recovered successfully" will pop up. You can check the recovered files in the destination folder path by clicking on "Browse" button.

Tips for Safe File Management
While data recovery tools work in most cases of data loss, they are not foolproof. To prevent files from disappearing permanently, it's essential to adopt some best practices for file management. Here are a few tips to help safeguard your data:
🔥Regular Backups: Always back up important files to an external hard drive or cloud storage, so you have a secondary copy in case of accidental deletion.
🔥Avoid Automatic Deletion: Don’t let the Recycle Bin automatically deleted files itself. This ensures that you have time to review and recover files before they are permanently deleted.
🔥Organize Your Files: By regularly organizing your files into folders and subfolders, you can prevent accidental deletions and keep your data easy to locate.
🔥Use File History: For critical documents, use File History or OneDrive that saves different versions of files over time.
Conclusion
Pinning the Recycle Bin to your Taskbar in Windows 10 or Windows 11 is a simple and effective way to keep your deleted files easily accessible. However, accidents happen, and files might end up in the Recycle Bin, only to be deleted unintentionally or they are permanently deleted.
If this happens, MyRecover is the perfect tool to help you recover lost files. Its Professional edition provides unlimited data recovery quota and file content preview feature, making sure it can help retrieve your data quickly and easily, minimizing the chances of permanent loss.


Stay Updated With Our
Latest Tips
Add us as a preferred source on Google to never miss helpful guides.