
Nikon DSLR Error Code List: What They Mean & How to Solve
This Nikon DSLR Error Code guide explains common Nikon error message issues, including f error Nikon alerts and model-specific problems. Learn what each code means, why it appears, and practical steps to troubleshoot and fix your camera safely.
By Aria / Updated on February 26, 2026
Introduction
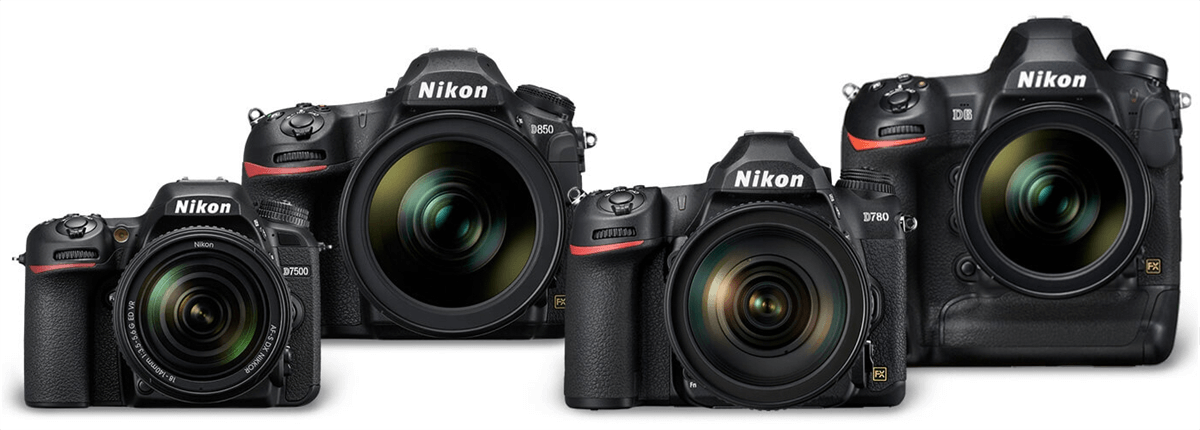
Nikon DSLR cameras are widely recognized for their optical precision, durable build quality, and advanced imaging performance. However, like any precision device, a Nikon DSLR may occasionally display an on-screen warning or malfunction indicator. When this happens, users typically encounter a Nikon DSLR Error Code or a generic Nikon error message.
An unexpected Nikon error message can immediately interrupt shooting and place your camera in a non-functional state. Whether it appears a specific error on Nikon DSLR like Err, FEE, F--, etc., these warnings indicate mechanical, electronic, or communication faults that require prompt attention.
In most cases, these error codes indicate one of three core issues: lens communication failure, shutter or aperture mechanism malfunction, or internal system and memory conflicts. The following sections will break down the most common Nikon error messages, explain their causes, and provide practical solutions to restore normal camera operation efficiently and safely.
How to Fix Most Common Nikon DSLR Error Code
Understanding what each Nikon DSLR Error Code means is essential for accurate troubleshooting. Some issues can be resolved quickly through basic checks and resets, while others may require technical servicing. This section explains in detail the causes and solutions for each Nikon DSLR error code. Choose the appropriate method based on your camera’s actual situation.
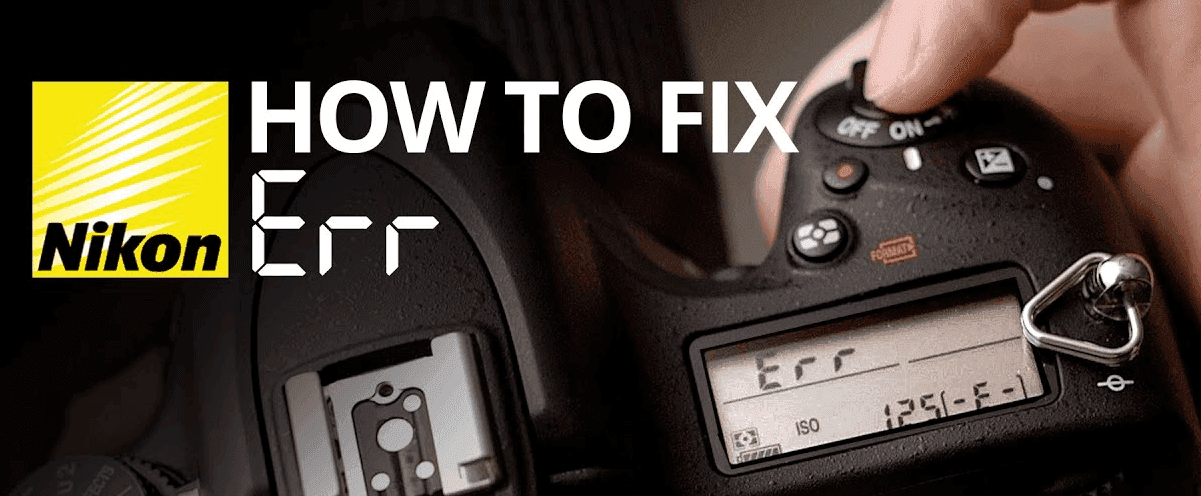
1. The "Err" Error Message
The "Err" message on Nikon DSLR is a general system fault indicator. It usually points to a shutter mechanism issue, aperture control malfunction, or internal communication failure between the lens and camera body. This error often appears after incomplete shutter cycles, low battery interruptions, or lens contact misalignment. Because it is a broad hardware-level alert, troubleshooting should begin with basic resets before considering mechanical servicing.
Recommended Solution Steps
Step 1. Turn off the camera and remove the battery for at least 2–3 minutes to reset internal circuits.
Step 2. Remove and reattach the lens, ensuring it locks firmly into place.
Step 3. Clean the lens and body electrical contacts gently with a microfiber cloth.
Step 4. Insert a fully charged battery and power the camera on.
Step 5. If the error persists after multiple attempts, professional shutter inspection may be required.
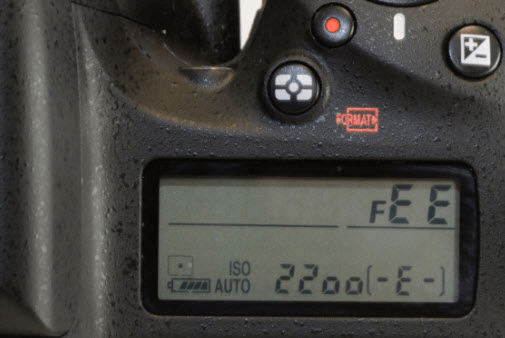
2. The "FEE" Error Message
The "FEE" error indicates an aperture control problem, most commonly when using a lens with a manual aperture ring. The camera cannot electronically control aperture because the ring is not set to its minimum value. This error is not mechanical failure but a configuration issue related to lens settings.
Recommended Solution Steps
Step 1. Turn off the camera before adjusting the lens.
Step 2. Rotate the lens aperture ring to the smallest aperture (highest f-number, e.g., f/22).
Step 3. Lock the aperture ring if your lens includes a locking switch.
Step 4. Turn the camera back on and verify normal shooting mode.
If the message remains, test the lens on another body to rule out contact faults.
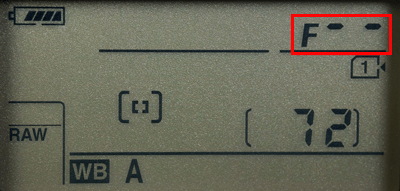
3. The "F--" Error
The "F--" (F dash dash) error signals that the camera cannot detect a compatible lens. This typically occurs when the lens is not mounted properly, incompatible with electronic communication, or the CPU contacts are dirty. Unlike FEE, this relates to lens recognition rather than aperture position.
Recommended Solution Steps
Step 1. Turn off the camera and detach the lens.
Step 2. Inspect and clean the gold electronic contacts on both lens and camera mount.
Step 3. Reattach the lens carefully until it clicks into position.
Step 4. Test with another compatible Nikon lens if available. If multiple lenses trigger "F--", the issue may lie in the camera’s mount circuitry.
4. The "For" Error Code
The "For" error typically appears when the memory card is not formatted for the current camera body. It indicates a file system mismatch rather than physical card failure. This commonly occurs when inserting a card previously used in another device.
Recommended Solution Steps
Step 1. Power off the camera and remove the memory card.
Step 2. Reinsert the card securely and power on.
Step 3. Navigate to the camera menu and select "Format Memory Card".
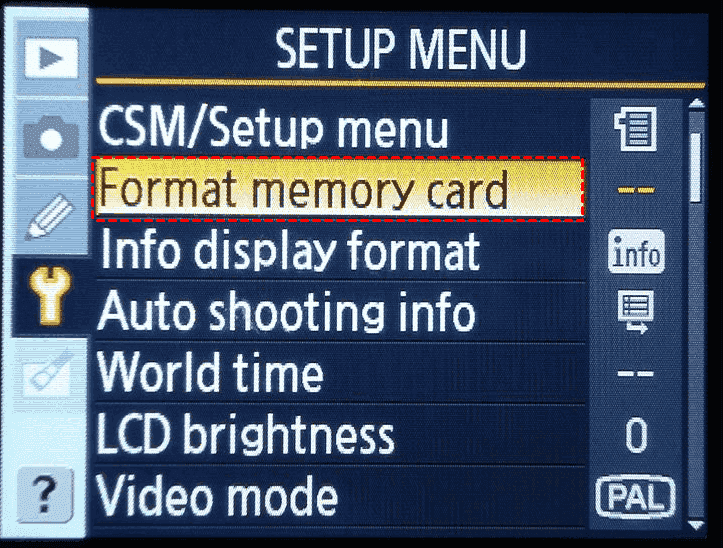
Step 4. Confirm formatting to initialize the card in Nikon’s required structure.
If formatting fails, test with a different SD card to rule out corruption.
5. Nikon Error Code "rxx" (e.g., r19, r02)
The "rxx" indicator (such as r19 or r02) is not an error but a buffer capacity warning. It shows the number of additional shots that can be taken before the camera’s internal image buffer is full. When shooting continuously, the number decreases as the buffer fills.

Recommended Solution Steps
Step 1. Pause continuous shooting to allow the buffer to clear.
Step 2. Use a high-speed memory card to improve write performance.
Step 3. Reduce image size or switch from RAW to JPEG if appropriate.
Step 4. Avoid extended burst mode when unnecessary. If the buffer never clears, check card performance or firmware status.
6. "/Err" or "Cha" Error Code
The "Cha" or "/Err" error message indicates memory card communication failure. Causes include card corruption, improper insertion, or card reader interface damage. Unlike "For", this error often signals read/write instability.
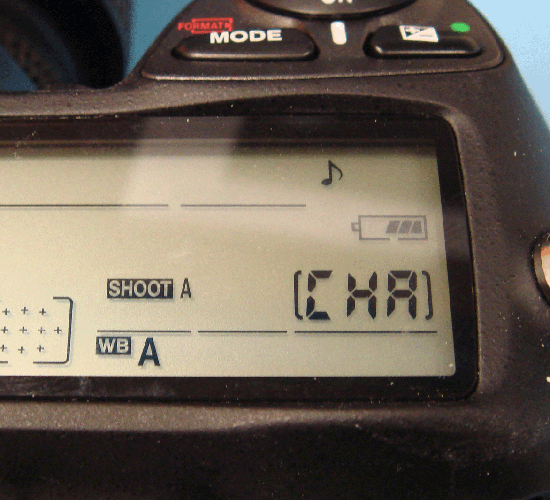
Recommended Solution Steps
Step 1. Turn off the camera and remove the memory card.
Step 2. Inspect the card for physical damage or bent pins.
Step 3. Insert the card into a computer to test accessibility.
Step 4. If readable, back up data immediately and reformat the card in-camera.
Step 5. Replace the card if errors continue.
7. "This Card Cannot be Used/Read" Error
This error indicates severe card corruption, incompatible card type, or file system damage. It may appear after improper ejection, sudden power loss, or using unsupported high-capacity cards on older models like certain Nikon D90.
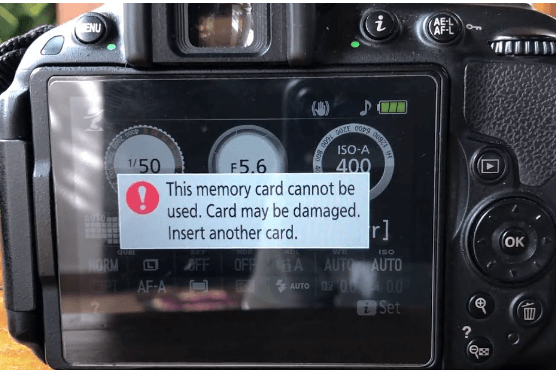
Recommended Solution Steps
Step 1. Remove the card and test it on a computer.
Step 2. If data is accessible, back up files immediately.
Step 3. Format the card in the camera to rebuild its file structure.
Step 4. If formatting fails, replace the card with a compatible, manufacturer-recommended model.
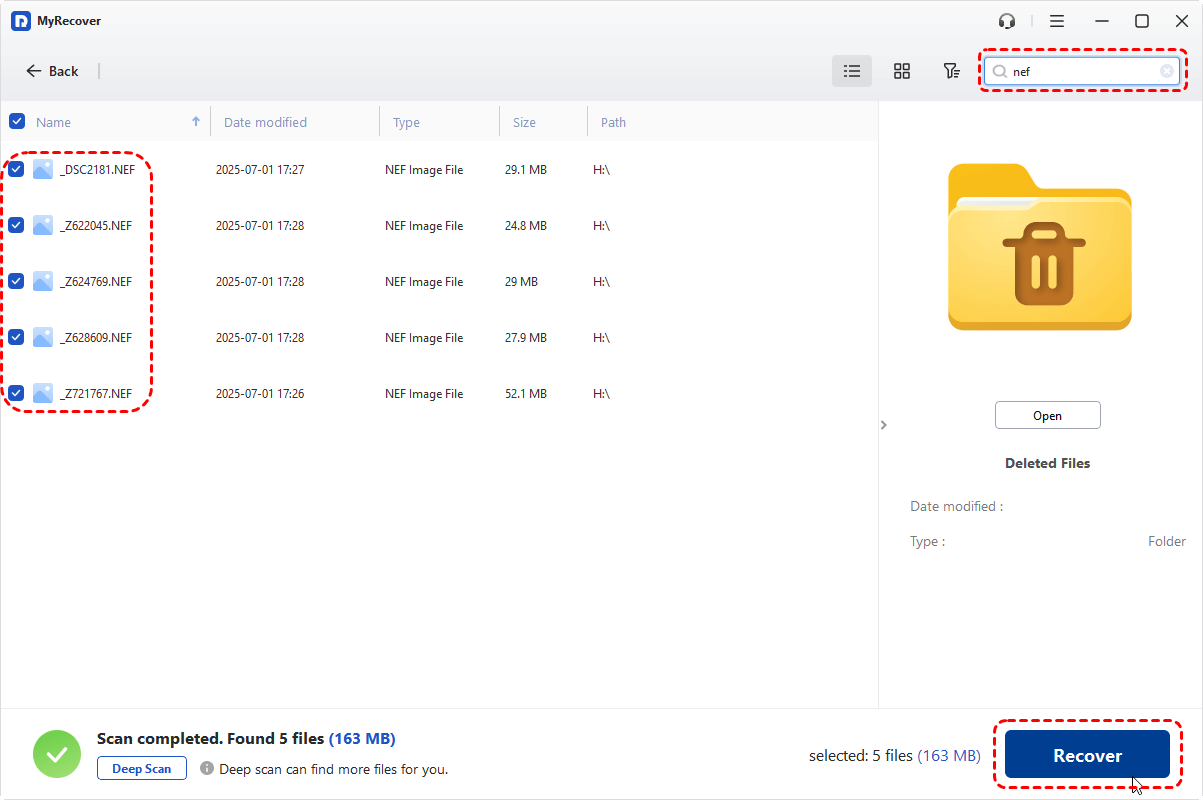
If important images or videos are missing due to card corruption, perform data recovery before further formatting attempts. MyRecover is a reliable data recovery tool. It supports data recovery from formatted and corrupted SD card, USB drives, external hard drives, SSDs, etc. Follow these steps to retrieve your files:

- Recover Without Backup: Restore lost files even if no Windows backup exists.
- Wide File Support (1000+): Recover photos, documents, videos, audio, archives, and more.
- Supports Multiple Devices (500+): Works on HDDs, SSDs, USB drives, SD cards, cameras, and other storage devices.
- High Success Rate: AI-powered file recognition and recovery algorithms ensure easy use and zero file omission.
👉Download and install MyRecover on your Windows supported computer, then connect your SD card to PC.
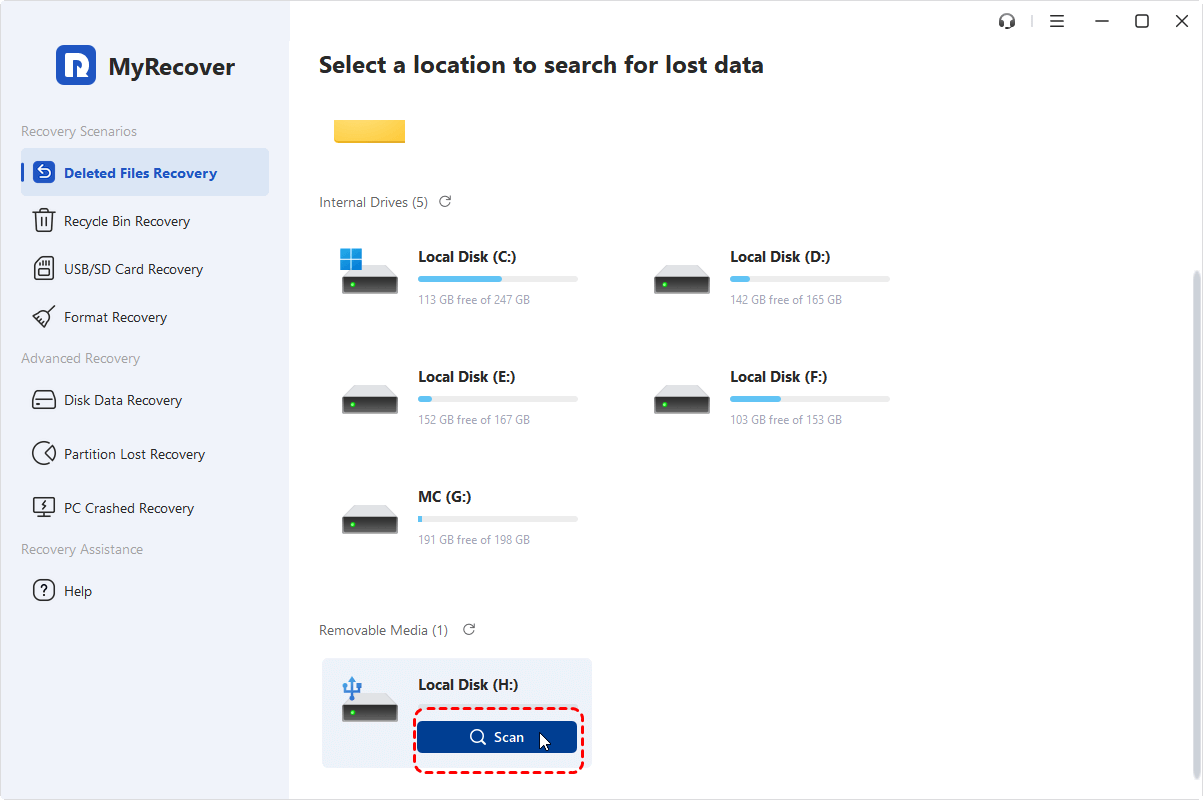
👉Select the card to scan and click "Scan", then choose the files you wish to recover and click "Recover". You can use the "Filter" function to locate the file type you want.
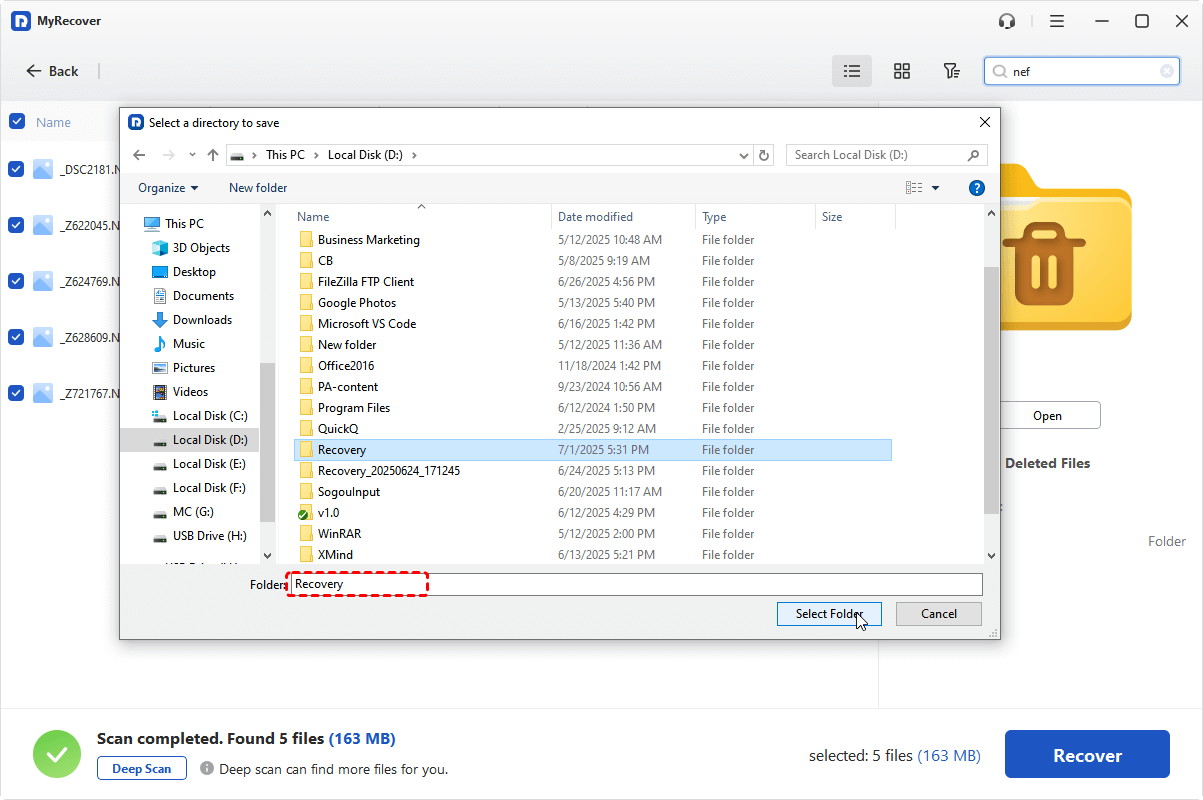
But if you need unlimited recovery capacity and the ability to preview files before restoring them, MyRecover Professional edition is the perfect upgrade. It even helps you recover data from systems that won't boot.
👉Select a safe location to save the recovered files.
8. "Information" Icon Error Message
The "Information" icon (often displayed as a blinking “i” symbol) is not a critical hardware failure but a warning indicator. It alerts the user that a setting conflict or shooting condition may prevent proper image capture. Common triggers include disabled flash in low light, unavailable autofocus due to lens settings, exposure limitations, or restricted shooting modes. This icon functions as a system notification rather than a mechanical error, so troubleshooting should begin by reviewing camera settings.
Recommended Solution Steps
Step 1. Press the "Info" or "I" button to display the detailed warning message.
Step 2. Review highlighted settings such as flash status, ISO limits, or focus mode.
Step 3. Adjust conflicting settings (e.g., enable flash or switch to compatible shooting mode).
Step 4. Half-press the shutter to confirm the warning disappears.
If the icon persists without explanation, resetting shooting settings to default may resolve configuration conflicts.
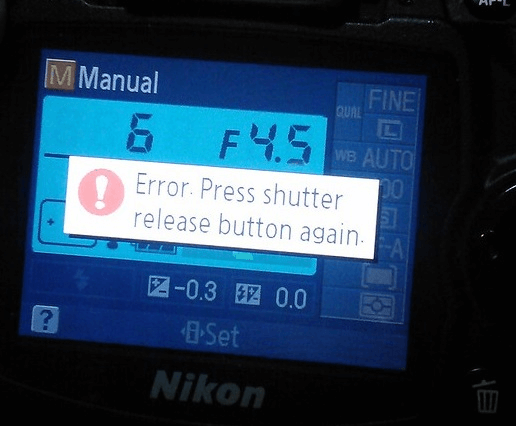
9. "Shutter Release" Error Message
A "Shutter Release" Error typically indicates that the camera cannot complete the shutter cycle. Causes include low battery voltage, shutter mechanism obstruction, mirror lock malfunction, or internal mechanical wear. In some cases, the camera may display "Error. Press shutter release button again". This suggests a temporary mechanical interruption rather than immediate hardware failure.
Recommended Solution Steps
Step 1. Turn off the camera and remove the battery for several minutes.
Step 2. Insert a fully charged Nikon-approved battery.
Step 3. Remove the lens and inspect the mirror box for visible obstructions.
Step 4. Reattach the lens and gently press the shutter release again.
Step 5. If repeated attempts fail, the shutter unit may require professional servicing.
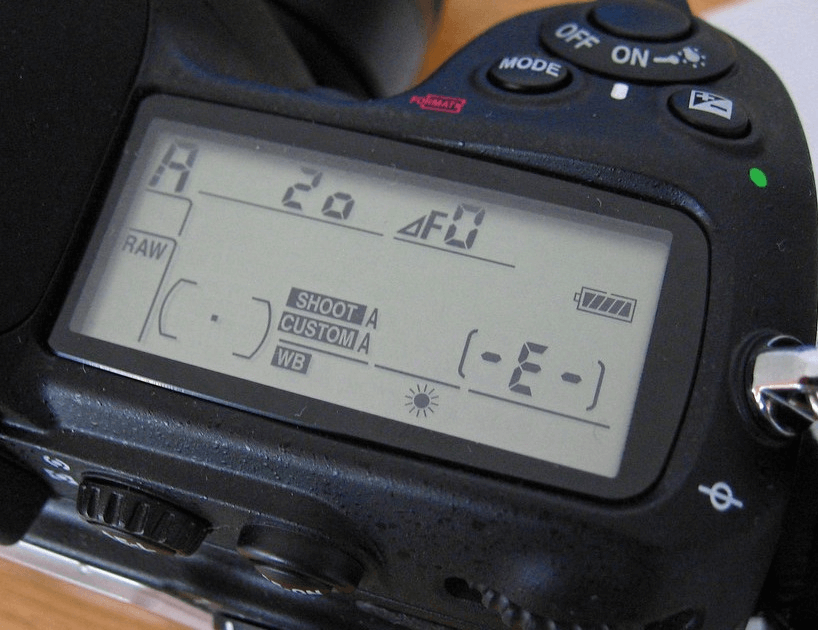
10. "(-E-)" Error
The "(-E-)" error generally relates to exposure system malfunction or aperture communication failure. It may appear when the camera cannot properly control or detect lens aperture values, especially during shooting. This can result from lens incompatibility, dirty electrical contacts, or internal aperture control faults.
Recommended Solution Steps
Step 1. Power off the camera and detach the lens.
Step 2. Clean the electronic contacts on both lens and mount carefully.
Step 3. Reattach the lens securely and power the camera on.
Step 4. Test in Aperture Priority (A) mode to verify aperture control responds correctly.
Step 5. If the error continues with multiple lenses, internal servicing may be required.
Summary
Nikon DSLR error codes are diagnostic signals that typically relate to lens communication faults, shutter or aperture malfunctions, or memory card issues. Most problems can be resolved through systematic troubleshooting. Storage-related errors should always be handled carefully to prevent data loss, with recovery performed before formatting when necessary.
By identifying the meaning behind each Nikon DSLR error code and applying the appropriate corrective steps, you can restore normal camera operation efficiently while minimizing the risk of unnecessary repairs or lost images with tools like MyRecover.


Stay Updated With Our
Latest Tips
Add us as a preferred source on Google to never miss helpful guides.