
[Beginner’s Guide] Android Recycle Bin Recovery
Accidentally deleted important files or photos from your Android device? This beginner’s guide to Android recycle bin recovery will help you get them back. You’ll learn where deleted files go, how to recover photos from the Android recycle bin, and what to do if you’ve already emptied it. We’ll also cover the best Android recycle bin file recovery tools to increase your success rate when restoring lost data.
By Emma / Updated on November 10, 2025
About Android Recycle Bin
Unlike Windows or macOS, Android doesn’t have a universal "Recycle Bin" where all deleted files are stored. Instead, many Android apps (like Gallery, Files by Google, or Samsung My Files) have their own built-in trash or recently deleted folders. These folders temporarily store deleted items (usually for 30 days) before they’re permanently erased. This feature helps users recover accidentally deleted photos, videos, or documents without using third-party tools.
Where to Locate the Recycle Bin in Android?
To carry out Android Recycle Bin recovery, first we should figure out where it is. Generally speaking, the location of the recycle bin depends on the phone brand and the app used. Here’s how to find it on some common Android devices:
📱Samsung Phones: Open the Gallery app. Tap the "Menu" or "More" options icon. Select "Recycle Bin" to view deleted photos or videos.
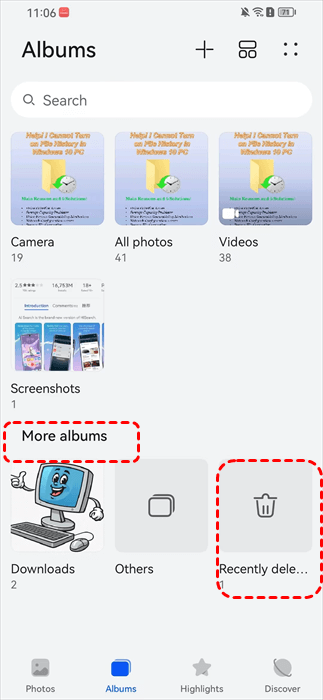
📱Huawei Phones: Open the Gallery app. Tap "Albums", Scroll down to the bottom "More Album". Select "Recently Deleted" to check deleted items.
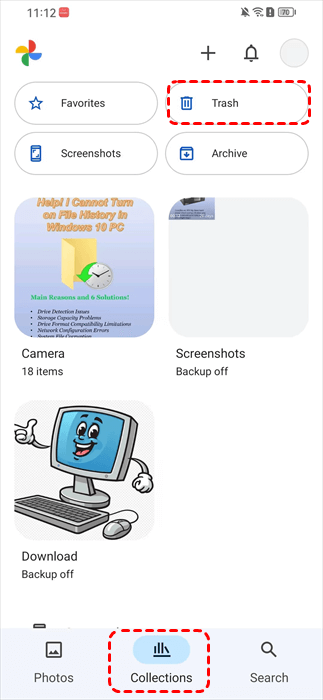
☁️Google Photos: Open Google Photos. Tap "Library" or "Collections" > "Trash". Long-press any photo or video to Restore it.
☁️Google Drive: Launch the app. Tap the "Menu" icon > "Trash". Choose the file you want to recover and tap Restore.
How to Perform Android Recycle Bin Recovery?
Once you locate the recycle bin on your Android device, you can easily restore recently deleted files in different devices or apps. Let’s go through all cases step by step.
1: Recover Photos & Videos from Gallery App Recycle Bin
When a photo or video is deleted from the Gallery app, many manufacturers keep it in a built-in trash/recently deleted folder for a limited time (commonly 15–30 days). If the item is still there you can restore it quickly with the following general steps (works for most Gallery apps)
Step 1. Open the Gallery (or Photos/Gallery+) app on your Android device.
Step 2. Look for "More Albums", sometimes found at the top or bottom of the screen.
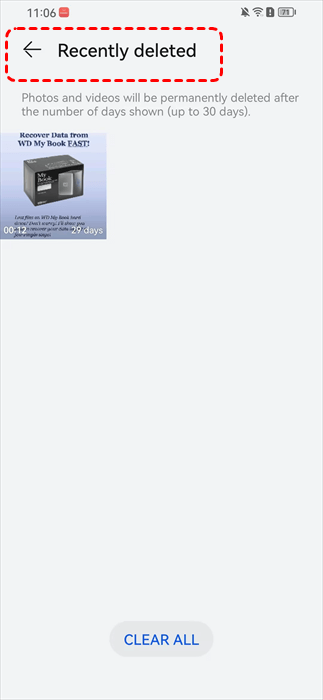
Step 3. Look for "Trash", "Recycle Bin", or "Recently Deleted" and open it.
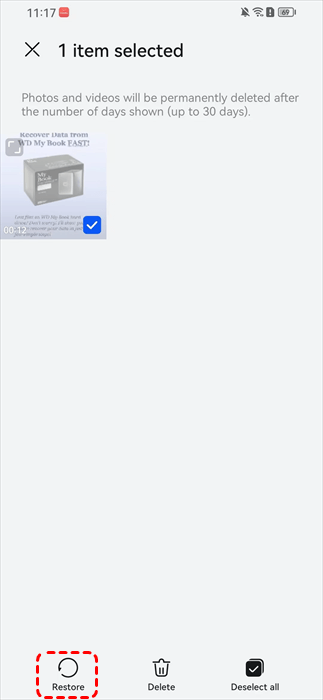
Step 4. Browse or long-press to select the photo(s) or video(s) you want to restore. Tap "Restore" (or Recover) — the item will be returned to its original album/location.
2: Recover Photos & Videos from Google Photos Recycle Bin
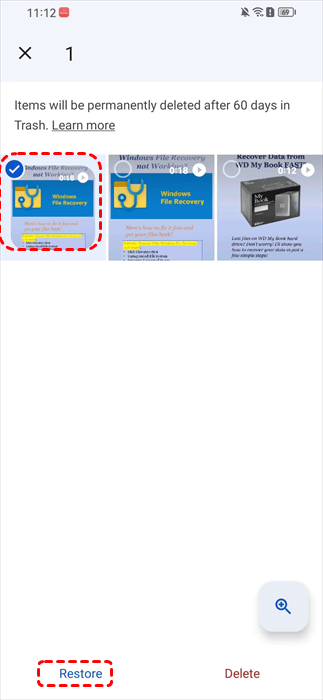
If your photos or videos were backed up or managed by Google Photos, you can easily restore them from its built-in Trash (also known as the recycle bin). Google Photos automatically keeps deleted items for 60 days before they’re permanently removed. Here’s how to recover them:
Step 1. Open the Google Photos app on your Android device.
Step 2. Tap the "Library" or "Collections" icon at the bottom.
Step 3. Select "Trash" (or Bin, depending on your region).
Step 4. Long-press the photo or video you want to restore.
Step 5. Tap "Restore" at the bottom of the screen.
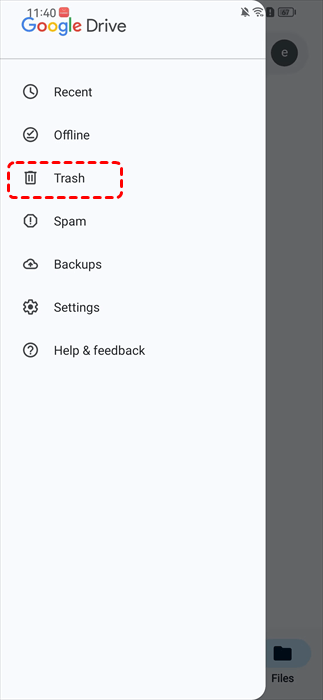
3: Recover Files from Google Drive Recycle Bin
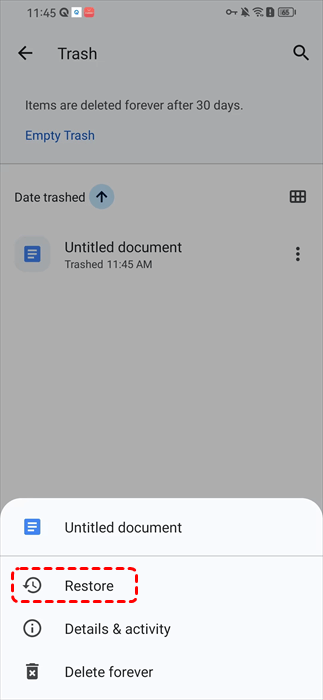
If you deleted downloads, documents, or media files using Google Drive, they don’t vanish immediately. Instead, they’re temporarily moved to the app’s Trash folder for 30 days before being permanently erased. You can easily restore them with the following steps.
Step 1. Launch the Google Drive app on your Android device.
Step 2. Tap the "Menu" icon (☰) in the left top-right corner.
Step 3. Select "Trash" from the list. Browse the deleted files in the Trash folder, then tap and hold to select the ones you want to recover.
Step 4. Tap "Restore" to move them back to their original folders.
What If the Android Recycle Bin is Emptied?
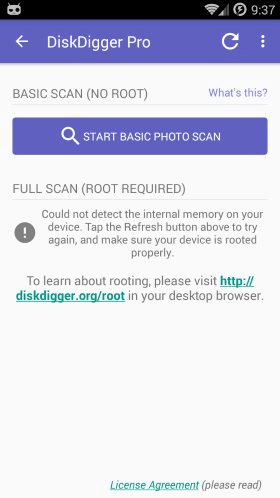
If you’ve already emptied the Android recycle bin or can’t find your deleted files there, you’ll need to use an Android data recovery tool. Tools like DiskDigger can deeply scan your phone storage and restore deleted files, photos, or videos even if they’ve been removed from the recycle bin.
Step 1. Download and install this Android data recovery app on your phone.
Step 2. Launch the software. When prompted, tap "Allow" to grant access to your photos, media, and files.
Step 3. Tap "Start Basic Photo Scan" to begin searching your device’s internal storage (For a full and deeper scan, root access may be required).
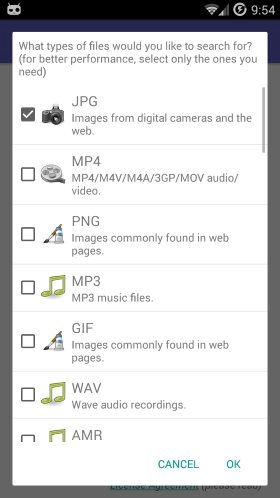
Step 4. Choose the file type you want to search for on the target phone and recover, and click on "OK".
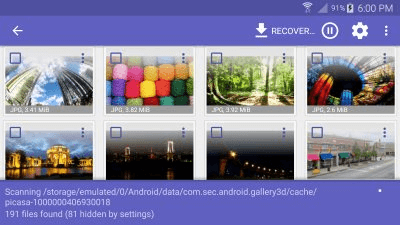
Step 5. Wait for DiskDigger to finish scanning. It will list recoverable photos and videos. Check the boxes next to the items you want to recover. Tap "Recover".
If your Android device uses an SD card as internal or portable storage, there is also a professional tool named MyRecover to recover data from Android SD card formatted as internal storage. MyRecover is able to perform a deep scan of the entire SD card, detect deleted or lost files, and restore them effectively even after formatting.

- 💖High Success Rate– Achieves up to 99% recovery success,.
- 💖AI-Powered Recovery– Uses AI recognition and deep scanning technology.
- 💖Broad Compatibility – Supports 1000+ file formats and 500+ storage devices.
- 💖Versatile Functionality – Handles 500+ data loss scenarios.
Step 1. Power off your Android phone safely. Eject the SD card and insert it into a card reader. Connect the card reader to your Windows computer or laptop.

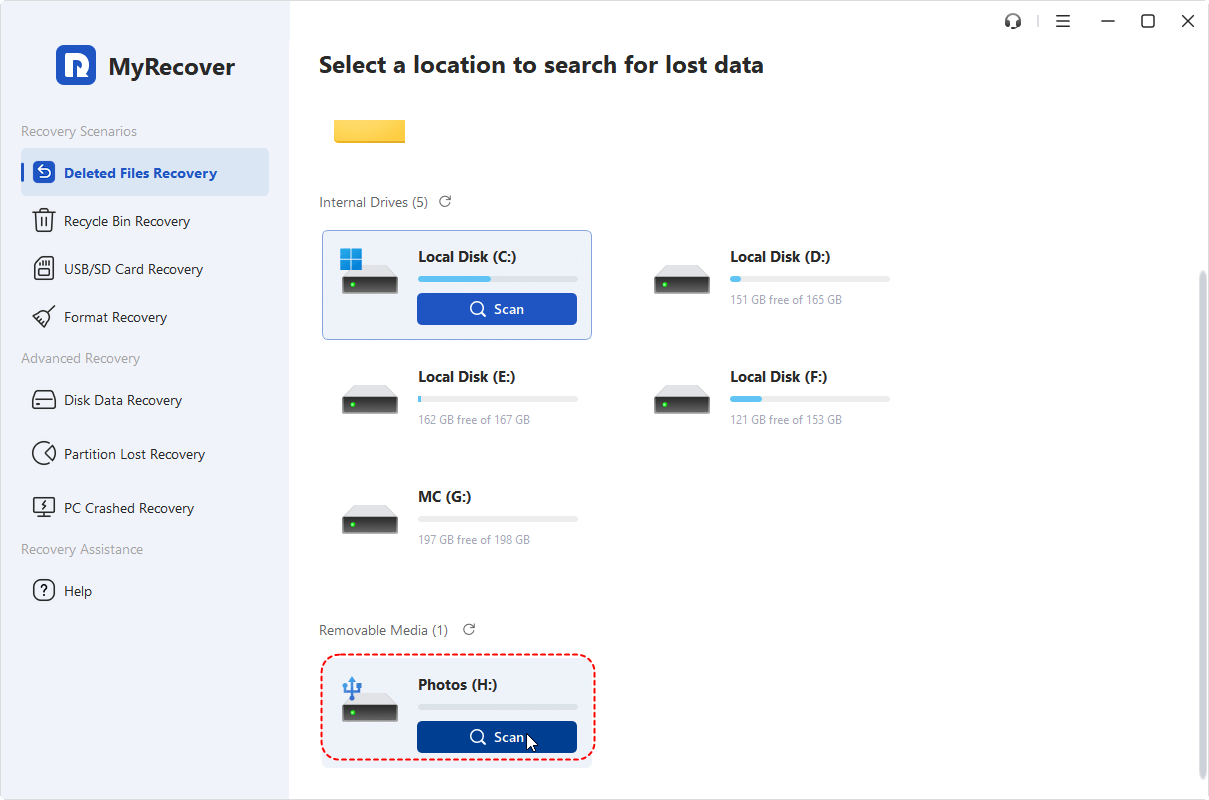
Step 2. Download and install MyRecover. Open the program, and it will automatically detect all connected drives, including your SD card. Select the SD card and click "Scan" to begin searching for deleted or lost files.
Step 3. Wait for the scanning process to finish — MyRecover will list all recoverable files. Use filters or search function to find specific items easily.
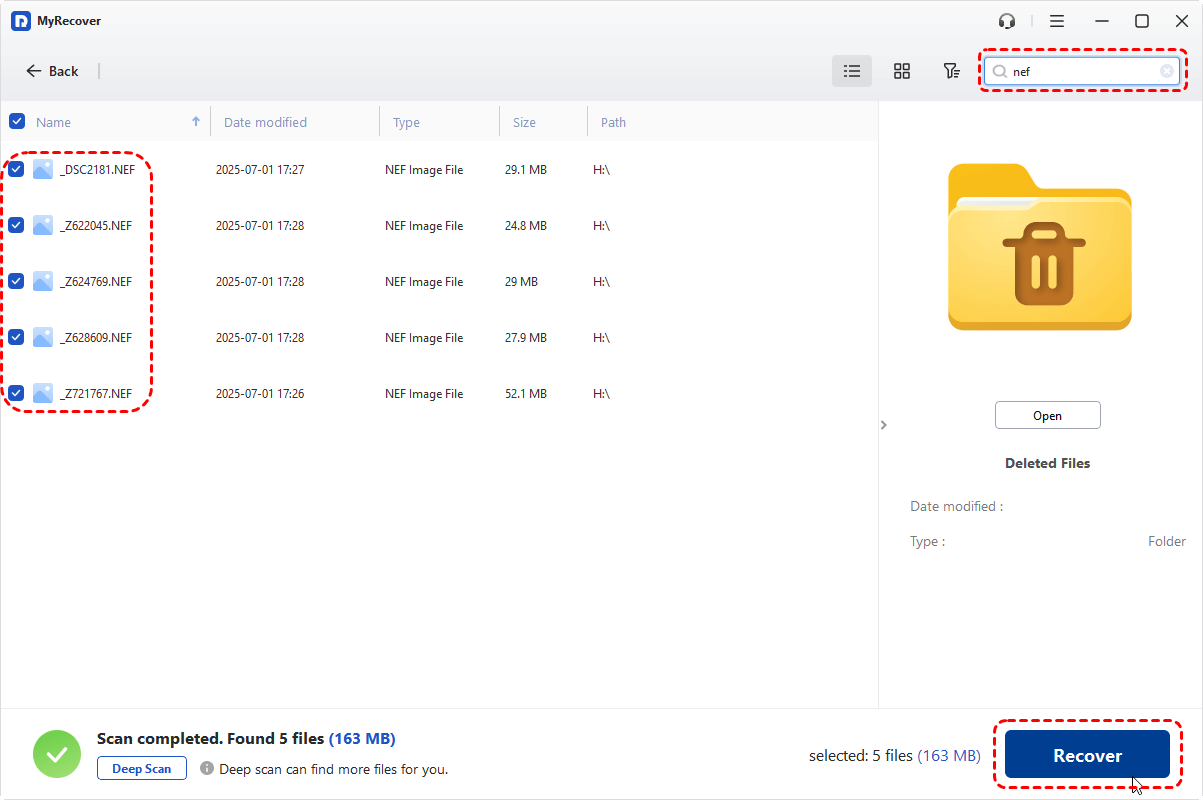
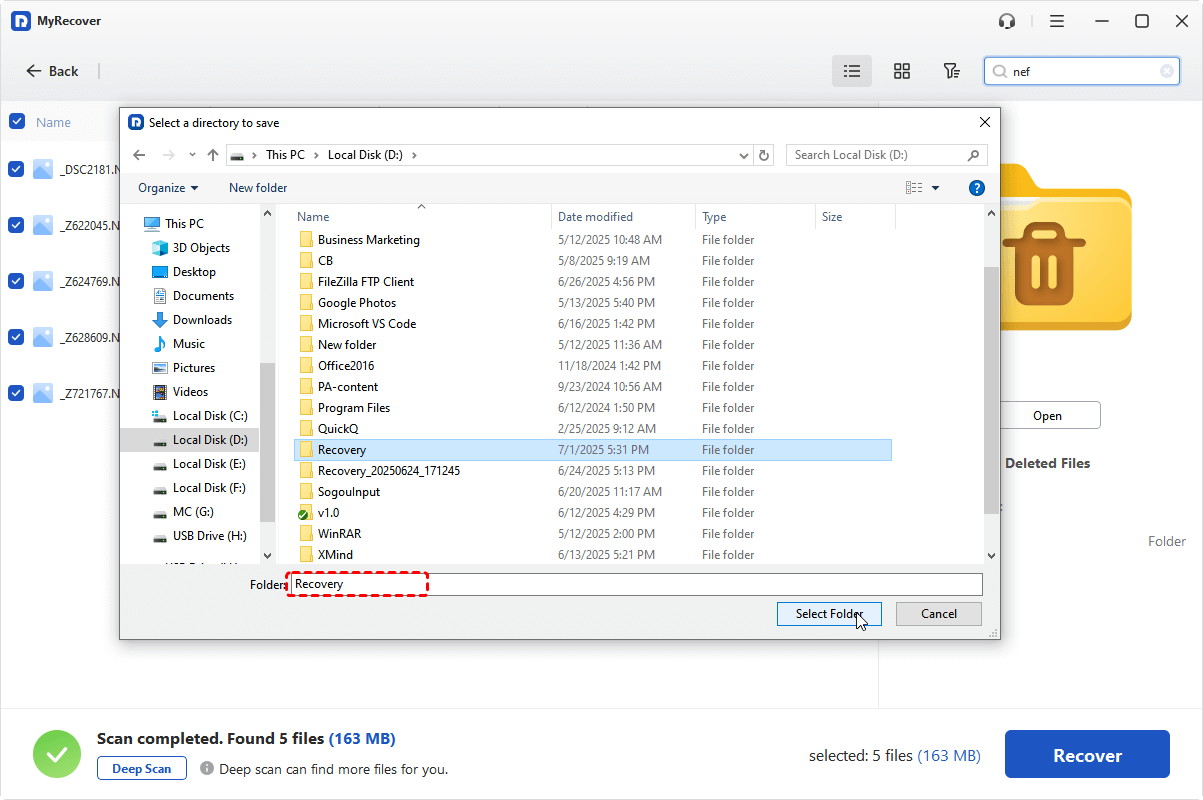
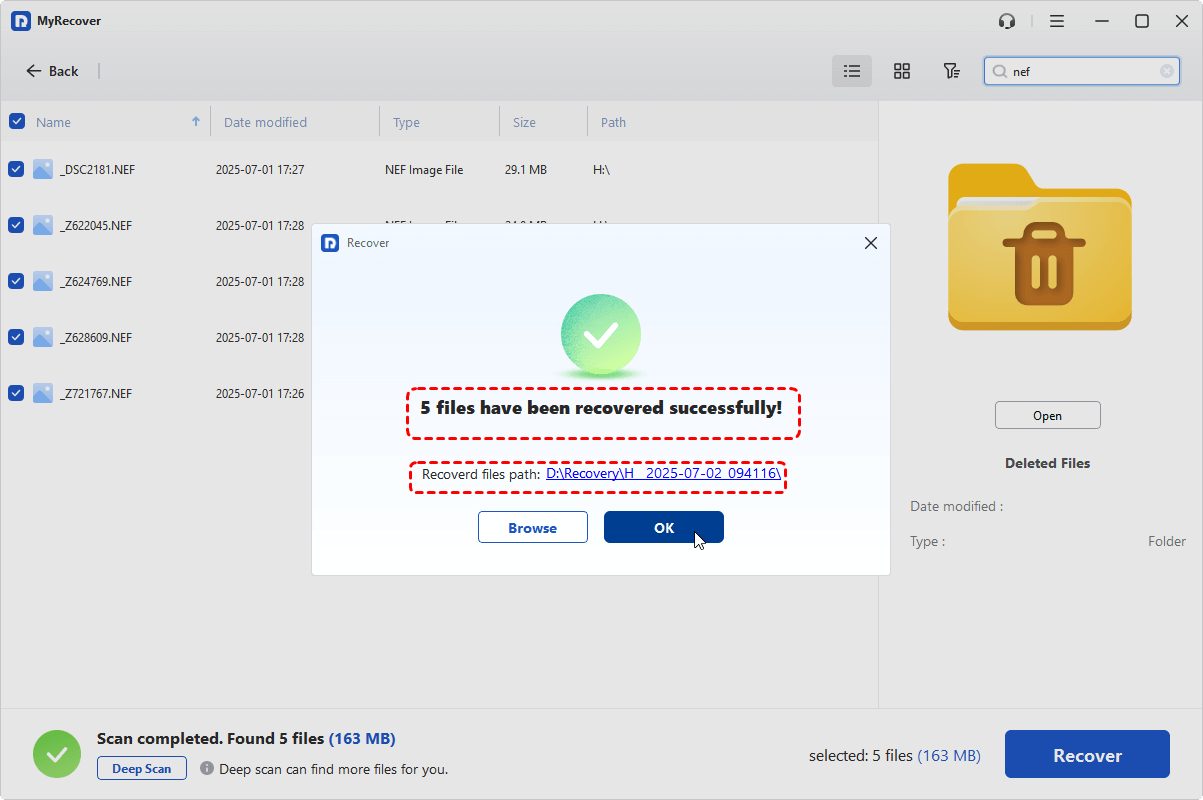
Step 4. Select the files you want to restore and then click "Recover". Choose a safe destination folder (not on the same SD card) to prevent overwriting.
Then wait for the recovery process to complete.
Conclusion
Android Recycle Bin recoveryis often easier than it seems — as long as you act quickly. Most Android phones and apps, such as Gallery, Google Photos, and Google Drive, include built-in recycle bins that temporarily store deleted data for a limited time. You can restore photos, videos, and documents directly from there within 30–60 days.
If the Android Recycle Binhas already been emptied, tools like DiskDigger and MyRecover provide powerful options to scan your phone’s internal storage or SD card and recover permanently deleted files.


Stay Updated With Our
Latest Tips
Add us as a preferred source on Google to never miss helpful guides.