
How to Disable Recycle Bin Windows 11?
This guide explains how to disable Recycle Bin in Windows 11, including methods to turn off Recycle Bin, prevent files from being stored in it, and hide the Recycle Bin icon from your desktop. Whether you want to delete files permanently, clear Recycle Bin automatically, or remove its visibility, this tutorial provides step-by-step solutions for every scenario.
By Emma / Updated on December 4, 2025
Why Disable Recycle Bin in Windows 11?
The Recycle Bin serves as Windows’ safety net for file deletion. When you delete a file, it doesn’t disappear immediately—instead, it is moved to the Recycle Bin. So you can easily restore files from Recycle Bin later if the deletion was accidental. This prevents data loss and gives you a second chance to recover important files before they are permanently removed.
However, there are situations where users may prefer to disable the Recycle Bin entirely:
🔸You want files to be deleted permanently right away, without storing them temporarily.
🔸You work on a shared or public computer, and you don’t want deleted items to remain visible or recoverable.
🔸You want to save storage space, especially on PCs with limited disk capacity or SSDs.
🔸You prefer a cleaner and faster workflow, avoiding the need to manually empty the Recycle Bin.
🔸You want a minimalist desktop, without the Recycle Bin icon or its functions.
3 Methods to Disable Recycle Bin in Windows Computer
To streamline file management and ensure deleted files are removed immediately, you can disable the Recycle Bin by turning off its functionality (storing deleted files) using the following methods.
Method 1. Turn off Recycle Bin in Its Properties & Setting
This method directly disables the Recycle Bin’s storage function. When you enable the option "Do not move deleted files to the Recycle Bin", Windows will permanently delete files immediately instead of storing them temporarily in Recycle Bin.
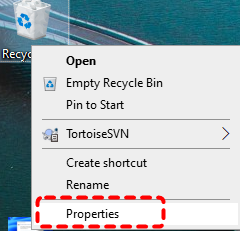
Step 1. Right-click the "Recycle Bin" icon on your desktop and select "Properties".
Step 2. In the Recycle Bin Properties window, choose the drive you want to configure (usually C:).
- Note:✎...
- Each drive in Windows has its own Recycle Bin folder and settings. This means you can configure different behaviors for each drive individually—for example, you might keep the Recycle Bin enabled on one drive while permanently deleting files from another. Check how to review $Recycle.bin files on each drive.
Step 3. Select "Don’t move files to the Recycle Bin. Remove files immediately when deleted."
(Optional) Check "Display delete confirmation dialog"if you want Windows to ask before permanent deletion.
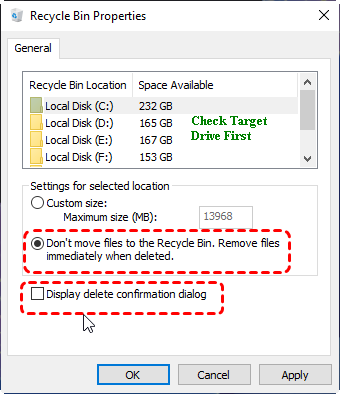
Step 4. Click "Apply", then "OK".
After enabling this setting, any file you delete will be permanently removed, and it will no longer appear in the Recycle Bin.
Method 2. Disable Recycle Bin via Registry Editor
The Windows Registry Editor allows you to directly control Recycle Bin behavior. By modifying specific registry keys, you can turn off the Recycle Bin so that deleted files are permanently removed immediately, bypassing the Recycle Bin entirely.
This method is useful if you want to enforce permanent deletion system-wide or automate the setting across multiple drives.
- ⚠️Note:✎...
- Modifying the Windows Registry can affect system stability. It’s recommended to back up the registry or create a system restore point before proceeding.
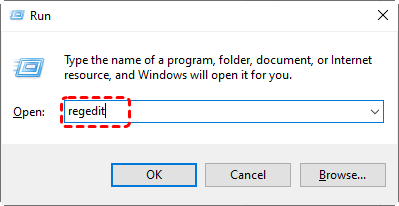
Step 1. Press "Win + R" to open the "Run" dialog.Type "regedit" and press Enter. Click Yes if prompted by User Account Control.
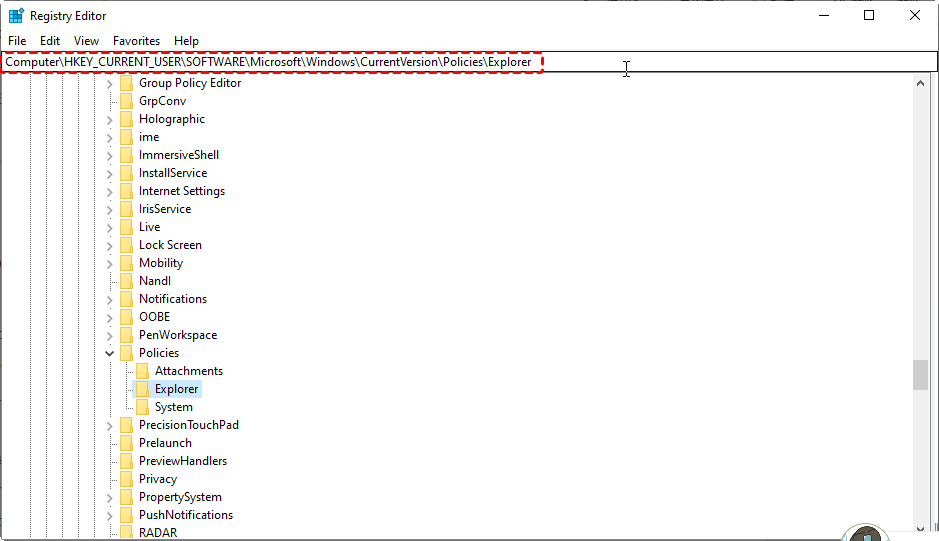
Step 2. Go to the following path:
HKEY_CURRENT_USER\Software\Microsoft\Windows\CurrentVersion\Policies\Explorer
Step 3. In the right pane, look for a DWORD (32-bit) value named NoRecycleFiles.Double-click NoRecycleFiles and set the Value data to 1.
- 1 = Delete files permanently
- 0 = Use Recycle Bin normally
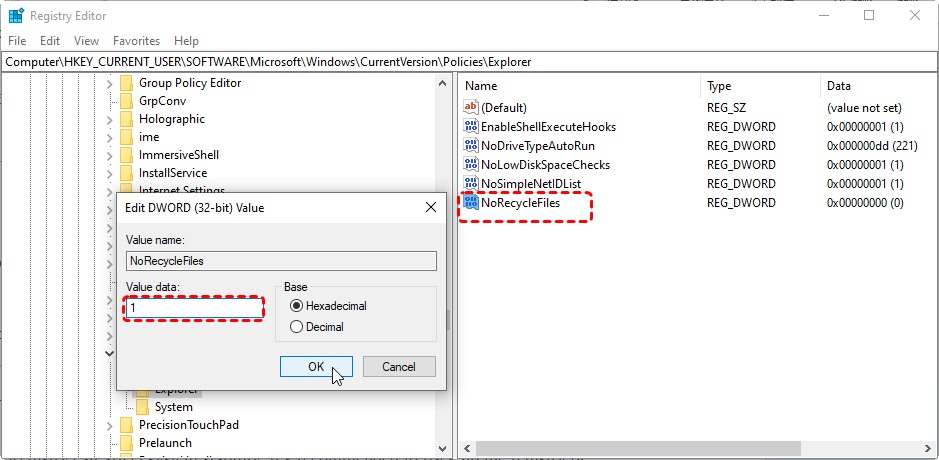
If it doesn’t exist, right-click the blank area, select New → DWORD (32-bit) Value, and name it NoRecycleFiles.

Step 4. Click "OK" and close the Registry Editor.
Restart Windows 11 for the changes to take effect. After completing these steps, any file you delete will be permanently removed immediately, bypassing the Recycle Bin.
Method 3. Disable Recycle Bin through Local Group Policy Editor
If your computer is running Windows 11 Pro, Enterprise, or Education, you can also turn off Recycle Bin function in the Local Group Policy Editor, which provides a powerful way to modify Recycle Bin behavior. By configuring the appropriate policy, you can permanently disable the Recycle Bin, ensuring that deleted files are removed immediately instead of being stored temporarily.
This method is especially useful for system administrators who want to enforce permanent deletion across multiple users or drives.
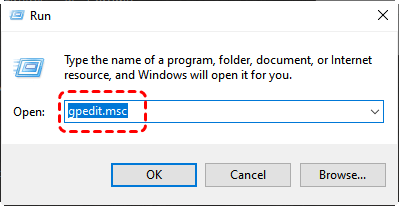
Step 1. Press "Win + R" to open the "Run" dialog.Type "gpedit.msc" and press Enter.
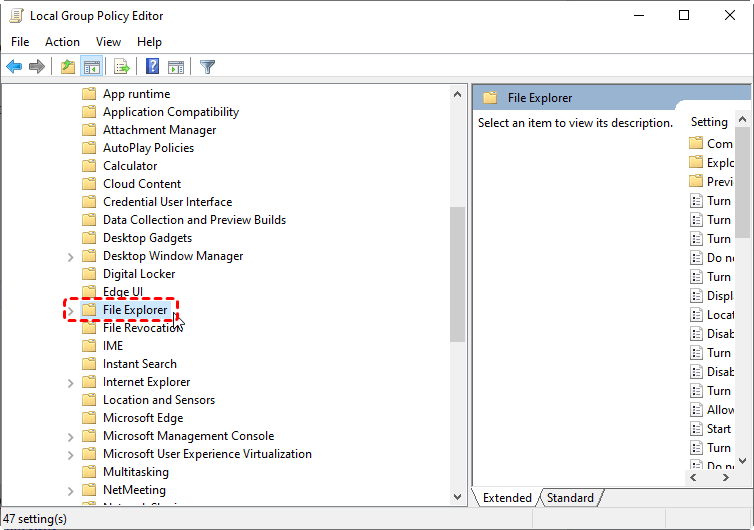
Step 2. In the left pane, go to:
User Configuration → Administrative Templates → Windows Components → File Explorer
Step 3. In the right pane, double-click "Do not move deleted files to the Recycle Bin".
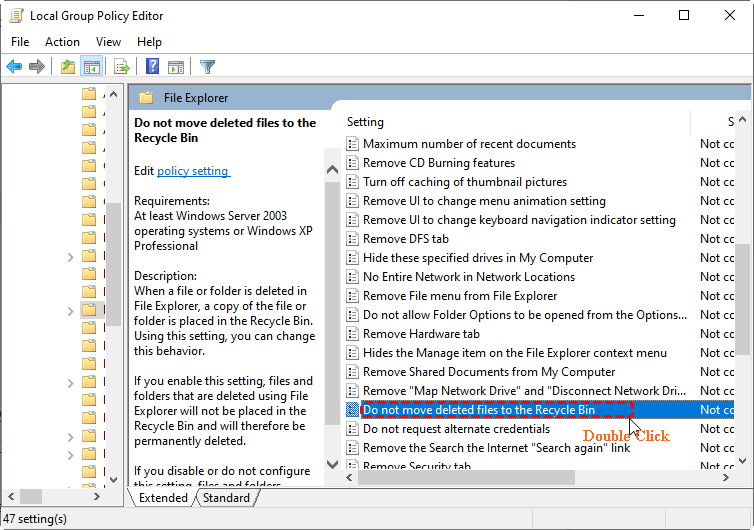
Step 4. In the policy settings window, select "Enabled". Click "Apply", then "OK".
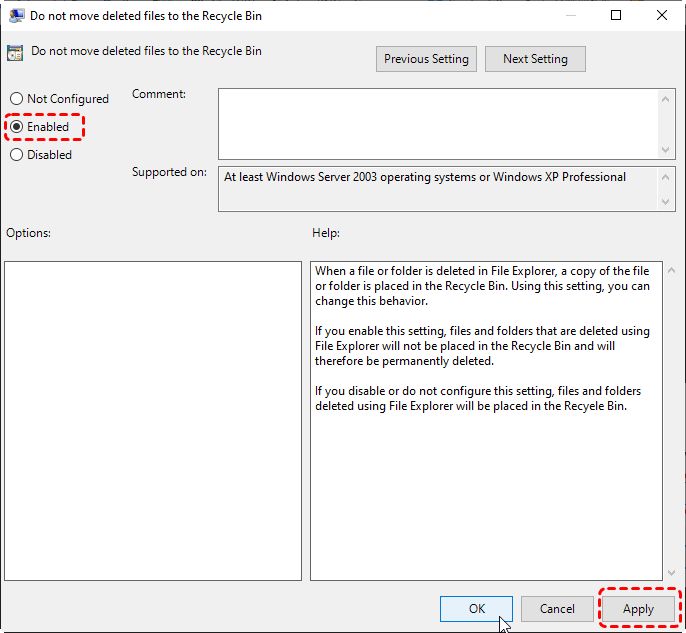
Restart Windows 11 for the policy changes to take effect.
Bonus Tip: How to Hide or Remove the Recycle Bin Icon from Computer Desktop
The above methods aim to completely disable the Recycle Bin’s function of temporarily storing deleted files from internal drives. If you only want to clean up your desktop, you can simply hide the Recycle Bin icon by following these steps.
This method does not stop Windows from storing deleted files in the Recycle Bin; deleted files will continue to be stored in the Recycle Bin until you empty it manually. It only removes the Recycle Bin icon from Desktop view, giving you a more minimalist and distraction-free desktop.
Step 1. Right-click on the desktop and select "Personalize".

Step 2. In the Personalization settings, scroll down and click "Themes".
![]()
Step 3. Under the "Themes" section, select "Desktop icon settings".
Step 4. In the Desktop Icon Settings window, uncheck the "Recycle Bin" option.
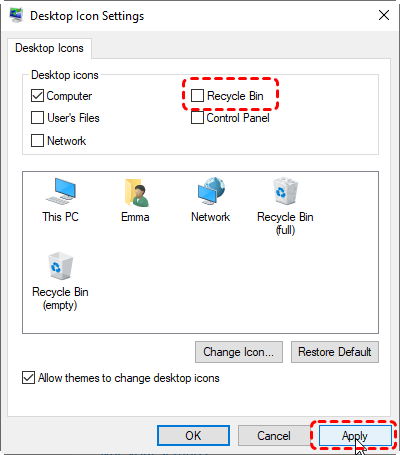
Step 5. Click "Apply", and then choose "OK".
How to Perform Data Recovery After Disabling Recycle Bin?
Disabling the Recycle Bin in Windows 11 or configuring it to permanently delete files immediately can streamline file management, but it also removes the safety net that normally protects against accidental deletions. Once files bypass the Recycle Bin, they cannot be restored through standard Windows methods, making accidental data loss a serious risk.
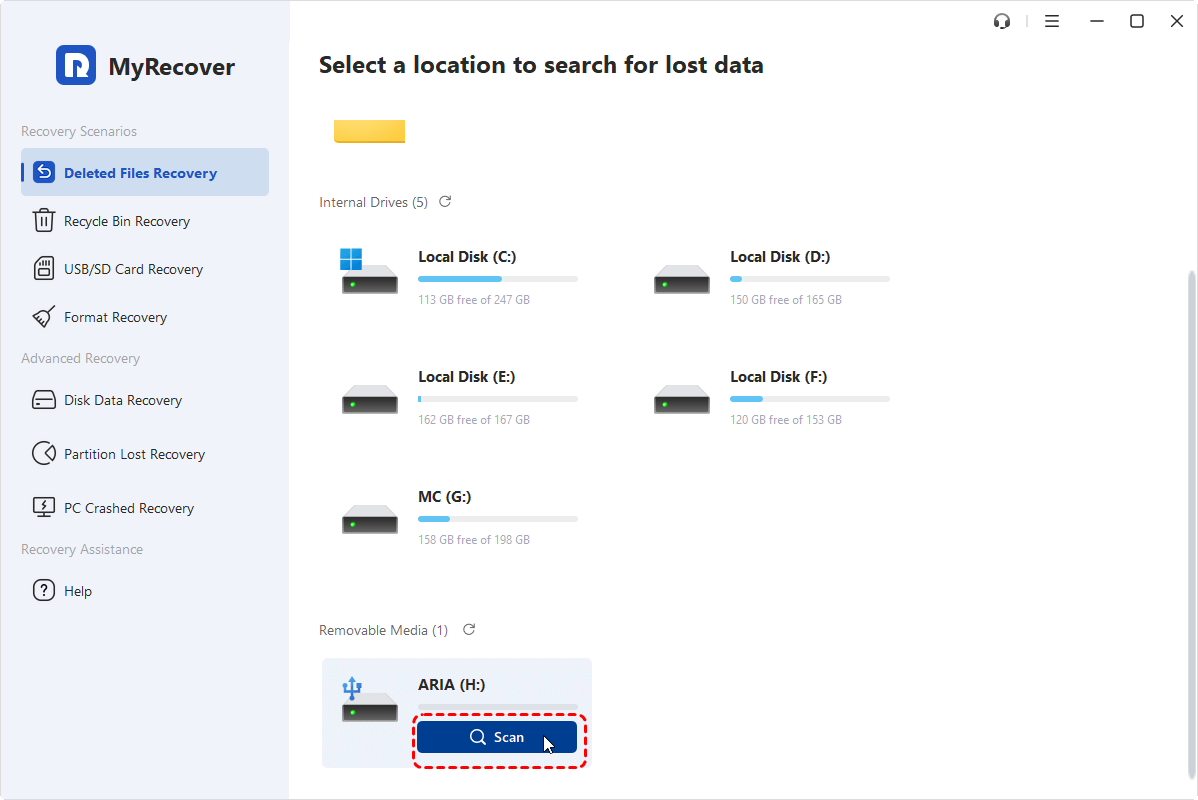
In such cases, using a professional data recovery tool like MyRecover can help you safely and efficiently recover permanently deleted files. It supports recovery from internal drives, external USB drives, SD cards, and even after disk formatting, file system error, system crash, etc, offering a reliable solution when the Recycle Bin is disabled.

- 🌟Recover Without Backup: Restore lost files even if no Windows backup exists.
- 🌟High Success Rate: AI-powered file recognition and recovery algorithms ensure easy use and zero file omission.
- 🌟Wide File Support (1000+): Recover photos, documents, videos, audio, archives, and more.
- 🌟Supports Multiple Devices (500+): Works on HDDs, SSDs, USB drives, SD cards, cameras, and other storage devices.
- 🌟Covers 500+ Data Loss Scenarios: Handles accidental deletion, formatting, system crashes, virus attacks, emptied Recycle Bin, partition loss, and more.
Step 1. Download and install MyRecover on your Windows 11 computer. Launch the program after installation. Select the drive or partition where the deleted files were originally stored. Click Scan to let MyRecover scan the selected drive for deleted or lost files.
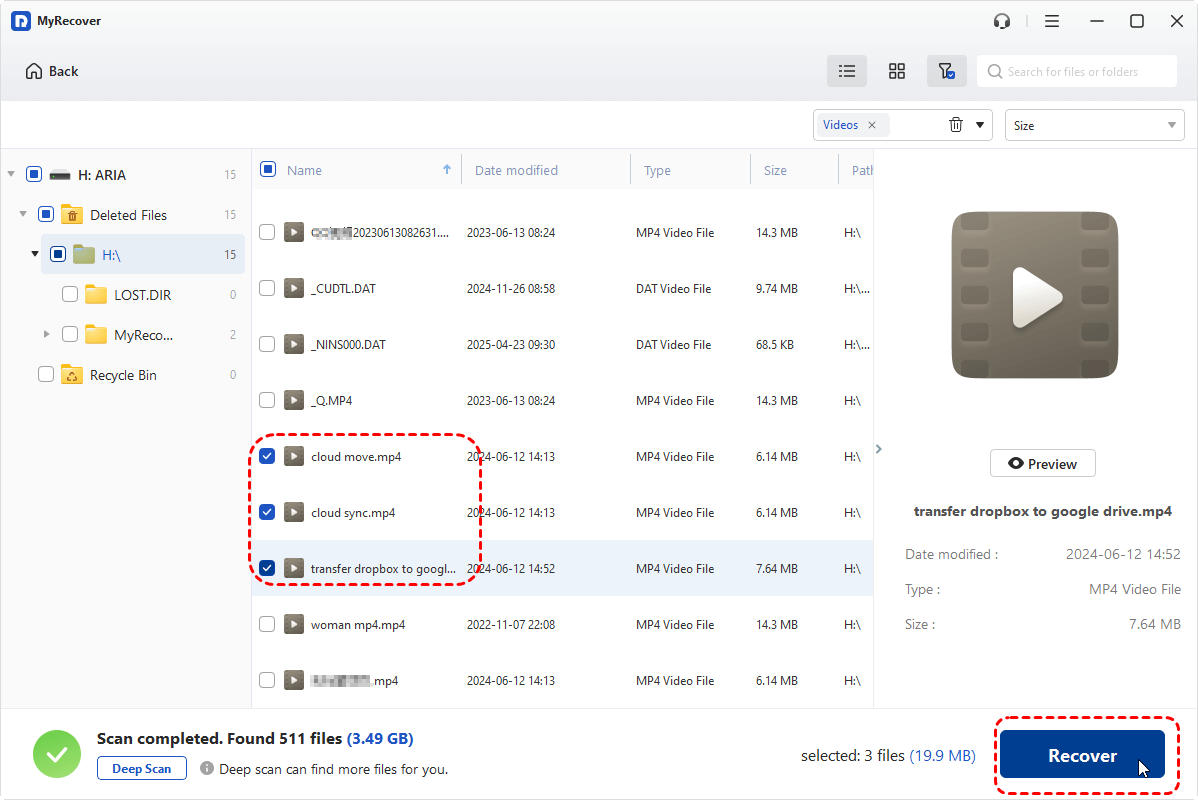
Step 2. Once the scan is complete, browse through the all recoverable files, Select the files you want to recover and click Recover.
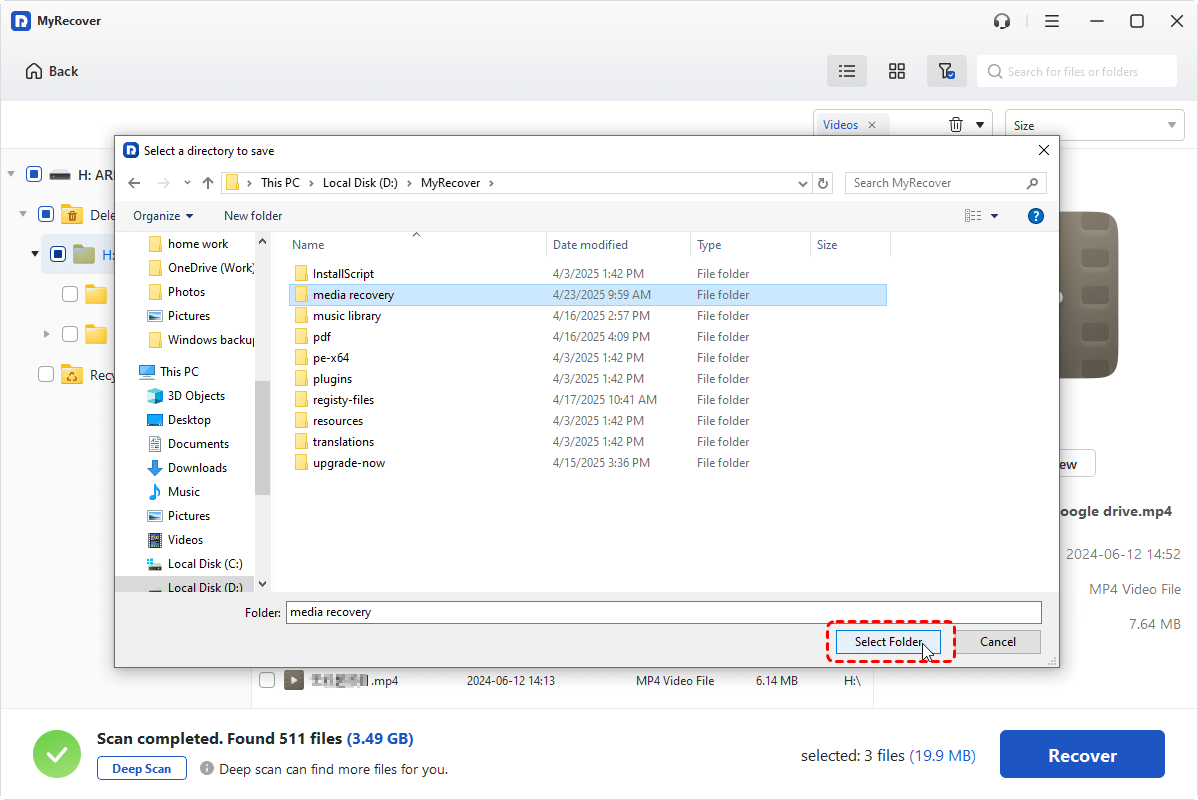
Step 3. Choose a safe location (preferably a different drive) to save the restored files.
Summary
Disabling the Recycle Bin in Windows 11 can help streamline file management, save storage space, and maintain a cleaner desktop. Whether you choose to turn off Recycle Bin in its properties, modify the Registry, or use the Local Group Policy Editor, each method ensures that deleted files are removed immediately, bypassing the Recycle Bin.
However, permanently deleting files also increases the risk of accidental data loss. Tools like MyRecover provide a reliable way to recover Windows hard disk data from 500+ different data loss cases, even after the Recycle Bin has been disabled.


Stay Updated With Our
Latest Tips
Add us as a preferred source on Google to never miss helpful guides.