
How to Recover Data After MBR to GPT Conversion
Many users panic, saying 'I lost all my files after converting MBR disk to GPT'. But recovery is possible! Discover effective data restoration tools, step-by-step solutions, and expert tips to regain access to your important files seamlessly.
By Vera / Updated on May 29, 2026
Introduction
Lost all my files after converting MBR disk to GPT
Long story short i basically converted my mbr disk into a gpt disk and lost everything on it ( i didn't format )
does anyone know how i can find the lost data? i really need to find it because my dumb self had the secret key for my crypto wallet there,,,
if i don't find the data i basically lost over 1000$+++ in nfts...
- Question from https://forums.tomshardware.com/
This cry for help is common on tech forums like Tom’s Hardware. Users often attempt to modernize their storage—perhaps to prepare for a Windows 11 upgrade—only to find their partitions have vanished. While the conversion process (especially via Command Prompt or Disk Management) is often marketed as a simple administrative task, it fundamentally rewrites the "map" of your hard drive. If that map is rewritten incorrectly or the old one is deleted before the new one is finalized, you face a critical data loss scenario.
If you have lost access to critical files, crypto keys, or NFTs due to a disk conversion, do not panic. The data is likely still on the disk; the operating system just doesn't know where to look. This guide provides a strategic roadmap on how to recover data after MBR to GPT conversion efficiently.
Understanding the Architecture: MBR vs. GPT
Before attempting to recover lost data after disk MBR to GPT conversion, it is essential to understand what changed.
-
MBR (Master Boot Record): An older standard that uses a 32-bit table to track partitions. It is limited to 2TB and 4 primary partitions. It stores its data at the very beginning of the disk.
-
GPT (GUID Partition Table): Part of the UEFI standard. It uses 64-bit identifiers, supports disks up to 9.4ZB, and stores multiple copies of the partition table (at the beginning and end of the disk) for redundancy.
Key Differences Between MBR and GPT
| Feature | MBR | GPT |
|---|---|---|
| Partition Limit | 4 Primary | 128 Primary |
| Max Disk Size | 2TB | 9.4ZB (virtually unlimited) |
| Boot Mode | BIOS | UEFI |
| Backup Partition Table | No | Yes |
| Corruption Tolerance | Low | High |
Why Do People Convert MBR to GPT and What Causes Data Loss?

Why Do People Convert MBR to GPT?
There are several reasons to switch from MBR to GPT — and most of them are linked to performance and compatibility.
- 🔖Compatibility with UEFI: UEFI firmware requires GPT, not MBR. So if you’re upgrading your system, conversion is often mandatory.
- 🔖Support for Larger Drives: Disks larger than 2TB can’t be fully used on MBR. GPT solves that limit easily.
- 🔖Performance and Stability Benefits: GPT disks handle errors better and provide redundancy, making them more secure for modern systems.
What Causes Data Loss During Conversion?
Data loss usually occurs because of missteps during the conversion process. Here’s what typically goes wrong:
- ☹️Using Disk Management or Command Line Tools Incorrectly: Some built-in tools require deleting partitions before converting, which wipes all your data.
- ☹️Failed or Interrupted Conversion Process: Power failure or improper shutdown during conversion can corrupt partitions, making your data unreadable.
Precautions Before Attempting Data Recovery
Recovery success is dictated by one rule: Preserve the current state of the disk. Before jumping into recovery, follow these essential tips:
- 1️⃣Stop Using the Drive Immediately: Stop any new operations on the affected drive — no downloads, installations, or file saves.
- 2️⃣Avoid Formatting or Writing New Data: Do not format or re-partition the disk; this could permanently overwrite lost data.
- 3️⃣Use a Reliable Recovery Tool: Choose software built specifically for partition or format recovery to maximize success.
[3 Methods] How to Recover Data After MBR to GPT Conversion
Can you recover data after MBR to GPT conversion? Yes! Even though your files might not show up, they’re usually still on the disk. Depending on your technical comfort level, choose one of the following strategies to recover lost files after MBR to GPT conversion.
Method 1: Use Professional Data Recovery Software
When a disk is converted and partitions disappear, the actual file data usually remains untouched, but the "Table of Contents" is gone. MyRecover is specifically engineered for these scenarios.
Designed for both beginners and advanced users, it helps restore files lost during disk conversion, formatting, or partition deletion with ease. It scans the disk for the remnants of old partition headers. By identifying where the old MBR boundaries were, it can virtually "reconstruct" the file tree, allowing you to recover entire folders with original names.

- 💡Partition Awareness: Unlike generic tools, it recognizes the signature of lost MBR partitions within a new GPT environment.
- 💡All-in-One Logic: It handles NTFS, FAT32, exFAT, and ReFS, ensuring that no matter what your old MBR disk was formatted as, it can be read.
- 💡User-Friendly: No command-line knowledge required—ideal for users who need a "one-click" solution for high-stakes data (like NFT collections).
Step-by-Step Recovery Using MyRecover
1. Do NOT install MyRecover on the affected disk. Install it on a separate machine or different drive.
2. Launch the software and select the drive that was converted from MBR to GPT.
3. Click Scan to begin searching for lost files and partitions.

4. Preview the recovered files to confirm they’re correct and intact.
5. Click Recover and save the files to a safe location (never the same drive).

MyRecover offers quick scanning, deep analysis, and an intuitive interface, making it ideal for restoring data lost due to disk conversion.
| Pros | ✅Easy GUI, automated steps, high success for non-technical users. ✅Fast previews and selective recovery. |
| Cons | ❌Cost (licensed per PC). ❌Not infallible — very low-level physical damage or overwritten data may still require lab services. |
If you are a technical user who prefers open-source utilities and understands partition geometry, you might consider a manual approach using TestDisk. However, be aware that this method involves writing directly to the partition table, which carries a higher risk of permanent loss if a mistake is made.
Method 2: Use Open-Source Tools (TestDisk + gdisk)
If you like command-line tools and want to repair the partition table directly, TestDisk and gdisk are powerful.
👉1. TestDisk
TestDisk is an open-source tool designed to "fix" the disk's map. It works by searching for "Backup Boot Sectors" to recover lost data after disk MBR to GPT conversion by rewriting the partition table.
When to use TestDisk
- If the partition table is damaged/overwritten but the file system still exists.
- If you want to attempt partition table recovery before deep file carving.
Quick TestDisk Walkthrough (Commands & Tips)
Step 1: Launch TestDisk
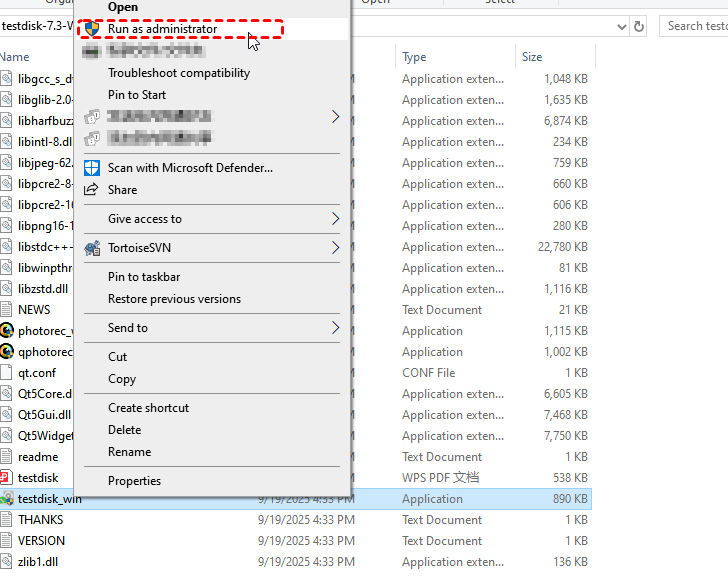
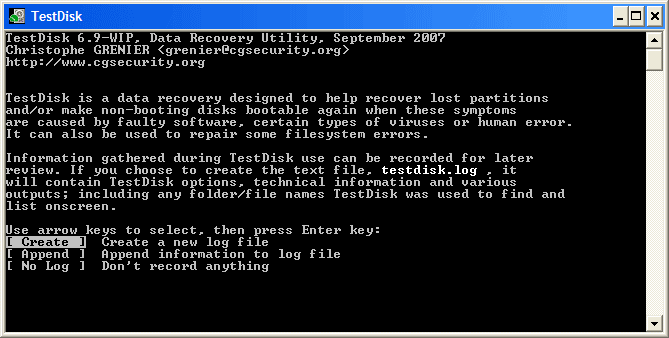
Run TestDisk as Administrator (Windows: testdisk_win.exe, Linux/macOS: sudo testdisk). Select "Create" to make a log file.
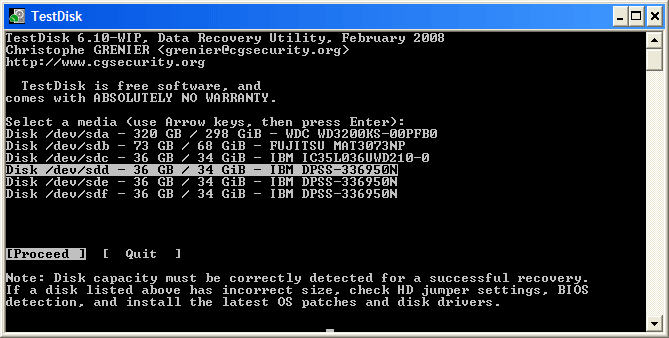
Step 2: Choose the Disk
Use the arrow keys to pick the drive where your partition is missing. Press Enter.
Step 3: Select Partition Table Type
Usually Intel for MBR disks, EFI GPT for modern systems. TestDisk detects this automatically — just confirm the default.
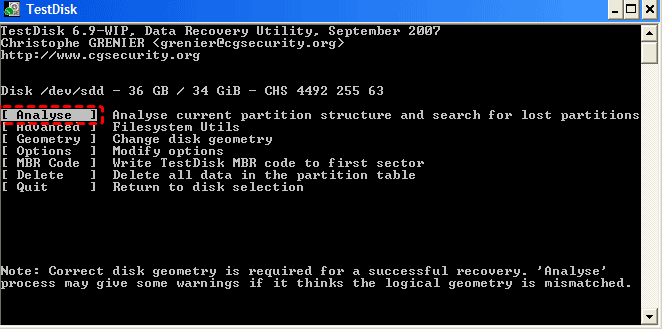
Step 4: Analyse
Select "Analyse" → Enter. Then choose "Quick Search".
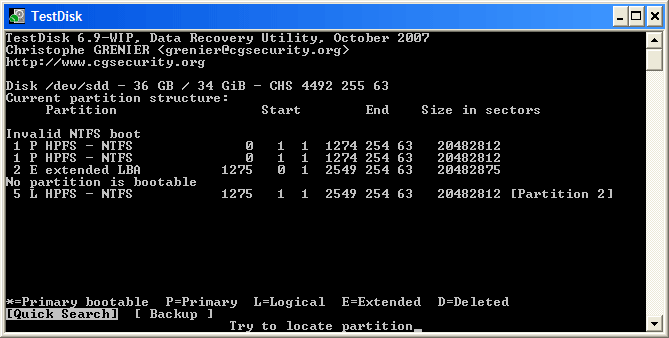
Step 5: Check Found Partitions
TestDisk lists partitions it found. Highlight one → press "p" to view files.
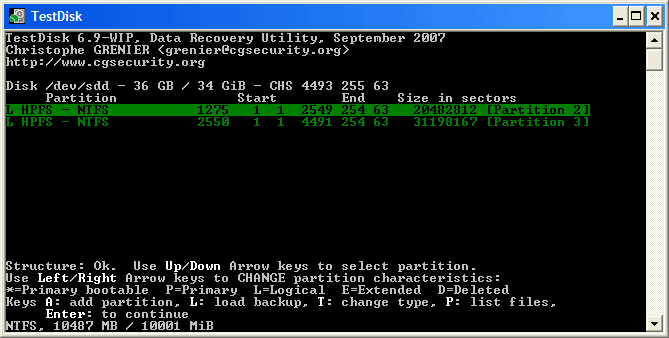
If your files appear = ✅ good sign!
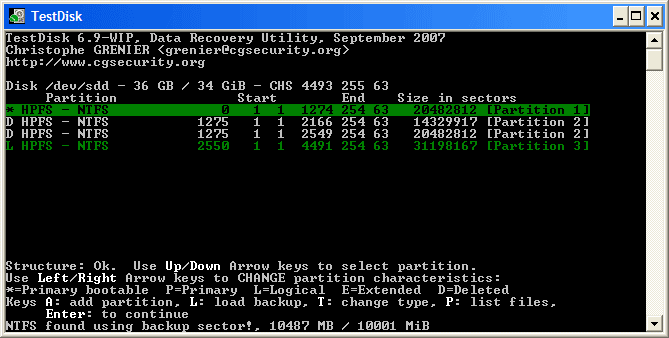
If not found → choose "Deeper Search" (takes longer).
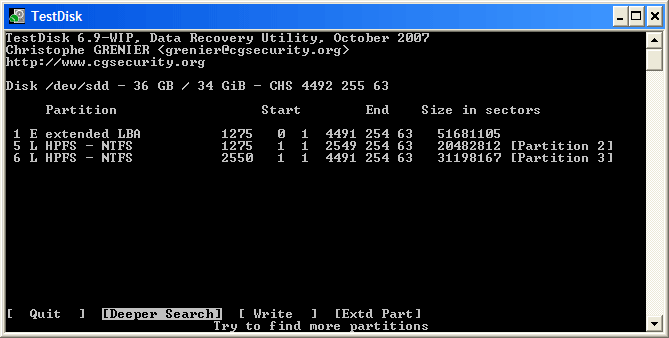
Step 6: Recover the Partition
When you find the correct partition:
- Make sure it’s marked as P (Primary) or * (bootable).
- Press Enter, then choose "Write" to save the partition table.
- Confirm when asked.
Step 7: Reboot
Restart your computer so your OS can reload the new partition table.
Step 8: Check Your Data
Open File Explorer (Windows) or Disk Utility (Mac/Linux). Your recovered partition should now be visible with all your files.
⚠️ If You’re Unsure
- Instead of writing, use "p" → "C" to copy files to another drive. This lets you recover files safely without changing the disk structure.
- If testdisk detects your previous partitions, copying files out to a safe disk is often the safest immediate action.
👉2. Using gdisk to Inspect/Rebuild Partition Tables
gdisk (GPT fdisk) can convert between partition table formats and inspect backup GPT headers. Typical flow:
1. Enter sudo fdisk /dev/sda.
2. Use v to verify disk.
3. Use b to back up partition table, r for recovery options.
4. w writes changes — only use after you are certain.
If the software methods above seem daunting, or if you had a safety net in place before the conversion, the third method is the most reliable and risk-free.
Method 3: Restore from a Backup
Modern Windows OS often creates "Shadow Copies" (snapshots) of your files before major system changes. Furthermore, many users unknowingly have cloud synchronization (OneDrive/Google Drive) active. This method relies on external redundancy rather than disk-level repair. If you’ve been maintaining backups — whether with File History, Windows Backup, or cloud storage — recovery becomes effortless.
- File History: open Control Panel → File History → Restore personal files.
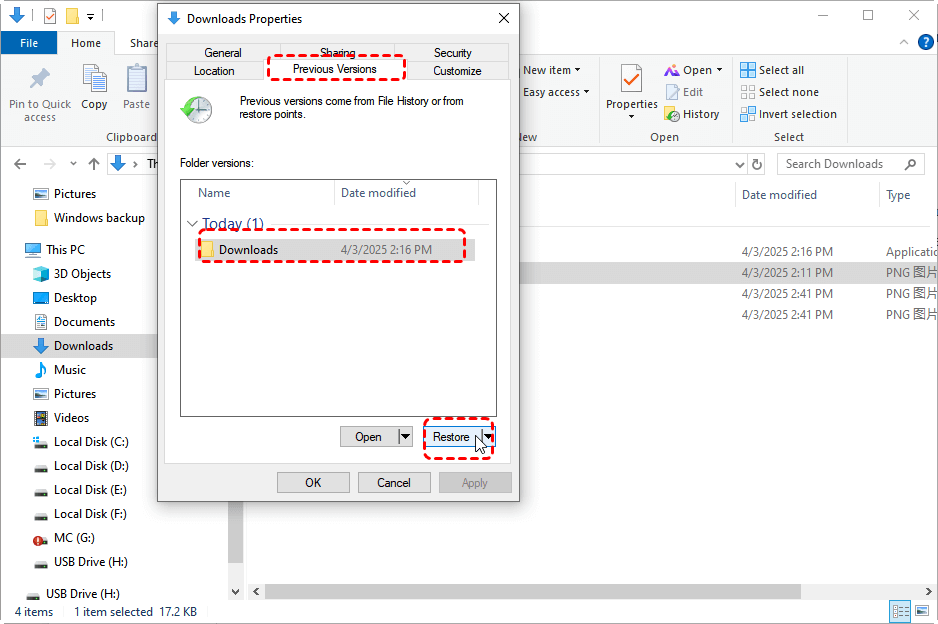
- Shadow Copies: Right-click folder → Properties → Previous Versions (if enabled).
- Cloud backups (OneDrive, Google Drive) — check web interfaces for earlier versions.
Backups are your best safety net against unexpected data loss.
Tips to Prevent Data Loss in Future Conversions
Data loss prevention is always better than recovery. Here’s how to stay safe next time.
✔️Always Create a Full Backup
Before making any partition or disk changes, back up everything to an external drive or cloud service. For example, you can use Windows File Recovery to back up your data first.
✔️Use Reliable Conversion Tools
Avoid using command-line methods unless necessary. Choose safe tools like AOMEI Partition Assistant, which can convert any disk between MBR and GPT without deleting existing partitions.
✔️Check Disk Health Before Conversion
Use SMART tools to check your drive’s health. A failing drive can make conversion risky.
Conclusion
Accidentally losing files during a disk conversion is a nightmare, but by following this guide on how to recover data after MBR to GPT conversion, you can often retrieve everything.
Most of the time your files are still physically present — you just need the right roadmap (or the right tools) to find them again. Start by stopping writes, image the disk, then pick a recovery strategy: beginner-friendly recovery software (like MyRecover), open-source tools (TestDisk/gdisk), restoring from a backup, or last resort—professional labs for physical damage. After recovery, validate files, back them up, and only then perform a safe conversion if needed. With a calm, methodical approach you’ll maximize your chances of a full recovery.
FAQs
1. Why does Windows show my disk as "Not Initialized" after I tried to convert it?
This happens when the MBR signature is wiped but the GPT header is incomplete. To solve "Not Initialized", do not initialize the disk. Instead, use MyRecover to scan the uninitialized space; it can find the data even without a valid disk signature.
2. I converted my boot drive to GPT and now my PC won't start. Is my data gone?
No. GPT requires UEFI boot mode. You likely need to enter your BIOS/UEFI settings and change the "Boot Mode" from "Legacy" to "UEFI." Your files are still there; the PC just can't find the bootloader.
3. Can MyRecover handle a RAW drive after a failed conversion?
Yes. When a conversion fails, the file system often defaults to RAW. MyRecover ignores the corrupted pointers and performs a raw sector-by-sector scan to identify and extract your files.
4. How is MyRecover different from just using "Undo" in a partition manager?
"Undo" only works if the software's session is active. MyRecover is a forensic-grade tool that analyzes the physical data left on the drive to reconstruct what was lost long after the conversion program has closed.
5. Does converting a disk to GPT automatically format it?
If using Windows Diskpart, yes—you must delete all volumes first. Third-party tools like AOMEI can restructure data without formatting, which is the safer route.
6. I have an SSD; does that make recovery harder?
Yes, due to TRIM. When a partition is deleted on an SSD, the TRIM command may permanently wipe the data cells. If you lost all my files after converting MBR disk to GPT on an SSD, power it off immediately and run recovery software from a bootable USB.


Stay Updated With Our
Latest Tips
Add us as a preferred source on Google to never miss helpful guides.