
How to Recover Files Lost in Cut and Paste For Free [Windows 11, 10, 8, 7]
When you accidentally lost files during a cut and paste operation in Windows computer, you can try to recover them by checking the Recycle Bin, using the "Restore previous versions" feature, Windows File History tool or employing data recovery software. All are free to recover files lost during cut and paste in Windows 11, 10, 8 or 7.
By Emma / Updated on November 26, 2025
"Data lost during cut-paste operation! Help please!"
I was transferring some files from D: driveto E: Drive. I cut the files from the source drive and pasted them in a folder in D: drive. And then suddenly after sometime, I couldn't see the folderand inside transferred files. Even when the cut-paste operation was over, I checked the number of files and everything.Where they have gone?How can i recover files lost in such cut and paste operation? It's 12 GB of data. Quite important to me!

Why Files Get Lost during Cut and Paste Operation?
Cut and paste is a common file transfer method, but data loss can occur due to:
1. Interrupted Transfer Process
This commonly happens if your system crashes or restarts while files are being moved, as the operation gets terminated mid-way. Similarly, if you're transferring files to a USB drive that gets disconnected prematurely, or if there's a sudden power outage before the paste completes, the files may vanish from both locations without warning.
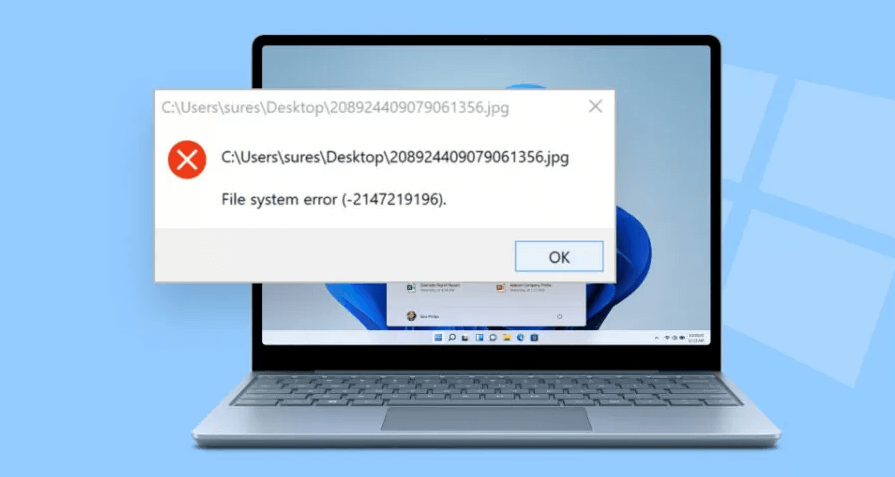
2. File System Errors
The health and structure of your storage device's file system significantly impact file transfer reliability. When your hard drive or USB develops bad sectors or experiences NTFS/FAT32 corruption, the operating system may fail to properly record the new file locations while simultaneously marking the original files as deleted.
3. Human Error
Users often accidentally cancel operations by hitting Escape or closing transfer windows prematurely, worsened by Windows' lack of confirmation prompts. Another common mistake is pasting files into wrong folders, especially with similar-looking directories, with users frequently unaware until later due to poor visual feedback.
4. Software/OS Glitches
The Windows operating system itself can sometimes be responsible for failed file transfers. Explorer.exe processes may crash or freeze during operations, leaving files in an undefined state where they exist in neither the source nor destination locations. Security software often compounds these problems by aggressively scanning files during transfer, potentially quarantining legitimate files it mistakenly identifies as threats.
5. Fundamental Difference Between Cut and Copy
The cut operation's design makes it riskier than copying. Instead of moving files immediately, Windows just marks them for relocation in system metadata until paste completes. Any interruption during this vulnerable period can orphan files - gone from the source but never reaching the destination. Unlike copying which keeps originals until confirmed, cutting risks loss from the start.
Can You Recover Files that Were Cut and Paste?
So, when you lost files during cut and paste operation, you might wonder if you can recover them.The short answer is Yes in many cases—if you act quickly. When files are lost during cut-paste operations, they often remain on the original drive until overwritten by new data. Recovery success depends on:
- Time elapsed (sooner = better)
- Storage type (HDDs retain data longer than SSDs with TRIM)
- Whether you continued using the drive (avoids overwriting)
How to Recover Files Lost in Cut and Paste?
Below you'll find detailed, step-by-step solutions ranging from simple built-in Windows features to professional recovery software, organized from easiest to most advanced approaches. Whether your files vanished due to a system crash, accidental misplacement, or transfer interruption, these techniques can help retrieve your important documents, photos, and other data. Let's explore each method in detail:
Method 1: Undo the Operation
Before diving into complex recovery methods, always try this simple but effective solution first. The Undo feature in Windows maintains a short-term memory of your recent file operations, allowing you to reverse accidental file movements if acted upon quickly.
Step 1. Open the folder where files went missing.
Step 2. Press Ctrl+Z immediately.
Step 3. Check if files reappear.

Method 2: Check Temporary Locations
Besides, it's worth checking Windows' temporary storage areas where your files might have been cached during the transfer process. The operating system often creates temporary copies or preserves partial data in these locations, especially when file operations are interrupted.
Step 1. Open the Run dialog by pressing Windows key + R on your keyboard. This will bring up the Run command window where you can access system folders.
Step 2. Type "%temp%" (without quotes) into the Run dialog and press Enter. This will open Windows' temporary files folder where partial or cached copies of your files might be stored.

Step 3. Carefully browse through the temporary files, sorting by date modified if necessary. Look for files with names or extensions matching what you lost.Once found, you can paste the files again in a safe location like your desktopto recover files lost in cut and paste.
If you don’t find files, you can check the system Temp folder by repeating the Run command process but entering "C:\Windows\Temp" instead. Some operations may store temporary copies in this alternate location.
Method 3: Restore from Backup
If you've previously set up backup solutions on your Windows system, this method offers the most reliable way to recover your lost files. Windows provides several built-in backupoptions that may have preserved your files before they went missing during the cut-paste operation.Next, we mainly introduce how to recover files in cut and paste using Windows File History backup.
Step 1. Open the File History backup versionby typing "Restore Your Files with File History" in the Windows search bar. Click "Open"under the option.
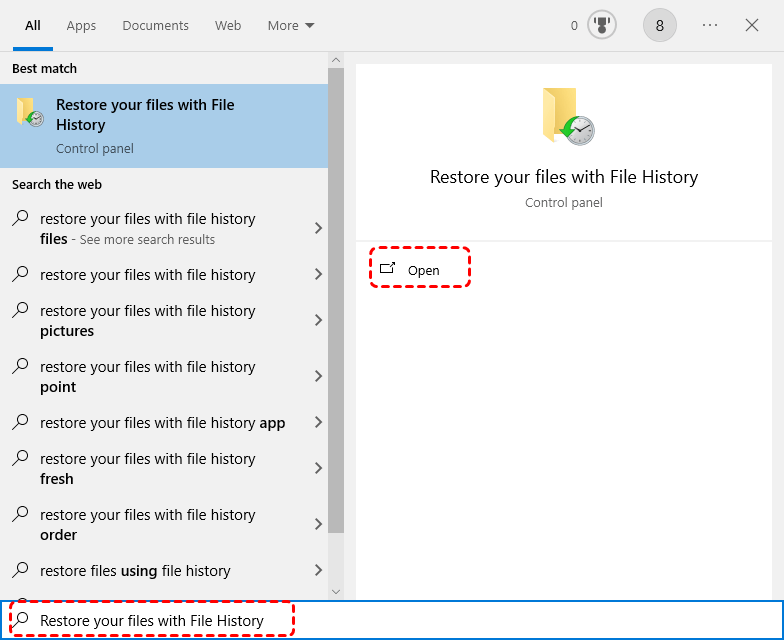
Step 2. Navigate through the folders and filesto locate the files you lost. Select the target one and click the green "Restore" button to return the files to their original location.

If no backups are available, proceed to Method 4 or Method 5for additional recovery options.
Method 4: Restore by Windows File Recovery
When other methods fail, Windows File Recovery offers a powerful command-line solution to retrieve lost files. This official Microsoft tool can scan your drive's raw data for recoverable files, though it requires some technical knowledge.
Step 1. Download Windows File Recovery from the Microsoft Store. Ensure you get the version matching your Windows build (only available for Windows 10 2004+ and Windows 11by far).

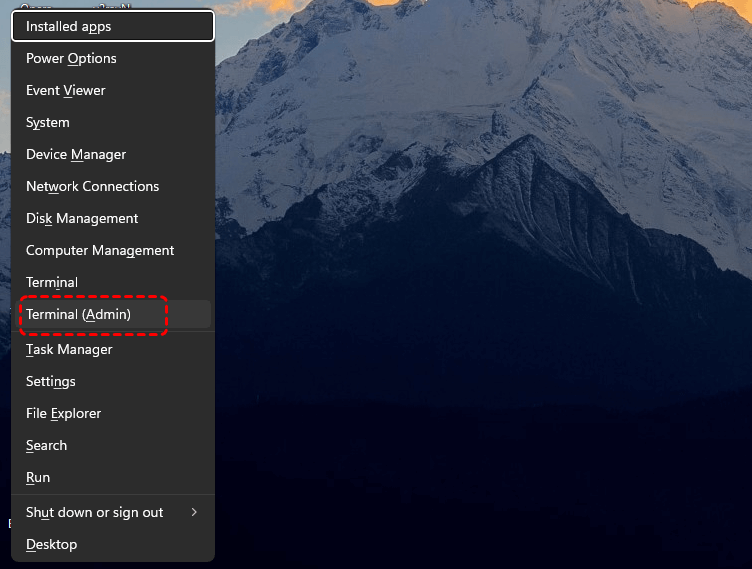
Step 2. Open Command Prompt as Administrator by right-clicking the Start menu and selecting "Terminal (Admin)"for Windows 11 usersor "Command Prompt (Admin)" for Windows 10 users.
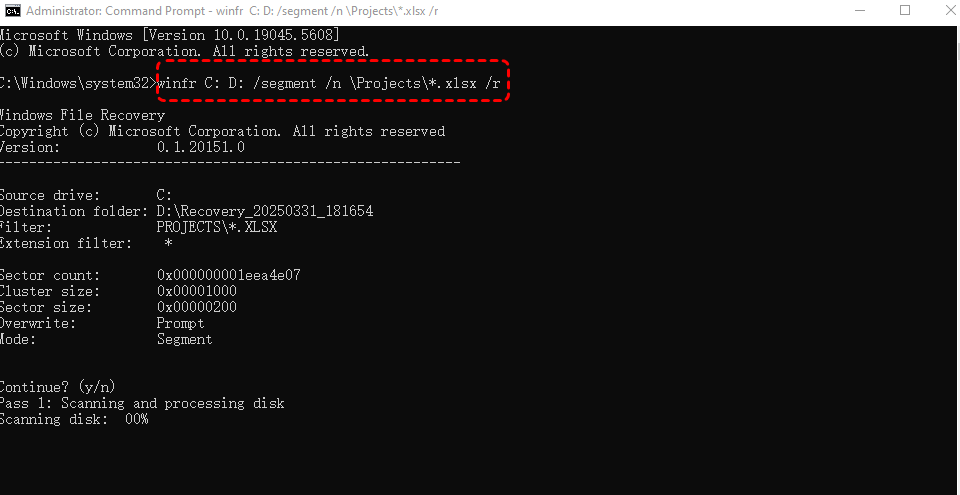
Step 3. Choose the appropriate command
Basic Command Structure: winfr source-drive: destination-drive: /mode /switches /n [file-filter]
1. Regular Mode (NTFS - recent deletions)
winfr C: D: /r /n \Users\YourName\Documents\test.xlsx
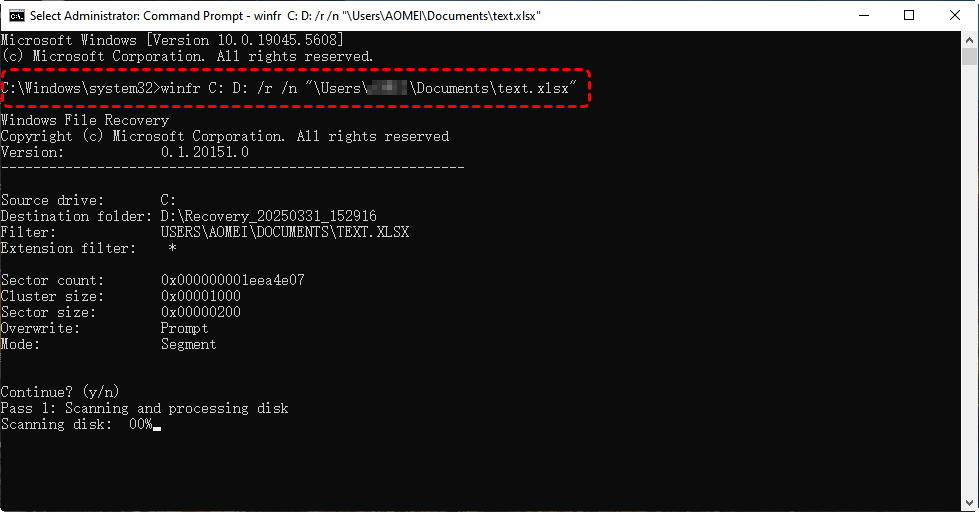
• Best for recently deleted files (NTFS drives only)
• Fastest scanning method
• Preserves original filenames and paths
2. Segment Mode (NTFS - deep scan)
winfr C: D: /segment /n \Projects\*.xlsx /r
• For formatted drives or older deletions
• Recovers by file segments
• Add /r for comprehensive recovery
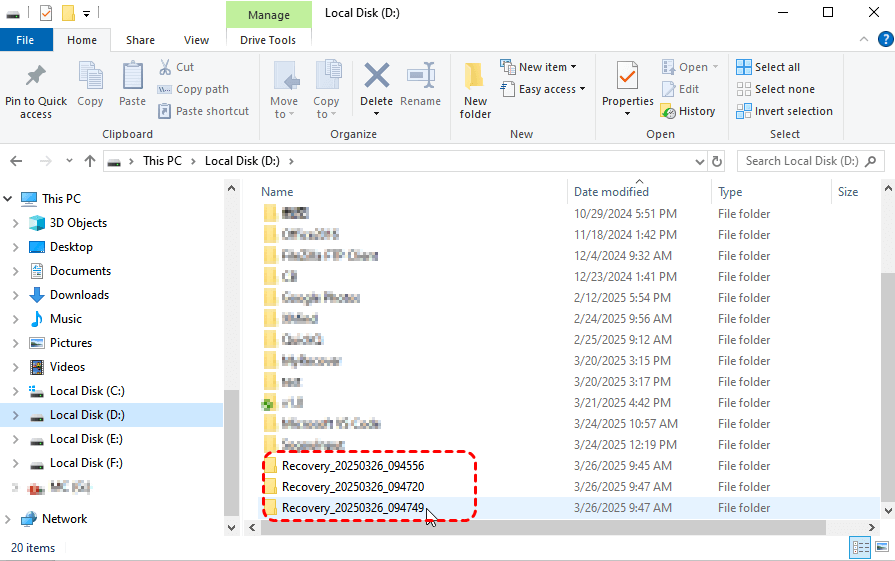
Step 4. Review recovered files in your destination folder. The tool creates a "Recovery_[timestamp]" folder containing found files.
Method 5: Restore Using Professional Data Recovery
When built-in Windows tools failto recover files lost in cut and paste, professional recovery software named MyRecovercan be nice a solutionto retrieve lost files. These advanced tools can perform deep scans of your storage device, often recovering files that other methods cannot detect.

- AI-Powered Recovery - Built-in intelligent recognition algorithm ensures precise recovery with zero omissions
- Broad Format Support - Restores 1000+ file types including documents, photos, videos, and more
- Comprehensive File Recovery- Handles 500+ data loss scenarios, covering all types of deletions, format, virus attack and logical damage.
- Multi-Device Compatibility - Full support for all storage media including HDDs, SSDs, USB drives, memory cardsand more.
Step 1. Download and Install Recovery Software
Download MyRecover free edition and install on a different drive than your lost files to avoid overwriting data.
Step 2. Select Scan Location
Launch the software and select the drive/partition where files were originally stored. For cut-paste failures, scan both source and destination drives.

Step 3. Run the Scan
Choose between Quick Scan (recent deletions) or Deep Scan (thorough sector-by-sector analysis). Deep scans may take a much longer timedepending on drive size.
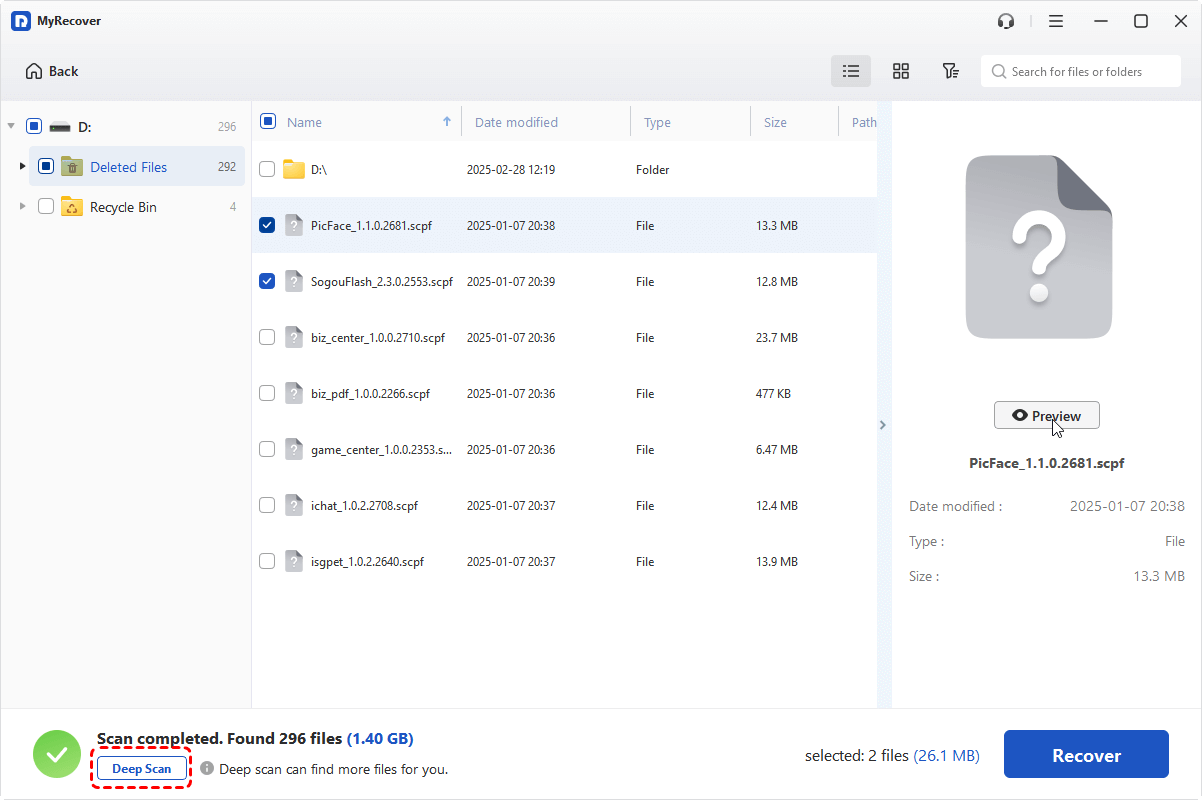
Step 4. Preview and Select Files
Once scanning is completed, you can browse all recoverable files. Select specific files or entire folders for recoveryand click on “Recover”.

🔔Note: If you want to preview files before recovery to check the file integrity, please switch to the Professional edition.
Step 5. Recover Your Files
Choose a different drive as the recovery destination. For large recoveries, make sure the destination drive hassufficient space.

In Conclusion
Losing files during a cut-paste operation can be stressful, but recovery is possible if you act quickly. In this article, we share you with 5 different methods to recover files that are lost in cut and paste for free. If you don’t want to try them one by one, you can directly use MyRecover since it is able to recover files from emptied Recycle Bin, formatted drive, raw partition, corrupted partition, virus attack, system crash and more.


Stay Updated With Our
Latest Tips
Add us as a preferred source on Google to never miss helpful guides.