
How to Recover Formatted Data From Android Phone Internal Memory
Accidentally formatted your Android phone and lost important data stored in internal memory? Take it easy! This article explores practical methods on how to recover formatted data from Android phone internal memory, covering both rooted and non-rooted devices.
By Emma / Updated on May 28, 2025
Can Formatted Phone Data be Recovered?
Android phones store most of their essential data—such as apps, system files, photos, messages, and app datawithin the internal memory. Unlike external SD cards, this internal storage is tightly integrated with the device’s operating system and not directly accessible like a USB drive. It’s where your phone saves everything by default unless you choose otherwise.

But what happens if this internal memory is formatted—whether by accident, during a factory reset, or due to system errors?The good news is that formatted data from a phone’s internal memory can sometimes be recovered. However, success depends on various factors:
- Type of Storage Affected: If the internal memory was formatted, recovery is more complex than from an SD card, especially on unrooted devices.
- Whether the Phone is Rooted: Root access is often required to scan and recover data from Android’s internal storage.
- Data Overwriting: If new data has been written after formatting, it may overwrite the original files, making recovery less likely.
In short, while recovery isn't always guaranteed, it’s absolutely possible—especially if action is taken quickly and the right tools are used.
How to Recover Formatted Data from Android Phone Internal Memory?
Recovering formatted data from an Android phone's internal memory can be challenging, especially compared to recovering files from an SD card. That’s because internal memory is protected by the system, and most recovery tools can’t access it directly unless the phone is rooted. But don’t worry—recovery is still possible in many cases. Depending on your phone's condition (rooted or not), there are different methods you can try. Below, we’ll walk you through several effective solutions.
1. Use Professional Data Recovery Software (Rooted or Not)
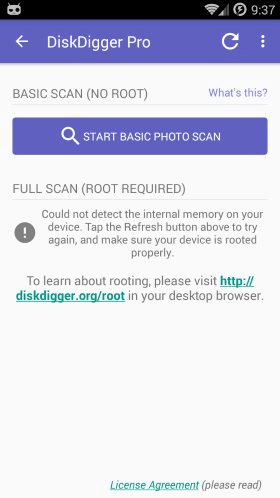
If your phone is rooted, you can use professional Android data recovery software to scan the internal storage and retrieve formatted data. Some popular tools include DiskDigger, which does not require your device to be rooted. However, it is more likely to find and recover more files if your device is rooted.
1. Install and launch the recovery tool on your Android phone.
2. Choose "Basic scan" or "Full scan". The "full" scan is available only on rooted devices, whereas the "basic" is available regardless of whether your device is rooted.
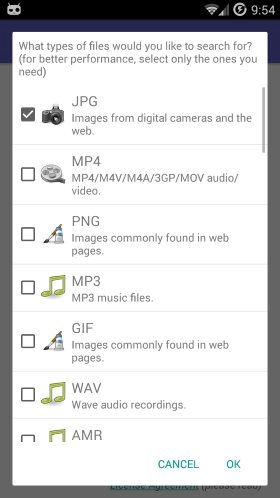
3. After you select the Android device to scan,now choose the file type you want to recover, and click on "OK".
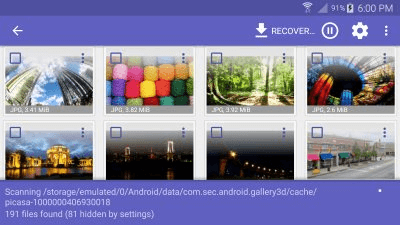
4. When the app starts scanning for lost files on your formatted Android internal memeory, you will see the main DiskDigger screen, which will start populating with recoverable files.
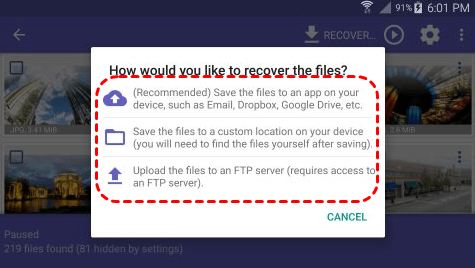
5. Tap on any of the files you want to recover. Click "Recover" button on the top toolbar.
6. DiskDigger provides 3 different ways for you to save the recoverable files: Save to an app, Save to device, and FTP upload. Choose one based on your requirements.
2. Use Google Cloud Backup Service (No Root Required)
If you had Google backup enabled before formatting, there’s a good chance you can restore formatted data from Android phone internal memoryusing Googlerelatedservice:
- Google Photos: Automatically backs up photos and videos.
- Google Drive: Backs up contacts, call history, SMS, and more.
1. Sign in to your Google account.
2. Go to Google Photos or Google Drive to check if your files are backed up.
3. If backup is available, download them to your local storage again.
Bonus Tip: How to Root Android Device
If you have to root your Android to recover formatted data from phone internal memory, it is important to get started in the right direction!There is not a one-size-fits-all solution when it comes to rooting Android devices, and different brands and even software versions can make the rooting process vary.
The good news is that rooting is much easier than it once was, since there are numerous powerful and simple root apps on the market today, which can help you root Android with a single tap, likeKingRoot, KingoRoot, and OneClickRoot. Today, we will walk you through the steps of rooting Android phone with OneClickRoot.
1. Go to the official site and enter your device brand, model, and Android version to see if it’s supported.
2. On your Windows, download and install the One Click Root desktop app.
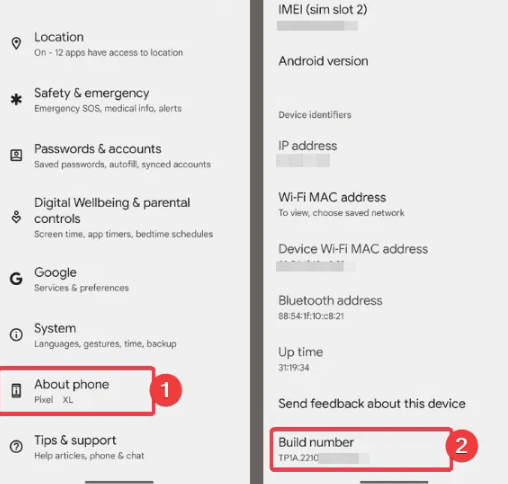
3. On your Android phone, go to:Settings > About phone > Tap "Build number" 7 times(until you see "You are now a developer!").
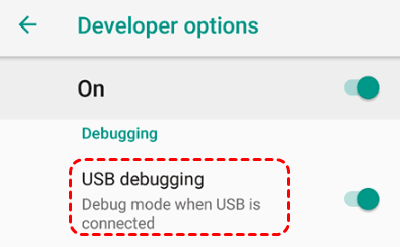
4. Go back to Settings > Developer options.Enable "USB debugging" and "OEM unlocking"(if available).
5. Connect your Android device to the computer using a USB cable.Authorize the computer on your phone when prompted.
6. Open the OneClickRoot software on your computer and select your phone. Click "Root Now" to begin the process.
Conclusion
Recovering formatted data from Android internal storage is possible but depends on several factors, such as root access, whether backups exist, and whether new data has overwritten the original files. The sooner you act, the higher your chances of recovery. If you're unsure how to proceed, stop using your phone immediately and rely on trusted recovery tools or professional help.
To easily manage or restore files from Android phones, it is better to use an SD card. When the data loss occurs for any reasons like accidental deletion, format, system crash, virus attack, and more, you can have more options to choose from such as MyRecover, an excellent Windows data recovery tool for both beginners and experts.

- User-Friendly Interface – No technical skills needed.
- Broad Device Compatibility – Supports HDDs, SSDs, USB drives, SD cards, and more.
- Extensive File Support – Recovers over 1,000 file types including photos, videos, documents, archives, and more.
- Versatile Recovery Capabilities – Handles 500+ data loss scenarios such as accidental deletion, formatting, system crashes, and more.
- Preview Before Recovery – View files before restoring to ensure accuracy.
- Powerful Scanning Technology – Advanced algorithms help reduce data loss to the minimum.
- Unlimited Recovery – No limits on the amount of data you can recover per session or overall.


Stay Updated With Our
Latest Tips
Add us as a preferred source on Google to never miss helpful guides.