
How to Recover Wiped Files Using Terminal Command [Windows/macOS/Linux]
Learn how to recover deleted files using terminal command and bring back your valuable data without third-party tools. Follow this easy terminal-based recovery method to restore files efficiently and protect your Mac/Windows from future data loss.
By Vera / Updated on May 29, 2026
Introduction
Ever wiped your files by accident and felt that sinking feeling in your stomach? Don’t worry — you’re definitely not alone. Many users lose important data either by deleting it manually, formatting their drive, or running a command that erases everything. The good news? There are ways to get those files back, even using just the Terminal command.
In this guide, we’ll explore how to recover wiped files using Terminal commands on Windows, macOS, and Linux, providing you with battle-tested terminal methods to bring your data back from the brink.
Understanding How Files Get Wiped
Here’s the thing — when you delete a file, your computer doesn’t actually erase it immediately. It just marks the space the file occupied as "available" for new data. Until that space is overwritten, your deleted files can still be recovered.
Difference Between Delete, Format, and Wipe
- Delete: Removes file references but keeps data recoverable.
- Wiping (Secure Erasing): Actively overwrites the data sectors with zeros, ones, or random patterns (using tools like shred or CCleaner’s secure wipe).
- Formating: High-level formatting creates a new file system index, but often leaves the raw data behind.
Can truly "wiped" (overwritten) data be recovered? Realistically, no. Once a bit is flipped from a 1 to a 0 and back again via a secure overwrite, the original state is lost. However, many people use the term "wiped" to describe a formatted drive or a massive accidental deletion. For these scenarios, the terminal commands below are lifesavers.
How to Recover Wiped Files Using Terminal Command
Each operating system handles file systems differently, necessitating specific tools and commands. We will break down the process for Windows, Mac, and Linux users.
How to Recover Deleted Files in Windows
Windows doesn't have a built-in "undelete" command in the standard Command Prompt, but Microsoft provides a specialized utility, and third-party console tools like TestDisk are industry standards.
🔖 Method 1: Use TestDisk Command
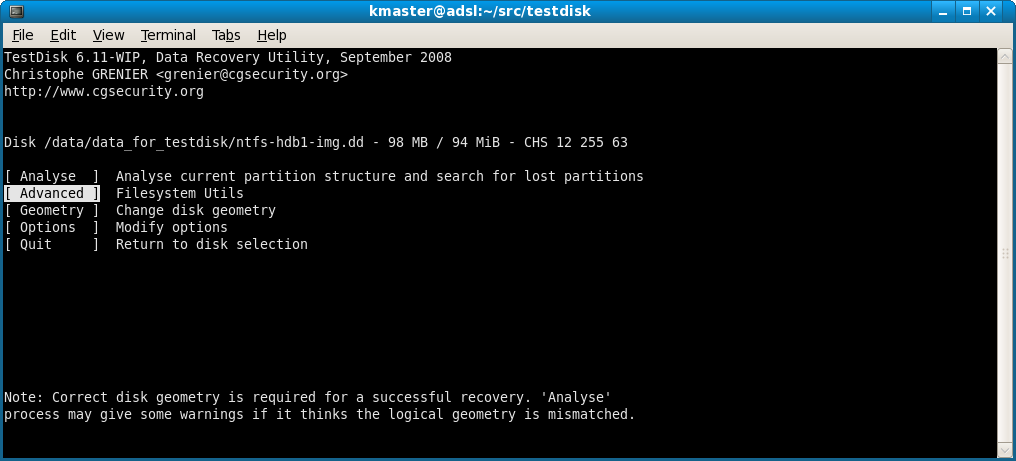
TestDisk is an open-source tool primarily designed to recover lost partitions and fix non-booting disks, but its "Advanced" menu is incredibly powerful for undeleting files from NTFS, FAT, and exFAT partitions.
1. Download and Extract: Download TestDisk from the CGSecurity website. You don’t need to install it; just extract the ZIP file.
2. Launch as Admin: Open your command prompt (CMD) or PowerShell as an administrator. Navigate to the folder where you extracted TestDisk and type: testdisk_win.exe
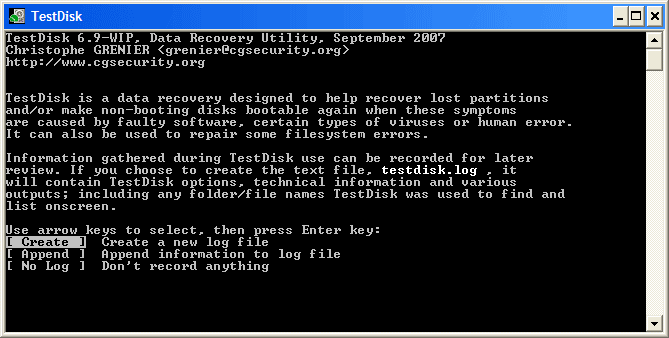
3. Log Creation: Select [ Create ] to start a new log file.
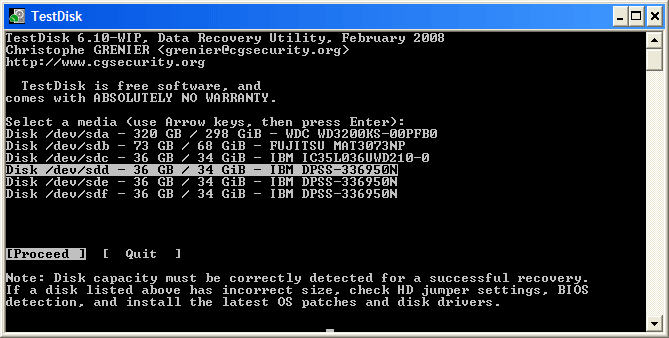
4. Select Drive: Use the arrow keys to highlight the physical drive where the files were lost and press Enter.
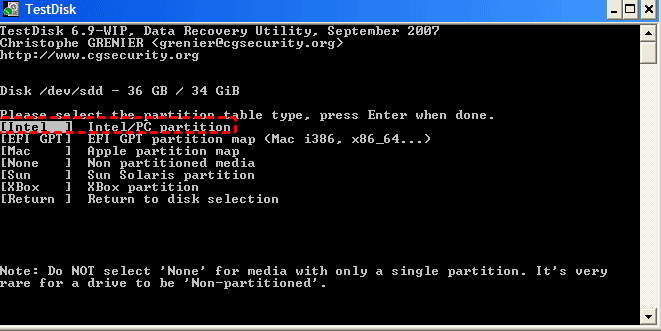
5. Partition Table: TestDisk usually detects this automatically (e.g., [Intel] or [EFI GPT]). Confirm the selection. Use Analyse to find lost partitions.
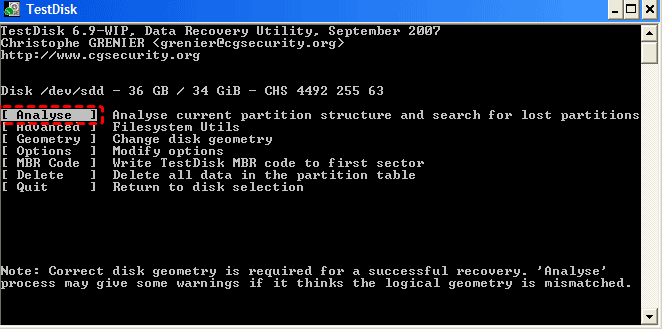
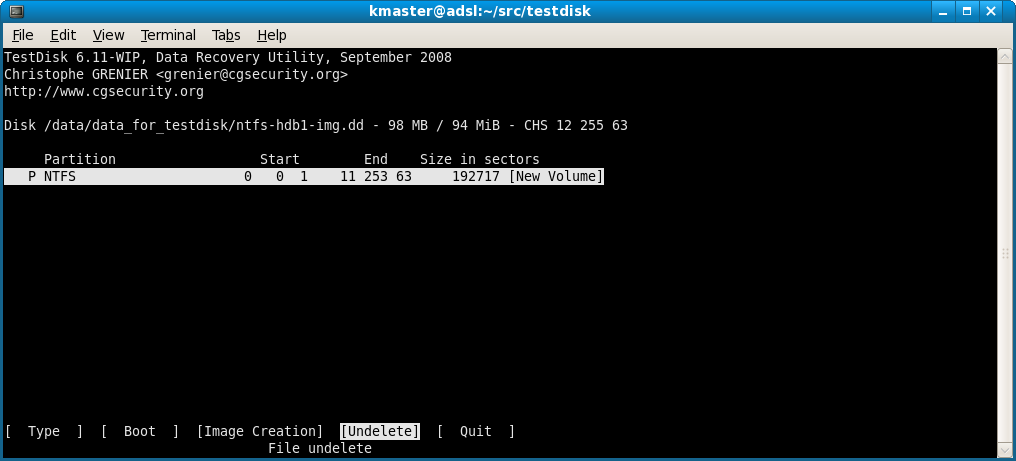
6. Advanced Mode: Select [ Advanced ] (Filesystem Utils).
7. Undelete: Highlight the partition where your files lived and select [ Undelete ] at the bottom.
8. Locate and Copy: You will see a list of deleted files in red. Browse to your file, press C to copy it, and select a destination on a different drive to save it.
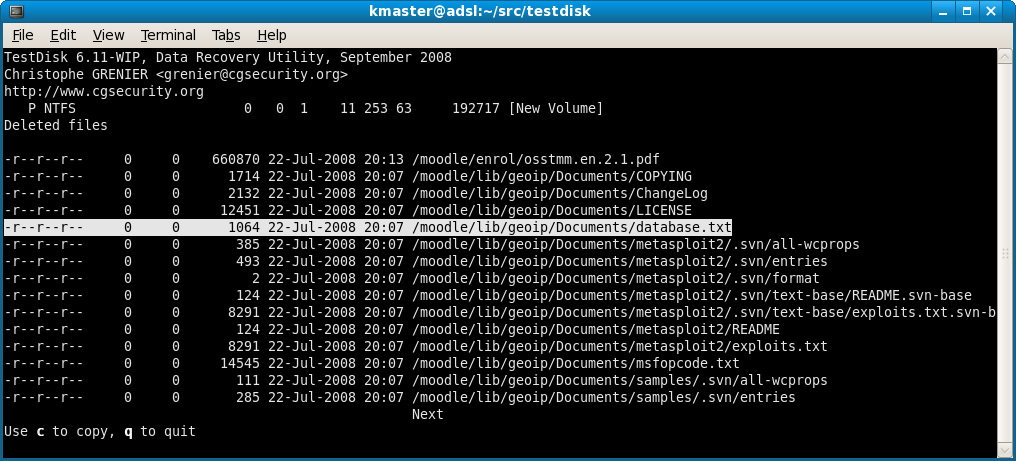
TestDisk digs deep into your drive structure and often restores wiped files effectively.
🔖 Method 2: Use Windows File Recovery (winfr)
In 2020, Microsoft released Windows File Recovery, a command-line app available for Windows 10 (version 2004 and later) and Windows 11. The tool offers two main modes: Regular (for recently deleted files on NTFS) and Extensive (for formatted drives or corrupted file systems).
Command Structure: winfr source-drive: destination-drive: [/mode] [/switches]
Examples:
-
Recover a specific folder from C: to D:
winfr C: D: /regular /n \Users\YourName\Documents\ImportantFolder\

-
Recover PDF and Word files using Extensive mode:
winfr H: D: /extensive /n *.docx
-
Search for a file with "invoice" in the name:
winfr C: E: /extensive /n *invoice*
🔖 Method 3: Use MyRecover (When Terminal Commands Don’t Work)
If the command-line method feels overwhelming or fails to recover files, tools like MyRecover can make the process much easier and more reliable. MyRecover offers a beginner-friendly interface and advanced scanning algorithms to recover files from wiped, formatted, or corrupted drives with just a few clicks.
While it is not a terminal-based tool, it acts as a "safety net." It features a deep-scan algorithm that can reconstruct files even when the MFT (Master File Table) is gone.

- Works on different devices – Hard drives, USBs, SD cards, SSDs.
- Fast scan option – Quickly finds recently deleted files.
- High success rate – Good chance of getting files back.
Steps to Recover Wiped Files with MyRecover
1. Download and Install MyRecover
Get it from the official website and install it on a different drive than the one you’re recovering from.
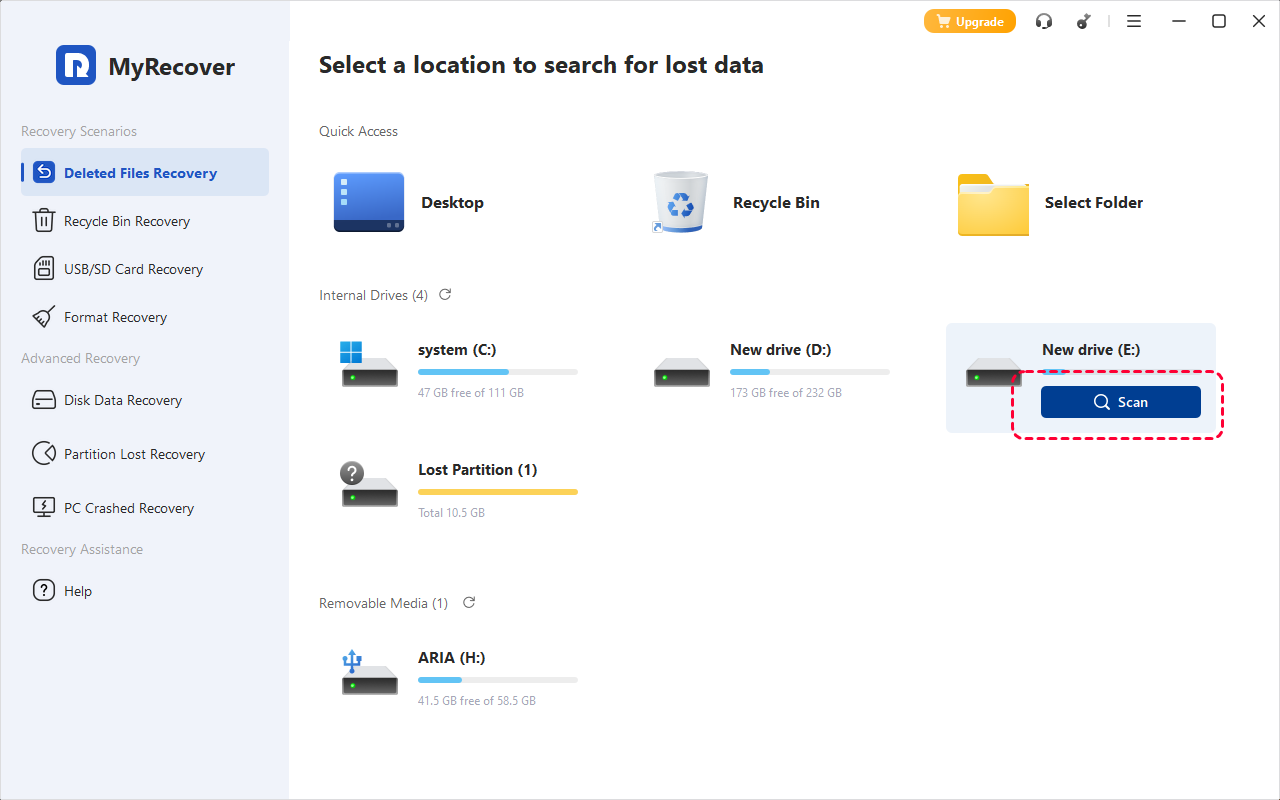
2. Select the Drive to Scan
Launch the program and choose the wiped drive.
3. Scan for Lost Data
Click Scan to detect recoverable files. MyRecover also supports a Deep Scan.
4. Preview and Recover
Once the scan completes, preview your files and click Recover to restore them safely.

This is the most hassle-free way to recover wiped files — no complicated Terminal commands, just a few clicks.
How to Recover Deleted Files in Mac
macOS users have access to a powerful Unix-based terminal. While the rm command is permanent, macOS offers backup utilities and file-carving tools through the console.
🔖 Method 1: Use tmutil (Time Machine Utility)
If you have Time Machine enabled, you don’t need the GUI to restore files. The tmutil command allows you to browse and restore from backups and local snapshots (which macOS takes automatically even if an external drive isn't connected).
For drives with physical damage or complex corruption, consult a data recovery specialist. They have lab tools that can extract data even from severely damaged disks.
👉Using Local Snapshots:
1. List Snapshots:
tmutil listlocalsnapshots /
This will show snapshots like com.apple.TimeMachine.2023-10-15-120000.
2. Mount the Snapshot:
sudo tmutil mount com.apple.TimeMachine.2023-10-15-120000
3. Recover via Command Line:
Navigate into the mounted snapshot in /Volumes/ and use the cp (copy) command to bring your file back to your home directory.
👉Restoring via tmutil restore:
tmutil restore '/Volumes/BackupDrive/Backups.backupdb/MyMac/Latest/Macintosh HD/Users/Name/File.txt' '/Users/Name/Desktop/Recovered_File.txt'
🔖 Method 2: Use PhotoRec
PhotoRec is the companion to TestDisk. While TestDisk recovers partitions, PhotoRec "carves" files out of raw data. It ignores the file system entirely, making it perfect for drives that have been "wiped" or formatted.
1. Install Homebrew from Terminal if you haven’t already: /bin/bash -c "$(curl -fsSL https://raw.githubusercontent.com/Homebrew/install/HEAD/install.sh)
2. Install via Homebrew: brew install testdisk.
3. Launch: sudo photorec.
4. Disk Selection: Choose the drive and partition.
5. File Opt: You can hit S to deselect all and then select specific extensions (like .jpg or .pdf) to speed up the process.
6. Search: Choose [ Other ] if the drive was FAT/NTFS/HFS+ and [ Whole ] to scan the entire drive.
7. Destination: Choose a directory to save files.
Warning: PhotoRec recovers files with generic names (e.g., f12345.jpg). You will need to sort through them later.
How to Recover Deleted Files in Linux
Linux offers the most robust environment for command-line recovery. If you are using the Ext3 or Ext4 file system, extundelete is the gold standard.
🔖 Use extundelete
Extundelete uses the file system journal to restore files with their original names and paths. You must unmount the partition immediately. If you are trying to recover files from the root partition (/), you should boot from a Live USB.
1. Install:
sudo apt install extundelete (Debian/Ubuntu)
sudo dnf install extundelete (Fedora)
2. Restore a Specific File:
sudo extundelete /dev/sdb1 --restore-file home/user/important.txt
3. Restore an Entire Directory:
sudo extundelete /dev/sdb1 --restore-directory /home/user/project
4. Restore Everything:
sudo extundelete /dev/sdb1 --restore-all
The recovered files are saved in a directory named RECOVERED_FILES in your current working directory.
Additional Tips for Successful Recovery
Using terminal commands for data recovery is a delicate process. To maximize your success rate, follow these expert rules:
1. Cease All Activity: The moment you realize a file is missing, stop using the device. Every second of usage (even background updates or temp file creation) risks overwriting the "free" space where your deleted file resides.
2. The "Different Drive" Rule: Never save recovered files to the same drive you are scanning. This is the fastest way to corrupt the very data you are trying to save.
3. Use Read-Only Mounts: In Linux or Mac, if you must mount a drive to scan it, mount it as read-only (mount -o ro).
4. Bit-for-Bit Imaging: If the data is priceless, use the dd command to create an image of the drive first.
dd if=/dev/sdb of=~/drive_image.img conv=noerror,sync
Then, run your recovery tools (TestDisk/PhotoRec) on the image file rather than the physical disk. This prevents further wear on a potentially failing drive.
5. Check for Hidden Files: Sometimes files aren't deleted but just hidden. In terminal, use ls -la to see all files, including those starting with a dot.
Conclusion
Recovering wiped files using terminal commands is a powerful skill that bridges the gap between a standard user and a data recovery specialist. Whether you are leveraging the journal-parsing capabilities of extundelete on Linux, the snapshot-restoring power of tmutil on Mac, or the signature-matching algorithms of winfr on Windows, the command line provides a direct, surgical approach to data retrieval.
However, remember that no tool is magic. If a file has been truly wiped—overwritten by new data—it is gone forever. This highlights the ultimate rule of digital life: The best recovery strategy is a robust backup strategy. Use these commands as your emergency toolkit, but let Time Machine, Windows Backup, or rsync be your primary defense.
FAQs
1. Can I recover files deleted with the rm command in Linux?
Yes. While rm bypasses the Trash/Recycle Bin, it only removes the link to the data. Using extundelete or PhotoRec from the terminal can scan the unallocated space and retrieve the data, provided it hasn't been overwritten by new system activity.
2. Does "Windows File Recovery" work on SSDs?
Yes, but with a major caveat: TRIM. On modern SSDs, the TRIM command actively clears "deleted" sectors to maintain write speeds. This often happens within minutes of deletion. If TRIM has executed, the terminal commands may find the file entry, but the data inside will be zeros.
3. Why does PhotoRec change all my file names to random numbers?
PhotoRec performs "file carving." It ignores the file system metadata (which contains the name) and looks for file headers (like the start of a JPEG). Because the name is stored in the metadata and the data is in the sectors, PhotoRec can find the data but has no way of knowing what the original name was.
4. Is there a way to recover files from a "Quick Formatted" hard drive?
Yes. A quick format simply writes a new, blank file system over the old one. Terminal tools like TestDisk can often find the "backup" boot sector of the old file system and restore the entire partition, names and all.
5. How does MyRecover differ from using terminal commands like winfr?
While terminal commands like winfr are excellent for targeted searches, MyRecover offers a more robust scanning engine for users who need to recover entire partitions after a wipe. It provides a visual interface to filter files by type and date, which can be much faster than typing complex search strings in a terminal.
6. Is MyRecover safer to use for beginners than the Command Line?
Generally, yes. The primary risk with terminal commands is "operator error"—typing the wrong drive letter and accidentally overwriting data. MyRecover mitigates this by providing a read-only scan environment with a GUI that prevents you from accidentally performing a "write" operation on the source drive.


Stay Updated With Our
Latest Tips
Add us as a preferred source on Google to never miss helpful guides.