
[Solved] How to Recover Data from Failed Hard Drive on Windows
A failed hard drive may cause data loss or corruption, performance degradation, file system errors, and in severe cases, even render the operating system unbootable. This guide will provide several methods to recover data from the failed hard drive and fix the issue.
By Aria / Updated on July 17, 2025
Causes and Signs of a Failed Hard Drive
A failed hard drive can cause significant trouble and inconvenience in both your work and daily life. Problems can vary from losing important files to complete system breakdowns, all often caused by a failed hard drive. Understanding the root causes and early warning signs can help mitigate the risk before total failure occurs.
The main causes of hard drive failure are as follows:
Physical Damage: Impacts, overheating, or physical wear can cause internal components of a hard drive to detach or damage the disk surface and internal structure.
Logical Errors: Malware attacks, improper system shutdowns, or software bugs can corrupt the hard drive's file system (e.g., NTFS, FAT32), making files inaccessible or causing the drive to become unreadable.
Power Surges: Sudden spikes in electrical power, often caused by lightning strikes or faulty power supplies, can fry the hard drive's controller board or damage its electronic components.
Bad Sectors: They can be caused by physical damage or software issues, and as they accumulate, the drive's performance deteriorates.
When these warning signs appear on your computer, you need to pay attention, as they may indicate a hard drive failure.
- Frequent system crashes or blue screen errors.
- Clicking or grinding noises from the hard drive.
- Files and folders becoming inaccessible or disappearing.
- Slow boot times or system freeze during startup.
- Drive not recognized by Windows or BIOS.
How to Recover Data from Failed Hard Drive on Windows
When a hard drive fails, the most critical task is to recover the data stored on the failed hard drive. You should immediately stop using the hard drive and then follow these steps gradually to perform data recovery.
Step 1: Determine the Type of Failure
Generally, hard drive failure are mainly categorized into two types: logical failures and physical failures. Understanding whether you’re dealing with a logical or physical issue is crucial before proceeding to recover data from failed hard drive. During the subsequent data recovery process, you will select appropriate recovery methods based on different error types.
⚠️Logical Failure: The drive is physically functional, but the file system is corrupted, or the OS is unable to access data properly. It can be repaired using some Windows built-in features.
⚠️Physical Failure: It is more severe issues that involve damage to the actual hardware components of the hard drive, and data recovery may require professional help.
Step 2: Connect the Failed Drive
If the hard drive is from another device or an external hard drive, remove it carefully from original device and connect it to a working Windows computer via appropriate adapter.

Step 3: Choose a Reliable Methods (For Logical Failure)
Compared to physical failures, data recovery from a hard drive with logical failure is generally easier. This is especially true if you have backed up relevant data using Windows built-in backup tools, cloud backup services, or other healthy external hard drives. Additionally, two professional data recovery tools are available for use, whether you prefer command-line interfaces or GUIs.
✅Method 1. Check the Backup
Windows offers two major backup tools, File History and Backup and Restore, which can help you back up files and recover them. If you use cloud backup tools, you can also achieve such functions. Next, we will detail how to recover data from failed hard drives using these three backup tools.
Option A. File History
First, type "Restore your files with File History" in the Start menu to open it.
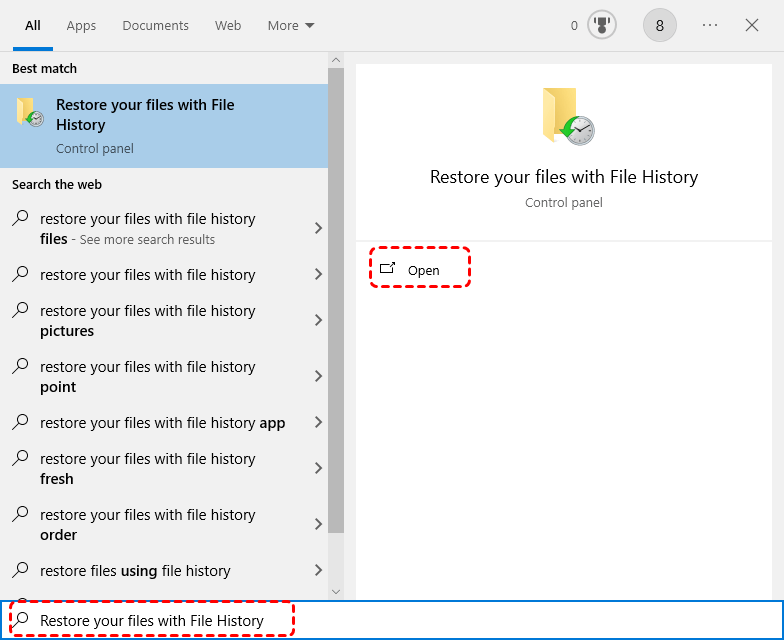
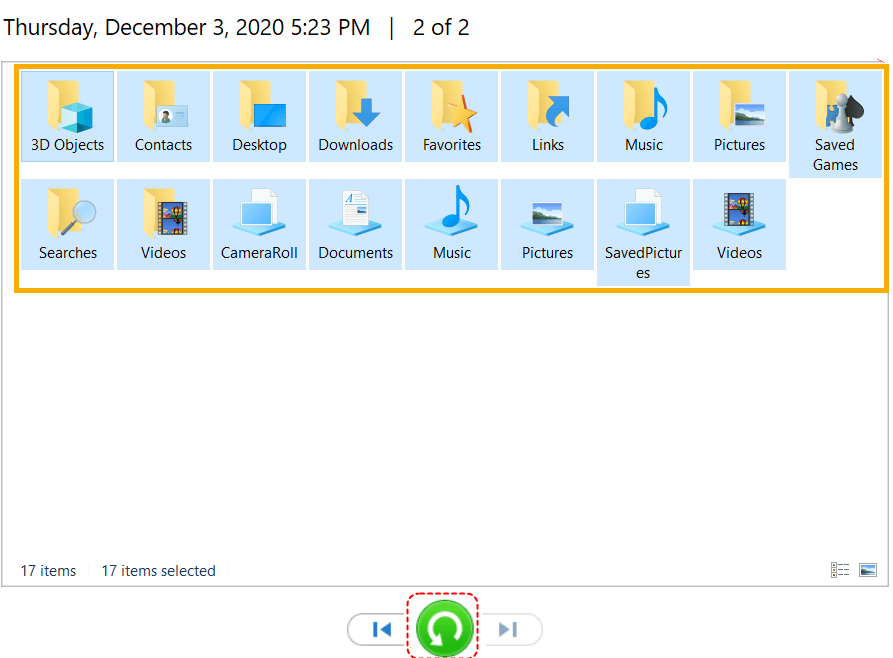
Then, navigate to the folder containing the files you want to recover and choose a desired version based on the backup time.
Finally, click the green "Restore" button to return the files to their original location.
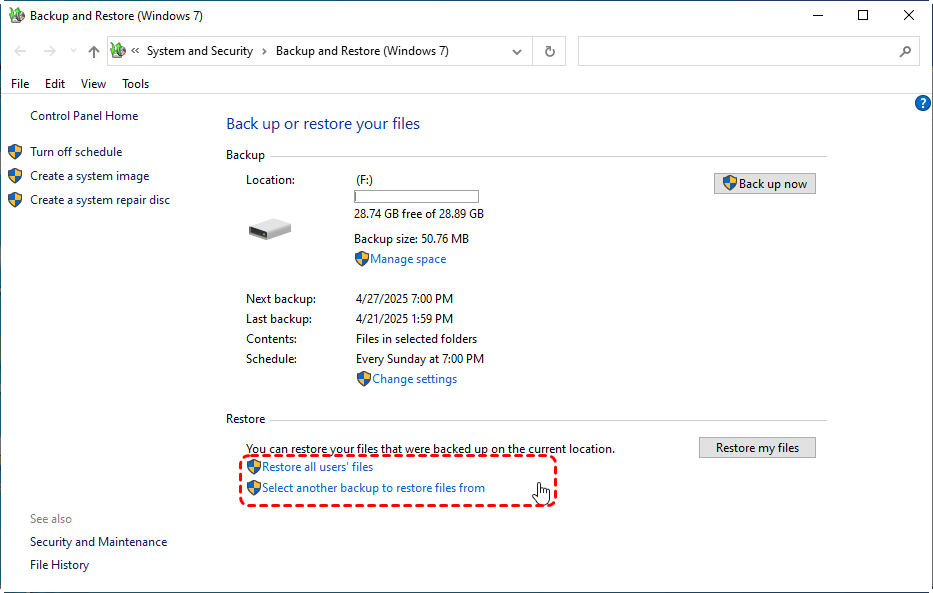
Option B. Backup and Restore (Windows 7)
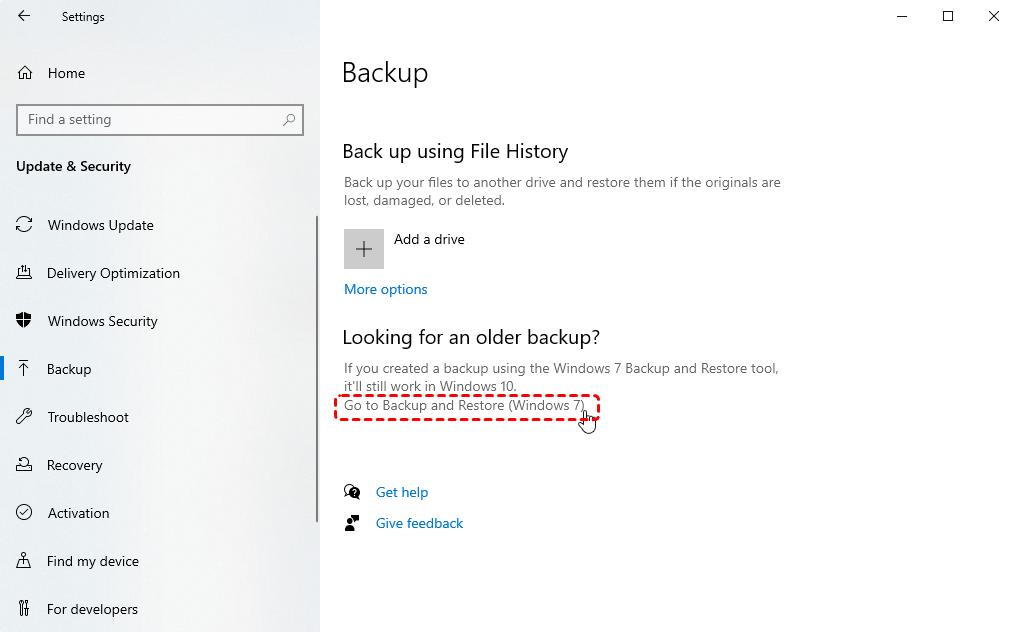
First, open "backup settings" and select "Go to Backup and Restore (Windows 7)".
Then, choose "Select another backup to restore files from" and select a created backup for restoration.
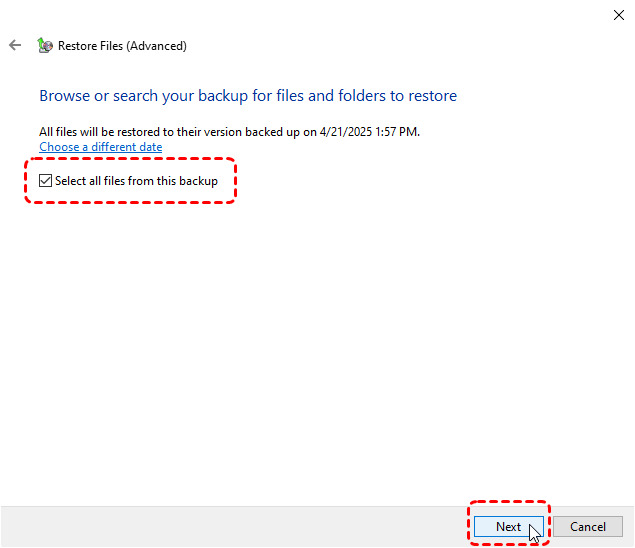
Next, select files you want to recover. You can recover all files from the backup by ticking "Select all files from this backup" option.
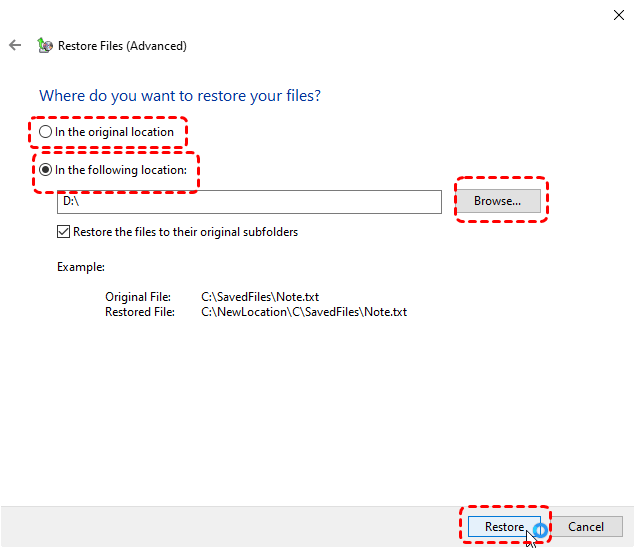
Lastly, choose a safe location to save the restored files and click "Restore" to start the process.
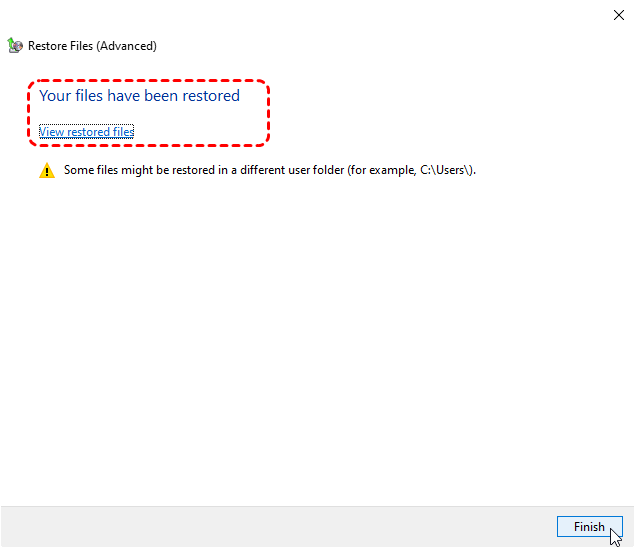
Once the process is finished, the message "Your files have been restored" will pop out. You can access and check the recovered files by clicking "View recovered files".
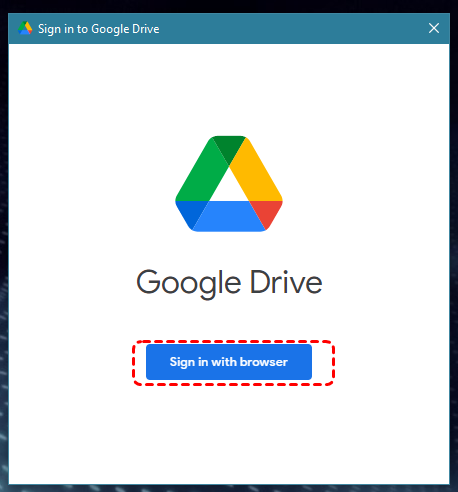
Option C. Restore from Cloud Backup
To begin, sign in to Google Drive with your account. (Take Google Drive as an example here).
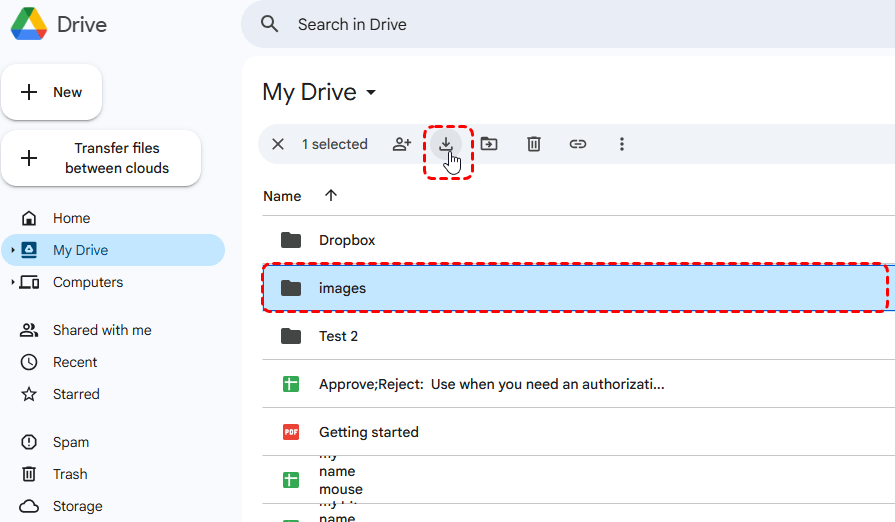
Next, navigate to the folder where you backed up from the failed hard drive.
Then, select the folder and click "Download" icon to recover the files.
- Notes:✎...
- The above three methods will only work if you have backed up files before the hard drive fails.
✅Method 2. Run Windows File Recovery Command (Command-line Tool)
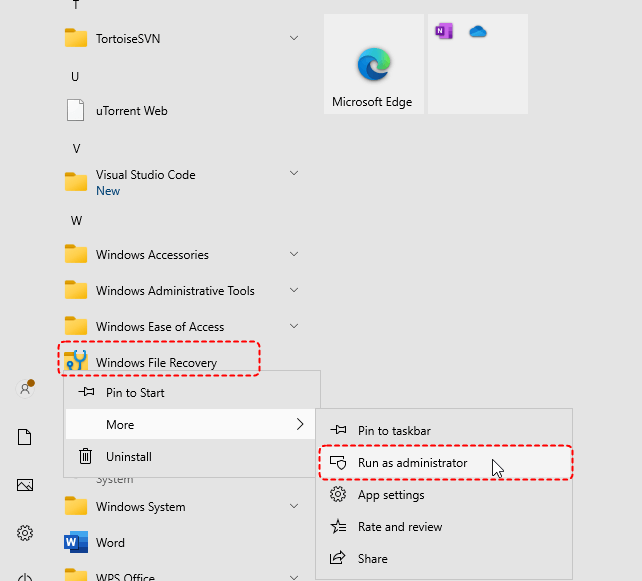
To begin, download and install Windows File Recovery from the official Microsoft channel.
Then, run Windows File Recovery as administrator.
Next, type the command "winfr F: E: /regular" to perform a quick scan for the failed hard drive, and press "Enter" to start the process. Replace the drive letters "F" and "E" with your actual drive letters.
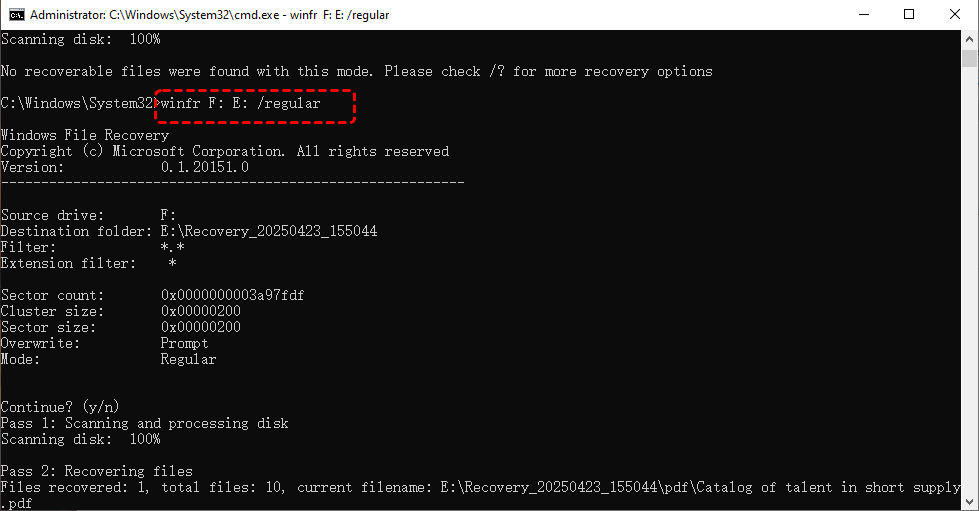
When the process is completed, you can press "Y" to check the recovered files to the destination folder.
- ★Tips:
-
Windows File Recovery only compatible with Windows 10 and 11.
-
Windows File Recovery also provide multiple Windows File Recovery commands that allow you to restore a specific file type, files and folders.
✅Method 3. Recover with Professional Recovery Tool—MyRecover (GUI tool)
If you're uncomfortable with command-line tools, MyRecover is perfect for you. It uses a graphical user interface (GUI), allowing users to complete data recovery by clicking icons. This tool simplifies the data recovery process and enables you to retrieve data from a failed external hard drive without requiring any backups.

- Intuitive interface requiring no technical expertise.
- Faster scanning compared to command-line tools.
- Higher success rate for permanently deleted files.
- Compatible with all Windows operating systems.
- Work on HDD, SSD, USB flash drive, memory card, etc.
First, download and install MyRecver on your computer.
Next, launch it and select the failed hard drive to scan for lost files, and click "Scan".

Then, choose the files you want to recover from the recoverable lists and click "Recover". If you cannot find the desired file, you can perform a deep scan for more fragmented file clues.

Lastly, select a safe location (not the failed hard drive) to save the recovered files.

Upon the completion of the process, the message "Files have been recovered successfully" will pop out. You can click the destination folder to check them.

Step 4: Professional Data Recovery Service (For Physical Failure)
If the hard drive has suffered physical damage or the above methods fail to recover data from the failed drive, you can try professional data recovery services. Hard drive brands like Seagate and WD offer professional data recovery services.
How to Fix the Hard Drive Failure on Windows 10
After recovering your data, the next step is to try fixing the faulty hard drive. This section provides several Windows built-in tools to fix these failures.
Run CHKDSK Command
CHKDSK command scans the drive for bad sectors and file system errors and attempts automatic repairs. Here's how:
Step 1. Open "command prompt" and run it as administrator.

Step 2. Type the following command "chkdsk G: /f /r" and press "Enter". Replace the drive letter "G" with your failed hard drive letter. Then the command will locate bad sectors and automatically repair them.

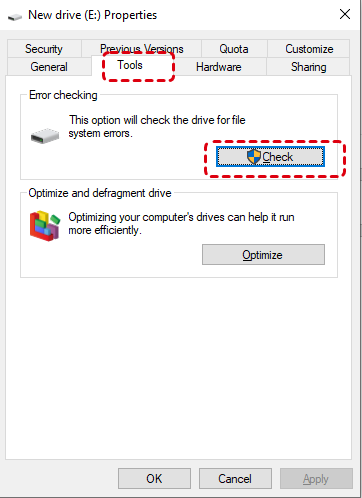
Checking Error in File Explorer
Similarly, if you are not fond of command-line tools, Windows also provides a GUI entry that can help you fix hard drive failures. Follow these steps to repair the disk error:
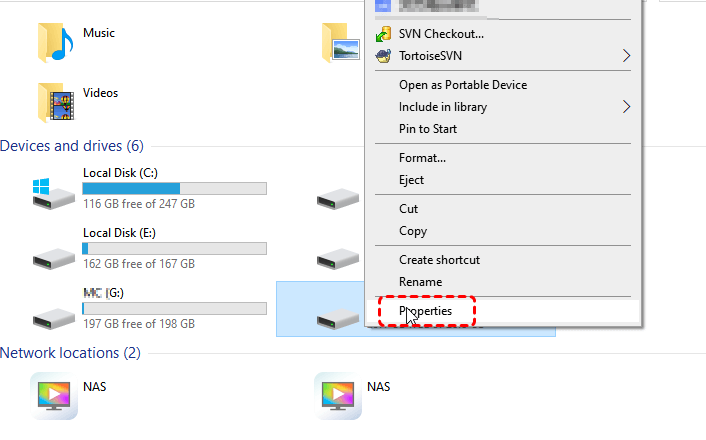
Step 1. Select the failed hard drive in File Explorer.
Step 2. Right click on it and choose "Properties".
Step 3. Under the "Tools" tab, click "Check" and click "Scan Drive" to start the process.
Scan Malware
If you suspect that the drive failed due to a virus or malware infection, you can use Windows Defender to scan for and remove the malicious software.
Step 1. Press "Win +E" to open File Explorer.
Step 2. Select the failed drive in File Explorer and right click on it, then choose "Scan with Microsoft Defender". Then it will perform a quick scan for the failed drive.
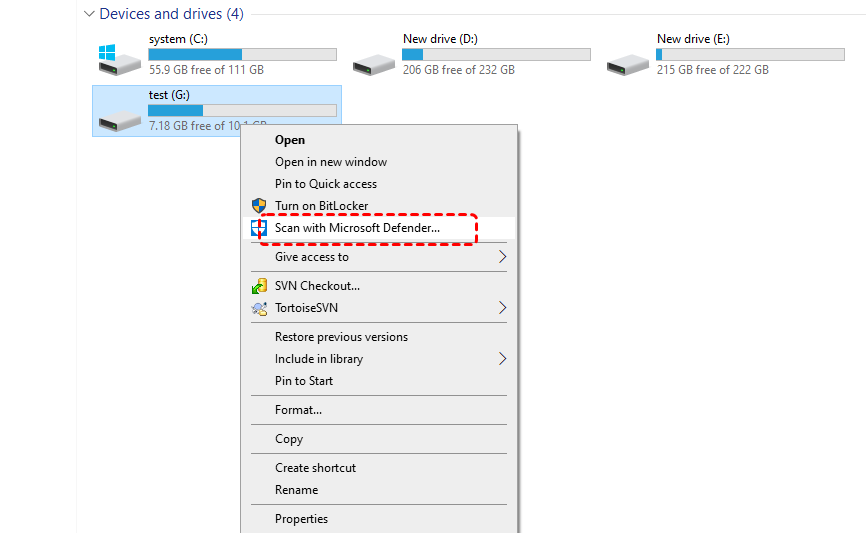
If you need a more thorough scan, you can select "Full scan" or "Microsoft Defender Antivirus (offline scan)" based on your specific requirements.

Summary
A failed hard drive doesn't always mean data is lost forever. Through the methods mentioned above, you can recover data from a failed hard drive and repair the drive failure. If the hard drive is indeed severely damaged, please consider professional data recovery services.
If you're seeking a reliable tool to recover data from a dead hard drive, MyRecover is worth trying. It covers various data loss scenarios, such as deleted partitions, formatted USB drives, and emptied recycle bins. MyRecover also offers the Professional and Technician versions to meet more sophisticated user needs, including recovering data from old system drives and previewing file contents before recovery.


Stay Updated With Our
Latest Tips
Add us as a preferred source on Google to never miss helpful guides.