
[Top 4 Methods] How to Recover Files Deleted by CHKDSK
Discover step-by-step solutions on how to recover files deleted by CHKDSK using trusted recovery software and manual methods. This guide helps you restore missing files safely and effectively, ensuring your valuable data is back without hassle.
By Vera / Updated on May 20, 2026
Introduction: When CHKDSK Goes Wrong
Ever run a disk repair and thought, "CHKDSK deleted my files"? You are not alone. CHKDSK (Check Disk) is a vital Windows utility designed to repair file system errors and map out bad sectors. However, its "fix-at-all-costs" logic can sometimes lead to data loss. While it successfully repairs the disk's structure, it may prune "corrupted" data that you actually needed.
If you are currently wondering how to recover CHKDSK deleted files, this guide provides the technical background and step-by-step solutions to retrieve your data before it is overwritten.
Why "CHKDSK Deleted My Files" Happens?
CHKDSK’s main job is to fix inconsistencies in your file system. To understand why your data vanishes, you must understand its solution logic:
1️⃣Orphaned Files: If a file exists on the disk but isn't listed in the directory, CHKDSK identifies it as an "orphan." It may attempt to "re-home" it, but if it fails, the link is severed.
2️⃣Cross-Linked Files: This occurs when two files claim the same storage cluster. CHKDSK often deletes both or "fixes" one by sacrificing the other to prevent further corruption.
3️⃣Bad Sector Isolation: If a file is sitting on a physically failing sector, CHKDSK marks that sector as "bad" and instructs the OS to ignore it, effectively making your file inaccessible.
Common Scenarios Leading to File Deletion
-
Interrupted Scans: Power loss or a sudden system crash while CHKDSK is rewriting the directory structure.
-
Severe Corruption: When the file metadata is so damaged that the utility cannot determine the file's original name or location.
-
Hardware Failure: Physical degradation of the drive (bad sectors) that prevents CHKDSK from reading the data it’s trying to repair.
Signs Your Files Were Deleted or Relocated by CHKDSK
Before jumping into recovery, identify how the data was handled. CHKDSK rarely "wipes" data; it usually just changes how the computer sees it.
-
Missing Folders and Directories: You might open your drive only to see folders gone or empty. This often means CHKDSK relocated fragments into a hidden "Found" folder.
-
The Appearance of .CHK Files: If you see a series of files with a .chk extension, these are the "recovered" pieces of your data that CHKDSK couldn't identify.
-
Decreased Disk Space: If your files are gone but the "Used Space" on the drive remains high, the data is likely still there, trapped in a hidden system directory.
Can You Recover Files Deleted by CHKDSK?
Files gone after chkdsk /f d. How to recover?
- Question from Reddit
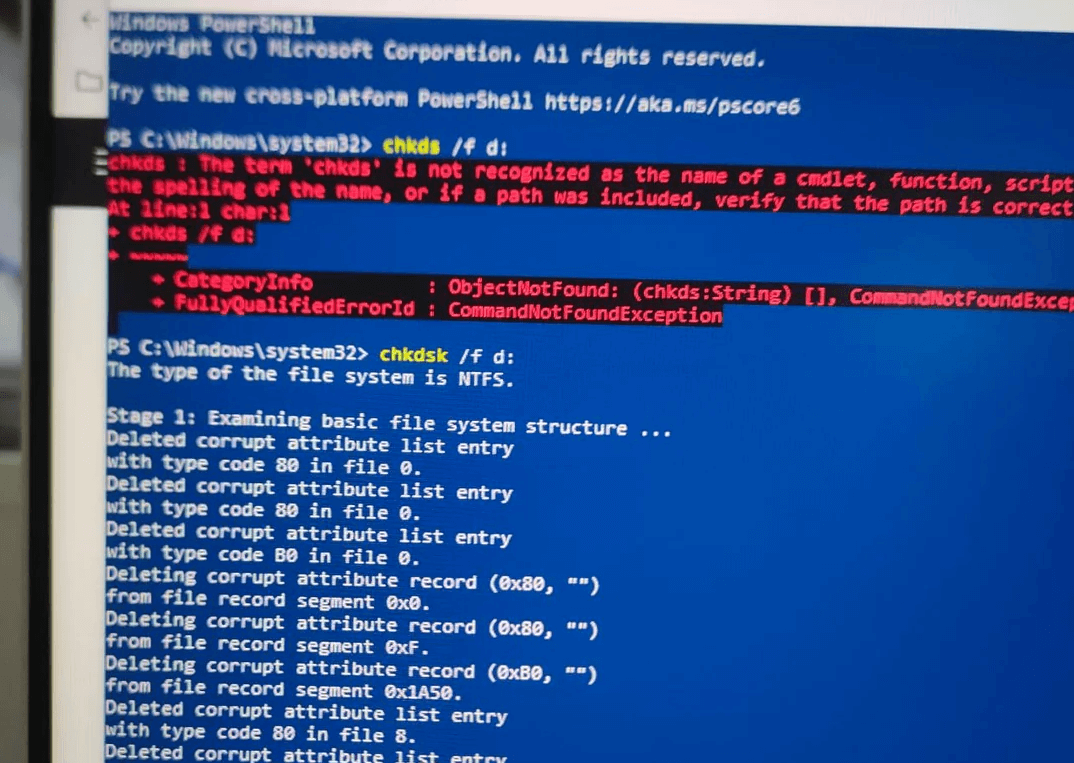
The good news? Yes, in many cases, recovery is possible.
CHKDSK moves data fragments into the Found.000 folder, which you can manually inspect. And, files that can’t be repaired or relocated are essentially "lost" but often still exist physically on the drive until overwritten.
Step-by-Step Methods to Recover Files Deleted by CHKDSK
While the loss of data is stressful, the logic of Windows' file system means that the "deleted" data is often still physically present on the disk until overwritten by new files. Here are the most effective ways to retrieve it.
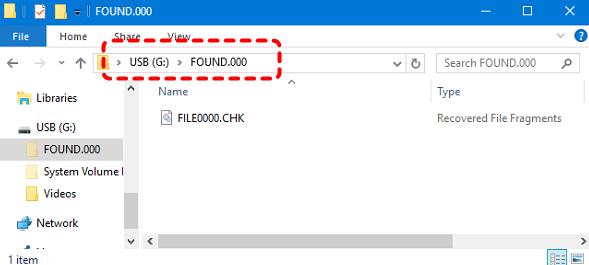
Method 1: Check Found.000 Folder (The Manual Extraction Logic)
When CHKDSK finds "lost clusters" (bits of data not associated with any file), it doesn't always delete them. It often saves them as fragments in a hidden system folder named Found.000. This is the most common way to recover CHKDSK deleted files manually.
How to Access and Recover from the Found.000 Folder:
1. Show Hidden Files & System Files:
- Open File Explorer and go to the drive you scanned.
- Click View > Options > Change folder and search options.
- In the View tab, select "Show hidden files, folders, and drives" AND uncheck "Hide protected operating system files" (Click 'Yes' on the warning).

2. Locate the Folder: Look for a folder named Found.000 (or Found.001, etc.) in the root directory of the drive.
3. Identify the .CHK Files: Inside, you will see files named FILE000.CHK.
4. Restore the Data:
- If you know the file type (e.g., it was a Word doc), try renaming the extension from .chk to .docx.
- For large batches, use third-party tools like UnCHK or CHK-Mate to scan the fragments and identify their original file headers.
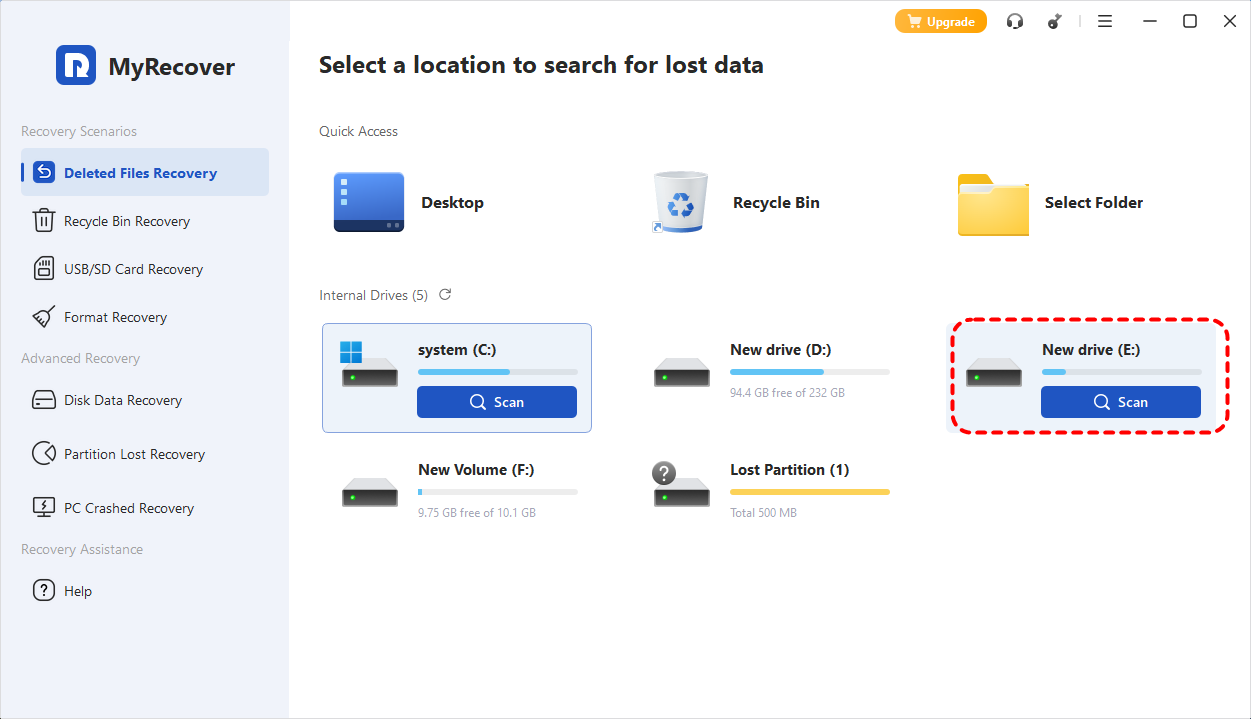
Method 2: Use MyRecover (The Professional Recovery Logic)
If the manual method fails or the Found.000 folder is empty, it means the file pointers were completely removed from the MFT. In this scenario, you need a tool that can bypass the file system and scan the raw data on the disk.
MyRecover is specifically optimized to recover files deleted by CHKDSK. Unlike standard recovery tools, it features a specialized algorithm that can reconstruct file signatures even after a CHKDSK repair has altered the disk's directory structure.
Why MyRecover is the Best Choice for CHKDSK Issues:、

- 🌈MFT Reconstruction: MyRecover can bypass the corrupted file table that CHKDSK was trying to fix and scan the disk's raw data layers.
- 🌈Deep Scan Technology: If CHKDSK marked sectors as "available" (effectively deleting your files), MyRecover’s Deep Scan algorithm can piece together fragmented data before it gets overwritten.
- 🌈Format-Aware Recovery: It recognizes over 1000+ file types, meaning it can find your lost photos or documents even if CHKDSK stripped them of their original names.
- 🌈Safe Recovery: It operates in read-only mode, ensuring no further damage is done to your drive.
Steps to Use MyRecover Effectively
1. Download and install MyRecover on a drive other than the one you’re recovering from.
2. Launch the software and select the affected drive.
3. Click "Scan" to perform a quick scan.
4. Preview the recoverable files listed.
5. Select your desired files and hit "Recover" to save them to a safe location.

Method 3: Windows File Recovery (Command-Line Utility)
For those comfortable with a technical interface, Microsoft provides a free tool called Windows File Recovery. This is useful to recover deleted files after CHKDSK when you are dealing with NTFS, FAT, or exFAT systems.
Why Windows File Recovery Is Useful
- It’s a free Microsoft tool.
- Works on NTFS, FAT, exFAT, and ReFS file systems.
- Offers two recovery modes (Regular and Extensive modes) for different scenarios.
How to Use Windows File Recovery Tool
1. Download: Get the tool from the Microsoft Store.
2. Admin Access: Right-click the app and Run as Administrator.
3. Execute Mode: For files lost after CHKDSK, the Extensive mode is recommended as it scans for file signatures rather than just the MFT.
- Syntax: winfr source-drive: destination-drive: /extensive /n [filter]
- Example: To recover all PDF files from a corrupted G: drive to a D: drive: winfr G: D: /extensive /n *.pdf
4. Wait for Completion: This process takes longer than a standard scan but is more likely to find files that have been "orphaned" by CHKDSK.
Method 4: Restore From Backup (The Safety Net Logic)
Why this method? This is the only 100% guaranteed recovery method. If CHKDSK attempted to repair a sector and accidentally zeroed out the data, software recovery may fail. Backups represent a "Point-in-Time" snapshot taken before the corruption occurred.
If you’ve been diligent about backing up your data, restoring lost files can be quick and painless. Windows offers built-in backup solutions, including File History and Backup and Restore.
👉1. Using File History
File History is a Windows feature that automatically backs up your files to another drive or network location. Here’s how to restore files using File History:
1. In Windows Search, type "Restore your files with File History". Then open it.
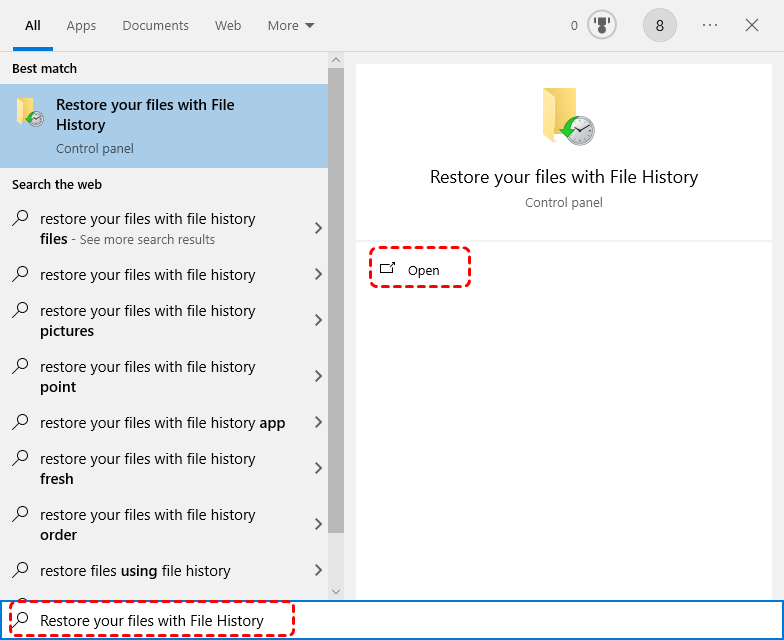
2. Browse the backed-up folders to locate the lost files.
3. Select the files you want and click "Restore" to recover them to their original location.

👉2. Using Windows Backup and Restore
If you previously set up Windows Backup:
1. Open Control Panel > System and Security > Backup and Restore (Windows 7).
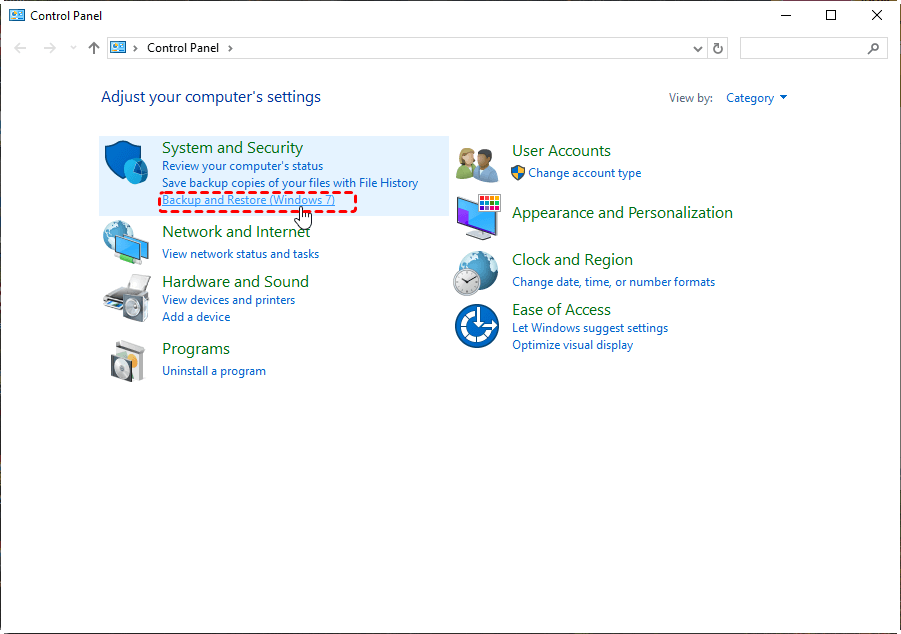
2. Select "Restore my files".
3. Choose the way you like to select the file you want to recover, and then click Next.
4. Specify the saving path for your recovered file, and click Restore.
Pro Tips: How to Prevent CHKDSK from Deleting Files
To avoid future situations where you have to recover CHKDSK deleted files, follow these best practices:
-
Run CHKDSK in Read-Only Mode: Always use the command chkdsk (without /f or /r) first. This allows you to see errors without the utility automatically deleting "corrupt" data.
-
Backup Before Repair: If the read-only scan shows errors, back up your most important files immediately before running chkdsk /f.
-
Check Drive Health (S.M.A.R.T.): If CHKDSK keeps finding errors, your drive may be failing physically. Use a tool to check S.M.A.R.T. status before attempting any repairs.
Conclusion
CHKDSK is a powerful tool for maintaining your drive’s health but can sometimes cause file loss. By checking the Found.000 folder, using data recovery software, using Windows File Recovery Tool, or restoring from backups, you stand a good chance of recovering files deleted by CHKDSK. And remember — always back up your important files before running any disk repair utilities.
Frequently Asked Questions (FAQ)
1. Why did CHKDSK delete my files instead of fixing them?
CHKDSK’s primary goal is a healthy file system structure. If a file is "cross-linked" (two files occupying the same space), CHKDSK will often delete one or both to ensure the disk remains readable by Windows.
2. Can I recover CHKDSK deleted files if the drive is an SSD?
Yes, but it is harder due to the TRIM command. However, since CHKDSK often moves or de-indexes files rather than "wiping" them, tools like MyRecover still have a high success rate on SSD data recovery if used immediately.
3. Is "Found.000" the only place where CHKDSK moves files?
Usually, yes. However, if CHKDSK cannot create that folder, it may simply mark the clusters as "empty," which is why professional software is often needed to recover files deleted by CHKDSK.
4. How long do I have to recover deleted files after CHKDSK?
You should attempt recovery immediately. Windows constantly writes small logs and temporary files to the disk. These can overwrite the sectors where your deleted files reside, making them unrecoverable.
5. I ran chkdsk /r and now my computer is slower. Did I lose data?
In fact, chkdsk /r scans for physical bad sectors. If it found many, it "blocked" them off. While this protects the OS, it means any data on those sectors was likely lost or moved. Use MyRecover to scan the drive for "Lost Partitions" to see if data can still be extracted from those weakened areas.
7. Is there a way to automate "how to recover CHKDSK deleted files" without manual work?
The most automated way is using a dedicated recovery tool. While manual methods like renaming .chk files require technical guesswork, a recovery tool automates the process of identifying file headers and rebuilding your directory.


Stay Updated With Our
Latest Tips
Add us as a preferred source on Google to never miss helpful guides.