
[2 Ways + 1 Aternative] How to Recover Files from Windows Image Backup
Wondering how to recover files from Windows image backup for Windows 7/10/11? This tutorial walks you through the process of retrieving lost data from a Windows system image. Whether restoring an entire system image or selectively recovering individual files and folders, the methods provided allow you to quickly recover important files even if your system cannot boot.
By Vera / Updated on April 2, 2026
Introduction
Ever had that mini heart attack when your PC crashes, and you think you’ve lost everything? Yeah, we've all been there. But if you were smart enough to create a Windows image backup, there’s good news—you can recover your files. In this article, we're going to walk you through how to recover files from Windows image backup the easy way, without all the tech jargon.
What is a Windows Image Backup?

Before we dive into the recovery part, let’s make sure we’re on the same page about what a Windows image backup actually is.
Why You Might Need One
A Windows image backup is basically a snapshot of your entire system—files, programs, settings, you name it. Think of it like a time machine for your PC. If your system crashes or becomes unusable, this image helps you bring everything back, just like it was.
What It Contains
It includes:
- System files
- Installed apps
- System settings
- Personal files (if selected)
It’s stored in a .vhd or .vhdx file and can be used to restore your PC or selectively recover data.
Can You Recover Files from Windows Image Backup?
Short answer: Absolutely. But let’s bust some myths first.
Common Misconceptions
- Myth: You can only restore the whole system.
- Truth: You can extract individual files, too.
What's Actually Possible
With the right approach, you can browse the backup like a regular folder and pull out only what you need—no need to nuke and rebuild your whole system.
Prerequisites Before Starting Recovery
Let’s make sure you're set up for success.
Check Backup File Availability
Locate your backup—usually stored in:
- External hard drive
- Network location
- Secondary partition
Make sure it hasn’t been corrupted or deleted. >> Look here to know how to recover files from external hard drives.
Make Sure You Have Enough Storage
When recovering files, especially large ones, you’ll need enough free space on your current drive to accommodate them.
How to Recover from Windows Image Backup
Here are 2 easy ways to recover from Windows image backup, depending on your needs.
Method 1: How to Restore Files and Folders from System Image Backup (Full System Restore)
If you need to fully restore your entire system—including the operating system, installed programs, settings, and files—this is the most direct and comprehensive solution. It is ideal when your PC cannot boot properly or when you want to revert to a complete system snapshot.
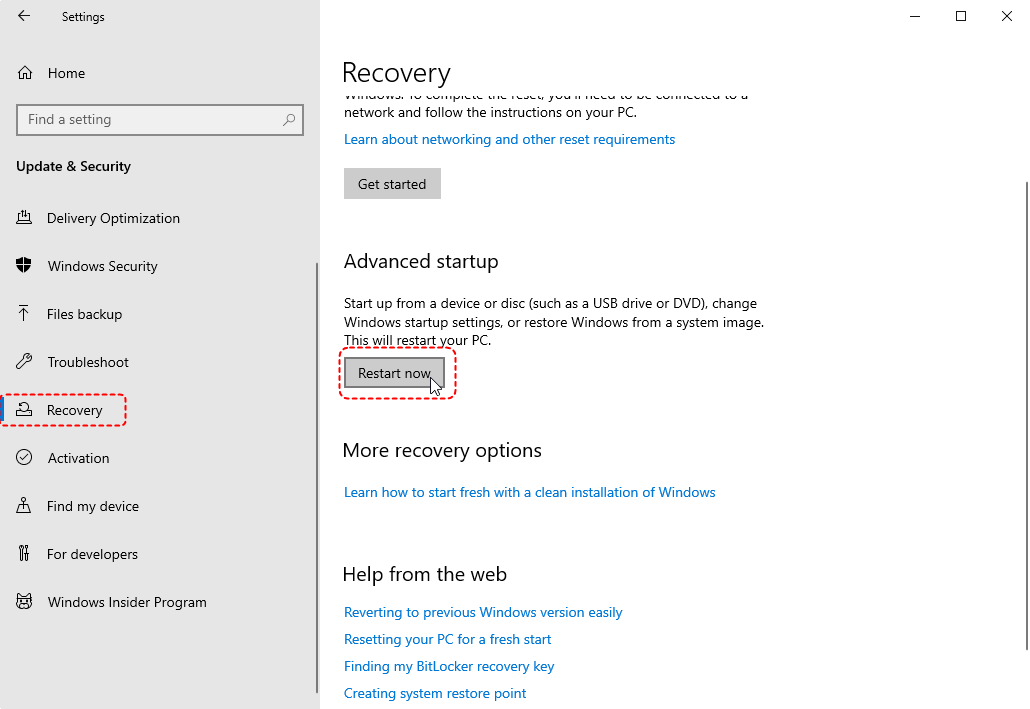
1. Access Advanced Startup Options:
Go to Settings > System > Recovery (in Windows 11) or Update & Security > Recovery (in Windows 10). Click "Restart now" next to "Advanced startup".
2. Navigate to System Image Recovery:
In the "Choose an option" window, select Troubleshoot > Advanced Options > System Image Recovery. If you don't see it, select "See more recovery options" first.
3. Follow the Wizard:
The System Image Recovery wizard will guide you through the process of selecting the backup image and restoring it.
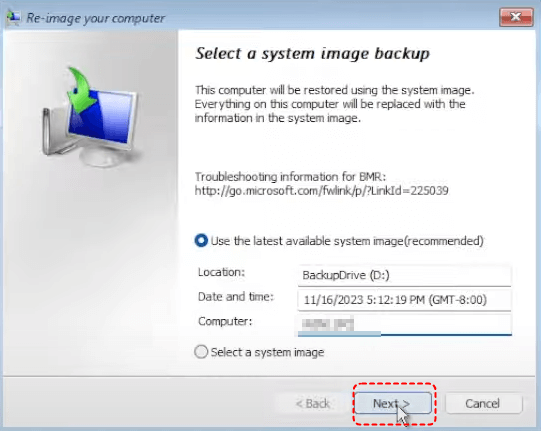
This will restore everything exactly as it was when the backup was made.
Method 2: Mount VHDX File (Best for Individual Files)
On the other hand, if you only need to restore specific files and folders from system image backup without affecting your current system, mounting the backup as a virtual drive is a more flexible option. It allows you to browse and copy individual data just like using a regular disk, perfect for selective recovery.
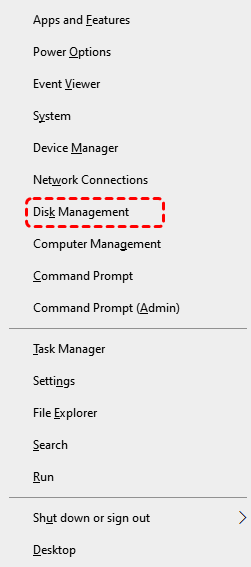
1. Open Disk Management:
Right-click the Start button and select Disk Management.
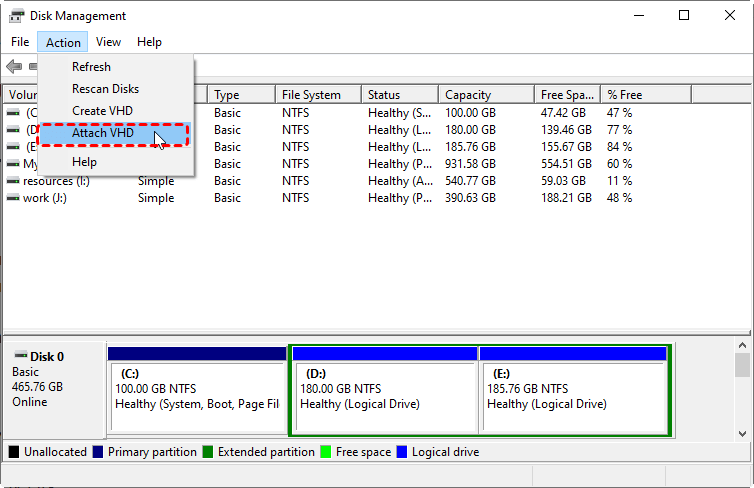
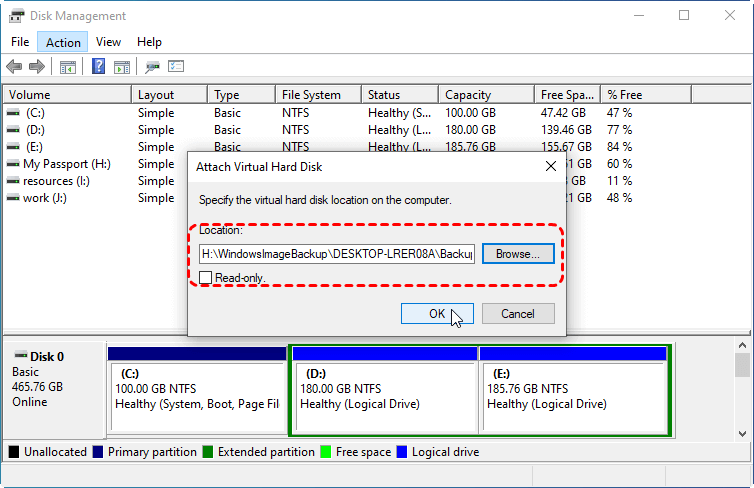
2. Attach VHD:
Go to Action > Attach VHD. Browse to the location of your system image backup file (usually a .vhdx file) and select it.
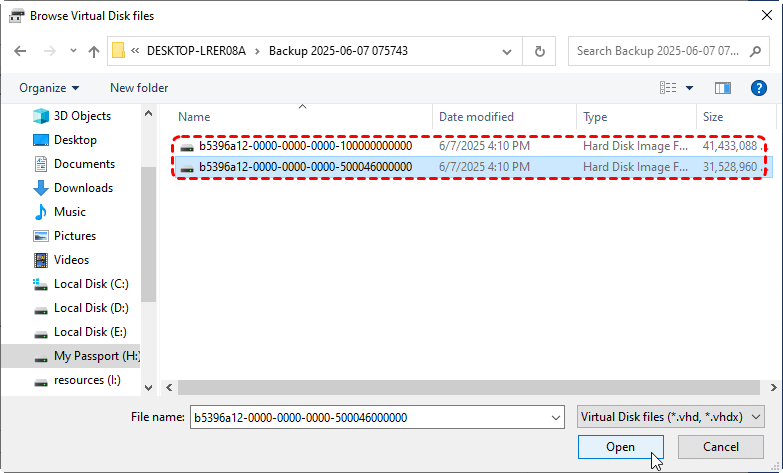
3. Mount the Image:
Click Open and then OK. The mounted image will appear as a drive in File Explorer.
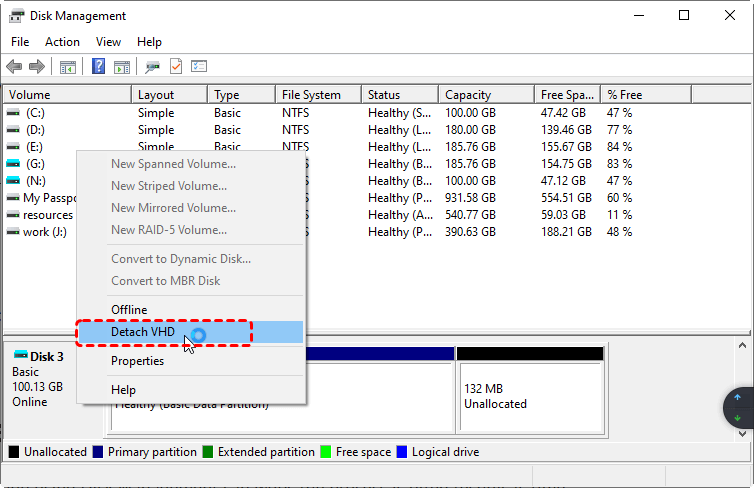
4. Copy Files:
Navigate to the mounted drive and copy the desired files or folders to your desired location.
5. Detach VHD:
Once finished, detach the VHD by right-clicking on the drive and selecting "Detach VHD".
How to Recover Files Without Restoring the Entire System
If the built-in methods aren’t doing it for you, third-party tools can make life way easier. One top recommendation is MyRecover—a powerful, user-friendly tool that’s perfect for recovering files without doing a full system restore.

- ✅ One-Click Recovery Simplicity: Just launch, scan, and recover – it’s that simple.
- ⚡ Ultra-Fast Scanning: Equipped with both Quick Scan and Deep Scan modes for recovering data at lightning speed without sacrificing accuracy.
- 💾 Supports 1000+ File Types: Supports formats like DOCX, JPG, MP4, PST, ZIP, and more.
- 🖥️ Full Windows Compatibility: Fully compatible with Windows 11, 10, 8, 7 and even older servers. Supports recovery from HDDs, SSDs, USB drives, SD cards, etc.
- 🔒 100% Safe and Secure: Read-only recovery – your existing data won’t be overwritten.
Step 1. Download and Install MyRecover
Download and install MyRecover on your computer.
Step 2. Launch and Scan
Launch the tool and find the specific location where the file is lost or damaged, such as Drive D. Let it scan this location and show you recoverable files.

MyRecover will automatically run a "Quick Scan" (for recently deleted files) or a "Deep Scan" (for formatted or corrupted drives) to find all deleted or lost files.
Step 3. Save Recovered Data
Choose the files you need and hit Recover. Then, in order to avoid destroying the unrecovered data in that path, select another folder path to save the recovered files.


To find the files you need to recover faster, you can use the file filter function or search for the file size in the search box.
It’s really that simple—no confusing menus or risk of overwriting anything important.
Common Problems and How to Fix Them
Even the best plans can run into hiccups. Here’s how to deal.
1. Mounting Errors
Fix: Make sure the .vhd file isn’t corrupted. Try another PC if needed. You can also use command-line tools like diskpart to manually mount the image.
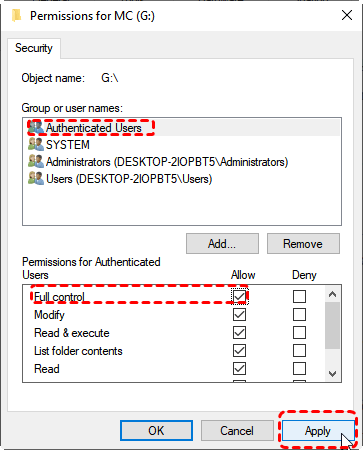
2. File Access Denied
Fix: Right-click the file > Properties > Security tab > Edit permissions. You may need admin rights to access some files.
3. Files Are Missing from Backup
Fix:
- Make sure you’re browsing the correct partition inside the mounted image.
- Check hidden folders or system folders—your files might be tucked away there.
- Use MyRecover to deep-scan the image for deleted files.
Conclusion
So, there you have it! Whether you’re dealing with a system meltdown or just need a single file, knowing how to recover files from Windows image backup can be a total lifesaver. And while Windows has its built-in options, tools like MyRecover make the process faster, easier, and a lot less stressful, especially helping you recover data from cashed Windows.
Frequently Asked Questions (FAQs)
1. Where are Windows image backups stored?
2. Can I recover only specific files from a Windows image backup?
3. How do I restore a Windows image backup if my computer won’t boot?
4. Why can’t Windows detect my system image backup?
This usually happens because:
- The backup is not in the WindowsImageBackup folder.
- The folder structure was changed.
- The backup is stored on an unsupported drive or location.
- The backup file is corrupted.
Make sure the folder structure remains unchanged and reconnect the drive where the backup is stored.
5. What file format does Windows image backup use?
6. Can I recover files from a Windows image backup on another computer?
7. What should I do if files are missing from my backup?
If files appear missing:
- Check different partitions inside the mounted image.
- Enable viewing hidden and system folders.
- Use a recovery tool to scan the backup image for deleted files if necessary.


Stay Updated With Our
Latest Tips
Add us as a preferred source on Google to never miss helpful guides.