 MyRecover



How to Recover Data from Crashed Windows 11 [Whether It Boots or Not]
Have you been hit by the chaos of a Windows 11 system crash? The question you’re most concerned about—how to recover data from corrupted Windows 11—may be answered for you in this article. This guide will also detail the causes and preventive measures of system crashes.

By Aria / Updated on May 27, 2026


Windows 11 System Crashed!
Yesterday, I was playing games on my Windows 11 PC. About 45 minutes after turning on the PC, it crashed. First, my screen completely froze and the PC became unresponsive. Neither my mouse nor any keys, including the Windows key, worked. I decided to turn off my monitor. When I did, the screen turns blue with an error shown. I waited 5 minutes and there was no improvement. How to recover data from the crashed windows? What should I do?
- Question from Kyle Tuener

Windows can crash for numerous reasons, potentially resulting in the permanent loss of Windows system data. Blindly attempting a forced shutdown or continuing to store data on a crashed computer significantly raise the risk of permanent and irrecoverable data loss. This guide will offer you solutions for handling various system - crash scenarios and show you how to retrieve lost personal data from a crashed Windows 11.
Is it Possible to Recover Data from a Crashed Hard Drive?
Many users panic when Windows 11 crashes and wonder: "My system crashed, did I lose my data?". In fact, system crashes won’t erase data automatically, yet there is a high risk of data loss. In many cases, data can still be recovered from a crashed hard drive, even if Windows 11 fails to boot or the system appears unusable. Recovery success mainly depends on what type of crash occurred and whether the drive has logical damage or physical failure.
The main causes of Windows crashed are as follows:
🔋 Too Little Memory Capacity: Computer memory, or RAM (Random - Access Memory), is crucial for a computer to function properly. Insufficient RAM can not only slow down the computer but, in severe cases, even cause it to crash.
🌡️ Overheating: When a computer has too many programs running simultaneously, the fan noise gets louder, the computer's internal temperature rises, and the system responds sluggishly. These issues commonly contribute to computer crashes.
🔌 Unstable Power Supply: If the power supply fails to deliver a stable and continuous voltage and current to the computer, it can cause instability in the computer system or even lead to a crash.
💽 Disk/SSD Failure: A damaged disk/SSD can cause your computer to fail to boot properly. This may lead to the drive not being correctly recognized and an error message appearing.
💡 Incompatible Software or Programs: Outdated software or programs that haven't been updated may lack compatibility with Windows 11. As a result, these programs may run sluggishly, fail to start properly, or even crash unexpectedly.
🛠️ Virus Attack: Malware is extremely harmful to a computer. It attacks the computer system and programs, causing the computer to run slowly, increasing the frequency of advertisements, altering computer settings, and ultimately crashing the computer.
How to Recover Personal Data from Crashed Windows 11
How can you recover personal files after Windows 11 system crash? You can try the following methods, regardless of whether the system can boot or not.
Scenarios 1: When Windows 11 is Partially Accessible (Desktop or WinRE Available)
If your crashed Windows system is still bootable, there are several practical ways to help you recover your personal data. You can choose the tool that best suits your personal needs.
Method 1. Run CHKDSK Command (Check Disk)
CHKDSK (check disk) is a built-in Windows tool that scans and repairs hard drives. It can help keep your system data organized.
Step 1. Type “command prompt” in the start menu search bar. Then right click on “command prompt” and select “Run as Administrator”.
Step 2. Type “chkdsk d: /f ” and press “Enter”(replace “g” with the letter of corrupted disk).
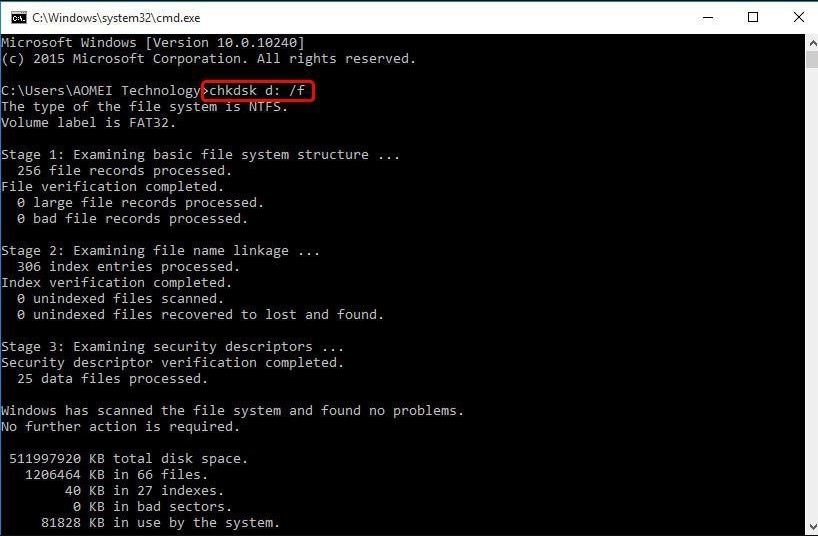
The command will scan for the errors of drive G, then fix errors and recover files. Before running this command, it is advisable to back up the files you need because forcing a repair might damage the file structure.
Method 2. Restore Files from File History
File History is a built-in Windows feature that automatically backs up files and folders, creating a history of your files so you can restore them if they are lost or damaged. Make sure you have set up File History backup before your Windows crash or file loss occurs.
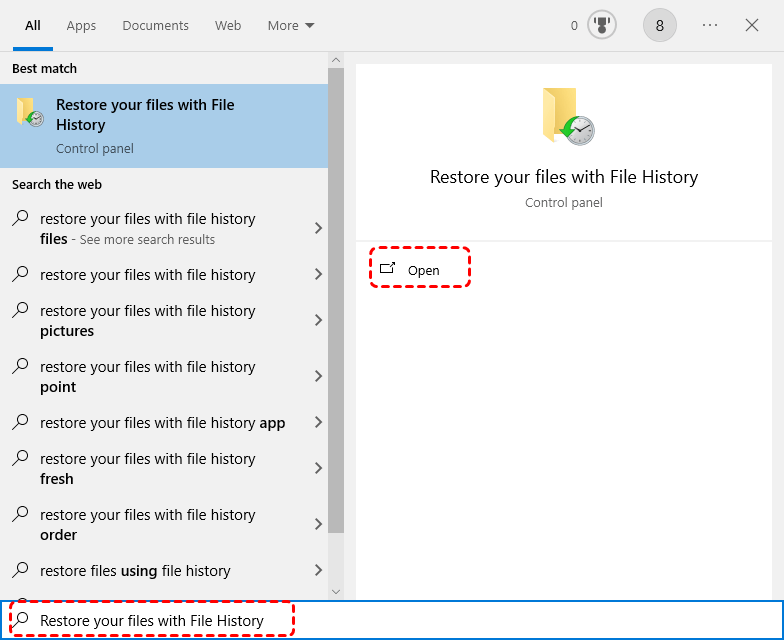
Step 1. Type “Restore your files with file history” in the start menu.
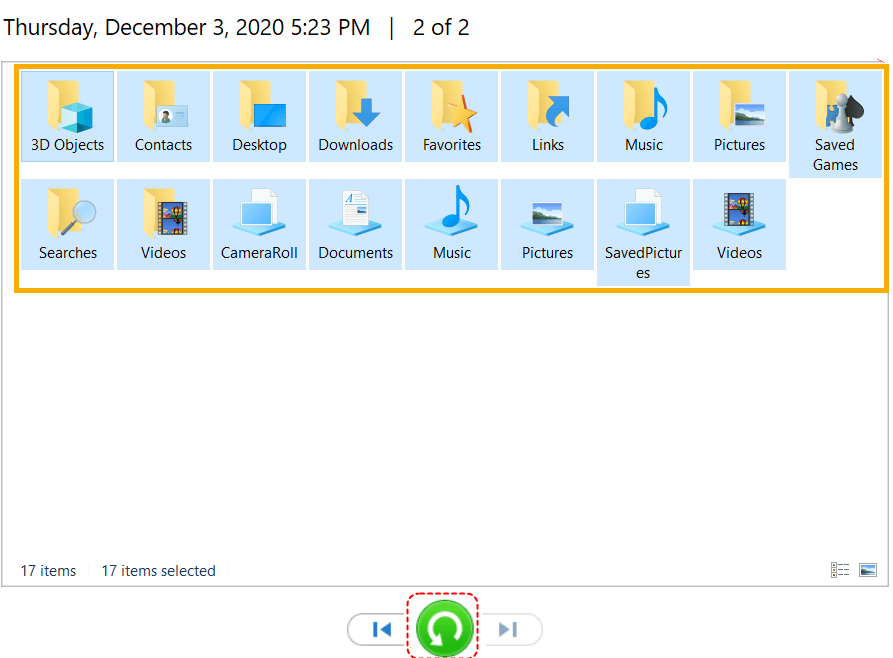
Step 2. Choose the version of the file you want to restore from the list.
Step 3. Click the green “recover” button at the bottom to restore the file to its original location.
Method 3. Run Windows File Recovery Command
Windows File Recovery is a free, command-line utility from Microsoft that helps users recover deleted or lost files from various storage devices. The tool offers two recovery modes: regular and extensive, extensive being more thorough for older or damaged files.
Step1. Download Windows File Recovery from official Microsoft Store, then follow the on-screen prompts to complete the setup process.

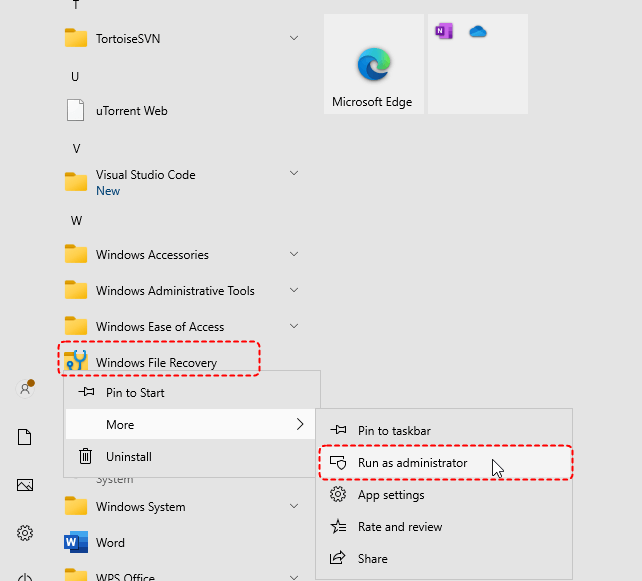
Step2. Locate Windows File Recovery in the start menu, right click and select “Run as administrator”.
Step3. In the command-prompt window that opens, enter the following command: winfr D: E: /extensive, replace “D” with the drive or partition letter from which you wish to recover data and “E” with the recovery destination drive letter.
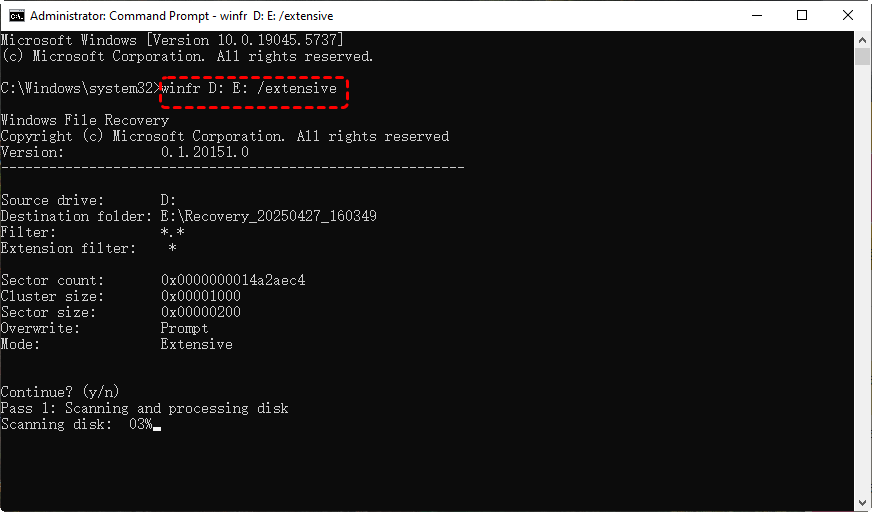
This command is used to direct windows file recovery to recover from the H drive and saved on the D drive.
Method 4. Try Professional Data Recovery Tool: MyRecover
MyRecover is a more user - friendly and effective method compared to the several ways mentioned above. It doesn't require running a complex command - line interface and is applicable to multiple data - loss scenarios, such as permanent deletion, partition loss, and system crashes, etc. You can follow the steps below to recover the desired data.
Why MyRecover is Suitable for Crashed Windows Data Recovery
✔️ Handle Multiple Crash Scenarios: Support recovery from OS crashes, BSOD, failed updates, corrupted partitions, RAW drives, accidental deletion, and formatted disks.
✔️ Deep Scan + Quick Scan Modes: Quick Scan retrieves recently deleted data fast, while Deep Scan searches more thoroughly for files lost due to crashes or corruption.
✔️ Recover from Lost or Inaccessible Partitions: Automatically detect missing or deleted partitions and scan them for recoverable files.
✔️ Support 1,000+ File Types: Recover documents, photos, videos, compressed files, emails, Office files, and other commonly used formats.
✔️ Compatible with Various Storage Devices: Work with HDDs, SSDs, USB drives, SD cards, and external hard disks.
Step1. Download and install MyRecover on your computer, ensure the installation location is different from the data loss disk to avoid data overwriting.
Step 2. Select a disk you want to recover files and click “Scan”.
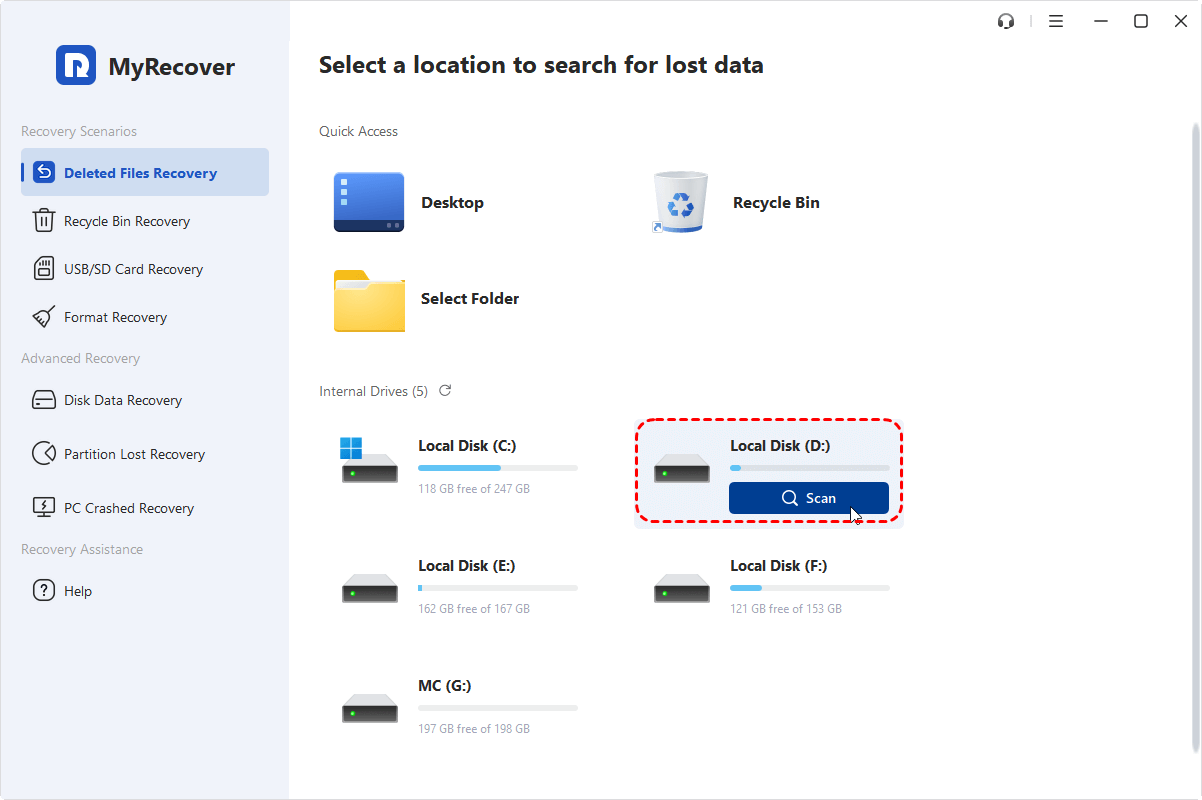
Step 3. Wait for a few minutes, after the scanning is finished, select the files you want to recover from the recoverable files presented by MyRcover and click “Recover”.
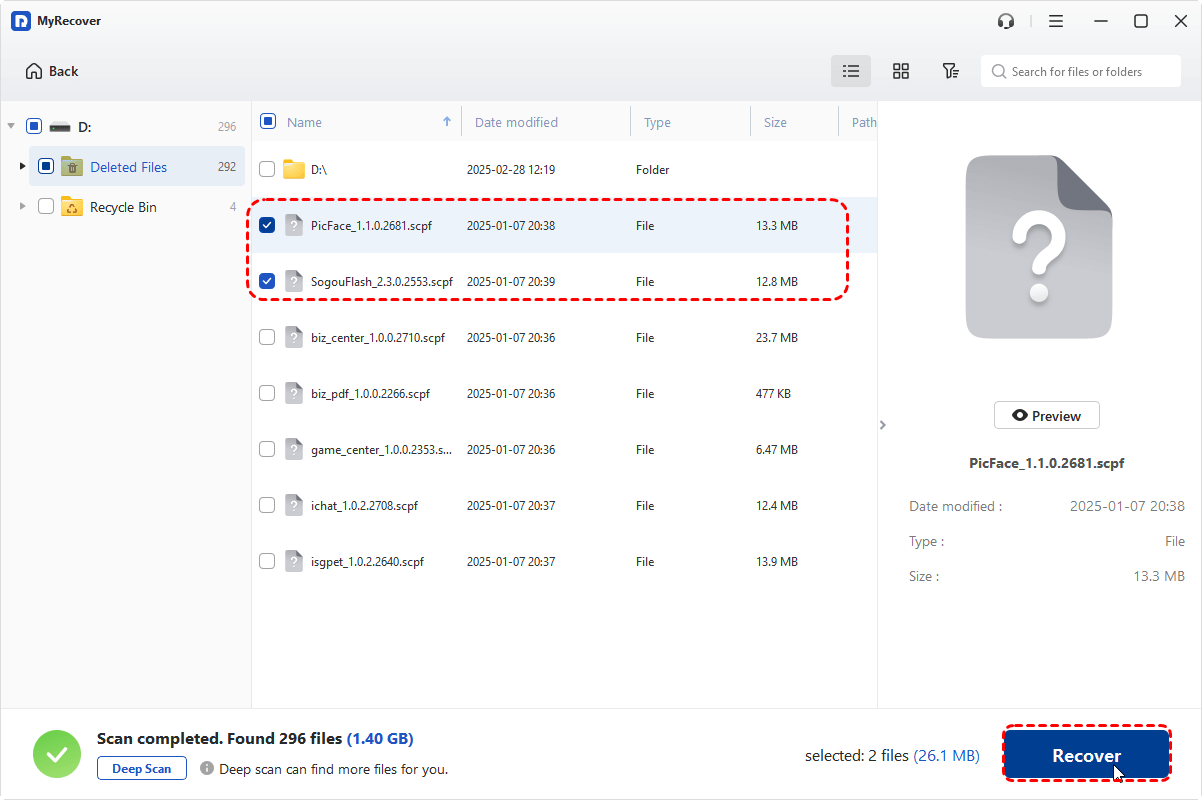
Step 4. Select a different destination disk to save the recovered files.

When the screen shows that “files have been recovered successfully”, you will be able to find the recovered files in the destination disk of your choice.
Each of these methods is suitable for more specific situations. In comparison, MyRecover is suitable for a wide variety of situations and simpler to use for most people.
Scenarios 2: When Windows 11 Won’t Boot at All (Complete System Failure)
Don't worry too much if your Windows won't boot up at all. There are also two methods that can help you recover personal data.
Method 1. Remove the Disk and Recover Data from Another Working Computer
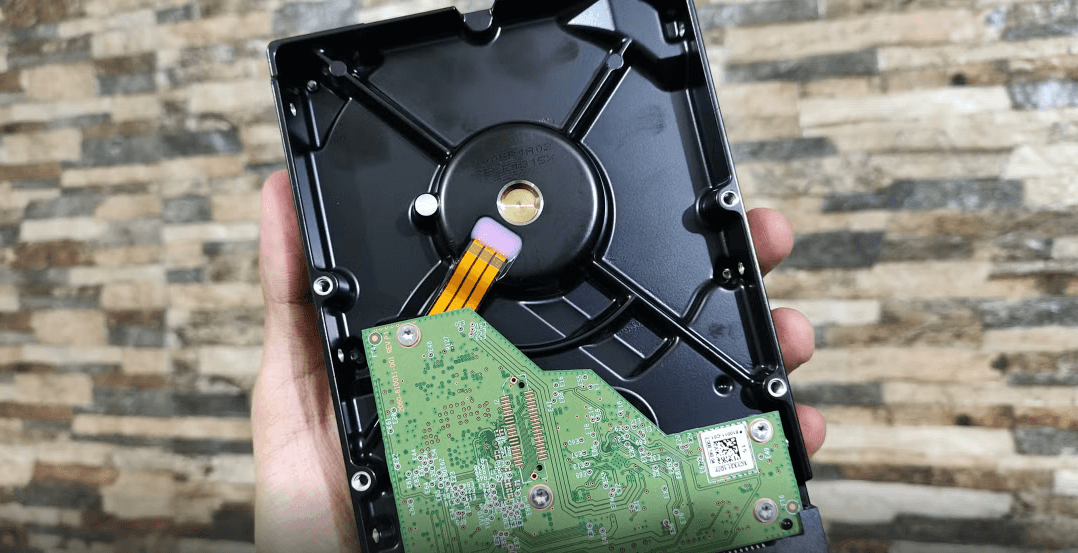
When a computer's system has crashed and cannot boot at all, the simplest way to recover data from the disk is to remove the hard drive where the files are located and install it in a bootable computer. This will allow the files on the disk to be accessed from the new computer. You can use this method to recover lost files from a failed hard drive on Windows 11 as long as the operating system crash is not caused by physical damage to the drive.
Method 2. Restore Files Using Robocopy Command
For non-professionals, removing the hard drive from a laptop by opening its back cover is quite difficult. Improper operations may even damage the drive, significantly reducing the chance of successful data recovery. If you have previously created a USB bootable media, you can boot into WinRE from this drive and use the Robocopy command to copy files from the system to a safe location.
Step 1. Attach an external HDD, SSD, or USB drive with enough free space to store recovered files.
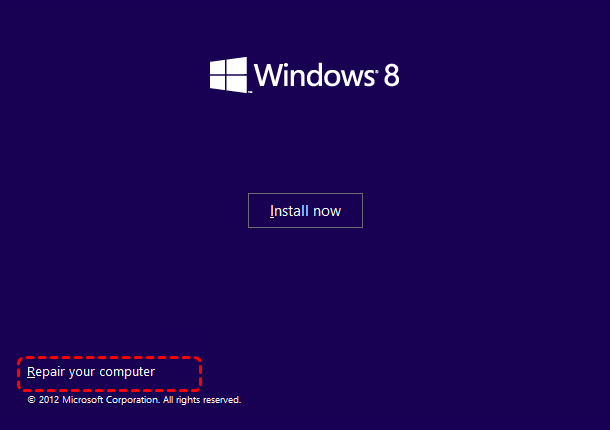
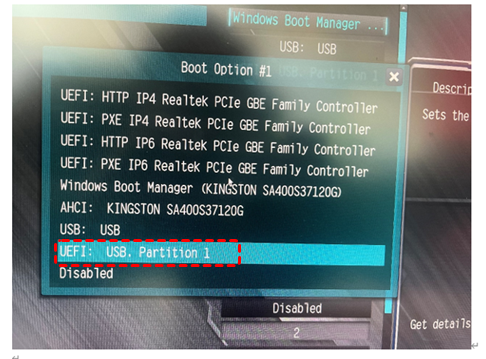
Step 2. Inert your bootable media and enter BIOS/UEFI to change the boot sequence to the USB drive. Restart your computer and select "Repair your computer" instead of "Install now".
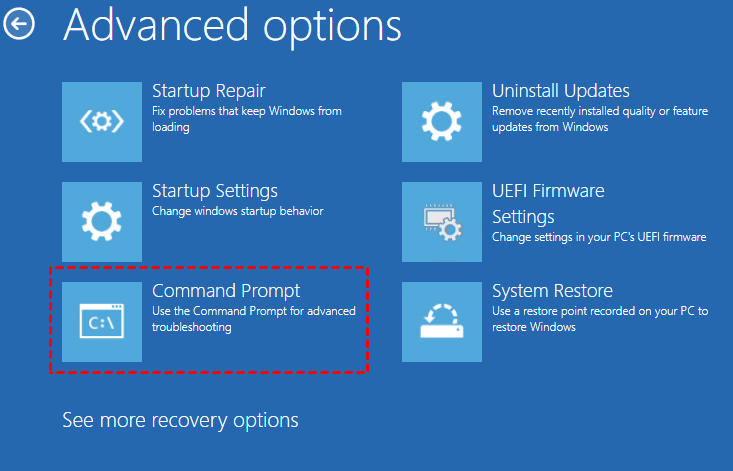
Step 3. Go to "Troubleshoot" > "Advanced options" > "Command Prompt".
Step 4. Drive letters in WinRE may different from File Explorer, so you need to check the drive letters using DiskPart command. Type the following commands:
- diskpart
- list volume
Take note of the drive letters of the partition you want to recover data from and the external hard drive where you will store the recovered data (you can identify them by their drive sizes).
Step 5. Enter the command to recover your files from the target partition:
robocopy C:\Users\YourUserName\Documents E:\Backup\Documents /E /COPYALL /R:3 /W:5
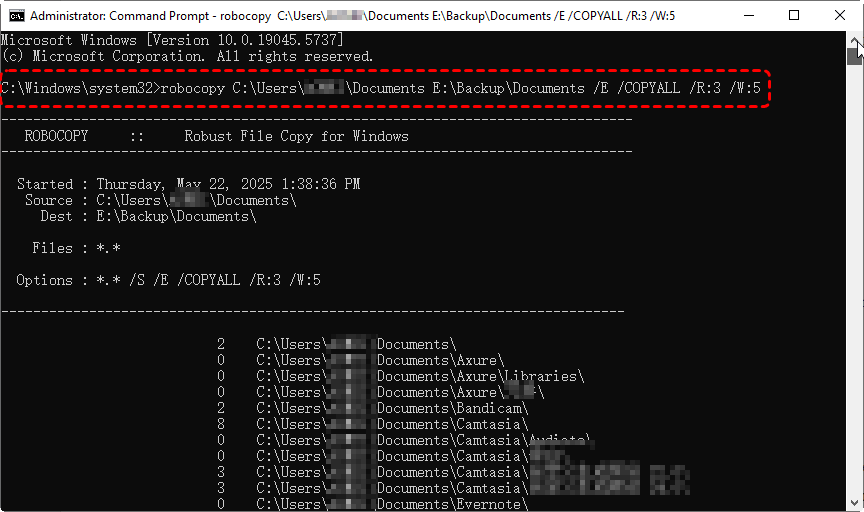
C:\Users\YourUserName\Documents: the source folder containing important data.
E:\Backup\Documents: the destination folder on external storage. Replace the two paths with your actual folder path.
- ★Tips:
- /E: Copy all folders including empty ones.
- /COPYALL: Preserve permissions, timestamps, and attributes.
- /R:3: Retry failed copies three times.
- /W:1: Wait 5 second between retries.
Step 6. Robocopy will display copied, skipped, and failed files in real time. Wait for the process to complete and you can check the recovered files in the destination drive.
Method 3. Create Bootable Rescue Media Using MyRecover for Data Recovery
For completely unbootable systems, MyRecover can also retrieve data and files from crashed Windows 11 by creating bootable disks, booting the computer into WinPE environment, then perform data recovery.
Step 1. On a working computer, download MyRecover professional version.
Step 2. Prepare a USB flash drive and connect it to the computer.
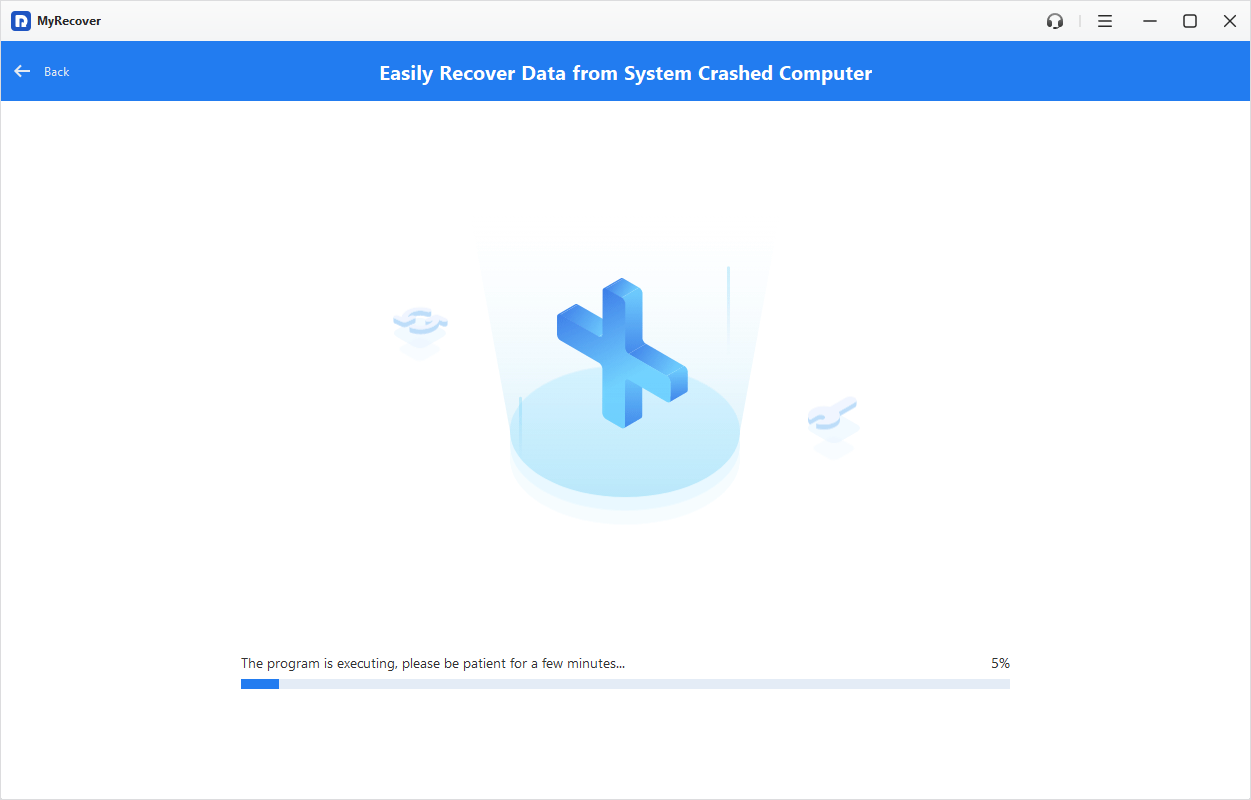
Step 3. Click “PC Crashed Recovery”, then choose “USB Boot Device” and click “Create” to create a bootable disk (use the USB as example).
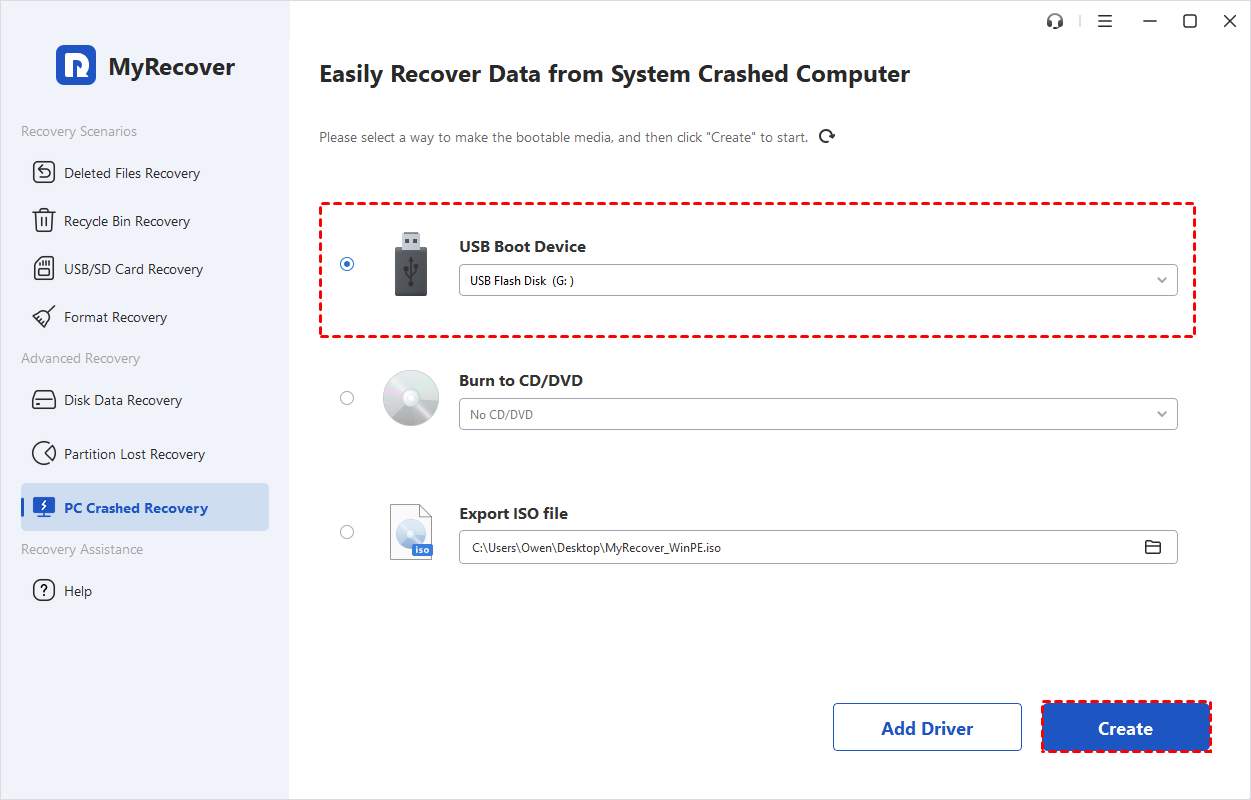
Step 4. After waiting a few minutes and receiving a prompt that the bootable disk has been successfully created, insert the USB bootable disk into the crashed computer.
Step 5. Boot the computer, enter the BIOS system and select the previously created bootable disk to boot the computer.
Step 6. According to account your personal needs, select the data you want to recover following the previously mentioned steps for using MyRecover.
How to Restore Windows 11 and Boot Your Computer as Before?
For those who want to restore the system, preserving it can minimize the damage caused by Windows crash. These two methods can help you restore Windows system to your desired state.
1. Perform System Restore
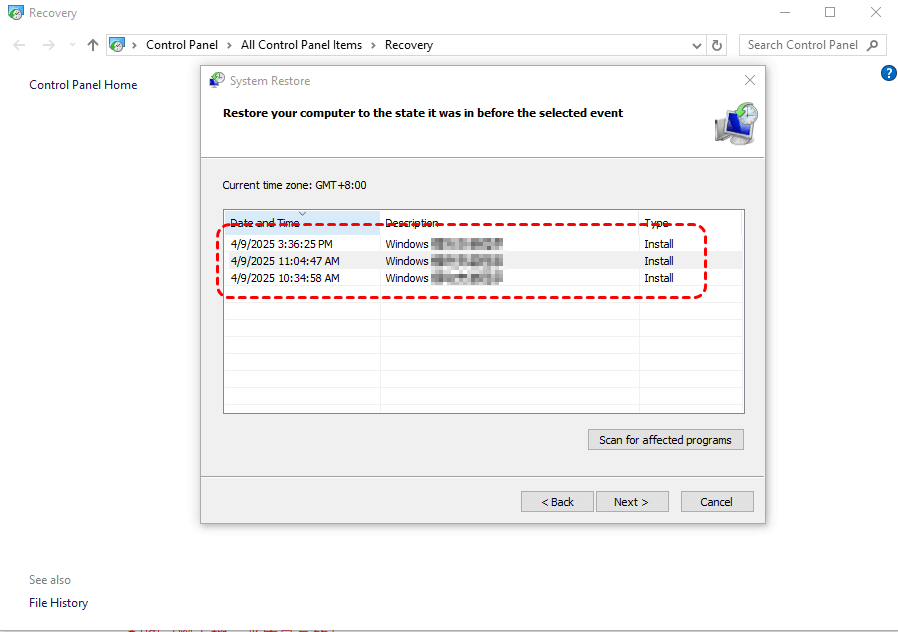
When your computer can boot up and you have created a system restore point before the crash, you can easily restore your computer to any working status.
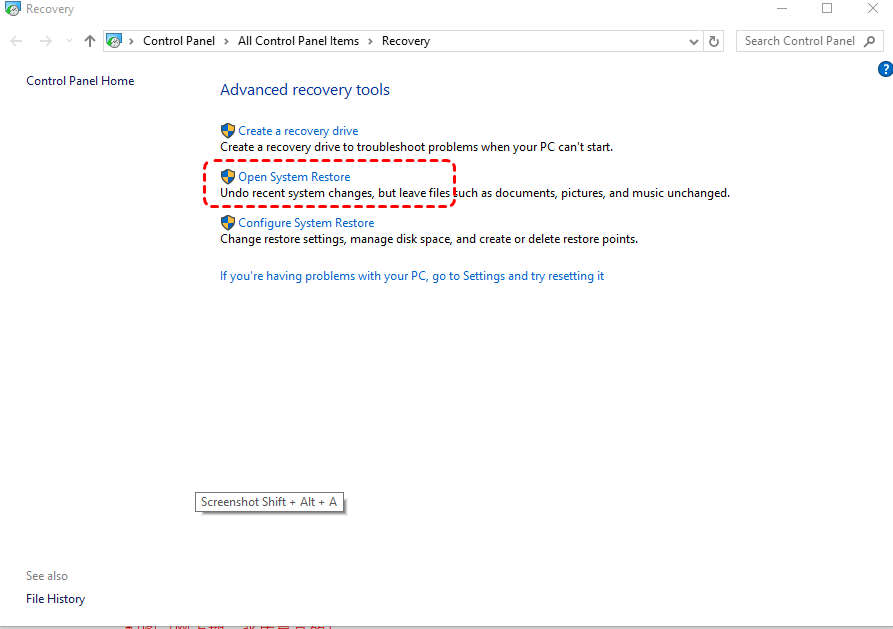
Step 1. Just type “recovery” in the search box and open the relevant application.
Step 2. Click “Open System Restore” and “Next”.
Step 3. Choose a state you want to restore.
Step 4. Choose a drive to hold the restored system and then click “Finish”.
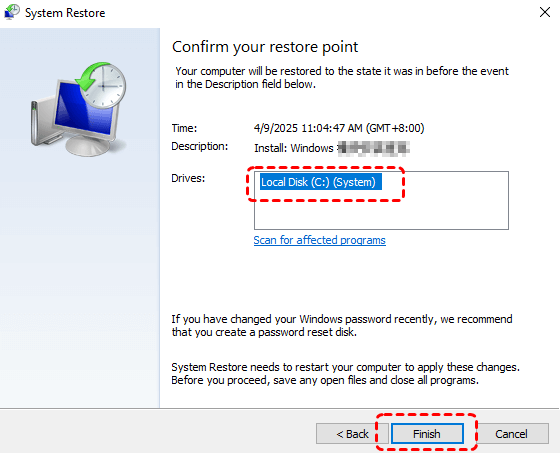
However, if your computer failed to boot properly, you can enter Safe Mode and choose a proper point to restore.
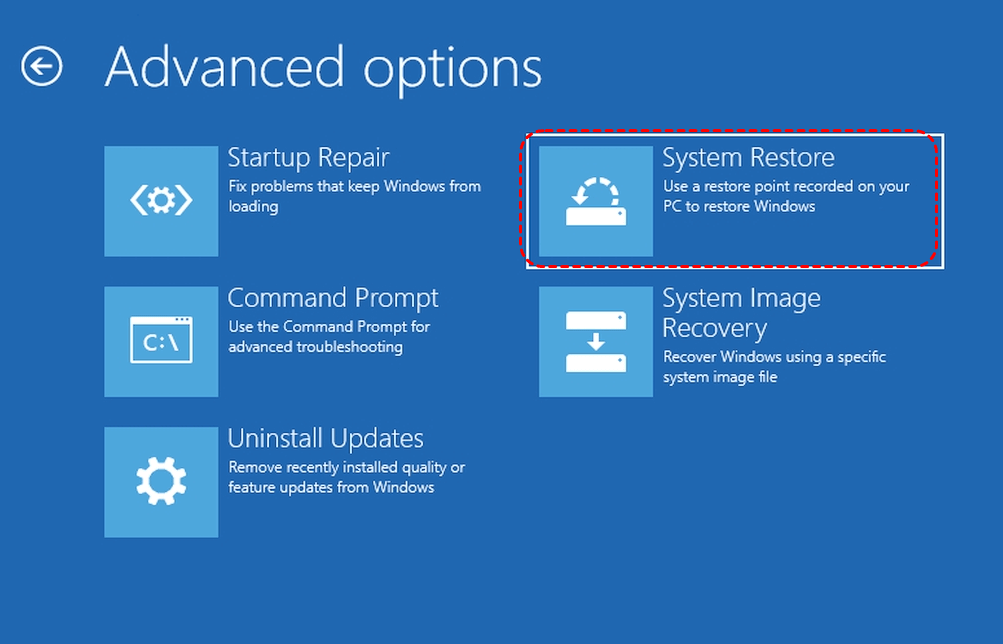
During this process, your computer will reboot. System Restore does not impact personal files like documents, pictures, or emails. However, any programs or drivers installed after the selected restore point will be uninstalled, and any uninstalled programs or drivers will be reinstated.
2. Reset This PC
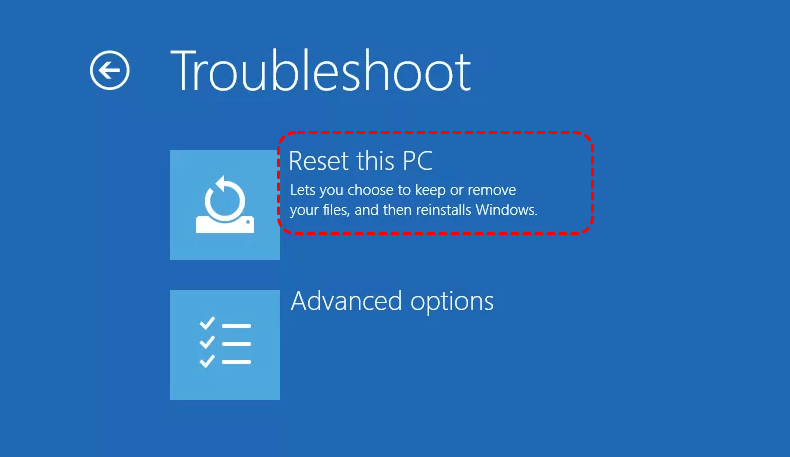
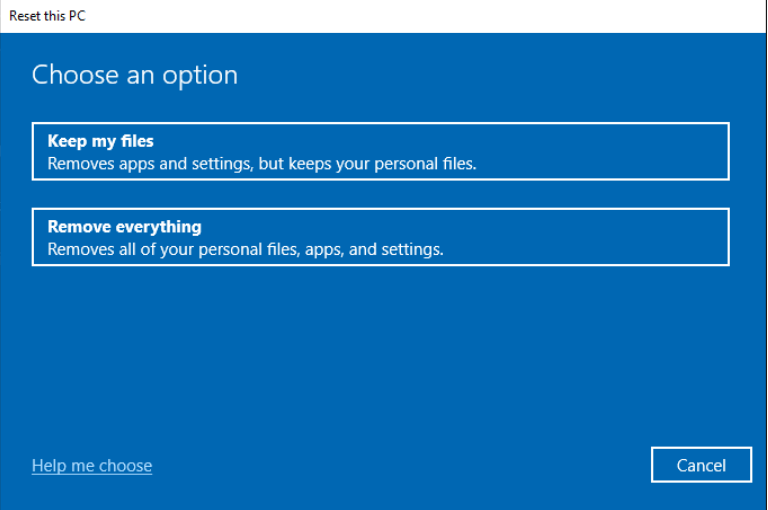
If Windows 11 remains in a crashed state or keeps showing boot errors, use Reset this PC to restore your computer to a brand-new state. During this process, you can choose to keep your personal files or remove everything. Note that this will only affect files on the C: drive; other drives will not be impacted at all.
Step 1. Restart your PC, then hold down the power button to force a shutdown as soon as it begins booting. Repeat this process three times, and the system will automatically enter WinRE. Then, select "Troubleshooting" > "Reset this PC".
Step 2. In the “Reset this PC” option, you can choose whether to keep your files or not based on your actual needs. Remember, choosing “Remove everything” will delete all your personal files, apps, and settings in C drive, while “Keep my files” will only delete apps and settings but keep your personal files intact.
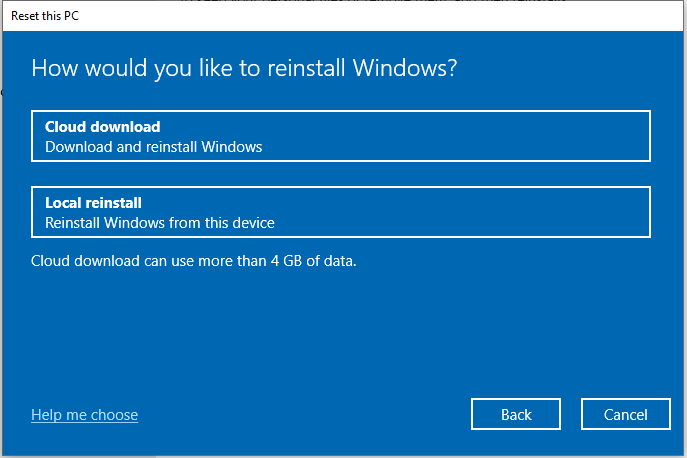
Step 3. Choose how to reinstall Windows based on your needs.
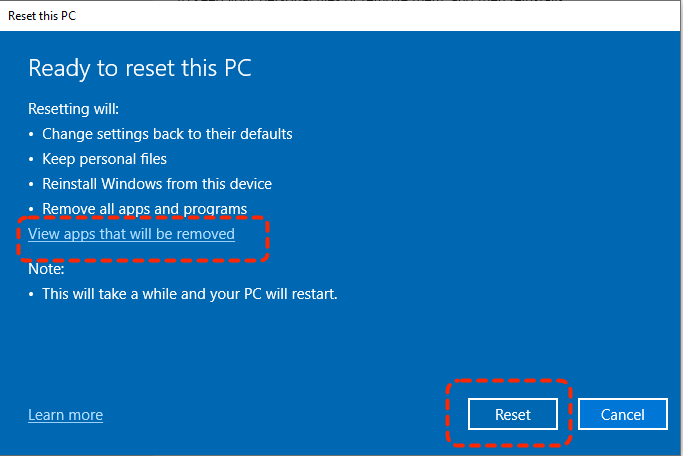
Step 4. Confirm the reset settings and click "Reset" to start the process. You can check the affacted programs by clicking on "View apps that will be removed".
Preventive Measures Against Windows Crash
Always back up your data to prevent data loss before performing any operation that involves a risk of losing data or files. Additionally, there are several precautions you can take to avoid Windows crash.
- Backup Files Regularly: Regularly backing up important files with a cloud storage tool, backup utility or other external drives. This will minimize the damage caused by Windows crash.
- Expand Memory Capacity: Promptly clean up junk files or replace a memory device with a larger capacity to ensure that the programs have sufficient space to run.
- Prevents Overheating: Keep the computer’s operating environment well-ventilated and clean dust in a time to prevent overheating.
- Fixed Power Supply: Secure the power cord to ensure that the computer receives a stable supply of current and voltage during operation.
- Monitor the Hard Disk: Run CHKDSK regularly to check for hard-disk errors and fix them, and detect hard-disk conditions.
- Updating Software and Programs: Regularly update software and programs to patch vulnerabilities and enhance system security and stability.
- Reliable Antivirus Software: Use reliable antivirus software to protect against viruses and malicious attacks. Avoid clicking on unsafe links and files.
Conclusion
If, unfortunately, your computer crashes one day, this guide will be helpful in solving your problem. Regardless of whether your computer can boot up or not, MyRecover can assist you in recovering data from a crashed Windows system. It is simpler and more comprehensive than complex command - line tools, catering to the needs of various users. With MyRecover, you will no longer be at risk of data loss.
FAQs
Q1: How to recover Windows 11 without losing data?
You can recover Windows 11 without losing personal files by using Startup Repair, System Restore, or Reset this PC (Keep my files) in Windows Recovery Environment (WinRE). Before repairing or reinstalling Windows, back up important data if possible to avoid unexpected loss caused by severe system corruption.
Q2: Can you recover data from a computer that won't turn on?
Yes. Data recovery is often possible if the storage drive itself is not physically damaged. You can remove the internal HDD/SSD and connect it to another computer, use bootable recovery media, or access files through specialized recovery software like MyRecover designed for unbootable systems.
Q3: Can you retrieve documents from a crashed computer?
Yes, documents can often be recovered from a crashed computer through backups, another working PC, Windows Recovery Environment, or data recovery tools like MyRecover. Success depends on whether the drive is still detectable and whether files have been overwritten or affected by physical damage.
Q4: How to get files off a hard drive that won't turn on?
If the computer won’t turn on, remove the internal drive and connect it to another PC using a SATA-to-USB adapter or enclosure. If the drive remains inaccessible, create a bootable recovery drive or use professional recovery software like MyRecover to scan and extract files safely.
Q5: How to reinstall Windows 11 without losing everything?
Get into WinRE and select "Troubleshoot" > "Reset this PC", then choose "Keep my files". This reinstalls Windows while preserving personal files stored in user folders, although installed apps and settings may be removed. Creating a backup beforehand is still recommended for additional protection.
Q6: Can you recover data from a dead PC?
Often, yes. A "dead PC" does not always mean the drive is dead. If the storage device still functions, files can usually be recovered by connecting the drive to another computer or using bootable recovery tools. Physical drive failure lowers recovery chances and may require professional services.

Stay Updated With Our
Latest Tips
Add us as a preferred source on Google to never miss helpful guides.
 Add as preferred source >>