
Solved: Samsung SSD 990 Pro Not Showing Up
Dealing with a Samsung 990 Pro SSD not detected issue? This detailed abstract helps you understand why your SSD fails to appear and walks you through reliable fixes. From BIOS settings to driver updates, restore detection fast and keep your Samsung 990 Pro running smoothly.
By Vera / Updated on May 29, 2026
Why Your Samsung SSD 990 Pro Isn’t Showing Up
The Samsung SSD 990 Pro is a powerhouse of speed, but even the most advanced Gen 4 NVMe drives can encounter "invisibility" issues. Whether you’ve just finished a new PC build or your existing drive has suddenly vanished, having your Samsung SSD 990 Pro not showing up can be incredibly frustrating.
SSD visibility is not just about the hardware being "plugged in." It depends on a delicate handshake between the physical connection, motherboard firmware (BIOS), system drivers, and the Windows Disk Management logic.
Main Reasons Your Samsung 990 Pro SSD Is Not Showing Up
- ⭕Improper installation: Tiny misalignments prevent electrical contact.
- ⭕Disabled M.2 slot: Motherboards often disable slots to save power or bandwidth.
- ⭕Wrong BIOS settings: Legacy modes (CSM) often clash with modern NVMe tech.
- ⭕Outdated NVMe driver: The system can't "speak" to the Samsung controller.
- ⭕Drive not initialized: New drives lack a partition table (GPT/MBR).
- ⭕File system corruption: A "RAW" state prevents Windows access.
- ⭕Faulty SSD or motherboard: Physical hardware defects or damage.
Common Scenarios Where the SSD Doesn’t Appear
Determining the location of the missing hard drive fragments can help you use more effective methods to resolve the problem.
1. SSD Not Showing Up in File Explorer
This is usually a software or logical issue. The drive is "seen" by the computer, but Windows hasn't assigned it a "name" (drive letter) or a recognizable file system. This typically happens when:
- The SSD is unallocated.
- There is no drive letter.
- The drive is RAW or unformatted.
- Windows lacks the proper driver.
2. SSD Not Detected in Disk Management
This indicates a deeper configuration problem. Windows knows something is in the slot, but it cannot communicate with it. This is a common reason for a Samsung SSD not detected during a fresh Windows installation. Possible causes include:
- Incorrect motherboard slot selection.
- BIOS PCIe mode mismatch.
- Driver or firmware conflicts.
- Hardware failure.
3. Samsung 990 Pro Not Recognized in BIOS
This is the most critical stage. If the BIOS doesn't see the hardware, the operating system never will. This usually points to physical installation errors or PCIe lane sharing conflicts. If BIOS doesn’t list the SSD:
- The SSD might not be seated properly.
- The NVMe slot could be disabled.
- Secure Boot/CSM settings may cause conflict.
- Motherboard PCIe lane distribution could be misconfigured.
If your Samsung 990 Pro SSD not detected by the system, this guide provides a comprehensive roadmap to fixing the issue.
How to Fix "Samsung SSD 990 Pro Not Showing Up"
We have organized these methods from the simplest physical checks to advanced system configurations, explaining the logic behind each fix.
Method 1: Check Physical Connections
M.2 slots are incredibly dense with tiny pins. Even a microscopic layer of dust or a 1-millimeter misalignment can prevent the "Handshake" between the SSD and the CPU. When a Samsung SSD not detected physically, no amount of software fixing will help.
🔖1. Reseat the SSD
1. Power off your PC completely.
2. Unplug the power cable and hold the power button for 5 seconds to discharge remaining electricity.
3. Remove the side panel and locate the M.2 slot.
4. Unscrew the retaining screw and gently remove the SSD.
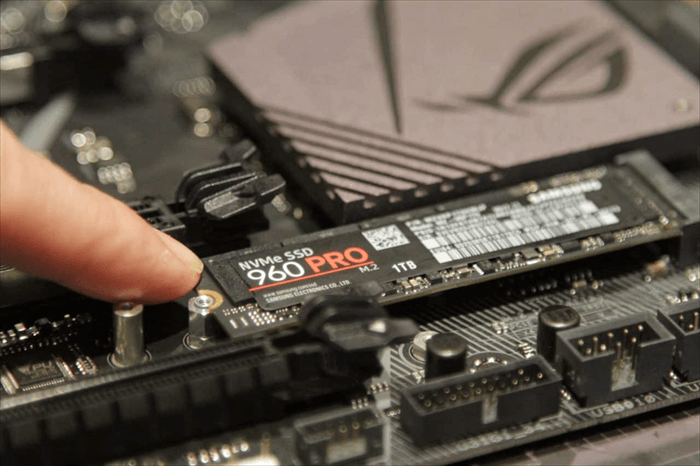
5. Reinsert the SSD at a 30-degree angle, firmly pushing until fully seated.
6. Tighten the screw—just snug, not overly tight.
🔖 2. Clean the M.2 Slot
Dust or debris in the slot interferes with signal contact.
1. Use compressed air to blow out the slot.
2. Wipe the SSD’s gold connectors with a microfiber cloth.
If the drive is physically secure but the Samsung SSD not showing up in your system list, the problem likely lies within your motherboard’s "brain"—the BIOS.
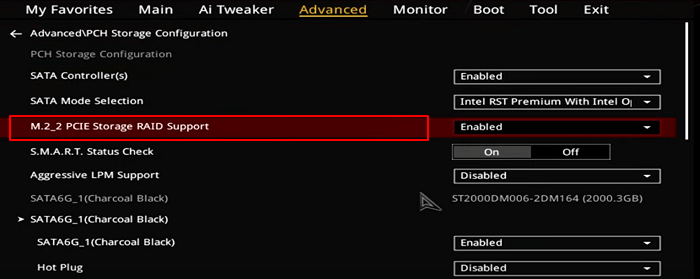
Method 2: Enable NVMe or M.2 Support in BIOS
Many modern motherboards share bandwidth between SATA ports and M.2 slots. If you have multiple SATA hard drives plugged in, the motherboard might automatically disable the M.2 slot to save PCIe lanes, resulting in a Samsung 990 Pro SSD not detected error.
Steps:
1. Restart your PC and enter BIOS (usually Del, F2, or F12).
2. Look for sections like:
- Advanced → Storage Configuration
- Advanced → NVMe Configuration
- Onboard Devices → M.2 Slot Configuration
3. Make sure NVMe/M.2 Mode is set to Enabled, Auto, or PCIe (not SATA).
Method 3: Change BIOS Storage Settings
The Samsung 990 Pro is a modern UEFI device. Older "Legacy" BIOS settings (CSM) can create a compatibility wall that prevents the BIOS from recognizing an NVMe drive as a bootable or even a visible device.
Try These Settings:
1. Switch SATA Mode to AHCI: AHCI allows full NVMe compatibility. RAID modes often hide SSDs unless special RAID drivers are loaded during Windows installation.
2. Disable CSM (Compatibility Support Module): Enabling CSM can interfere with NVMe detection. Turning it off forces the motherboard to use UEFI, which is native to the 990 Pro.
3. Set PCIe Link Speed: If your motherboard is older, manually setting the slot to "Gen 4" or "Gen 3" can sometimes solve handshake issues.
4. Enable Secure Boot: On some modern boards (especially for Windows 11), Secure Boot is required for proper NVMe initialization.
Once the BIOS recognizes the drive, Windows still needs the correct "language" (drivers) to talk to the Samsung controller.
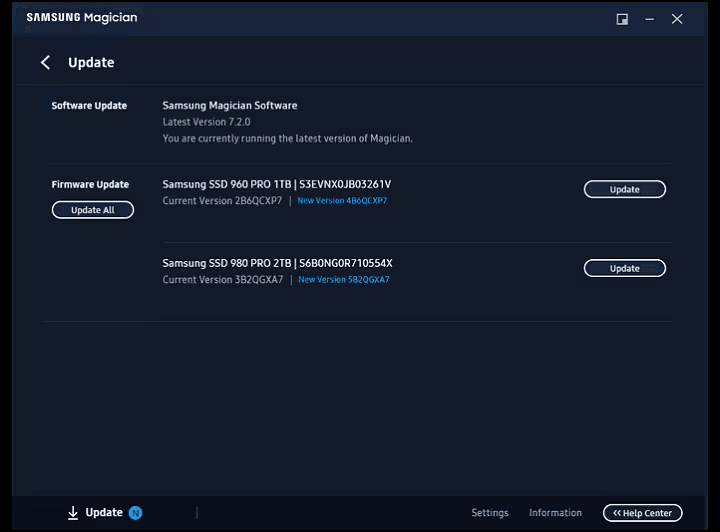
Method 4: Update Drivers & Samsung Magician Firmware
Hardware and software must be in sync. Samsung occasionally releases firmware updates to fix "vanishing" bugs in the 990 Pro series. Similarly, Windows might need the specific Samsung NVMe driver to handle the drive’s high-speed controller properly.
Steps:
1. Install or update Samsung NVMe Driver from Samsung’s support page.
2. Install Samsung Magician, the official management tool for Samsung SSDs.
3. Open the software and check for:
- Firmware updates: (Crucial for 990 Pro stability).
- Health checks: To see if the drive has any SMART errors.
- Drive diagnostics: To verify the controller is responding.
Method 5: Initialize the SSD in Disk Management
A brand-new SSD is like an unformatted book. Windows sees the physical "book" but doesn't know where the pages start or end. "Initializing" creates a partition table (GPT) so Windows can begin writing data.
Steps:
1. Right-click Start → Disk Management.

2. If you see your SSD labeled as Not Initialized:
- Right-click → Initialize Disk
- Choose GPT unless you need MBR for legacy systems.

3. After initializing, create a New Simple Volume.
Method 6: Assign a Drive Letter
Sometimes the drive is initialized and healthy, but Windows simply forgot to give it a "name" (like D: or E:). Without a drive letter, the volume exists but is hidden from the user interface.
Steps:
1. Open Disk Management.
2. Locate your Samsung 990 Pro (it should have a blue bar indicating it is a "Primary Partition").
3. Right-click the partition and select Change Drive Letter and Paths.
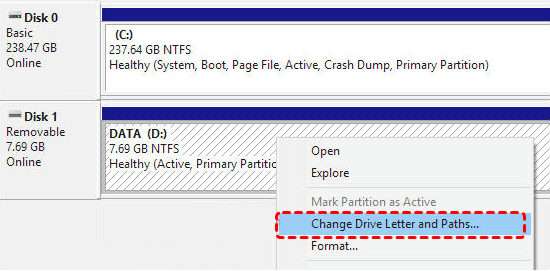
4. Click Add → Choose any available letter.
Method 7: Format the SSD
If a drive's file system becomes "RAW" (corrupted), Windows can see the drive but cannot read it. Formatting resets the file system to a healthy state (NTFS), allowing data to be stored again.
1. In Disk Management, right-click the SSD partition and select Format.
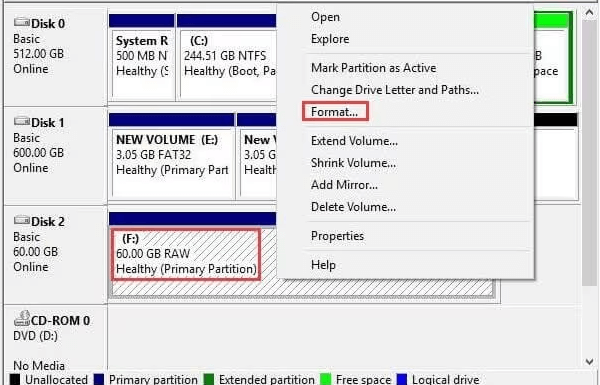
2. Choose NTFS for Windows-only use or exFAT for cross-platform use.
3. Leave the allocation size as default and ensure "Perform a quick format" is checked.
Method 8: Use Diskpart to Manually Detect and Clean the Drive
Sometimes the Windows graphical interface (Disk Management) gets stuck. Diskpart is a powerful command-line utility that communicates at a lower level with the storage controller, allowing you to force a "Clean" which wipes all partition metadata so you can start fresh.
Steps:
1. Type cmd in the Windows search bar and Run as Administrator.
2. Type diskpart and press Enter.
3. Type list disk to see all connected drives.
4. Identify your 990 Pro (check the size) and type select disk X (replace X with your drive number).
5. Type clean.
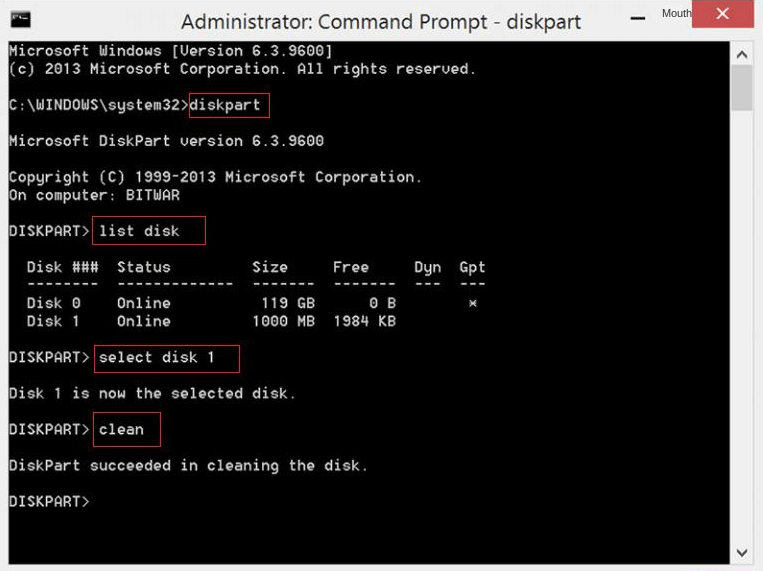
4. Return to Disk Management; the drive should now prompt you to initialize.
Method 9: Test the SSD in Another Device
This is the final diagnostic step. It helps you determine if the "fault" lies with the Samsung 990 Pro itself or if your motherboard/CPU has a dead PCIe lane.
Options:
-
Insert the SSD into another PC or a friend's computer.
-
Use a USB NVMe M.2 Enclosure. If it shows up via USB, the SSD is fine, and the issue is your motherboard's M.2 slot.
-
Try a different M.2 slot on your own motherboard (most boards have 2 or 3).
Bonus Tip: What If the Data on My Samsung SSD 990 Pro Is Lost?
If your Samsung SSD 990 Pro wasn’t showing up due to corruption, formatting, wrong initialization, or accidental deletion, you might be worried about losing valuable files. The good news? Most of the time, the data is not gone forever — it’s just temporarily inaccessible. That’s where MyRecover comes in.
MyRecover is a professional data recovery tool designed to restore data from SSDs, HDDs, USB drives, and more — including the Samsung SSD 990 Pro. Whether your SSD became unallocated, RAW, formatted, or simply disappeared from File Explorer, MyRecover can help you retrieve your files safely.
Why Choose MyRecover for Samsung SSD 990 Pro Data Recovery?

- 🌈High recovery rate powered by advanced scanning algorithms.
- 🌈Supports NVMe SSDs, including Samsung 990 Pro.
- 🌈Restores deleted, formatted, or corrupted files.
- 🌈Works on RAW drives.
- 🌈Recovers photos, videos, documents, and system files.
- 🌈Simple, beginner-friendly interface.
How to Recover Lost Data from Samsung SSD 990 Pro Using MyRecover
1. Download and install MyRecover on your Windows PC.
2. Launch the program and select your Samsung SSD 990 Pro.
3. Click Scan to search for deleted or lost files.
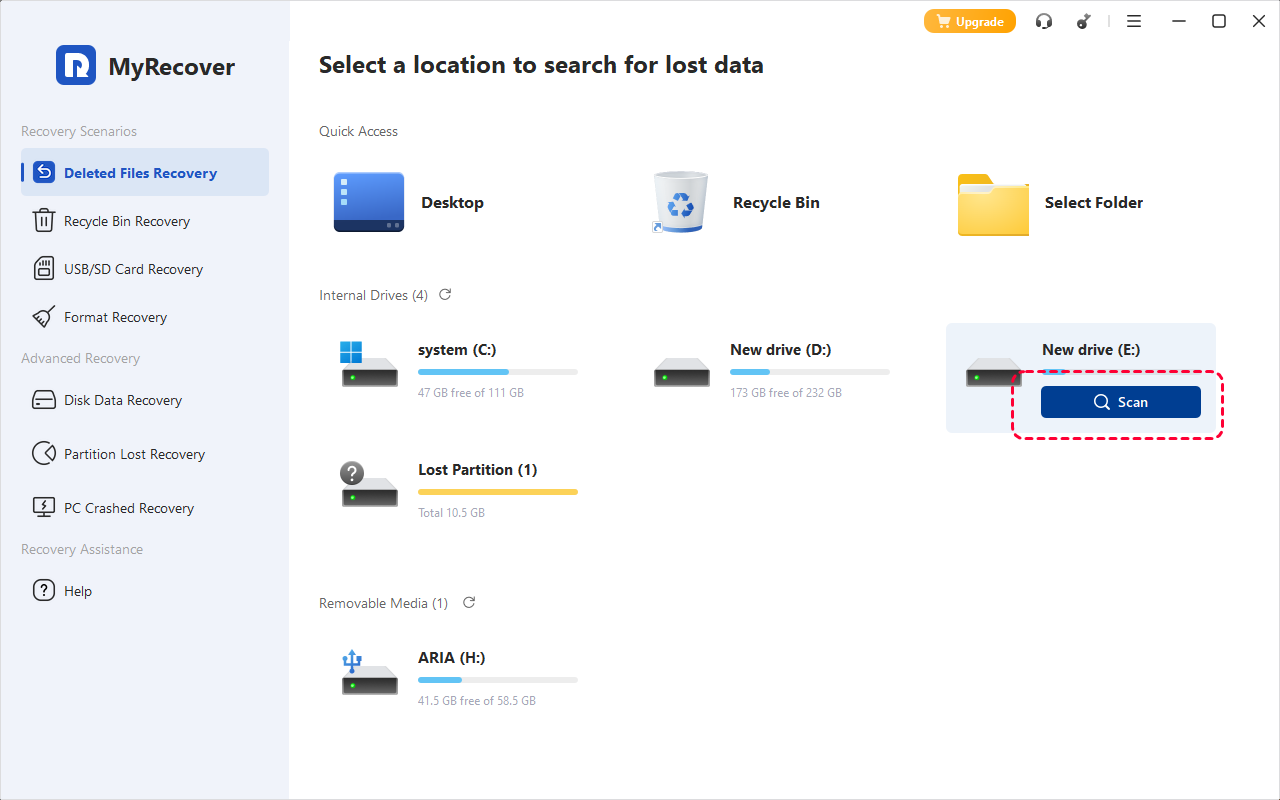
4. Preview the found data and select what you want to recover.
5. Click Recover and save the files to another safe location.

Conclusion
A Samsung SSD 990 Pro not showing up can be caused by something as simple as a loose connection or as deep as BIOS misconfiguration. By following the detailed troubleshooting steps above, you can quickly diagnose why your SSD isn’t being detected and restore it to full functionality.
And if you accidentally lose data during the process, tools like MyRecover ensure you have a safe, reliable way to get your files back.
Frequently Asked Questions (FAQ)
1. Why is my Samsung SSD 990 Pro not showing up in "This PC"?
This usually means the drive is "Unallocated." It has no partition or drive letter. Use Disk Management to initialize the disk and create a "New Simple Volume."
2. What if my Samsung 990 Pro SSD not detected after a "Diskpart Clean"?
The clean command erases the partition table. To get your data back, use MyRecover to scan the unallocated space before you create a new partition.
3. Is my Samsung SSD not detected because of a driver?
It's possible. While Windows has a generic driver, installing the official Samsung NVMe Driver via Samsung Magician can often force the system to recognize the drive.
4. Can I recover data from a Samsung SSD not showing up due to RAW format?
Yes. A RAW status means the file system is corrupted. MyRecover can bypass this corruption to "see" the files and move them to a safe location before you format the drive.
5. Does the 990 Pro need GPT or MBR?
Always use GPT. Modern NVMe drives like the 990 Pro require GPT to function correctly with UEFI BIOS and Windows 10/11.
6. Can heat cause a Samsung SSD not showing up error?
Yes. If the 990 Pro overheats (above 80°C), it may disconnect itself to protect the controller. Ensure your M.2 heatsink is properly installed.


Stay Updated With Our
Latest Tips
Add us as a preferred source on Google to never miss helpful guides.