
Solved: Samsung T7 SSD Not Showing Up
If you’re dealing with 'Samsung SSD T7 not showing up', this guide reveals the common reasons your T7 stops appearing and the best fixes to restore detection fast. From cable issues to system settings, learn the exact steps to get your Samsung SSD recognized again.
By Vera / Updated on November 21, 2025
What Causes Samsung T7 SSD Not Showing Up?
Your Samsung T7 may disappear for several reasons. Understanding them helps you troubleshoot faster.
Connection & Cable Issues
The T7 requires a high-quality USB-C cable (preferably USB 3.1 or 3.2). Cheap or damaged cables often cause detection issues.
USB Port or Power Problems
Some USB ports don't deliver enough power to recognize external SSDs.
Driver or Firmware Conflicts
Outdated USB or storage drivers can prevent the SSD from appearing.
File System Corruption
If the file system gets damaged, your SSD may show up as unallocated or not appear at all.
Partition Problems
No partition = no drive letter = invisible SSD.
Hardware Failure
Although rare, physical damage can make the drive undetectable.
How to Recover Data Before Troubleshooting (Recommended)
Before you repair anything, secure your data first. Some fixes (like formatting or initializing) erase everything. That’s why it’s best to use MyRecover, a reliable data recovery tool for damaged, unrecognized, or corrupted Samsung T7 SSDs.
MyRecover can:
- Recover deleted or lost data from Samsung SSDs.
- Scan unrecognized drives.
- Rescue corrupted files.
- Work even when the SSD doesn’t appear in File Explorer.
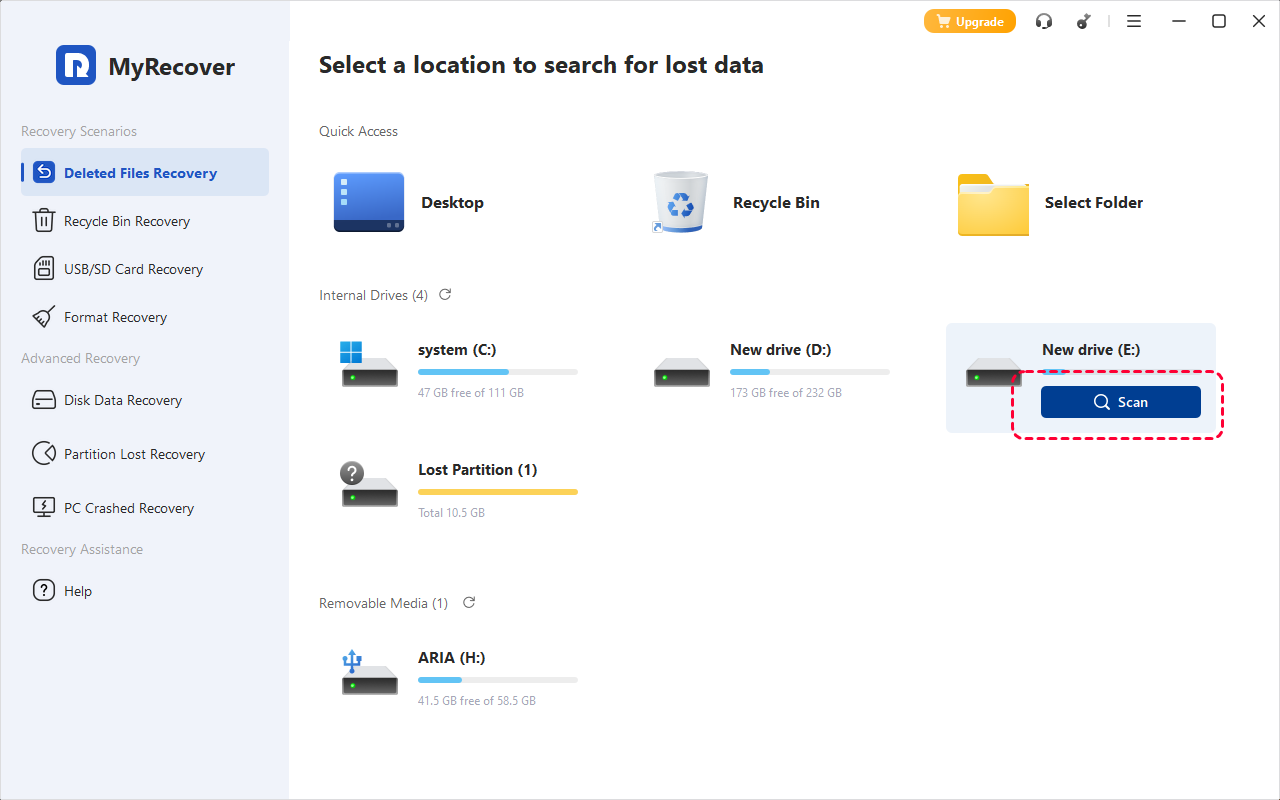
Steps to Recover Data Using MyRecover
1. Install and launch MyRecover on your computer.
2. Connect your Samsung T7 SSD.
3. Select the T7 from the drive list.
4. Click Scan to begin data recovery.
5. Preview and select the files you want to restore.
6. Click Recover to save them securely.

After your data is safe, you can proceed with the repair methods below.
Fix Samsung T7 SSD Not Showing Up on Windows
Below are expanded, more detailed instructions for every method.
Method 1: Change USB Port or Cable
A huge number of recognition issues come from cable or port failure—especially on laptops with weak power output or USB hubs.
Try these detailed steps:
- Plug the T7 directly into your computer, not through a USB hub or docking station.
- Switch between USB-A and USB-C ports (if available).
- Use only USB 3.1 or 3.2 cables to ensure full power and transfer capability.
- Test the SSD on another computer.
- Test using another cable—preferably the original Samsung cable.
Signs the cable/port is the problem:
- The SSD light flickers weakly or turns off quickly.
- The SSD connects and instantly disconnects.
- The T7 works on one computer but not another.
If this is the case, you’ve found the culprit.
Method 2: Update USB & Storage Drivers
Outdated or corrupted drivers can cause your Samsung T7 to be detected as “Unknown USB Device” or not appear at all.
Step-by-step driver update:
1. Right-click Start → select Device Manager.
2. Expand each of the following categories:
- Disk drives
- Universal Serial Bus controllers
- Storage controllers
3. Look for anything with:
- A yellow warning icon
- "Unknown device"
- "USB Root Hub" issues
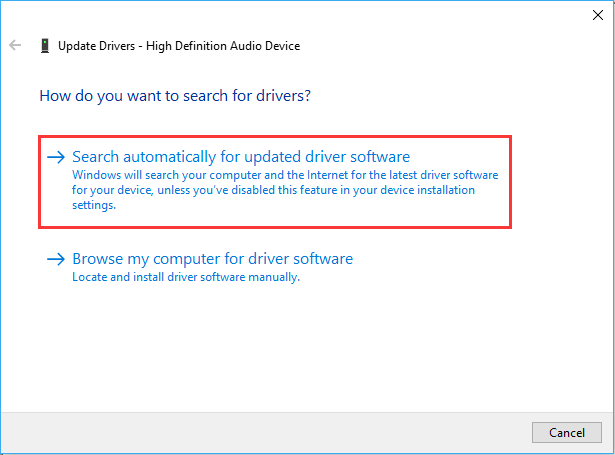
4. Right-click → Update driver → Search automatically for updated driver software.
Optional deeper fixes:
1. Uninstall the USB controller:
- Right-click the controller.
- Select Uninstall device.
- Restart your PC — Windows will reinstall drivers automatically.
2. Update chipset drivers from your motherboard/provider (Intel, AMD, Dell, Lenovo, HP, etc.)
Driver issues often impact SSD detection, so this fix is critical.
Method 3: Assign a Drive Letter
If Windows recognizes the SSD but doesn’t assign a drive letter, the T7 won’t show up in File Explorer.
How to assign a drive letter:
1. Right-click Start → open Disk Management.
2. Find your Samsung T7 in the drive list.
3. If it has no letter (e.g., "Volume" only), right-click → Change Drive Letter and Paths.
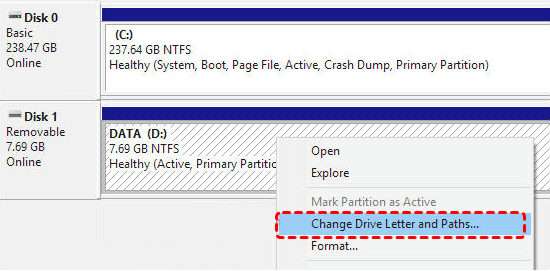
4. Click Add → choose any letter → OK.
Signs this is the issue:
- The SSD shows as Healthy Primary Partition but not in Explorer.
- The SSD appears in Disk Management but not anywhere else.
This method instantly fixes visibility issues for thousands of users.
Method 4: Initialize the SSD
If your Samsung T7 SSD appears as Not Initialized, Windows cannot read the drive until a partition table is created.
To initialize the drive:
1. Open Disk Management.
2. Find the Samsung T7 labeled as Unknown – Not Initialized.
3. Right-click the label → select Initialize Disk.
4. Choose partition style:
- GPT (recommended for modern systems)
- MBR (for legacy systems)
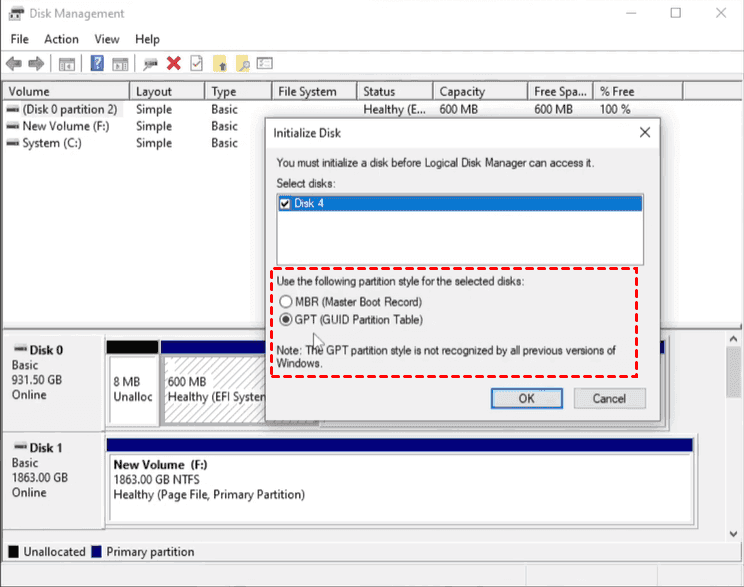
5. After initializing, right-click the unallocated space → New Simple Volume.
- Initializing a disk removes all data.
- If your disk became uninitialized after accidental disconnection, corruption, or system crash, restore data first using MyRecover.
Why initialization is needed:
An uninitialized drive means the drive has:
- No partition table
- Corrupt metadata
- A damaged file system
This method repairs those issues (but at the cost of data).
Method 5: Format the Samsung T7 SSD
This is a last-resort method for fixing deep file system corruption.
When to format:
- The drive shows as RAW.
- Windows reports “You need to format the disk before using it”.
- The file system is corrupted and unreadable.
- The SSD shows as unallocated and formatting is the only way to rebuild the file structure.
How to format the SSD:
1. Open Disk Management.
2. Right-click your Samsung T7 volume.
3. Select Format.
4. Choose file system:
- exFAT (best for Windows + Mac compatibility)
- NTFS (best for Windows only)
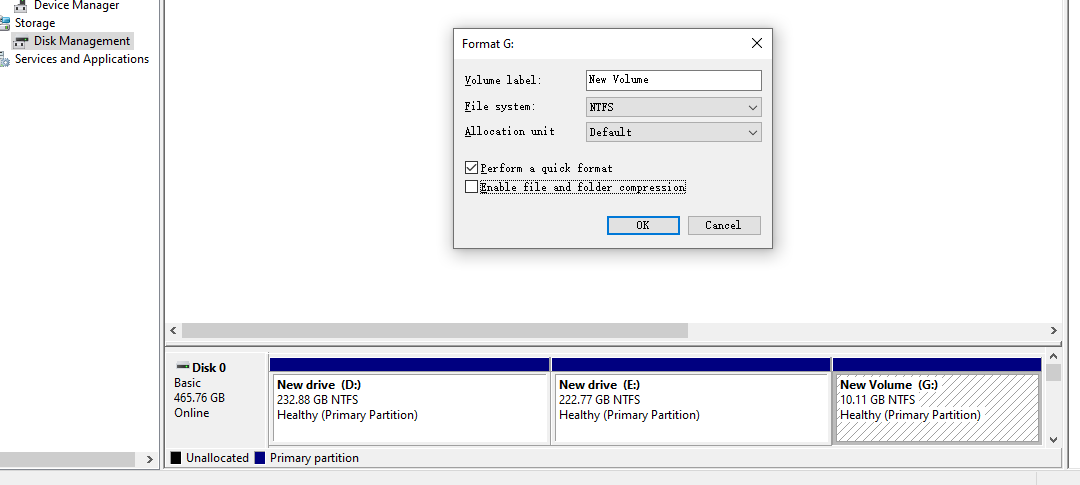
5. Uncheck Quick Format if you want a deeper scan (takes longer but safer).
6. Confirm and complete the process.
Fix Samsung T7 SSD Not Showing Up on Mac
This section now has more detail for each Mac method.
Method 1: Reconnect the SSD Correctly
Try these steps:
- Switch from USB-C to USB-A with an adapter.
- Directly connect to the Mac—avoid hubs or dongles.
- Try all ports on your MacBook, iMac, or Mac mini.
- Try resetting SMC on older Intel Macs (helps with USB power issues).
- Try connecting the T7 to another Mac.
Check for LED behavior:
- Solid light = connected normally
- Blinking rapidly = connection unstable
- No light = cable or power issue
Method 2: Show the Drive in Finder
Sometimes the T7 is detected but hidden from Finder.
Enable external drive visibility:
1. Open Finder → top menu → Settings (or Preferences).
2. Under the General tab, check External disks.
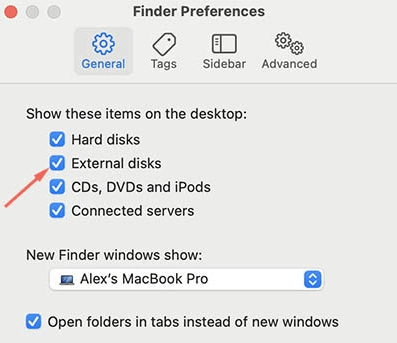
3. Under the Sidebar tab, enable External disks as well.
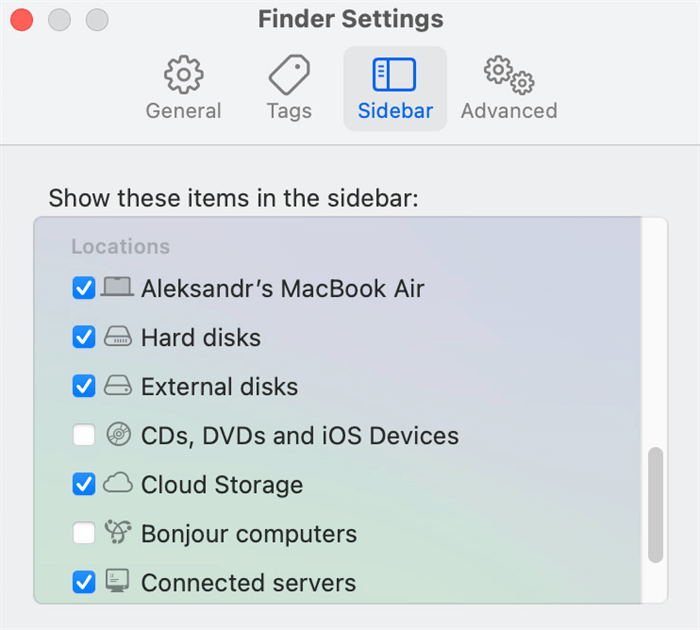
Next, check in:
- Desktop
- Sidebar under "Locations"
- Disk Utility (even if Finder doesn’t show it)
This is a simple fix but surprisingly effective.
Method 3: Repair Samsung T7 Using Disk Utility
Mac’s First Aid tool automatically repairs:
- Corrupted file systems
- Damaged metadata
- Partition errors
- Mounting issues
How to run First Aid:
1. Open Disk Utility.
2. Select your Samsung T7 in the left pane.
3. Click First Aid → Run.
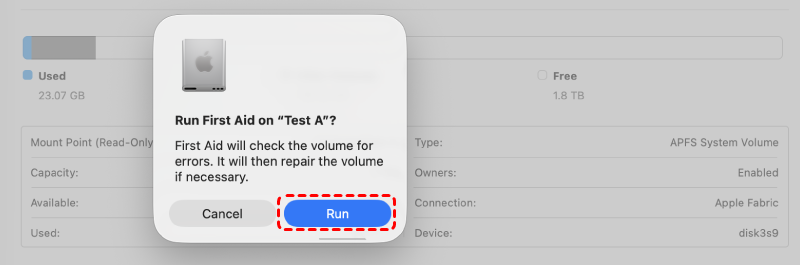
4. Wait while the drive is repaired.
What First Aid fixes:
- Directory corruption
- Partition map header issues
- Missing APFS containers
- Broken mount points
If macOS cannot repair the T7, it will warn you that the drive "cannot be repaired" — this indicates severe corruption.
Method 4: Erase the Drive
When repair fails, the last Mac fix is to erase the disk. You’d better recover your data before moving to this step.
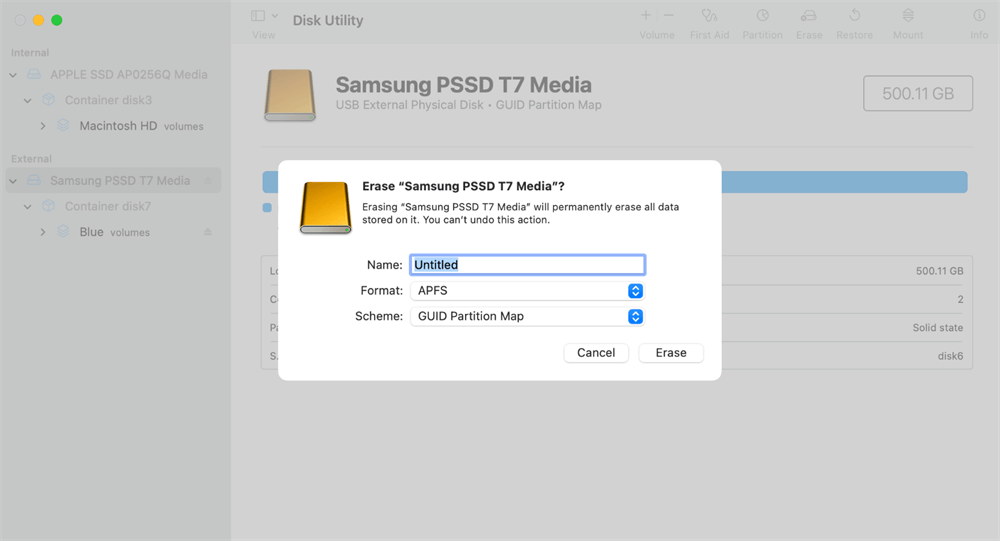
Steps to erase:
1. Open Disk Utility.
2. Select the Samsung T7.
3. Click Erase.
4. Choose:
- exFAT (universally compatible)
- APFS (best for macOS-only work)
- MS-DOS (FAT) (older systems only)
5. Name the drive.
6. Click Erase to confirm.
Erase vs Format difference:
- Erase completely rebuilds partitions.
- Format only rewrites the file system.
Erasing is more powerful for repairing deeper corruption.
How to Prevent Samsung T7 SSD Not Showing Up Again
Here are simple tips to avoid future issues.
Disconnect Safely
Always use Eject before unplugging.
Avoid Physical Damage
Even a small drop can affect internal NAND chips.
Keep Firmware Updated
Updates ensure:
- Security
- Compatibility
- Better performance
Use Quality Cables
Low-quality cables lead to:
- Loose connections
- Slow transfer speeds
- Non-recognition issues
Conclusion
The Samsung T7 SSD not showing up is frustrating, but with the right steps, it’s usually easy to restore. Start with simple fixes like checking the cable and USB port, then move on to Disk Management or Disk Utility repairs. And before you make changes that could erase data, always recover your files using MyRecover. Once your SSD is back online, remember to keep firmware updated and always handle the device with care.
Your data and SSD performance will thank you!


Stay Updated With Our
Latest Tips
Add us as a preferred source on Google to never miss helpful guides.