
[Solved] Second Hard Drive Not Showing up Windows 11
When a second hard drive does not show up in Windows 11, it can prevent access to important storage space and data. This article examines the common reasons behind this issue and outlines structured troubleshooting steps to resolve it. By following the solutions provided, you can restore visibility of the second drive safely and effectively.
By Aria / Updated on January 27, 2026
Overview
"Hello everyone? I don't know why my 2-nd hard disk not showing up after I updated my computer from Windows 10 to 11. It doesn't show up even in disk management, computer management, device manager, cmd diskpart, and I tried in BIOS but I didn't fix it. I would like an answer as soon as possible. Any help is appreciated."
- Question from ErsiMeci
A second hard drive not appearing on your computer is a surprisingly common issue, especially after system upgrades, hardware changes, or fresh installations of Windows. Many users encounter this problem on modern systems and immediately worry about hardware failure or permanent data loss. In reality, in most cases, the issue is caused by configuration, drivers, or system recognition errors rather than a physically damaged disk.
Main Causes of the Second Hard Drive Not Showing up
Understanding these common causes early on helps determine whether the issue is software-based, recoverable, or requires hardware attention. There are several underlying reasons why a second hard drive may not appear:
- Loose or faulty SATA/USB connections;
- The disk is uninitialized or unallocated;
- Missing or outdated storage drivers;
- The drive is disabled in BIOS/UEFI;
- File system corruption or logical errors;
- Drive letter conflicts;
- USB storage disabled in Device Manager.
How to Recover Data from a Not Showing up Hard Drive
Before attempting any fixes that could modify the disk structure, data recovery should be prioritized, especially if the drive contains important files. Formatting, initializing, or running repair commands may overwrite recoverable data. In such a case, MyRecover comes in handy. It is designed to recover data from various drives including USB drive, SD card, HDDs, SSDs and more. Even if the drive is not accessible, MyRecover can scan the hard drive directly and extract files bypass File Explorer.

- 1000+ Devices Supported: HDD, SSD, USB flash drive, SD card, etc.
- 1000+ File Formats: Videos, PNG, VMDK, Archives, Emails and more.
- 500+ Data Loss Cases: Deletion, Format, Virus Attack, System Crash, etc.
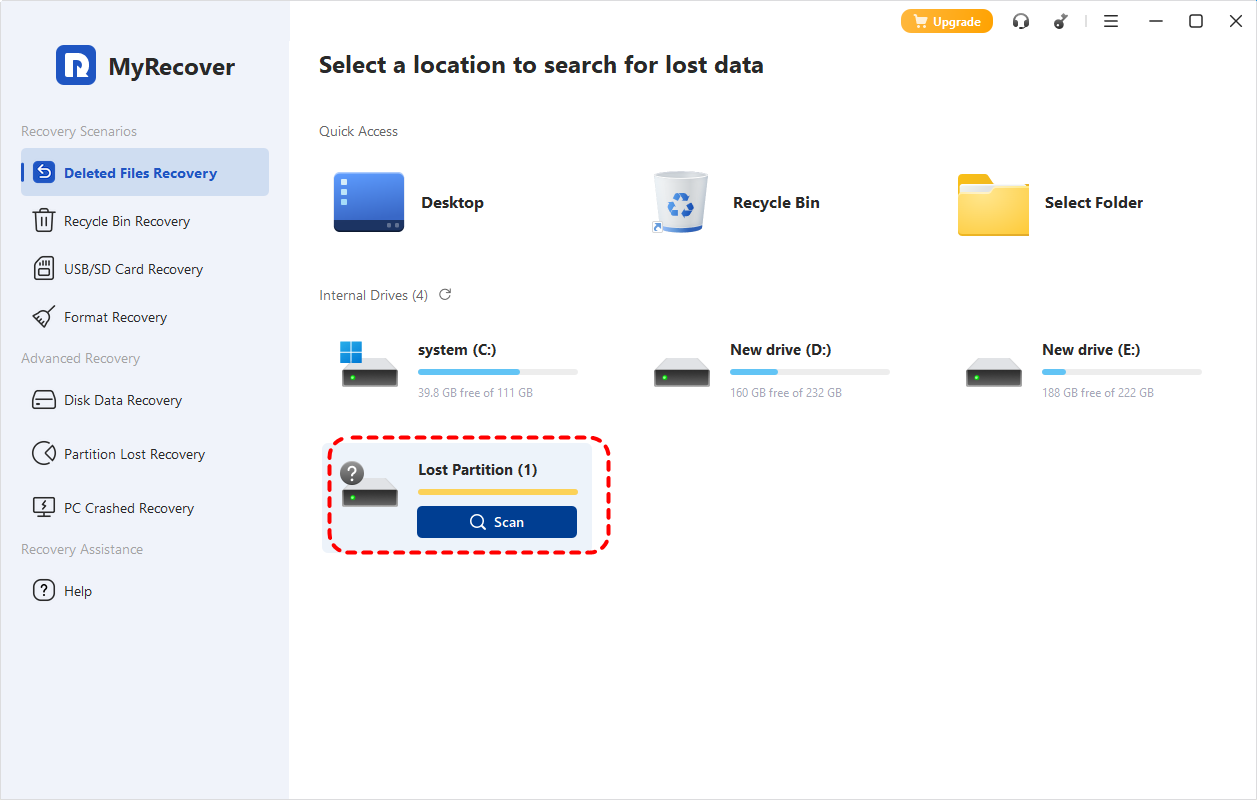
Step 1. Download and install MyRecover on your computer from Microsoft Store, avoid installing it on the drive with lost files.
Step 2. Launch the program and select the drive to scan, then click "Scan" to search for recoverable files.
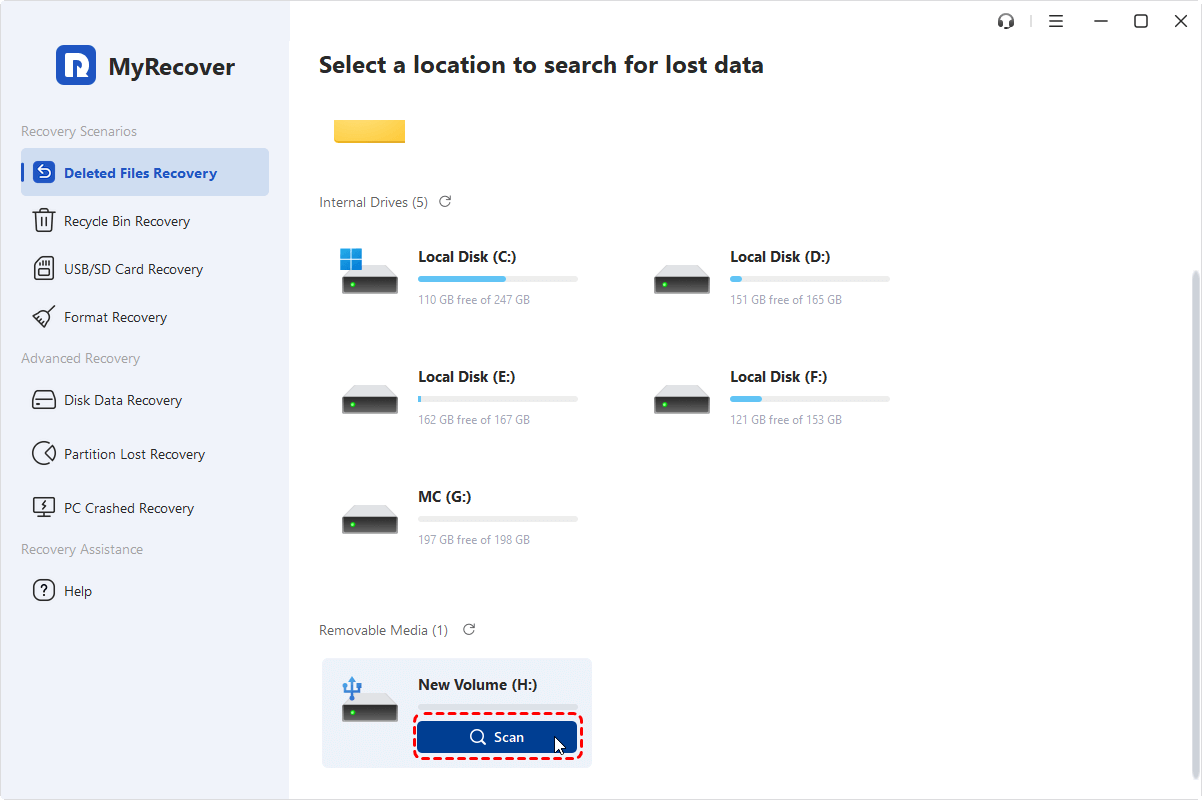
- Notes:✎...
- LIf you can’t locate your target drive, it may show up as a "Lost Partition", you can identify it by checking the drive’s storage capacity.
-

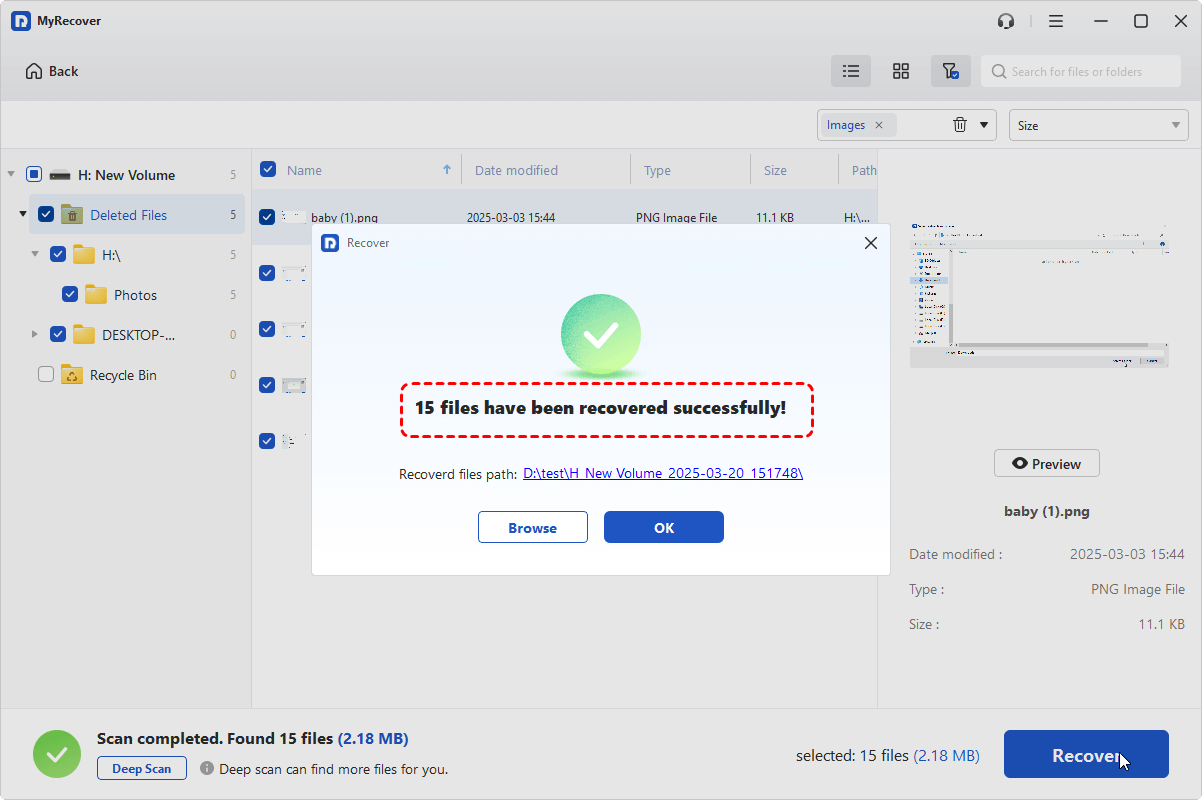
Step 3. After the scan is completed, choose the files you want to recover from the recoverable lists and click "Recover".
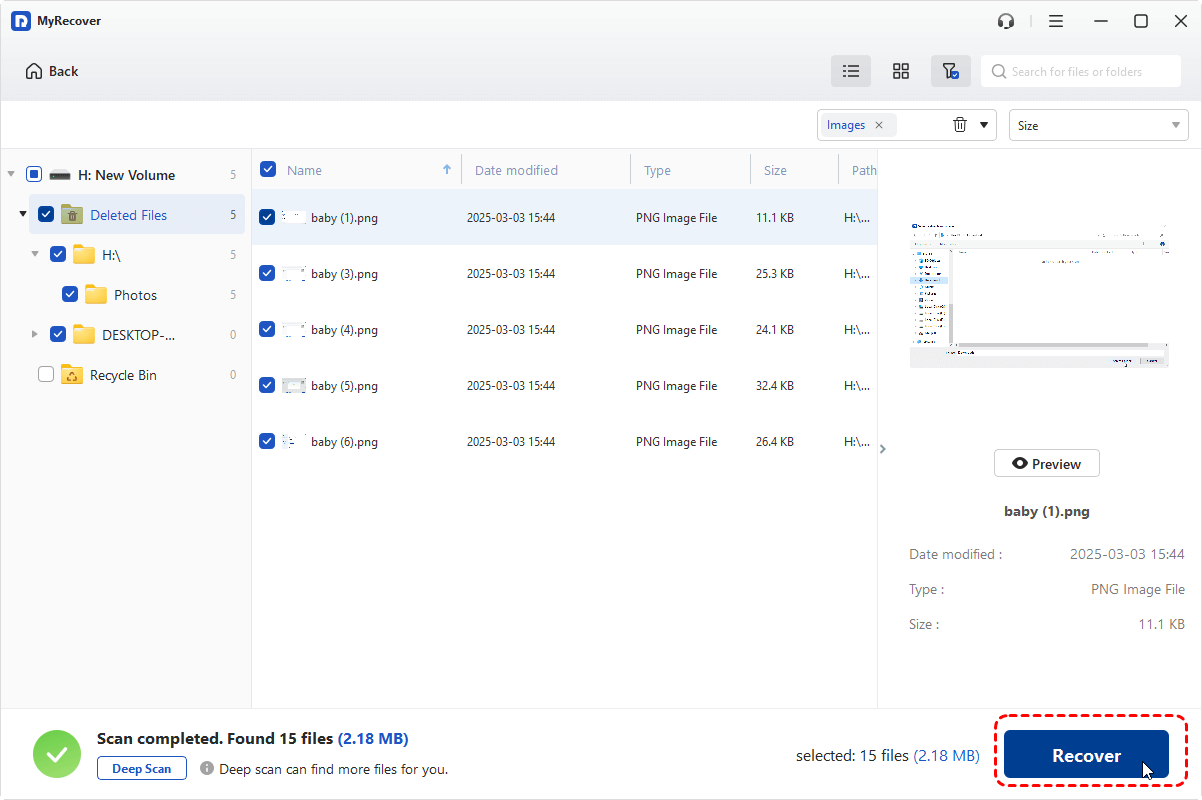
The MyRecover Professional edition is particularly useful when dealing with large-capacity drives or complex recovery scenarios, like data recovery from unbootable computer, offering file content preview before restoration.
Step 4. Select a safe location (not the original drive) to save the recovered files.

Once the process is done, the message "Files have been recovered successfully" will pop up. Then, you can access the recovered files in the destination folder by clicking on the "Browse" button.
How to Solve the "Second Hard Drive Not Showing up" Issue
Once data safety is ensured, you can proceed with fixing the detection problem itself. Each of these methods addresses a different issue, you can pick the right one based on your actual situation. Let's explore them one by one.
Check Physical Connection First
Before changing any system settings, verify that all cables are properly connected. This method is especially important if the issue appeared suddenly after moving the computer or installing new hardware. For internal drives, reseat the SATA data and power cables. For external drives, try a different USB port or cable. Check if they can be recognized by other devices.
Check in Disk Management
Disk Management is one of the most critical diagnostic tools. If the drive appears there but not in File Explorer, it may be unallocated, offline, or missing a drive letter. Press "Win" + "X" and choose "Disk Management" to check drive status.
👉For Missing Drive Letter:
Step 1. Right click on the drive not showing up in File Explorer and select "Change Drive Letter and Paths".
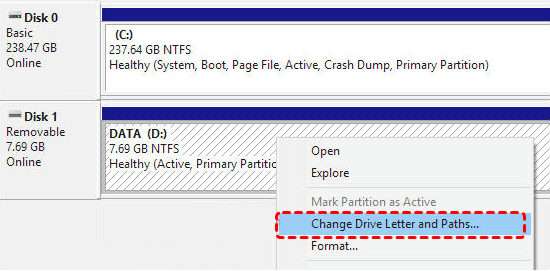
Step 2. Assign a new drive letter for the drive. Check if it shows in File Explorer.
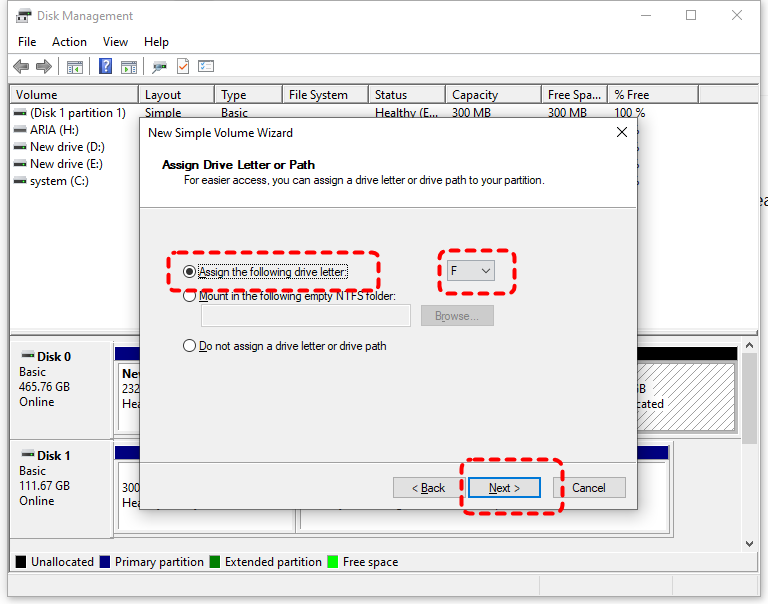
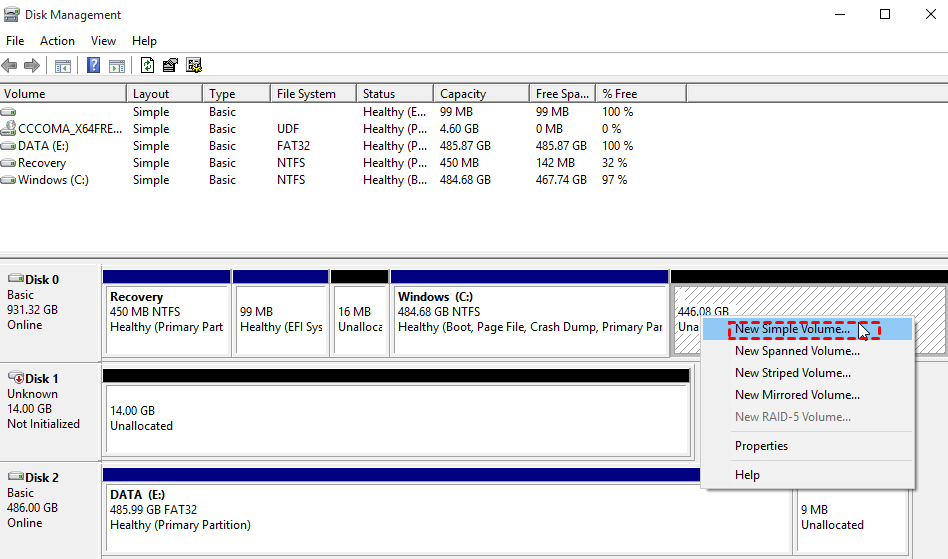
👉For Unallocated Space:
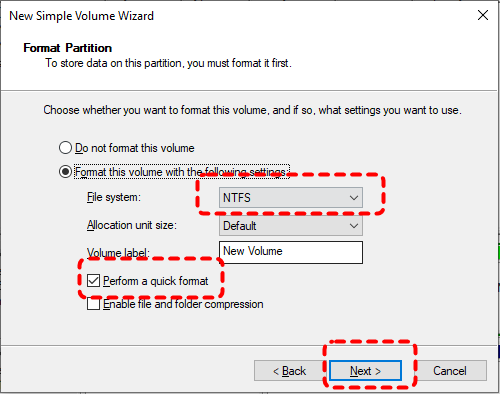
Step 1. Right click on the unallocated space and select "New Simple Volume".
Step 2. Assign a new drive letter for the drive and click "Next".
Step 3. Choose if you want to format the drive. But you can use drive only when you format it.
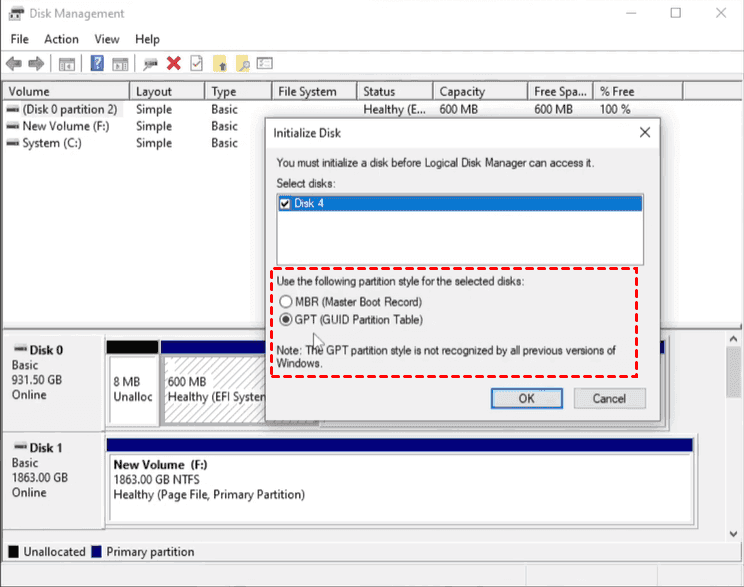
👉For Uninitialized/Unknown Disk:
Step 1. Select the uninitialized disk and right click on it, then choose "Initialize Disk".

Step 2. Choose a partition style (MBR or GPT) based on your needs.
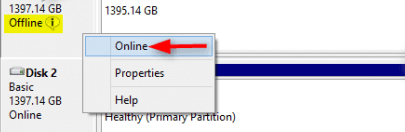
👉For Offline Disk:
Right click the offline disk and select "Online" to mount it.
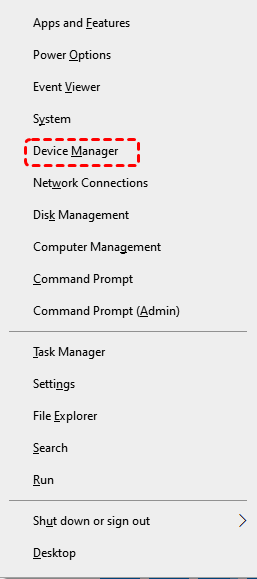
Enable USB Device in Device Manager
For external drives, Windows may disable USB storage devices due to power or driver conflicts. Re-enabling the device in Device Manager can immediately restore access. This fix is particularly relevant for external second drives that intermittently disconnect.
Step 1. Press "Win" + "X" and choose "Device Manager" to open it.
Step 2. Expand "Portable Devices" and right click on the not showing up drive, then click "Properties".
Step 3. Under the "Driver" tab, click "Enable Device".
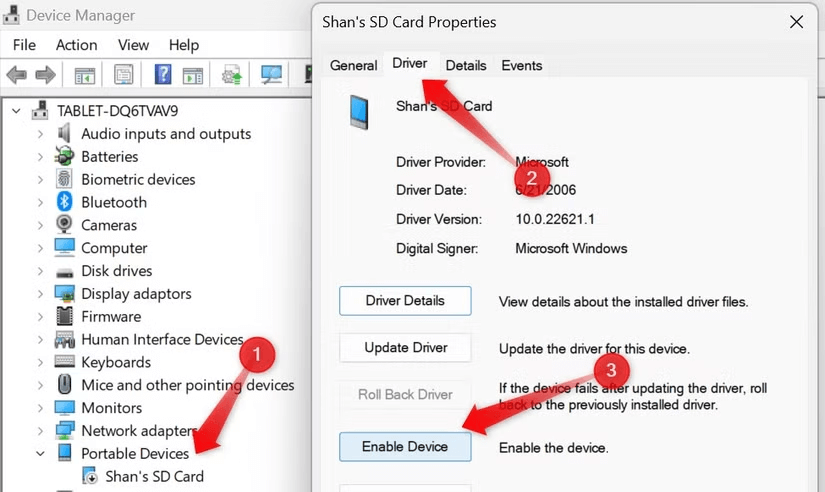
Then, check if the second hard drive is visible in File Explorer or Disk Management.
Update or Reinstall the Storage Driver
Outdated or corrupted drivers can prevent Windows from recognizing the second hard drive. Updating the disk driver through Device Manager can restore proper detection. Follow these steps:
Step 1. Open Device Manager as described above.
Step 2. Expand the "Portable Devices" or "Disk drives" and right click on the second hard drive, then select "Update driver".
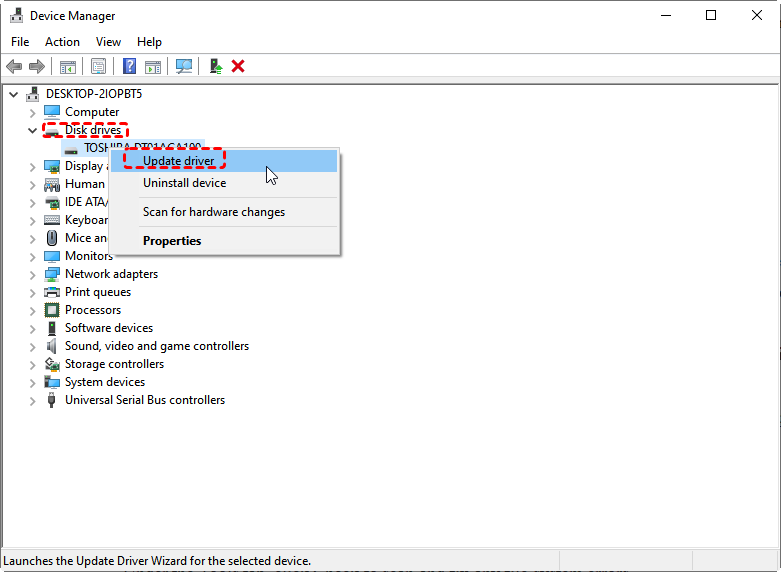
Step 3. Click "Search automatically for updated driver software" to continue the process.
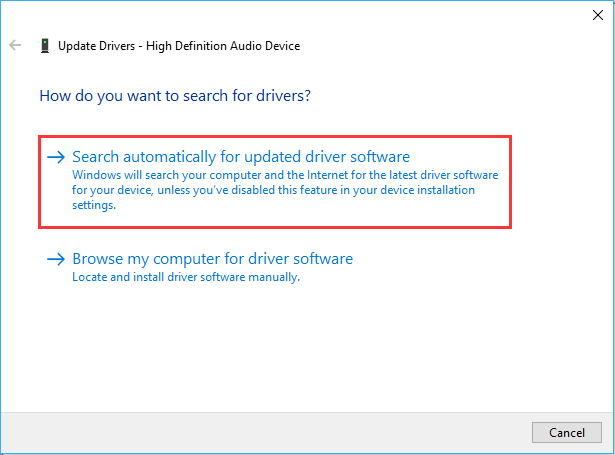
If updating does not help, uninstalling the driver and rebooting allows Windows to reinstall a clean version automatically.
Run CHKDSK Command
File system errors can cause a drive to become inaccessible. Running the CHKDSK command can repair logical errors and restore the not showing up second hard drive visibility. Here's how:
Step 1. Locate Command Prompt in the Start menu and right click on it, then choose "Run as administrator".

Step 2. Enter the following command "chkdsk G: /f /r" and press the "Enter" key. Replace the drive letter "G" with your actual drive letter.

Wait for the process to finish, the command will automatically scan and repair any detected file system errors.
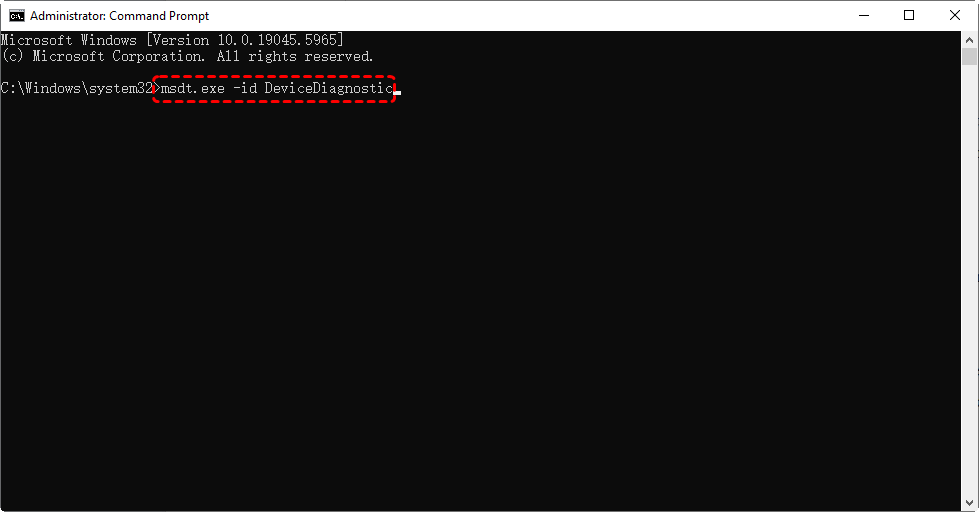
Run Hardware and Devices Troubleshooter
Hardware problems with the second hard drive can also prevent it from being recognized by the system. Windows includes a built-in troubleshooter that can automatically detect and fix common hardware issues. Follow these steps to fix hardware issues:
Step 1. Press "Win" + "X" and choose "Windows PowerShell (Admin)" to open it.
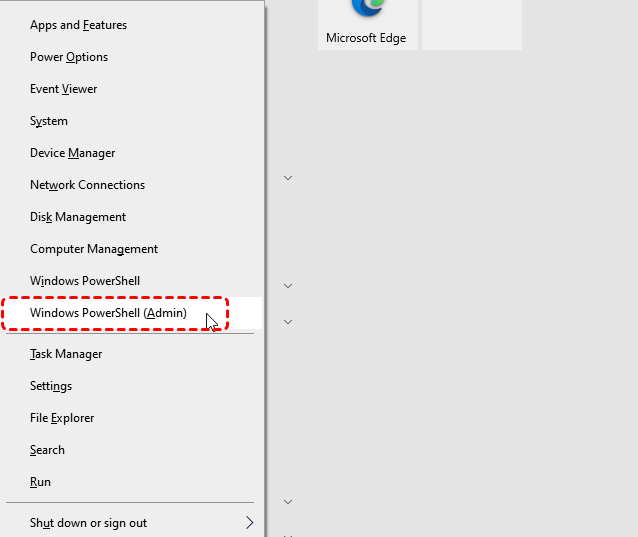
Step 2. Enter the command "msdt.exe - id DeviceDiagnostic" and press "Enter". Then, see if you can find the second hard drive in File Explorer.
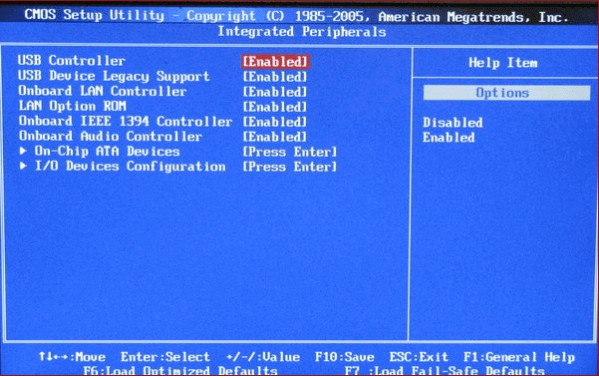
Enable the Drive in BIOS/UEFI
When second hard drive not showing up in Windows, checking its status in BIOS will let you determine if there’s a connection issue. To solve this issue, enter BIOS/UEFI to confirm it is enabled. Some systems disable unused SATA ports by default.
Step 1. Restart your computer and repeatedly press Del, F12 or F2 (depends on your computer brand) to enter BIOS.
Step 2. Once inside BIOS/UEFI, use the keyboard or mouse to navigate to Storage Configuration (names vary by manufacturer).
Step 3. Look for Integrated Peripherals and make sure the second hard drive is set as "Enabled".
Scan for Malware or Virus
Malicious or virus can block access to storage devices, alter permissions, or interfere with system services, making a healthy drive appear missing, blank, or inaccessible in Windows. Running a full malware scan helps determine whether the issue is software-based rather than hardware-related.
Step 1. Go to "Settings" > "Update & Security" > "Windows Security" > "Virus & threat protection".
Step 2. Click "Quick scan" to scan the whole system. If any threats are detected, remove or quarantined it.
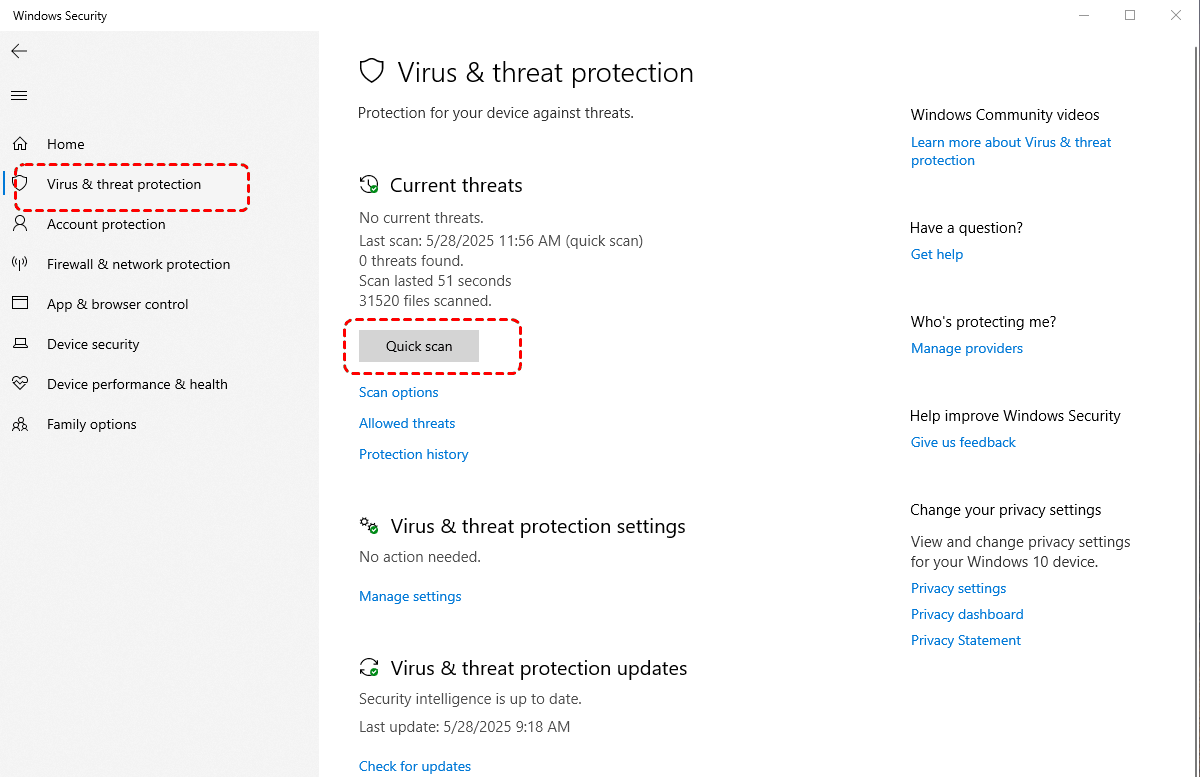
If needed, you can also perform a full scan under "Scan options" for your system. A full scan checks all files, running processes, and system memory, which is essential for detecting threats that interfere with storage access.

The Bottom Line
A second hard drive not showing up on Windows does not automatically indicate hardware failure or permanent data loss. In most cases, by using the method mentioned above, the problem can be solved safely and efficiently. For users who want to recover data from the second hard drive, MyRecover provides a reliable path to data recovery without unnecessary risk.


Stay Updated With Our
Latest Tips
Add us as a preferred source on Google to never miss helpful guides.