
Fix USB Power Surge Error Windows 10 Without Losing Data
When the USB power surge error suddenly appears on your computer, it may interrupt your work and cause the USB device to become unresponsive. This guide will provide step-by-step solutions to fix the error and restore normal functionality to your USB devices without the risk of losing important data.
By Aria / Updated on December 11, 2025
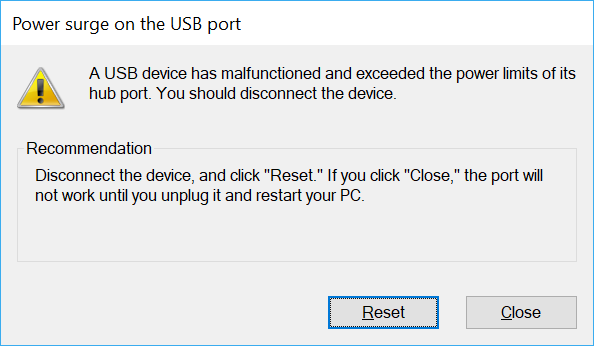
"Power Surge on the USB Port" Error in Windows 10
"Surface 3, Windows 10. Out of warranty. The USB port doesn't work, and I get a constant error message from File Explorer of:
Power surge on the USB port. A USB device has malfunctioned and exceeded the power limits of its hub port. You should disconnect the device.
A few months ago, I had this same issue and it resolved itself after about a day of time powered completely off, but now it’s come back. Even when nothing is plugged in, even after reboots, shutdowns, switching to my Ubuntu install and back, etc. So, my question is, is there any way to entirely disable the USB icon from flickering on and off in the notification area without completely disabling USB?"
- Question from David
If the "Power surge on the USB port" message keeps popping up on your computer, you’re not alone. This is a common USB power surge error encountered by many Windows users. This error typically pops up when there is a surge in power through one of your USB ports. While it can be concerning, this issue is usually solvable with a few troubleshooting steps.
In this guide, we’ll explore the common reasons behind the "Power Surge on USB Port" error and provide solutions to both fix the issue and recover data from inaccessible USB devices.
Reasons Behind the USB Power Surge Message
Understanding the reasons behind the error can help you find solutions more easily. The USB power surge error can occur for several reasons. Some of the most common causes include:
🔋Excessive Power Draw: USB devices, especially external hard drives or other high-powered peripherals, can draw more power than the USB port can provide, leading to a power surge.
🔌Faulty USB Port or Hub: A malfunctioning USB port or hub may fail to regulate power properly, resulting in a surge.
💽Overloaded USB Ports: Plugging too many devices into a single USB hub or port can create an overload, triggering the error.
💡Driver Issues: Outdated or corrupt USB drivers can cause miscommunication between the device and the system, leading to the error.
🛠️Power Supply Problems: If your PC’s power supply isn’t providing enough power to the system, USB devices may not receive enough power, leading to surges.
How to Recover Data from the Inaccessible USB Device
When the USB power surge error pops up while a USB device is connected to your computer, the USB will become inaccessible. If it stores a large amount of important data, the potential risk of data loss can be frustrating. Before attempting to fix this error, it’s crucial to retrieve your files from the inaccessible USB using a professional data recovery tool like MyRecover.
MyRecover is a powerful tool designed to recover data from formatted USB drives, deleted partitions and more complex data recovery scenarios. It supports over 500 file types recovery and can recover data from drives that have been affected by virus or file system errors.

- Safe Recovery – Read-only process, no risk of overwriting data.
- Broad Compatibility – Supports Windows 11/10/8/7/Server and NTFS, FAT, ReFS, exFAT, etc.
- Smart Scanning – Quick Scan for recent files, Deep Scan for full recovery.
- Easy to Use – Intuitive design, no technical skills required.
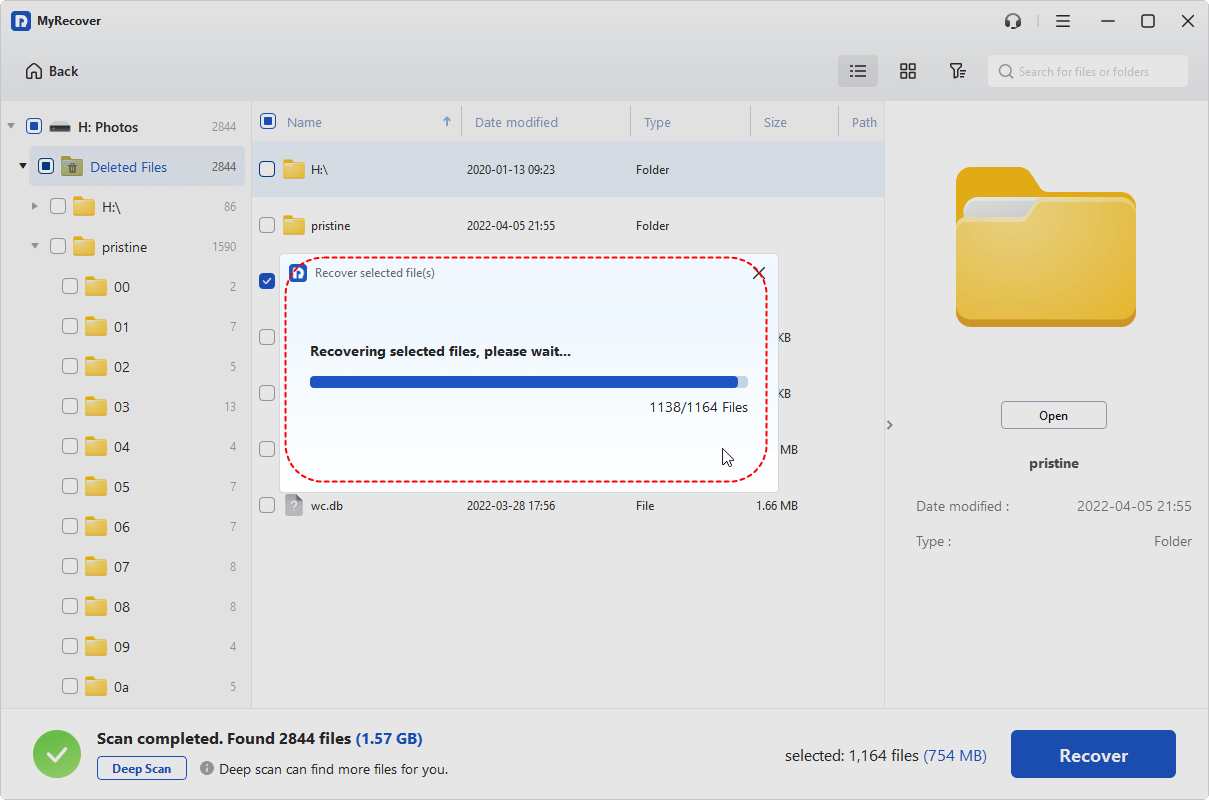
Step 1. Download and install MyRecover on your computer from Microsoft Store. Connect the USB with error to your computer correctly.
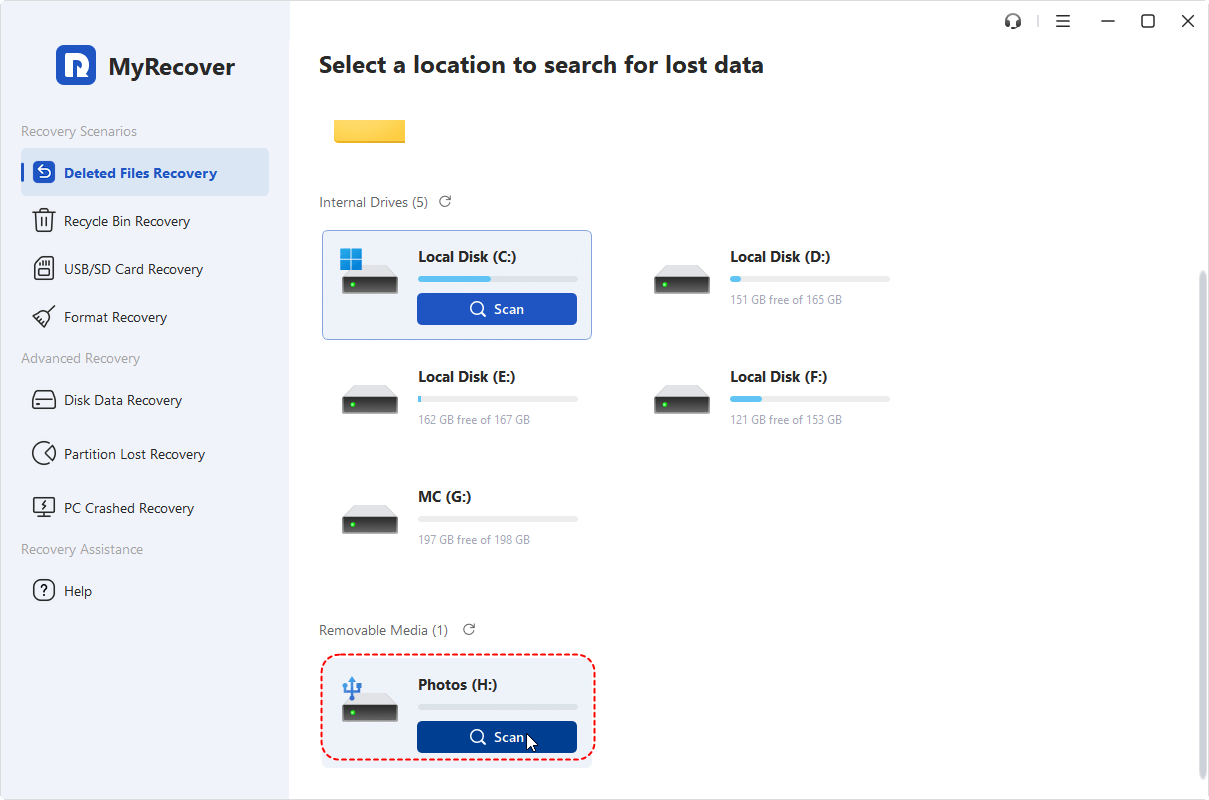
Step 2. Launch the app and select the USB drive to scan for lost files, then click "Scan".
Step 3. After the scan is finished, choose the files you attempt to recover from the recoverable lists and click "Recover".
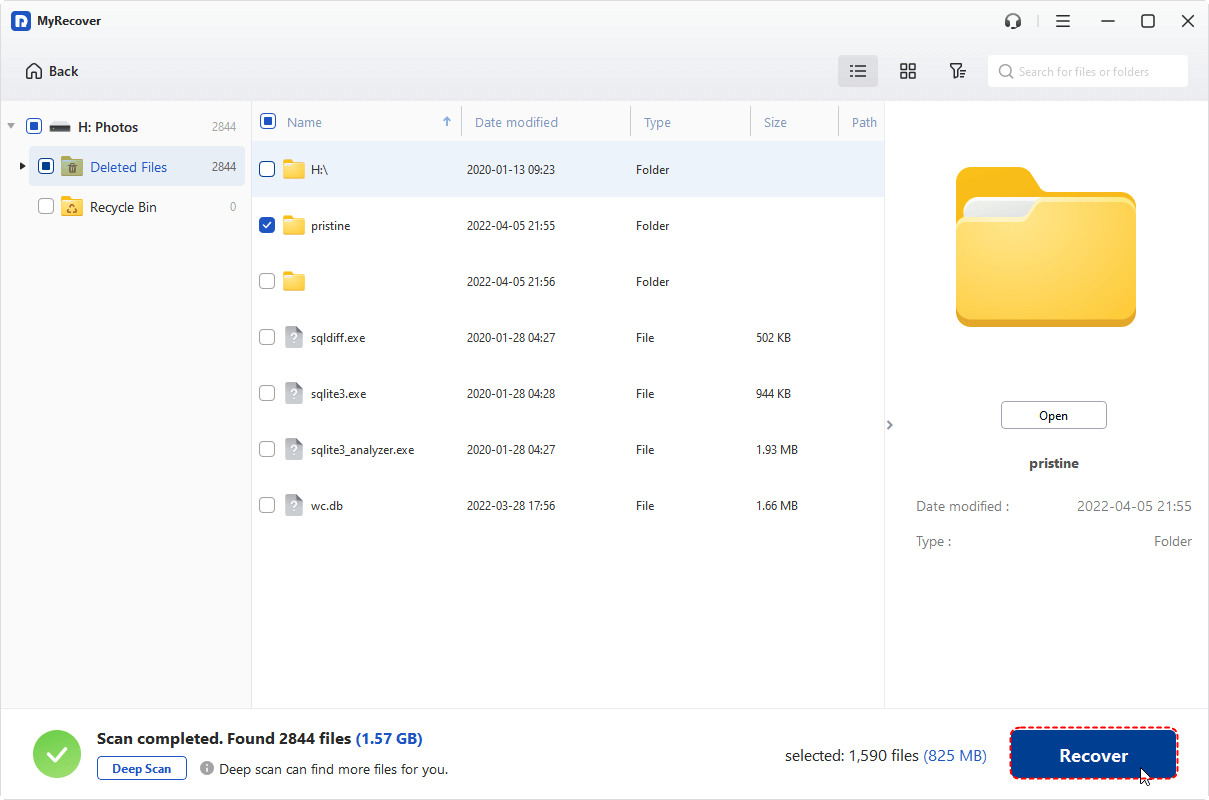
Under the "Path" tab, select the "Existing files" folders and click the "Recover" button to extract all files from the USB device.
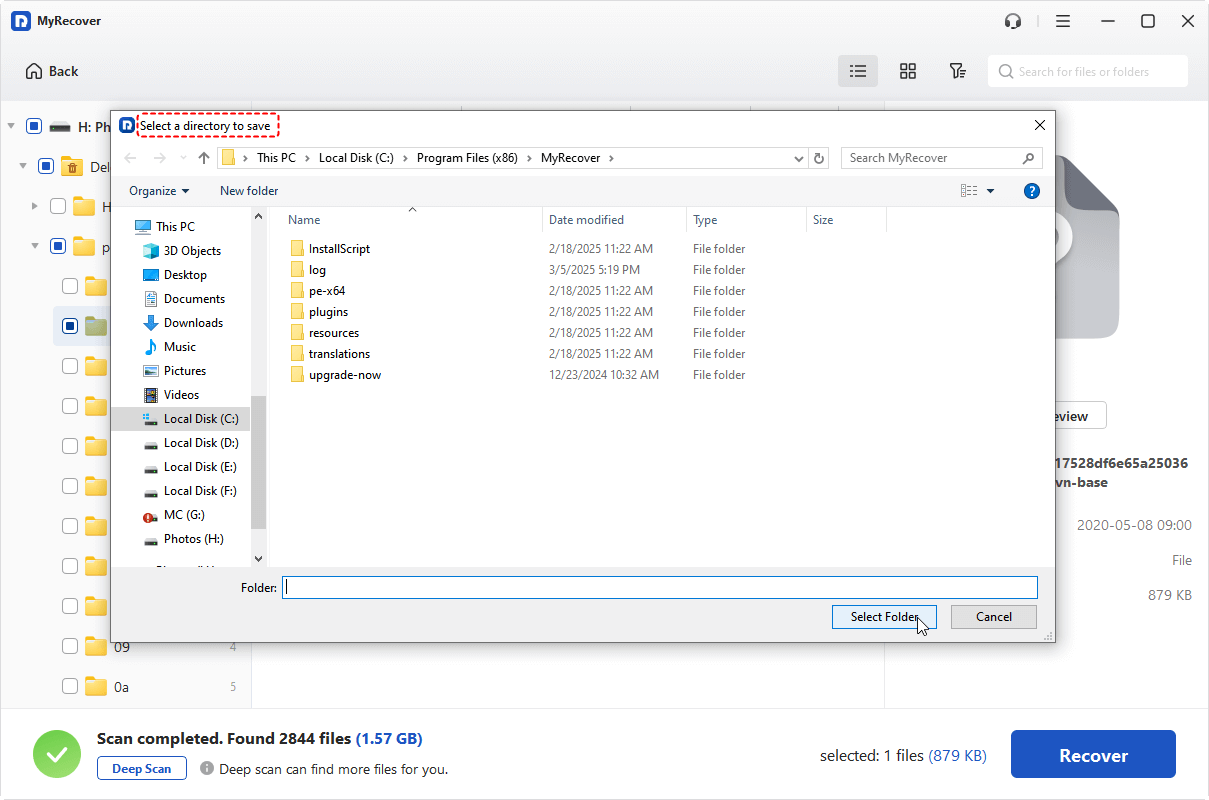
Step 4. Select a safe location to save the recovered files.
Once the process is done, you'll see the message "Files have been recovered successfully". Then, you can check the recovered files by clicking on the destination folder path or the "Browse" button.
How to Fix the "Power Surge on the USB Port" Error
After ensuring there is no data loss, you can start trying the following methods to fix this error. This section will provide 6 methods to fix the "power surge on the USB port" error. Let's explore them one by one.
Restart Your Computer
Sometimes the USB Power Surge error is only temporary, possibly caused by system power management issues or device conflicts. Restarting your computer can resolve temporary power management problems. Turn off your computer and wait several seconds, then reboot computer to check if the USB power surge error persists.
Disconnect the Hardware
If restarting your computer doesn’t resolve the power surge error, you can follow the solution prompted by the error message to disconnect the USB device.
Step 1. Remove all the USB devices from your computer and click "Reset" on the Windows power surge notification.
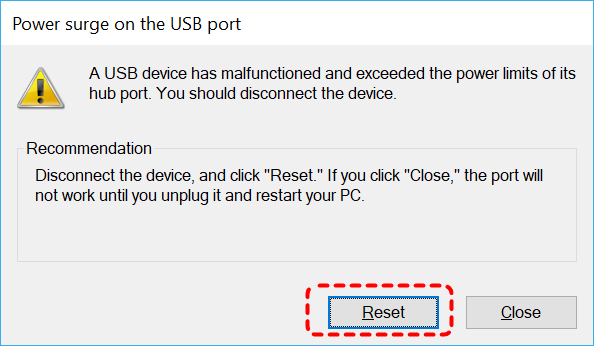
Step 2. Restart your computer and carefully reconnect the USB drive to check if the error remains.
Uninstall or Reinstall USB Controller Devices
Corrupted or outdated USB controller devices may cause USB power surge error on Windows. Uninstalling and reinstalling the USB controller devices can often fix this error.
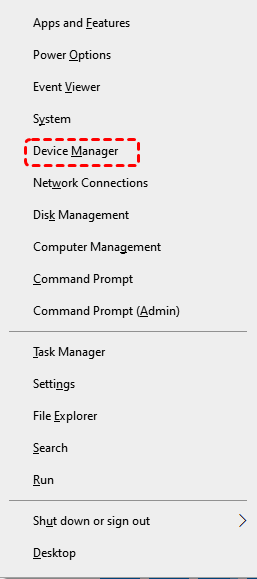
Step 1. Press "Win" + "X" and select "Device Manager" to open it.
Step 2. Expand "Universal Serial Bus controllers" and right click on each device, then select "Uninstall device" or "Update driver".
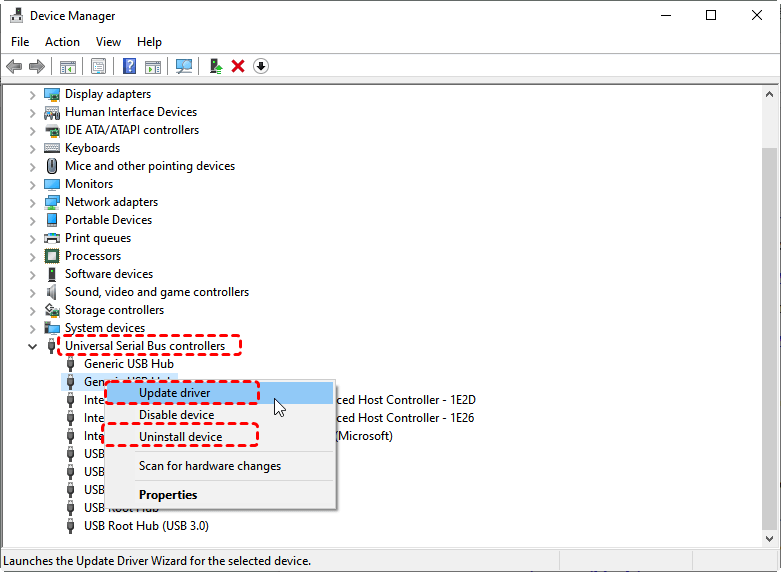
Step 3. If you choose to uninstall the device, restart your computer to allow Windows to reinstall the controller device. Then, insert USB into your computer to see if the error is addressed.
Run the Hardware Troubleshooter Command
Sometimes the issue may be linked to the hardware instead of the USB drive itself. Windows comes with a built-in Hardware and Devices Troubleshooter that can help detect and resolve hardware-related problems. When the USB power surge message pops up, you can try this way to fix the issue.
Step 1. Press "Win" + "X" and choose "Windows PowerShell (Admin)" to open it.

Step 2. Enter the following command "msdt.exe -id DeviceDiagnostic" and hit the "Enter" key.
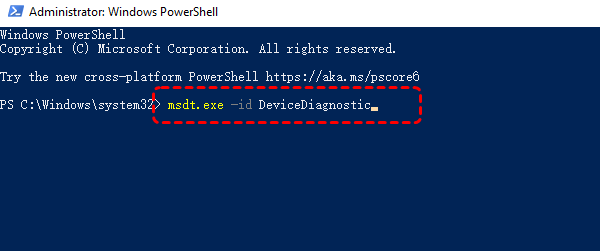
Step 3. This command will open the "Hardware and Devices" troubleshooter window. Click "Advanced" and check the "Apply repairs automatically" box, then click "Next" to detect hardware problems.

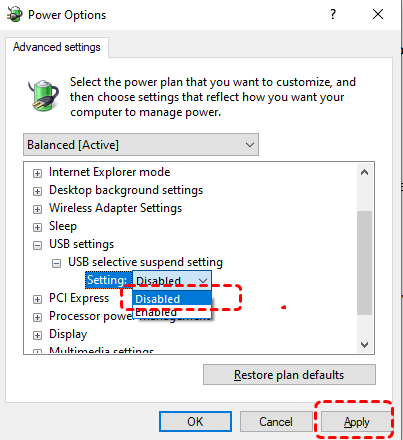
Disable the USB Selective Suspend Setting
This is a Windows power management feature that shuts off USB device power when the devices are idle. While it helps save power, it can sometimes cause power supply issues.
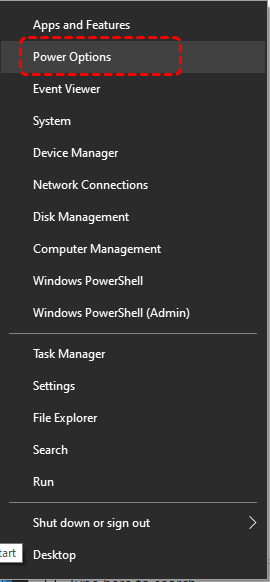
Step 1. Right-click the Start button and select "Power Options".
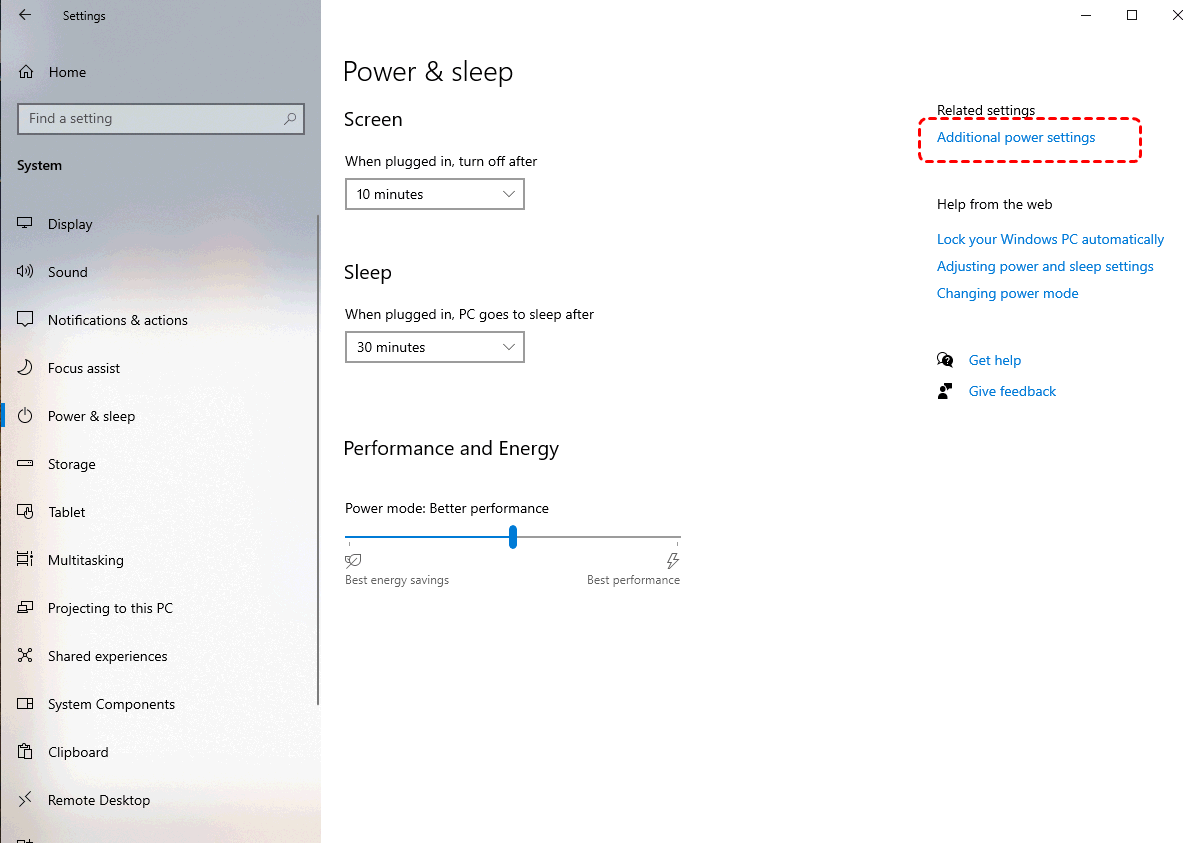
Step 2. In the opened "Power & sleep" window, Choose "Additional power settings".
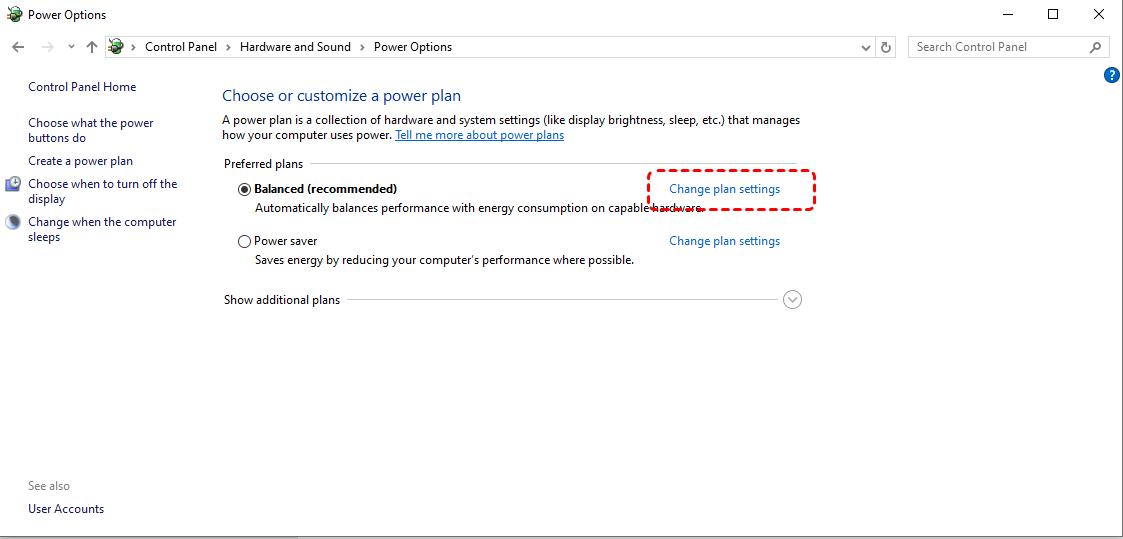
Step 3. Then click on "Change plan settings" and "Change advanced power settings".
Step 4. Expand "USB settings" > "USB selective suspend setting", select "Disabled" and click "Apply".
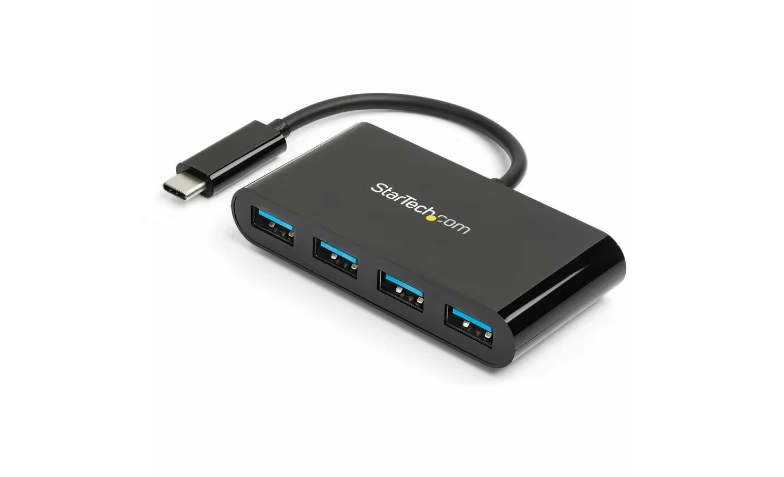
Use a Powered USB Hub
If the problem persists, it may be because the built-in USB ports on your computer cannot provide enough power to support the devices. You can use a powered USB hub which comes with their own power supply and delivers stable power to multiple devices and avoiding overload issues.
Summary
In conclusion, while USB power surge errors can sometimes be a temporary glitch, recurring problems may indicate a deeper issue. You can try to fix it using above method. However, it’s important to note that if there’s any risk of data loss while attempting to fix the issue, you can use a professional data recovery tool like MyRecover to extract your important data.
If you are handling more complex scenarios, such as creating a bootable data recovery drive, MyRecover Professional edition gives you everything you need to ensure your data is safe. It even allows unlimited data recovery quota and file content preview.


Stay Updated With Our
Latest Tips
Add us as a preferred source on Google to never miss helpful guides.