 MyRecover



Windows Cannot Run Disk Checking Because It Is Write Protected? Here’s What to Do
A write-protected USB drive can prevent Windows from running CHKDSK, displaying the error "windows cannot run disk checking write protected." This guide explores the common causes of this issue and explains how to remove write protection using practical troubleshooting methods. It also covers what to do when CHKDSK shows the error, so you can check the drive and address potential file system errors without putting your data at unnecessary risk.

By Aria / Updated on November 3, 2026


Why CHKDSK Shows "Windows Cannot Run Disk Checking Write Protected"
You plug in a USB drive and Windows says there’s a problem with it. A folder that opened yesterday now gives you an error, so you run chkdsk E: /f to fix the issue, but Windows responds "Windows cannot run disk checking on this volume because it is write protected."
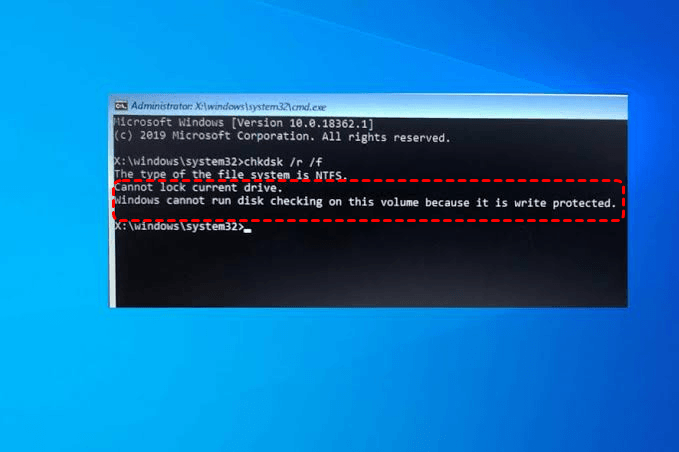
The /f option tells CHKDSK to repair file system errors. That requires writing changes to the USB drive. A lock switch, a read-only setting, or a restriction on the computer can block those writes. A drive can become read-only for several reasons:
- The drive’s lock switch is on. Some USB drives have a physical switch that blocks changes while still letting you open or copy files.
- The disk or volume is marked as read-only. A read-only attribute can apply to the entire USB drive or to the volume you open in File Explorer, such as E:.
- The computer blocks writes to USB drives. A Windows setting or a policy on a work or school PC can prevent you from saving files to removable storage. The same USB drive may work normally on another computer.
- The USB drive may be failing. If it stays read-only on several computers after you’ve ruled out the lock switch and software settings, the drive itself may have a fault.
How to Remove Write Protection from a USB Drive in Windows 10/11
Copy any important files you can still open to your computer before attempting a repair. If Windows asks you to format the USB drive or you can’t copy the files you need, go straight to the file recovery section to get your files back with the Windows data recovery software - MyRecover.
Method 1. Check the USB Drive for a Write-Protect Switch
Some USB drives have a small switch that locks the device against changes. You may still be able to open files while the switch is locked, but Windows can’t save changes or repair the file system. Look along the sides of the USB drive for a slider with a padlock symbol or a Lock label.
Step 1. Find the switch. Check the markings to identify the unlocked position. If the drive has no switch, continue to remove the read-only settings via DiskPart.
Step 2. Eject and unlock the drive. Safely eject the drive, unplug it, and move the switch to the unlocked position.
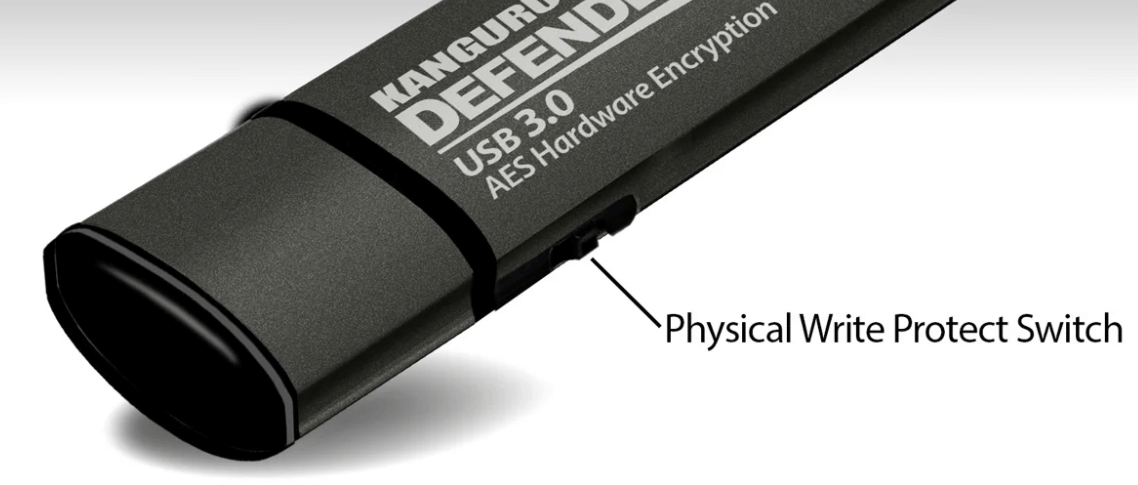
Step 3. Reconnect the drive. Once your important files are backed up and the drive is stable, try creating a small test file. If Windows still blocks writes, check DiskPart.
Method 2. Clear the Read-Only Attribute with DiskPart
DiskPart can show whether Windows has marked the entire USB drive or one of its volumes as read-only. Disk 2, for example, refers to the physical drive, while E: refers to the volume you open in File Explorer. Many USB drives have just one volume, so either setting can look the same when you try to save a file. Check the disk first, then inspect the volume if needed.
Step 1. Find the USB drive. Open Command Prompt and run it as administrator, run diskpart, then run list disk. Match the USB drive’s capacity and verify its disk number.
Step 2. Check both read-only values. Run select disk N using the verified disk number, followed by attributes disk. Check both Current Read-only State and Read-only.
- If Read-only shows Yes, run attributes disk clear readonly, then run attributes disk again.
- If Current Read-only State remains Yes while Read-only shows No, the DiskPart attribute is already clear. Do not keep repeating the command. Check the physical lock, Windows policy, storage controller, or device condition instead.
- If both values show No, continue with the volume and computer-policy checks below.
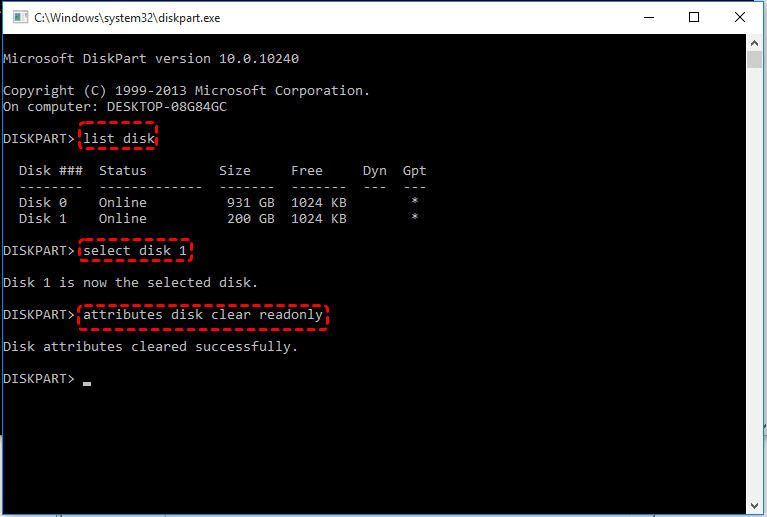
On a basic MBR disk, the volume’s read-only attribute applies to all volumes on that disk.
Step 3. Check whether the problem follows the USB drive. If neither the disk nor the volume is marked read-only and Windows still blocks writes, try the drive on another PC that allows USB writes. If it works there, check the original PC’s USB settings.
Method 3. Check Windows USB Write Restrictions in Group Policy or the Registry
Check the Group Policy or Registry settings if the USB drive accepts files on another computer, or if several working drives become read-only on this one. On a personal PC, you can check for a local policy or an existing registry setting that blocks USB writes. On a work or school computer, ask IT to check which policy applies.
In Group Policy:
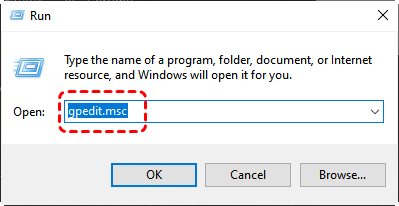
Step 1. Check Local Group Policy if available. Press Win + R and enter gpedit.msc and click OK to open Group Policy.
Step 2. go to Computer Configuration > Administrative Templates > System > Removable Storage Access.
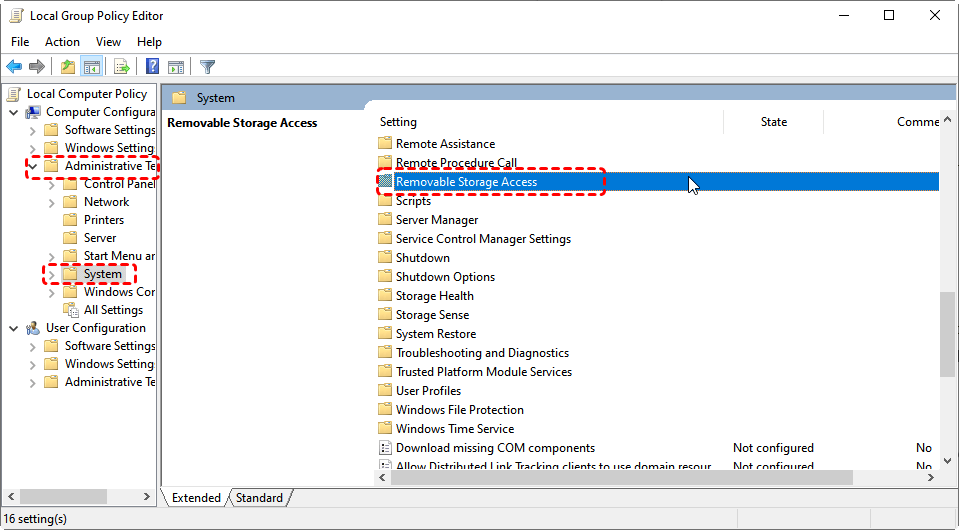
Step 3. If Removable Disks: Deny write access is enabled and you manage the PC, set it to Disabled and apply the change.
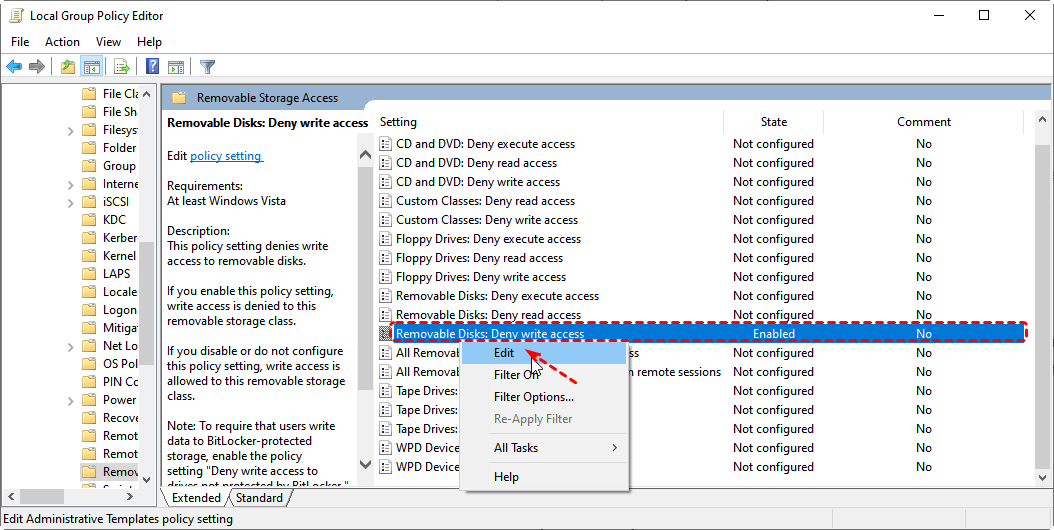
- ★Tips:
- Also check BitLocker and device-control policies on managed PCs. Windows can deny write access to removable drives that are not protected by BitLocker, and an organization may apply additional removable-storage restrictions through device management or endpoint security software. If this is a work or school computer, do not disable these controls yourself; ask IT which policy is responsible.
In Registry Editor:
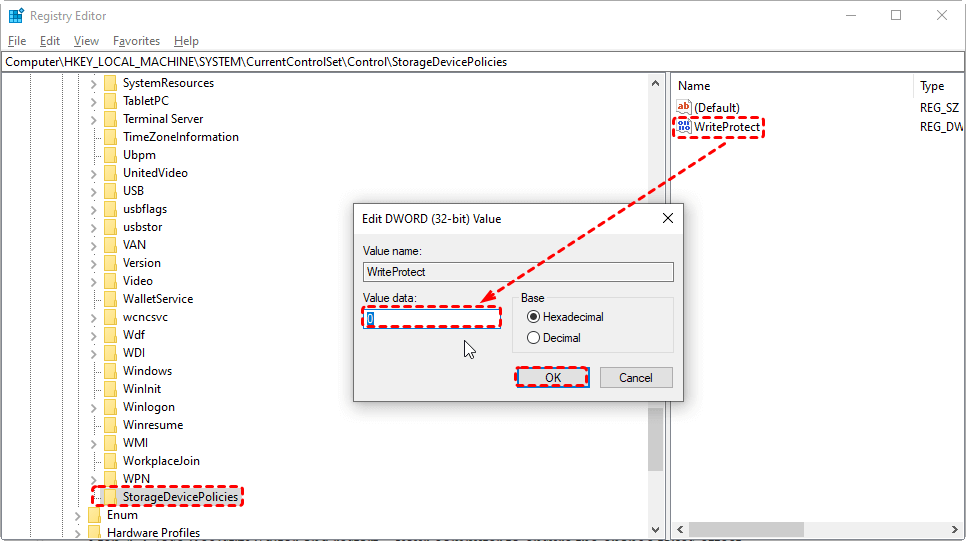
Step 1. Open Registry Editor by pressing Win + R and type regedit.
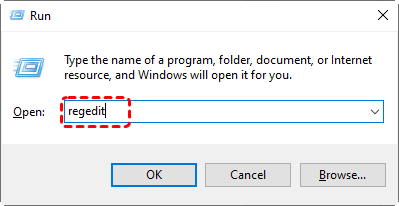
Step 2. Check the existing registry setting. In Registry Editor, look under HKEY_LOCAL_MACHINE\SYSTEM\CurrentControlSet\Control\StorageDevicePolicies. If the key or WriteProtect value is missing, skip this check.
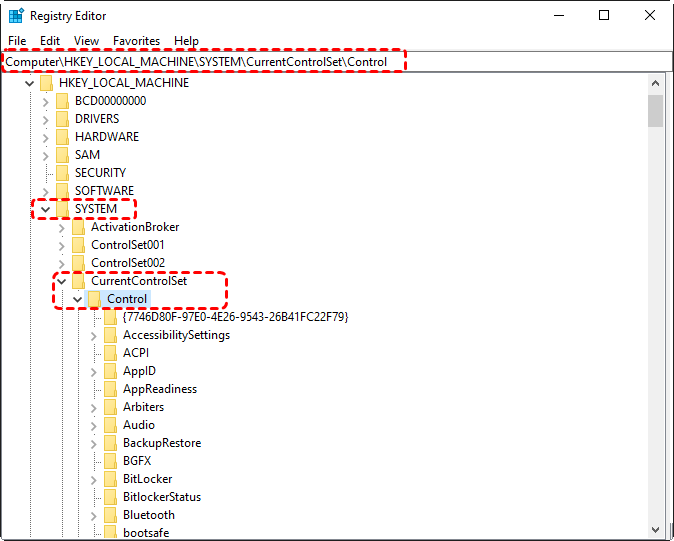
Step 3. Change the value if it is enabled. If WriteProtect is set to 1 on your personal PC, export the key as a backup, then set the value to 0. Restart Windows and reconnect the drive.
Method 4. Run Windows Error Checking After Write Access Is Restored
Windows Error Checking is a graphical way to check the file system, but it does not bypass write protection. Use it only after the drive accepts writes and after copying important files elsewhere. If the device remains read-only, neither Error Checking nor CHKDSK can complete repairs that require file-system changes.
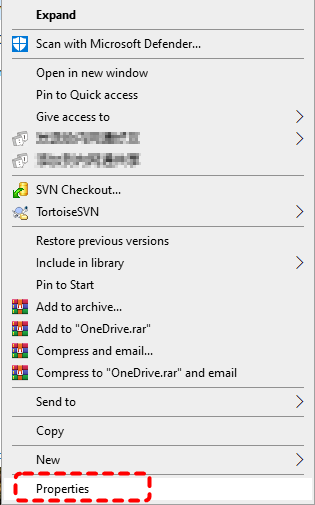
Step 1. Open the USB drive’s properties. In File Explorer, go to This PC, right-click the USB drive, and choose Properties.
Step 2. Start Error Checking. Open Tools tab and select Check under Error checking. Follow the prompts to scan and, if Windows offers a repair, proceed after backing up your files.
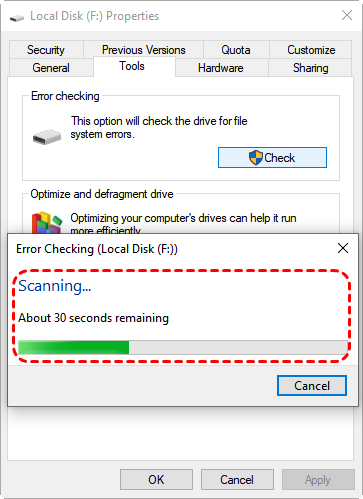
Step 3. Check the original drive. Try opening the drive that gave you trouble. If it still won’t open and the files matter, recover them before trying another repair.
If the Drive Still Refuses Writes, Stop Repeating Repair Commands
If the drive remains read-only on multiple computers, especially when Current Read-only State is Yes but Read-only is No, its controller may have forced the device into a protective read-only state. Stop repeating DiskPart, CHKDSK, and formatting attempts. Copy every accessible file to another disk first. If the device disconnects, reports I/O or CRC errors, shows No Media or 0 bytes, or displays an incorrect physical capacity, avoid repeated full scans and seek hardware or professional recovery assistance.
If files won’t open or Windows asks you to format the drive, cancel the prompt. If the drive stays connected and Windows can still read its storage, try a file recovery scan.
How to Recover Files from an Inaccessible USB Drive with MyRecover
If Windows detects your USB drive but you can’t open or copy important files, MyRecover can scan for files that are still readable. This helps when Windows asks you to format the drive or when folders still won’t open after you restore write access. You can review the results, preview supported files, and save the files you need to your computer or a different drive. Check those copies before deciding whether to format the USB drive.
 MyRecover
- Recover deleted & lost files from HDD, SSD, USB, SD card, camera as you need.
- Support 1000+ formats of photos, videos, docs, archives, emails, compressed files, etc.
- Reliable rescue for deletion, formatted disk, emptied Recycle Bin, system crashes and more.
 100% Secure
Step 1. Download and install MyRecover. If Windows asks to format the USB drive, select Cancel. Download and install MyRecover on the computer’s internal drive.
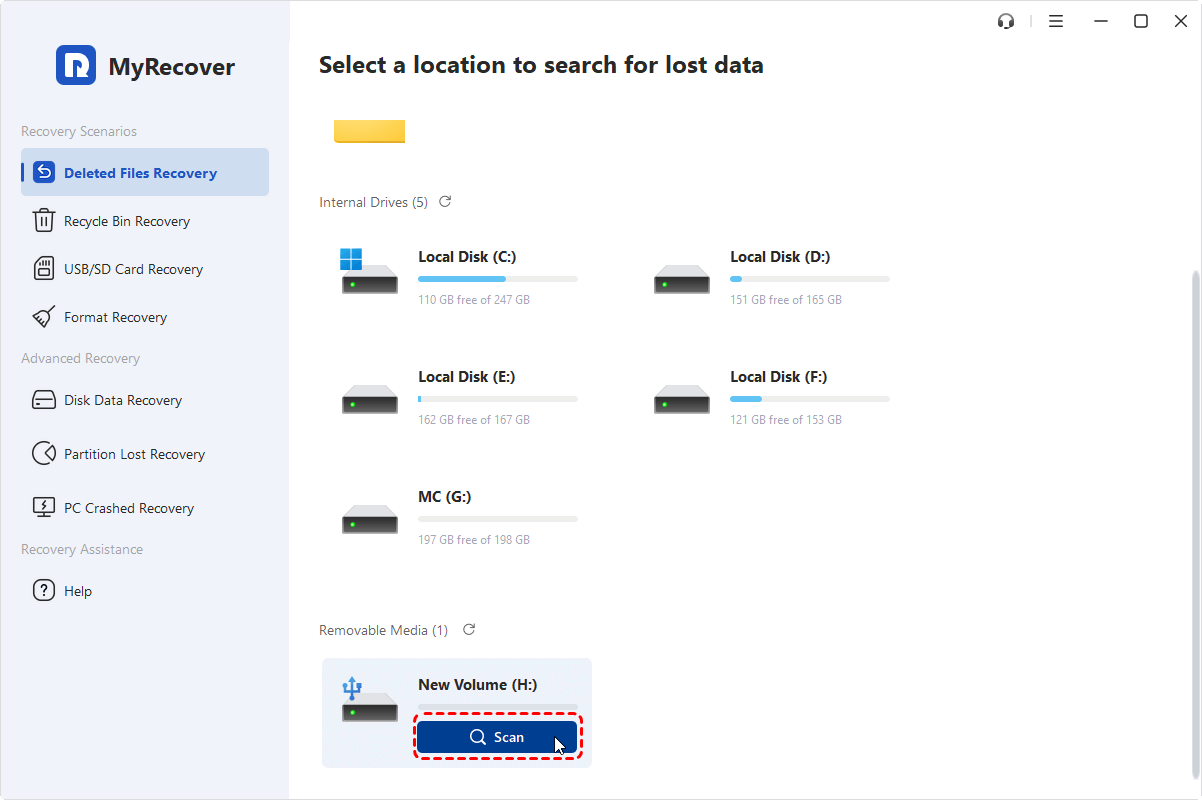
Step 2. Select and scan the USB drive. Choose Deleted Files Recovery, identify the affected drive by its name and capacity, and select Scan.
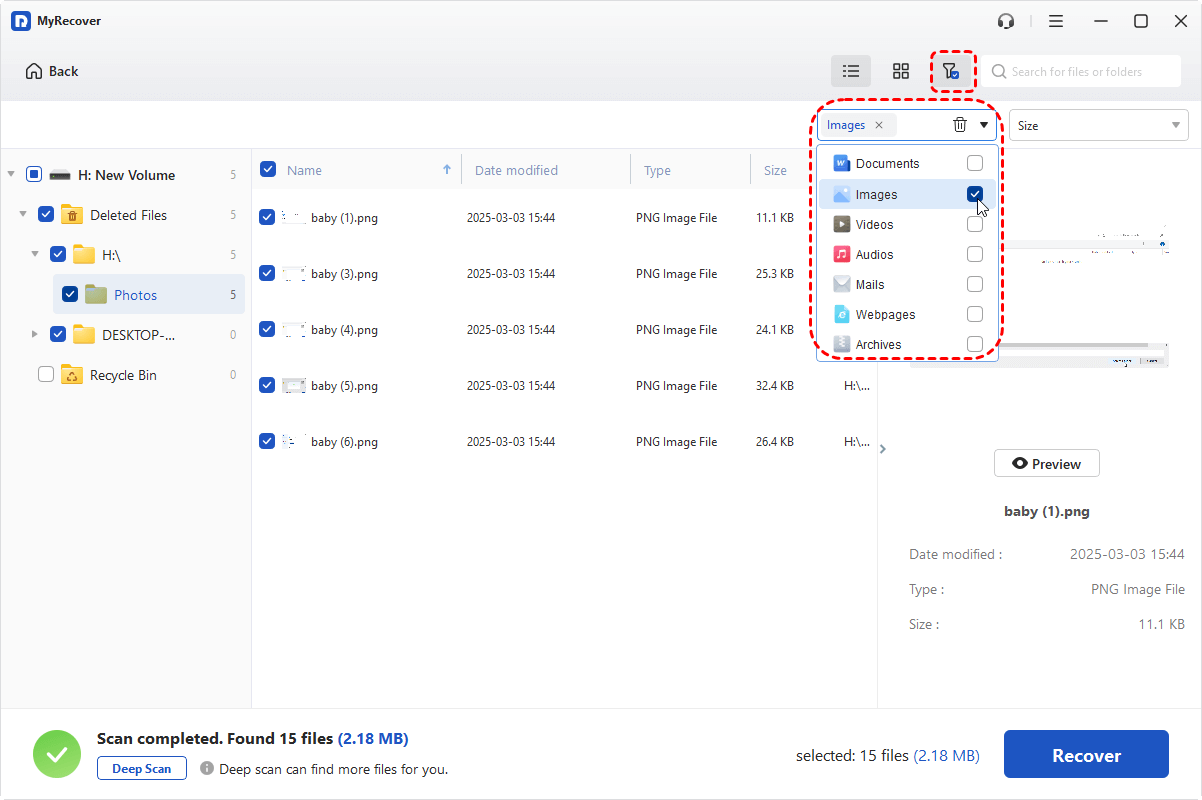
Step 3. Find the files you want back. Search by name or filter by file type. Preview supported files, such as photos or PDFs, before selecting them.
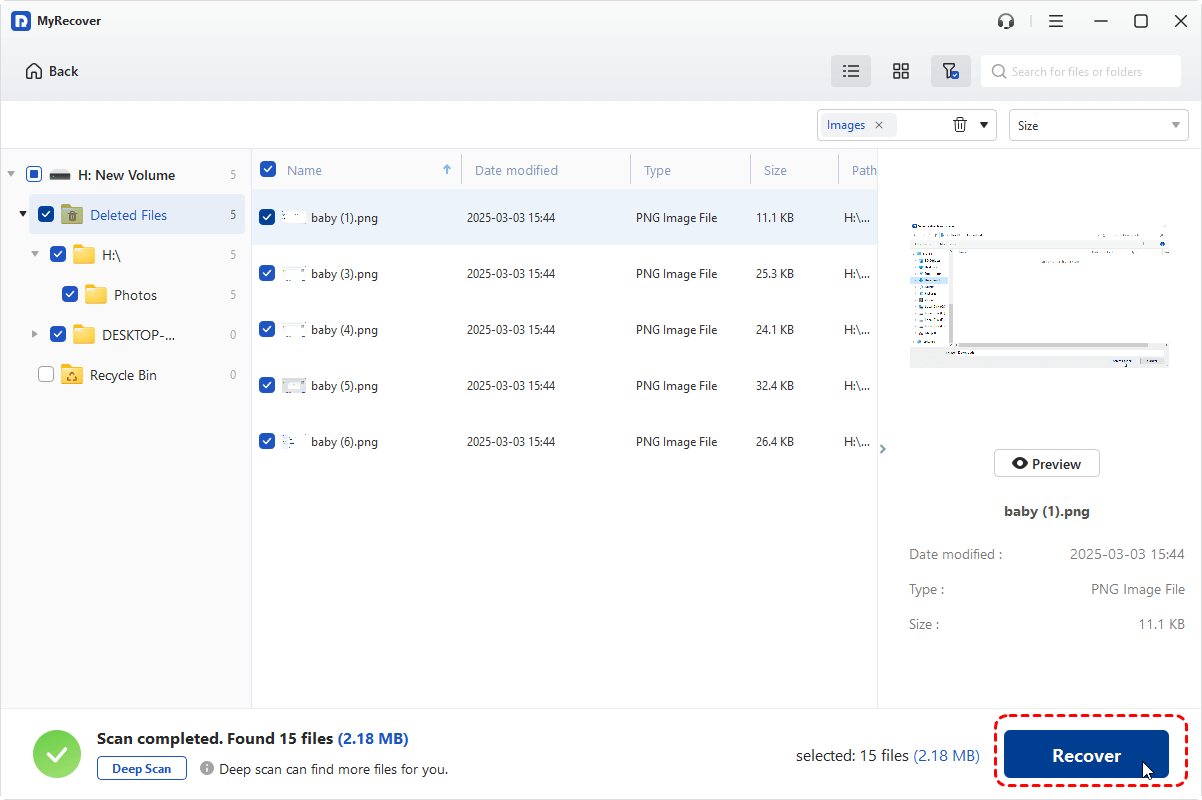
Step 4. Save to a different drive. Select the files you need, click Recover, and choose a folder on your computer or another external drive. Open a few important files from that folder to check the copies.
Consider formatting after you’ve checked the saved copies and the USB drive accepts writes. If the original partition is missing and Disk Management shows its space as Unallocated, MyRecover’s Partition Recovery may be relevant.
Conclusion
Find out what is blocking writes before repairing the file system. If Windows can see the USB drive but File Explorer can’t copy your important files, MyRecover can help you find and save readable files to another drive. For IT and repair teams that handle recovery across multiple PCs, consider MyRecover Technician.
FAQs
Can I run CHKDSK without /f on a write-protected USB drive?
Yes, if Windows can read the volume and recognize its file system, you can try chkdsk E: using the actual drive letter. This checks and reports errors without fixing them. If the report shows errors, save any important files before attempting a repair.
Does clearing the read-only attribute erase files on a USB drive?
No, clearing the read-only attribute in DiskPart does not erase files. It changes the setting that marks the disk or volume as read-only. Once writes are allowed, later actions such as formatting can still affect the files stored there.
Why does Windows say my USB drive is write-protected only when I copy one large file?
If small files copy successfully, check the exact error and the drive’s free space. A FAT32 drive can reject a single file of 4 GB or larger even when it has plenty of room. Open the drive’s Properties to check its file system.
Can a USB drive work on a Mac but be inaccessible on Windows?
Yes, if the drive uses a file system such as APFS that Windows cannot open natively. Copy your files from the Mac first. If you need to use the drive on both systems, consider exFAT after backing up the files.
Why does my USB drive show as “No Media” or 0 bytes in Disk Management?
Windows may detect the USB device while being unable to read its storage. Try another USB port and check whether the drive shows its real capacity on another computer. If it still reports No Media or zero capacity, ordinary recovery software has no readable storage to scan.

Stay Updated With Our
Latest Tips
Add us as a preferred source on Google to never miss helpful guides.
 Add as preferred source >>