
[Solved] Windows File Recovery Failed to Create Destination Folder
When attempting to retrieve data via Windows File Recovery by inputting the corresponding command, an error message "Failed to create destination folder, Error 0x80070356: Unknown error 0x80070356" is returned. In this guide, we will provide step-by-step solutions to troubleshoot and resolve the issue, ensuring you can recover your important data.
By Aria / Updated on December 16, 2025
Introduction
Windows File Recovery is a powerful data recovery tool. With its robust data recovery features, it’s the go-to solution for countless users looking to get back lost files. But even this reliable tool isn’t perfect. Many users have reported that after typing in the recovery command, Windows File Recovery doesn’t restore data as intended; instead, it pops up an error: "Failed to create destination folder."

This error can be frustrating, especially when you're trying to restore important files. Understanding why this happens and how to resolve it is crucial to ensure a smooth recovery process. Let's dive into more details.
Why Does Winfr Failed to Create Destination Folder?
Several factors could be responsible for Windows File Recovery "Failed to create destination folder" error:
🔉Drive Connection Issues: If the drive is improperly connected or not recognized by the system, Windows File Recovery cannot create the destination folder on the drive.
🔌Incorrect Command Syntax: A common mistake is entering the wrong command syntax in the recovery tool, causing the destination folder to fail.
🔋Insufficient Drive Space: If the destination drive doesn't have enough space to accommodate the recovered files, the tool will fail to create the necessary folder.
💽Permission Issues: Lack of proper permissions for the folder or drive you're trying to recover to can cause the Windows File Recovery 0×80070356 error.
📂File System Corruption: Corrupted file systems may prevent the creation of a destination folder, even if there's enough space on the drive.
How to Solve Windows File Recovery "Failed to Create Destination Folder"
Based on the aforementioned causes of the problem, you might already have some fixes in mind. Below are 6 methods to solve this issue and get back the data you want. Let's go through each one.
Check Drive Connection
The first thing you should do is ensure that the drive you're trying to recover files to is properly connected to your computer. If you're using an external drive, try reconnecting it or using a different USB port. Sometimes, loose connections or a malfunctioning USB port can cause issues.

Check Drive Space
If the destination drive doesn't have enough available space, the tool will not be able to create the folder for the recovered files. Check the available space on your destination drive and ensure it has enough room for the recovery.
Step 1. Navigate to "Settings" > "System" > "Storage" and click "View storage usage on other drives".
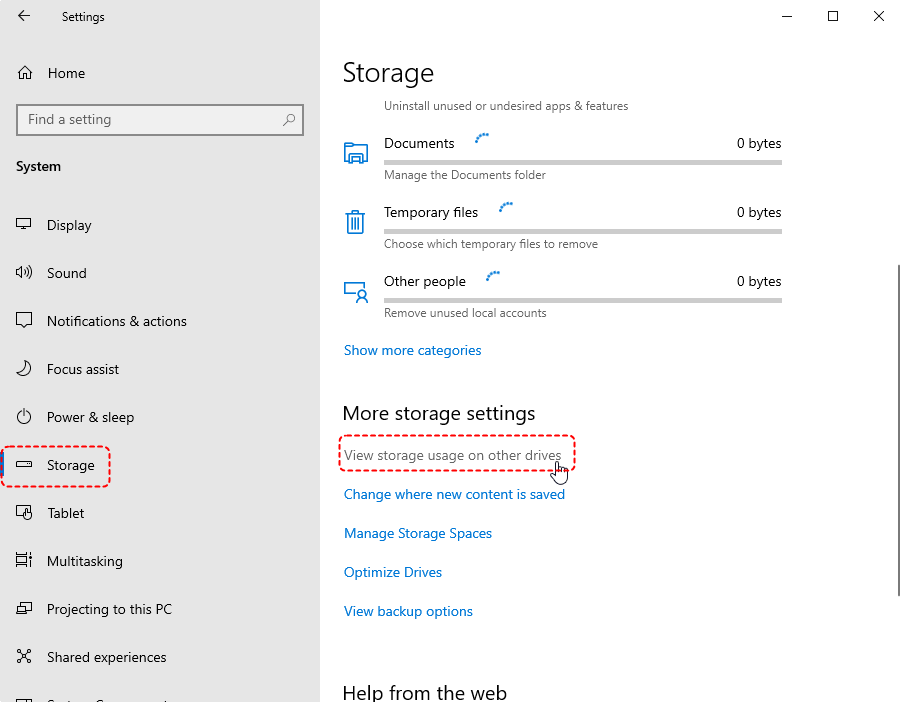
Step 2. Select your target drive to check detailed storage usage.

You can do this by right-clicking the drive in File Explorer and selecting Properties to view the available space. If the storage space is full, you can use Disk Cleanup to delete unnecessary temporary files and cache files.
Run CHKDSK Command
Corrupted file systems can cause Winfr failed to create destination folder. To fix this, you can run the CHKDSK command on the destination drive to check for and repair any file system errors.
Step 1. Open Command Prompt as administrator.

Step 2. Enter the following command "chkdsk g: /f /r" and press "Enter" key. Replace the drive letter "G" with your actual drive letter. This command will automatically scan and repair any errors on the drive.

Use Correct Command Syntax
When using Windows File Recovery, make sure you are entering the correct command syntax. The most basic command structure is:
winfr source-drive: destination-drive: [/mode] [/switches].
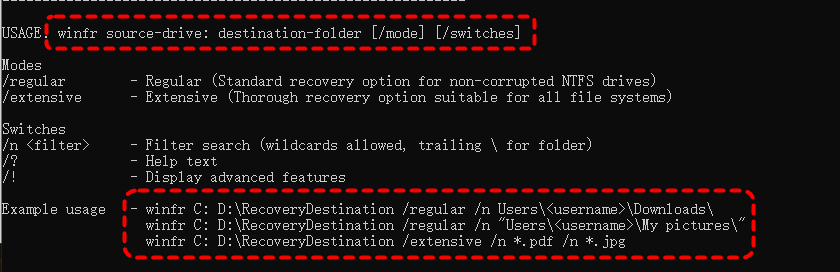
If there are spelling mistakes in the entered command, or if symbols, spaces, etc., are missing, it will not only trigger the 0x80070356 error but also may display the "There was an error parsing your command" error.
Additionally, if the specified destination file path is too long (over 260 characters), it will also prevent the recovery command from executing, and you may encounter the "failed to create destination folder" error. Choose a simpler path like C:\Recovery.
Try Another Destination Drive
If the drive you're attempting to recover to isn't working properly, try selecting a different destination drive. It's often helpful to use a different drive to ensure that the problem isn't with the drive you're trying to recover to. If the error no longer occurs, it indicates that the original target drive may have physical damage.
Change Permission of the Destination Folder
Sometimes, Windows File Recovery fails due to lack of permission to create folders in the specified destination. You can take ownership of the folder and grant yourself full permissions to resolve this.
Step 1. Locate the hard drive with Windows File Recovery 0×80070356 error in File Explorer.
Step 2. Right click on it and select "Properties". Go to the "Security“ tab and click on "Edit".
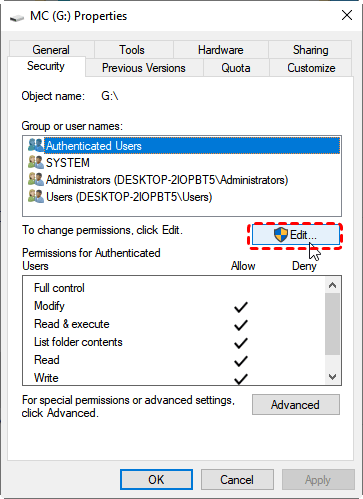
Step 3. Select your current account and check the "Full Control" permission.
Alternative Data Recovery Tool: Using MyRecover for File Recovery
If you're still facing issues with Windows File Recovery, you might want to consider using an alternative data recovery tool like MyRecover. It features a more intuitive GUI interface that is user-friendly, especially for novice users unfamiliar with command-line operations. MyRecover provides step-by-step guided operations, eliminating complete data recovery failures caused by minor errors like typos.
Discover the compelling highlights of MyRecover below.
✅No Command Line Needed – Simple GUI (graphical interface) for easy file recovery.
✅Higher Success Rate – Advanced deep scan for NTFS/FAT32/exFAT drives.
✅500+ Devices Support – Recover files from all types of devices like SSD, HDD, USB flash drive, SD card, cameras, game console drives and more.
✅Handle 500+ Data Loss Scenarios – Recover from deleted partition, formatted hard drive, emptied Recycle Bin, system crash, virus attack, etc.
✅Supports over 1,000 file types – Including documents, photos, videos, audio, archives, and Outlook data files.
✅OS Compatibility – Work not only on Windows 11 /10, but also on Windows 8.1/ 8/ 7 and all Servers.
4 Steps to Recover Lost Data with MyRecover
Step 1. Download and install MyRecover on your computer from Microsoft Store, avoid installing it on the drive with lost files.
Step 2. Launch the app and select the drive where the deleted files were stored, then click "Scan".

Step 3. After the scan is complete, choose the files you wish to recover from the recoverable lists and click "Recover".

With MyRecover Free, you can recover up to 500MB of data at no cost. But if you need unlimited recovery capacity and the ability to preview files before restoring them, MyRecover Professional edition is the perfect upgrade.
Step 4. Select a safe location to save the recovered files.

Once the process is done, the message "Files have been recovered successfully" will pop up. Then, you can view the recovered files in the destination folder path by clicking on the "Browse" button.

The Bottom Line
By following the methods above, you’ll not only address the Windows File Recovery "failed to create destination folder" issue but also recover your lost files using reliable tool MyRecover, whether you're dealing with an accidental file loss or a damaged drive. For more sophisticated data recovery requirements such as data retrieval from a dead computer, MyRecover Professional Edition represents a valuable investment.


Stay Updated With Our
Latest Tips
Add us as a preferred source on Google to never miss helpful guides.