
Solved: Your File History Was Disconnect For Too Long in Windows 11 & 10
If you see the message "Your File History was disconnected for too long" on Windows 11 or 10, it means Windows hasn’t been able to access your backup drive for a while. This article provides easy-to-follow solutions to reconnect your File History drive, troubleshoot common issues, and restore automatic backup functionality.
By Emma / Updated on September 28, 2025
User Case
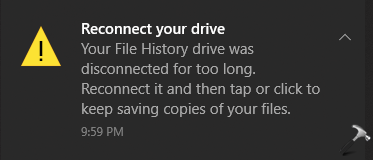
On the lower right corner of my screen there is a bell shape that gives me notifications. I keep getting a Security notification that says: Reconnect your drive, your file history drive was disconnect for too long.
Why am I getting this message. I think my computer is compromised. I have not done anything to get this message. My computer is doing things I am not aware of sometimes. Help. I don't know how to do what it is telling me I should do. Should I even do what it says to do?
Why Does "Your File History Was Disconnected For Too Long" Keep Popping Out?
File History is a built-in backup tool in Windows 10 and Windows 11 that automatically saves copies of your files on an external drive or network location. It allows you to restore previous versions of documents, photos, and other important files if they are accidentally deleted or modified.
The error message "Your File History was disconnected for too long" appears when Windows hasn’t been able to access the designated backup drive for a certain period. This can happen for several reasons.
⛔External Drive Disconnection: The backup drive may be unplugged, turned off, or experiencing connection issues.
⛔Network Location Unavailable: If your File History is stored on a network drive, network interruptions or changes in credentials can prevent access.
⛔Drive Letter Changes: Windows may fail to recognize the backup drive if its assigned drive letter has changed.
⛔System Sleep or Hibernation: Extended sleep or hibernation can temporarily disconnect the drive, triggering the warning.
⛔File or Backup Corruption: Temporary corruption of system files or the File History configuration may prevent proper connection.
Solutions to "Your File History Was Disconnected For Too Long" Error Message
Now that we understand why the "Your File History was disconnected for too long"error occurs, you can take steps to fix it and restore your backup functionality.
Solution 1. Check and Reconnect the External Drive
One of the most common reasons for the "Your File History Was Disconnected For Too Long" error is that the backup drive has become disconnected, turned off, or is otherwise inaccessible. When Windows cannot detect the drive, it cannot continue backing up your files, which triggers the warning message.
- Ensure the external drive is properly plugged into your computer and powered on.
- Try connecting the drive to a different port to rule out USB port issues.
- If possible, use a different cable to eliminate cable problems.
Wait a few moments and then check if Windows recognizes the drive in File Explorer.
Solution 2. Verify Network Locations and Credentials
If your File History is stored on a network drive, connection issues or changed credentials can trigger the error. Make sure your computer is connected to the network where the backup location is stored. Check that you have the correct username and password to access the network drive.
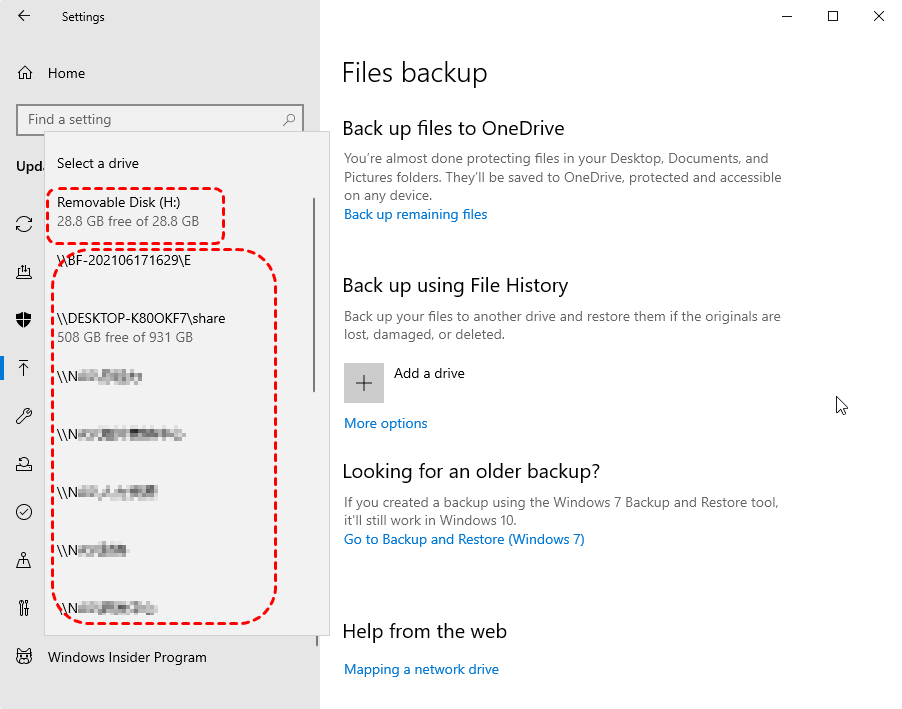
Try mapping the network drive again in Windows Explorer. Once the connection is stable, open File History settings and confirm the backup location is accessible.
Solution 3.Restore or Change the Drive Letter
Windows may fail to detect your backup drive if its assigned drive letter has changed, because File History relies on the original drive letter to locate the backup destination. When the letter changes, Windows treats it as a different drive, which can trigger the "Reconnect your drive. Your File History was disconnected for too long"error.
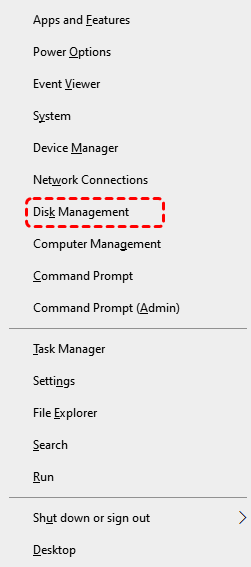
Step 1. Open Disk Management by right-clicking the "Win+X" simultaneouslyand selecting it.
Step 2. Locate your backup drive in the list of drives. Right-click the drive and select "Change Drive Letter and Paths".
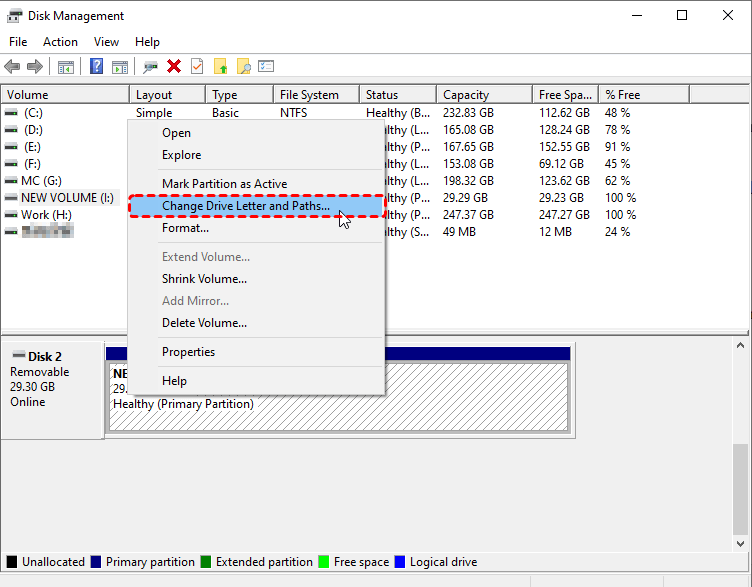
Step 3. Assign the original drive letter used by File History or choose a new one, then confirm the change.
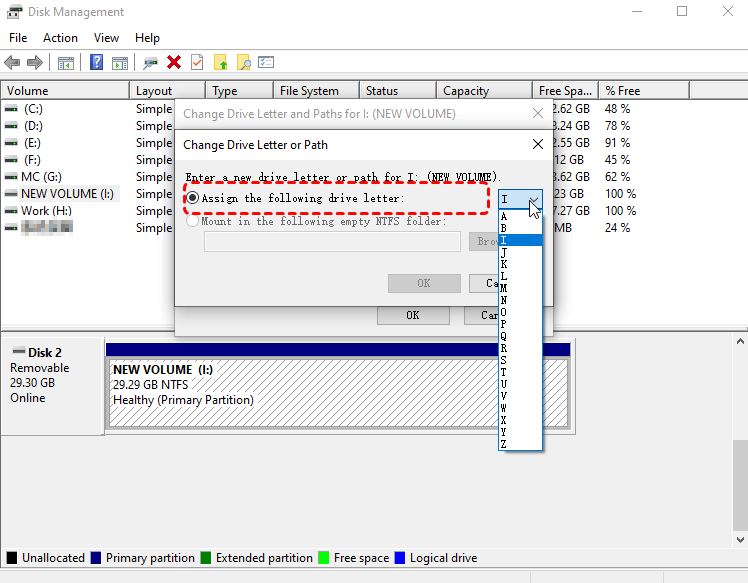
Check if File History recognizes the drive and resumes backup.
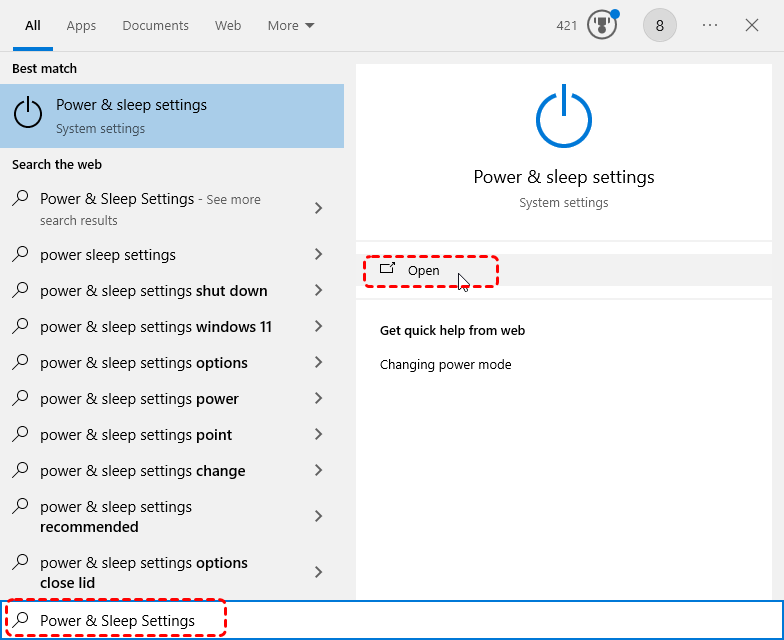
Solution 4. Adjust Sleep and Hibernation Settings
Extended sleep or hibernation can temporarily disconnect your backup drive, interrupting File History’s access and triggering the warning. When the drive is unavailable during these periods, Windows cannot continue scheduled backups, which may result in missed or delayed file versions.
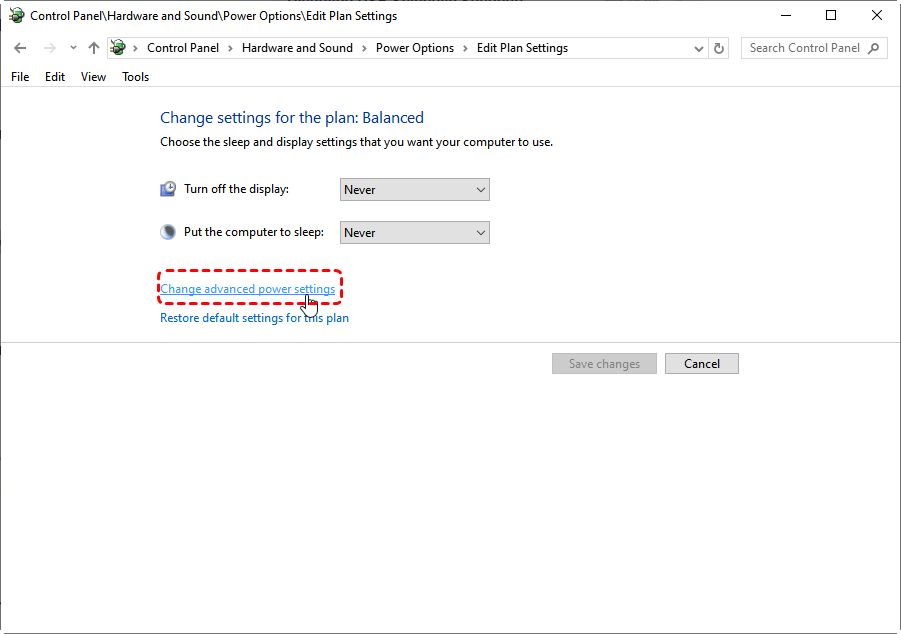
Step 1. Open "Power & Sleep Settings" from the Start menu.
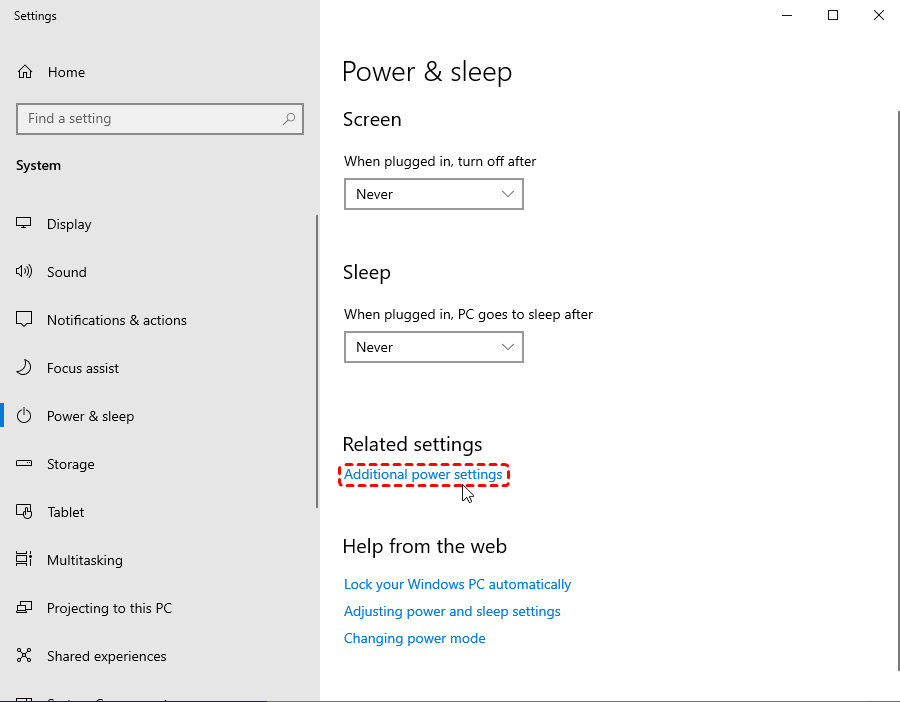
Step 2. Under the "Screen" and "Sleep" sections, adjust the timers to a longer duration or select "Never" if you want to temporarily disable sleep.

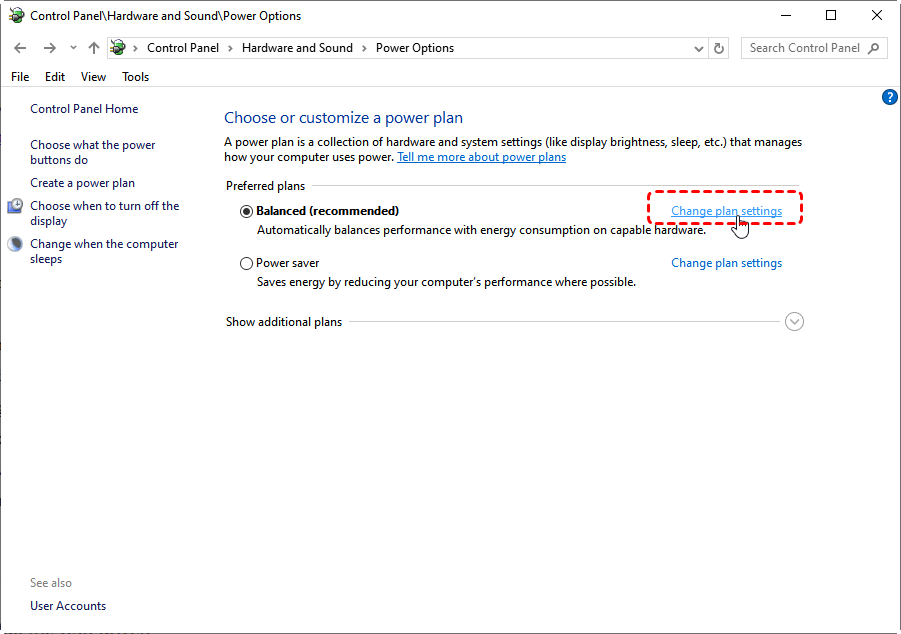
Step 3.In the Advanced power settings, click the "Change plan settings".
Step 4. Click on "Change advanced power settings".
Step 5. Expand "USB settings > USB selective suspend setting" and set it to "Disabled".
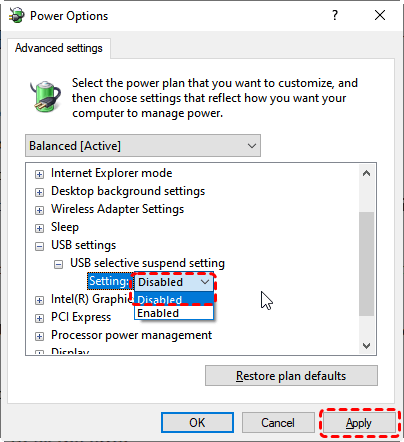
After adjusting the settings, reconnect the drive and verify that File History is functioning properly.
Solution 5. Repair Potential File System Error
File system errors on your backup drive can prevent Windows from accessing it properly, triggering the "Your File History was disconnected for too long" in Windows 11 or Windows 10. Repairing these errors can restore normal access and allow File History to function correctly.
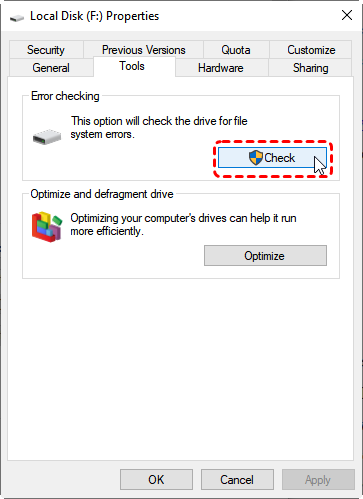
Step 1: Open File Explorer and navigate to This PC. Locate the external or network drive used for File History backups.
Step 2: Right-click the backup drive and select "Properties".
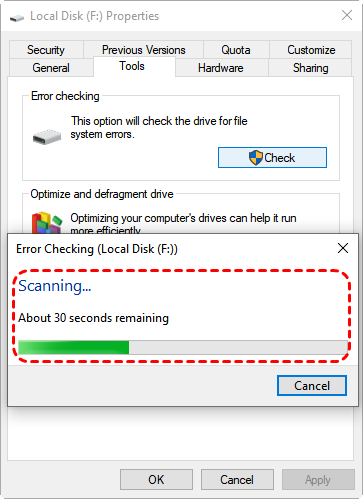
Step 3: Go to the Tools tab and click "Check" under the "Error checking" section. Windows will scan the drive for file system errors.
If Windows detects any errors, follow the on-screen prompts to repair them. You may need to restart your computer if prompted.
After the repair completes, reconnect the drive (if needed) and check File History settings. Confirm that the drive is recognized and that backups resume without errors.
Solution 6. Adjust Sleep and Hibernation Settings
Temporary corruption in system files or the File History configuration can prevent Windows from accessing your backup drive properly. To resolve this, you can reset File History and repair system files.
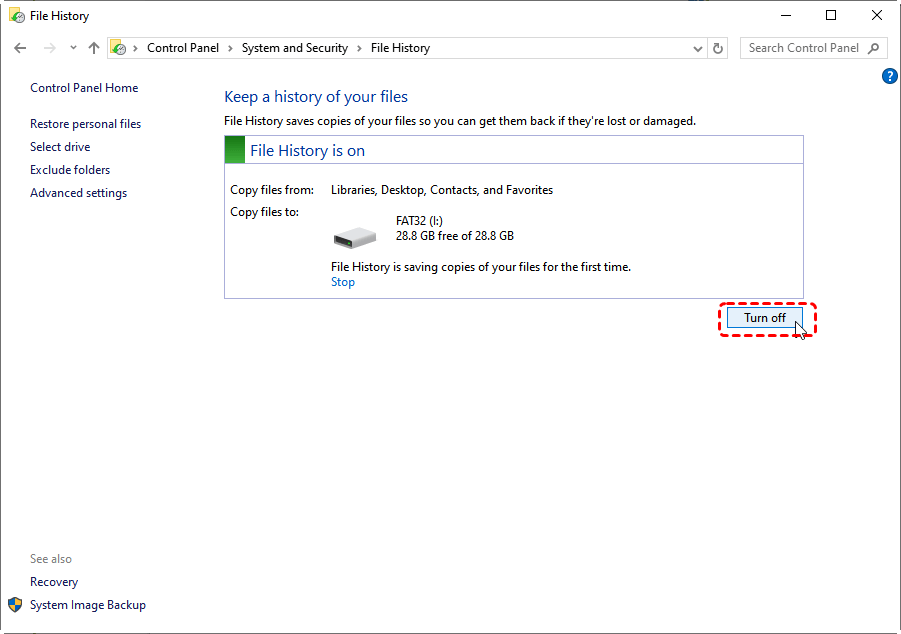
Step 1: Turn Off and Turn On File History
Open Control Panel and navigate to File History. Click "Turn off" to stop the current backup configuration. Wait a few moments, then click "Turn on" to restart File History. This resets the backup configuration and often fixes minor corruption issues.
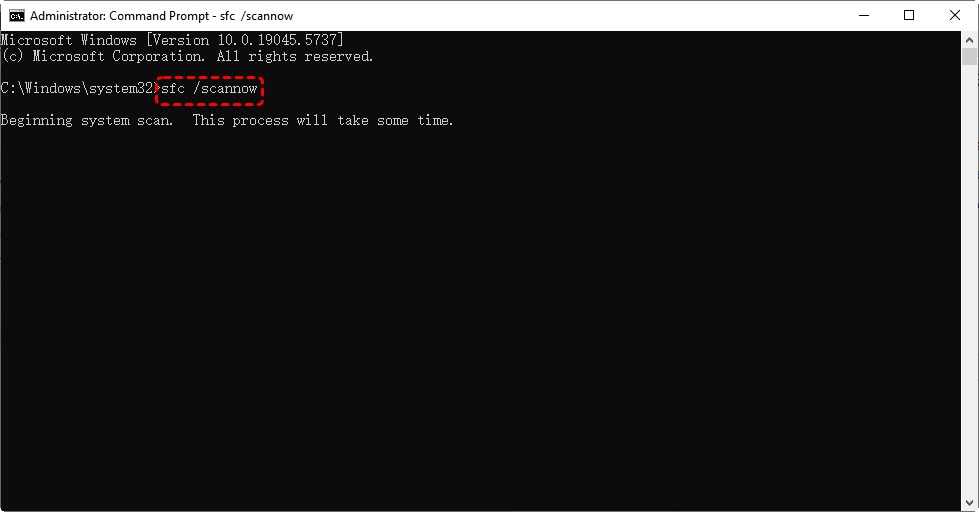
Step 2: Run System File Checker (SFC)
Open Command Prompt as an administrator. Type the command "sfc /scannow" and press Enter. This scans for and repairs corrupted Windows system files that may be affecting File History.
Step 3: Run DISM (if needed)
If SFC reports unfixable issues, run the following commands one by one in the Command Prompt:
DISM /Online /Cleanup-Image /CheckHealth
DISM /Online /Cleanup-Image /ScanHealth
DISM /Online /Cleanup-Image /RestoreHealth
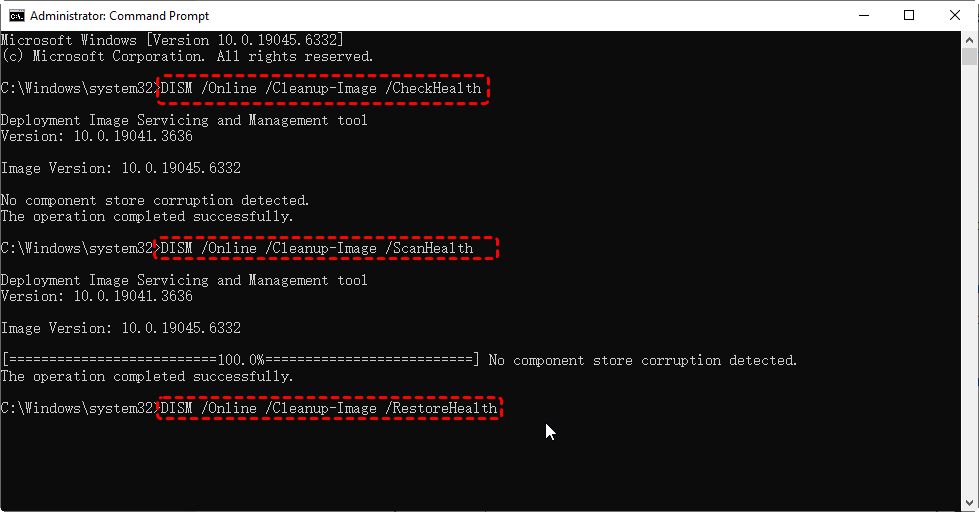
This will repair deeper system file corruption that SFC may not fix.
Step 4: Check File History Functionality
After resetting File History and repairing system files, reconnect your backup drive and open File History settings. Make sure the backup drive is recognized and that scheduled backups resume successfully.
Powerful Alternative to File History: Recover Data Without Backup
If you encounter repeated issues with File History, or if your backup drive is lost or corruptedand you cannot restore data from File History in Windows 10 or Windows 11, you don’t have to worry about losing your files. Instead, you can turn to MyRecover, a professional data recovery tool that allows you to restore deleted, lost, or inaccessible files directly from your Windows PC, external drives, without a prior backup.
Unlike File History, which relies on a connected backup drive, MyRecover scans the storage device itself to locate recoverable files, offering a reliable solution when traditional backup methods fail. With support for thousands of file types and hundreds of scenarios, it provides a simple and effective way to rescue your important data.

- ✨Quick & Deep Scanning – Perform fast scans for recently deleted files and deep scans for more complex recoveries.
- ✨Preview Before Recovery – Check recoverable files in advance to verify their integrity before restoring.
- ✨Wide Device Support – Compatible with 500+ devices, including SSDs, HDDs, USB flash drives, SD cards, and more.
- ✨Extensive File Format Support – Supports over 1,000 file formats, including PNG, MP4, MP3, TXT, ZIP, MSG, and many others.
- ✨Comprehensive Data Loss Coverage – Handles 500+ data loss scenarios, such as accidental deletion, formatting, power outages, and virus attacks.
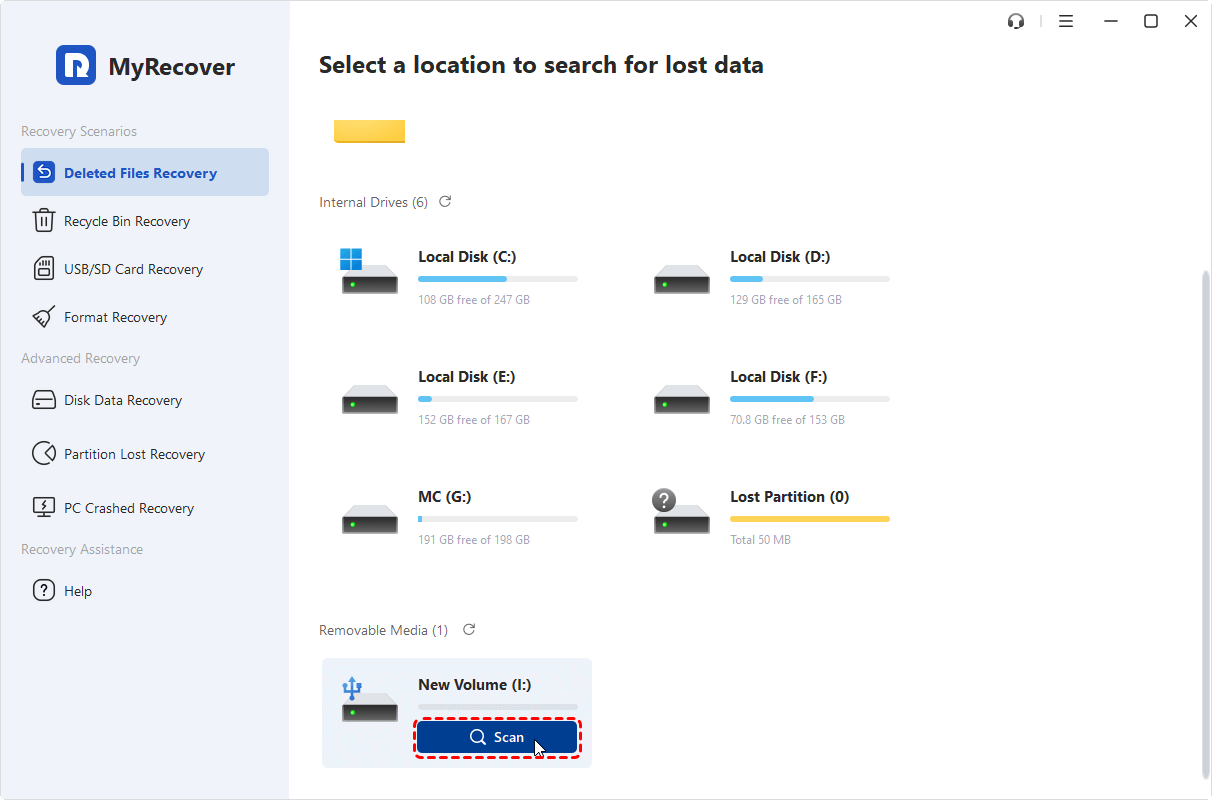
Step 1. Download, install, and launch MyRecover on your Windows computer.
Step 2. In the main interface, locate the drive where your lost or deleted files were stored. Hover on the driveandclick "Scan" to start the recovery process.
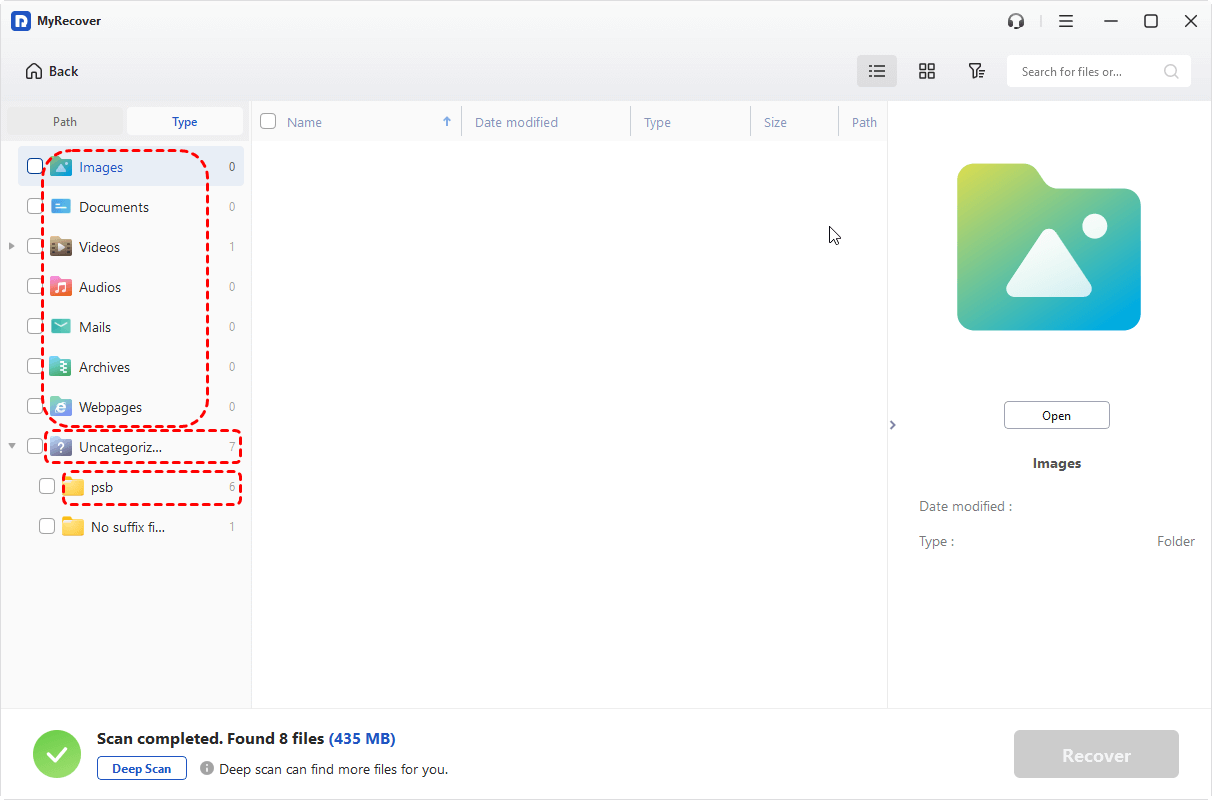
Step 3. Wait while MyRecover performs a quick scan or a deep scan to locate all recoverable files. Once the scan is complete, browse through the list of recoverable files. Use the search bar to locate specific items or apply file type filters to narrow down the results.
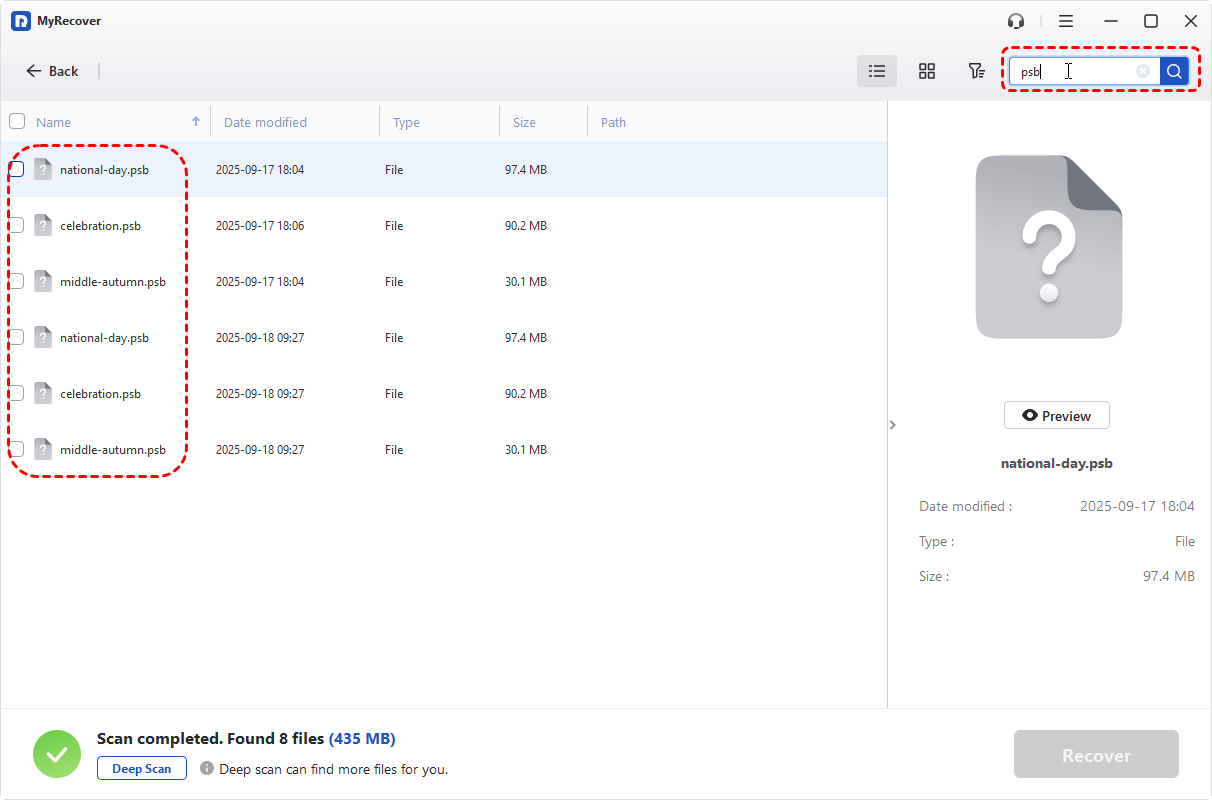
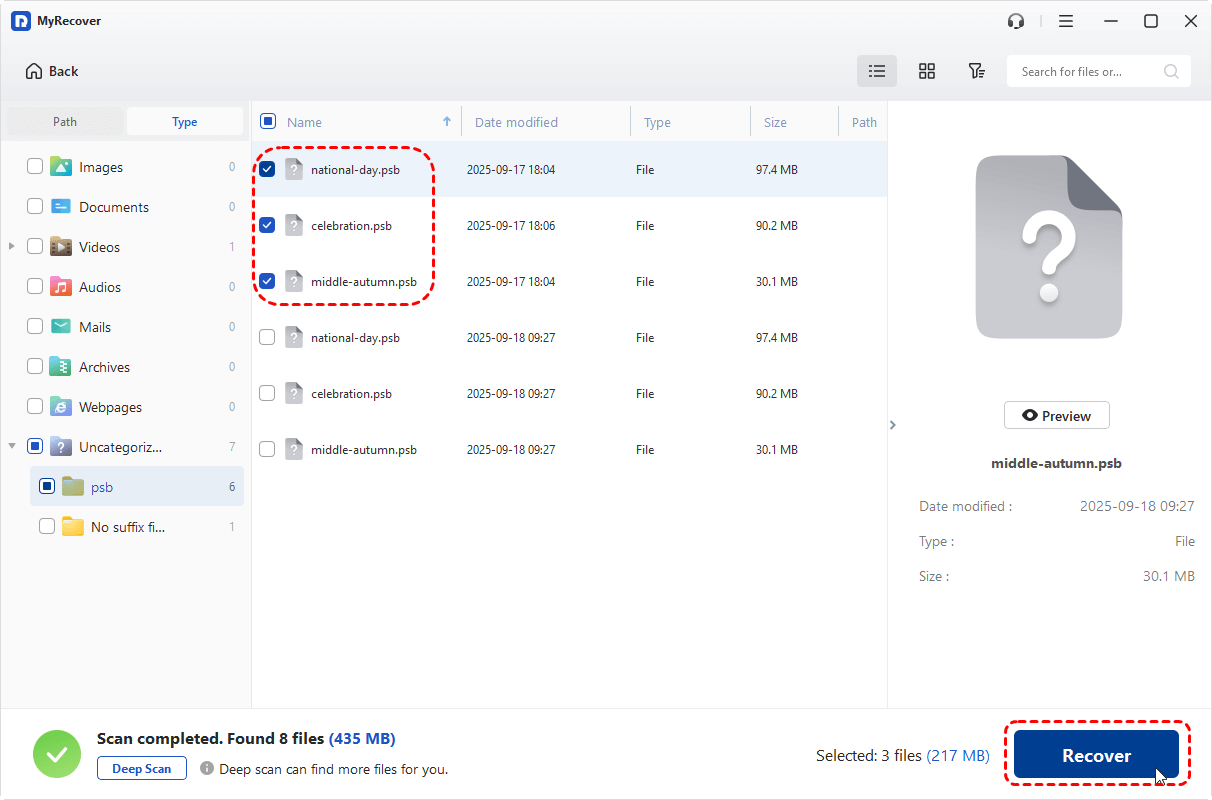
Step 4. Select the files you want to recover and click "Recover". Choose a safe location on another drive to save the restored files, avoiding overwriting the original data.
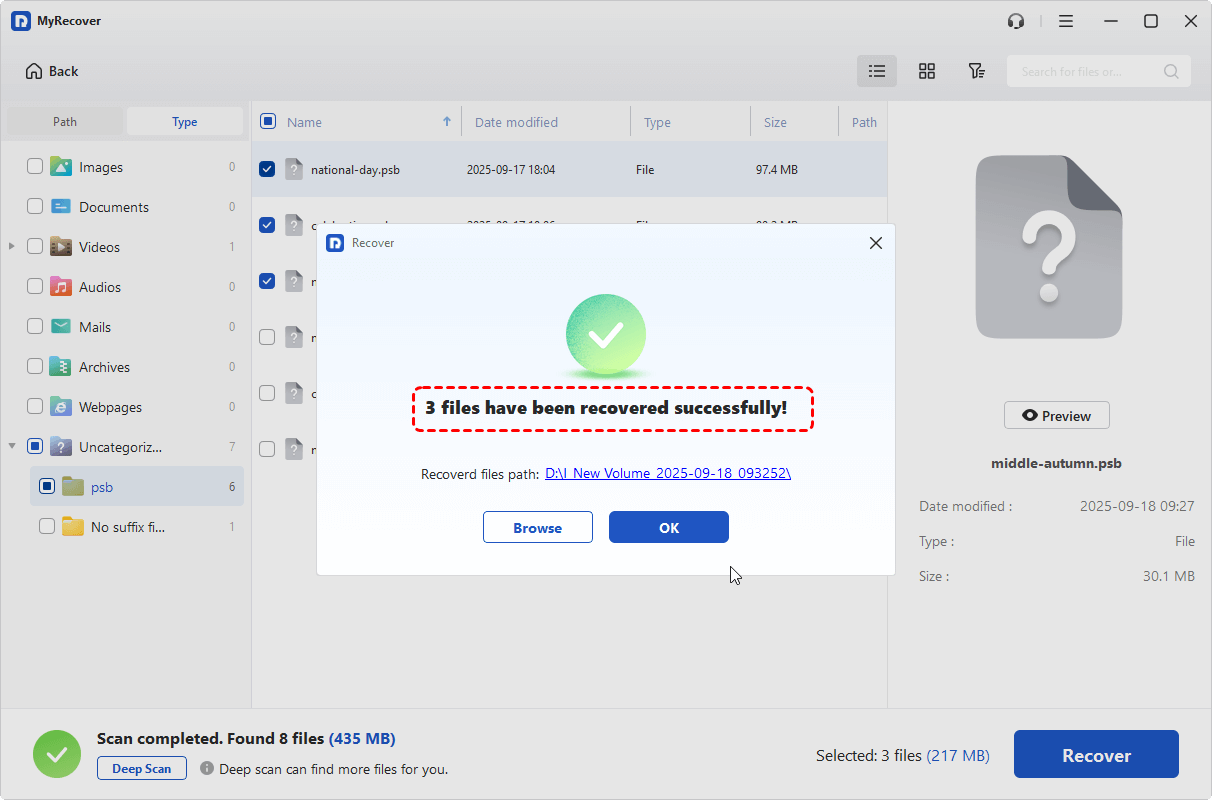
After recovery finishes, MyRecover will display a summary showing the total number of files recovered and the destination folder where they have been saved. You can now access your recovered files normally.
Bottom Line
After reading this article, you should now understand why the "Your File History was disconnected for too long" error keeps appearing in Windows 11 or Windows 10, as well as how to fix it using various methods. If none of these solutions work and your backup is lost, there is still a chance to recover your files.
This is where MyRecover comes in, a powerful data recovery tool that can restore over 1,000 file types across 500+ devices and handle 500+ different data loss scenarios, all without requiring a prior backup. It is also capable of recovering files from Ext4 drives, deleted partitions, inaccessible drives, corrupted disks, and more, providing a reliable solution when traditional backup methods fail.


Stay Updated With Our
Latest Tips
Add us as a preferred source on Google to never miss helpful guides.