
Fixed: Deleted Files from SD Card But Still Full on Windows / Mac
If you've deleted files or photos from your SD card but it still shows as full, you’re not alone. Many users encounter this issue where the SD card shows no files but is reported as full. In this guide, we’ll explore common reasons behind this problem, while providing solutions for both Windows and Mac users to recover space and fix the issue.
By Emma / Updated on December 11, 2025
Why Am I Deleting Files from SD Card but Storage Still Full?
It’s frustrating when you delete files from your SD card, but the storage space remains full. This common issue can occur for a variety of reasons, and understanding why it happens can help find the right solution.
1. Hidden Files and System Files
Even after you delete files, there may still be hidden or system files occupying space on your SD card. These files could include: thumbnails, cache files and metadata.
2. File System Corruption
File system errors or corruption can cause your SD card to misreport storage. This can happen if the card is removed improperly, or the system crashes while writing or deleting data.
3. Residual Data from Deleted Files
Some files might not be fully erased from the SD card, especially if the deletion process was interrupted or done incorrectly. This results in "phantom" data still occupying space, even if the files appear to be gone.
4. Large System or Backup Files
Sometimes, when files are deleted, the SD card’s storage still reports full because there are large backup or system files that weren’t visible. For instance, photos, videos, or other large files may have been backed up to hidden folders or system partitions.
5. Partitions and Multiple Storage Areas
In some cases, the SD card may have multiple partitions or storage areas. If you delete files from one partition, the storage indicator might still show as full if other partitions are in use.
6. SD Card Wear and Tear
SD cards have a limited lifespan, and over time, their performance can degrade. This wear and tear may cause your SD card to show inaccurate storage information, even after files are deleted.
How to Fix "Deleted Files from SD Card But Still Full" on Windows & Mac?
So, the "SD card still shows full after deleting files" or "SD card full but no files" issue could be due to hidden files, system errors, residual data, or even wear and tear. The good news is that with the right tools and techniques, you can recover lost space, fix errors, and get your SD card back to its original state.
Method 1. Show Hidden Files
Sometimes, deleted files may still be taking up space because they are hidden or system files that are not visible by default. Here's how to reveal hidden files:
On Windows:
Step 1. Open File Explorer and navigate to your SD card. Click on the "View" tab at the top of File Explorer.
Step 2. Check the box for "Hidden items" under the "Show/hide" group. This will display hidden files and folders on your SD card.
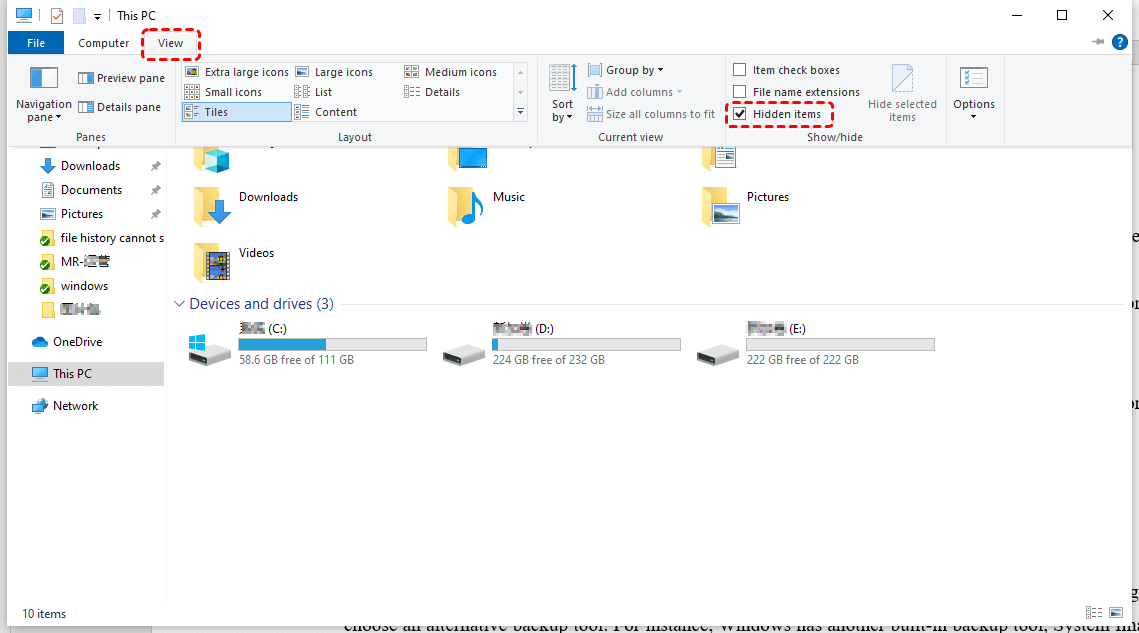
Look through the files and see if any hidden files are still taking up space. If you find any, you can delete them.
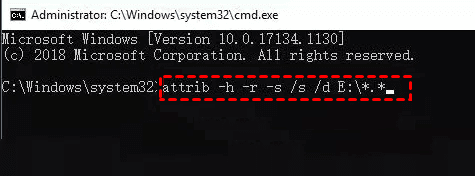
Alternatively, you can use the Command Prompt to remove hidden files: Search Command Prompt in the Start menu, right click the result and choose "Run as administrator".

Type attrib -h -s /s /d X:\*.* (replace X with your SD card drive letter) and press Enter.This will remove the hidden and system file attributes from all files on the SD card, making them visible.
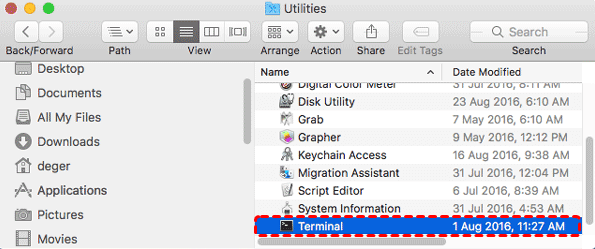
On Mac:
Step 1. Open Terminal (you can find it by searching in Spotlight or under Applications > Utilities).
Step 2. Type the command and press Enter: defaults write com.apple.finder AppleShowAllFiles YES
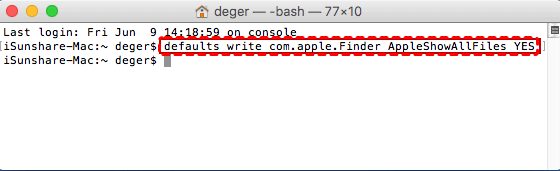
Step 3. This will show hidden files. Then, restart Finder by typing: killall Finder
Your hidden files should now be visible on the SD card. Go through them and delete any unnecessary or residual files.
Method 2. Remove Cache or Temporary Files
Temporary or cache files can accumulate on your SD card and take up unnecessary space. These files may not be visible in File Explorer or Finder, but they can still cause the SD card to appear full even if you have deleted all files from it. Follow these steps to remove them:
On Windows:
Step 1. Open File Explorer and navigate to your SD card. Right-click on the SD card and select "Properties".
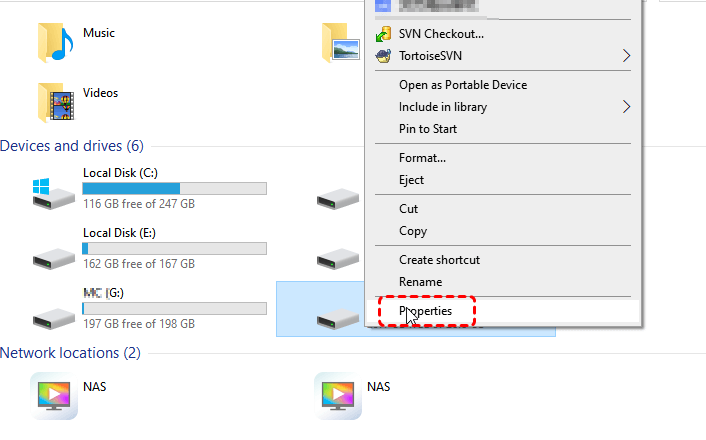
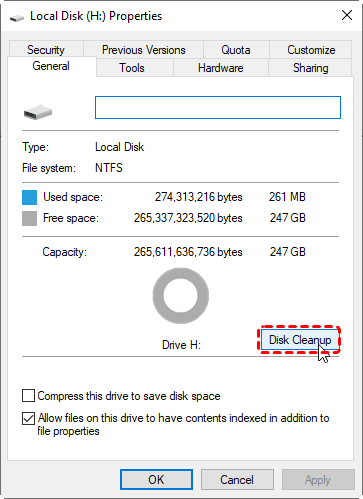
Step 2. Under the "General tab", click on the "Disk Cleanup" button.
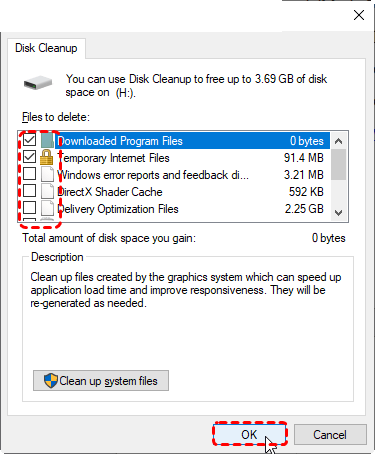
Step 3. This will open the Disk Cleanup utility, which will scan for files that can be safely deleted, including temporary files, system files, and cache files.
Step 4. Once the scan is complete, a list of file categories will appear. Check the box next to Temporary files, Thumbnails, and any other unnecessary files. Click "OK" to remove the selected files.
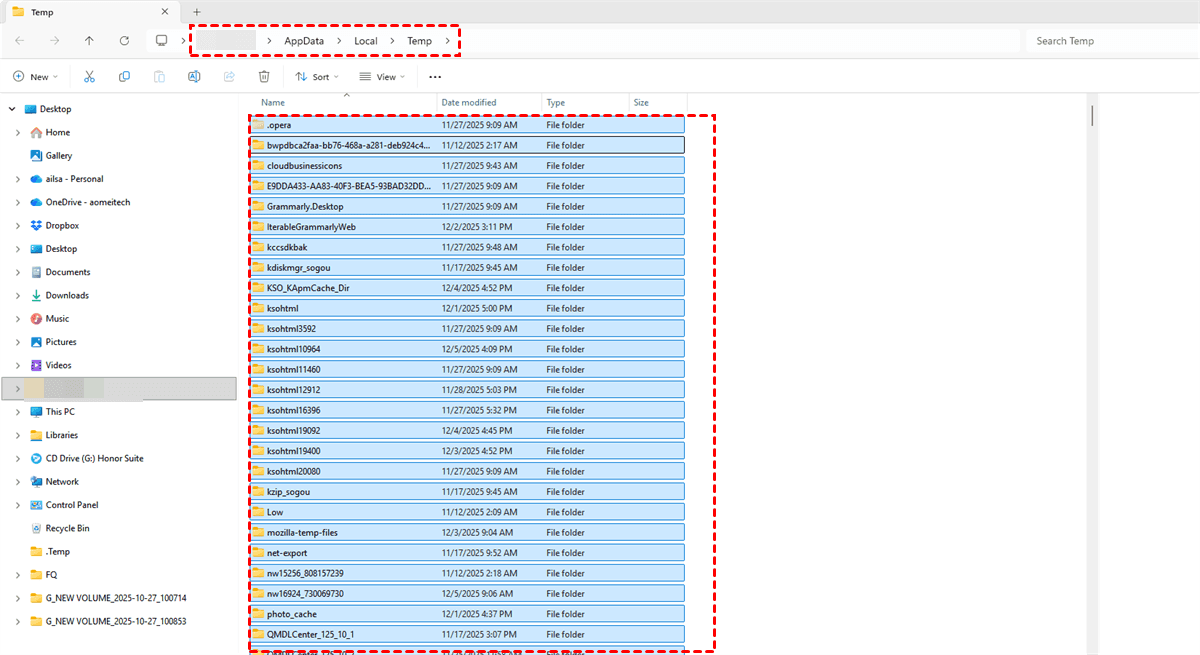
Additionally, you can manually search for temporary files and delete them: Press Win + R, type "%temp%", and press Enter. This will open the Temp folder.
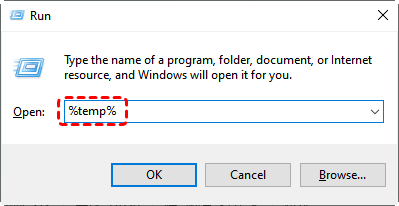
Select all files in the Temp folder and delete them. Be sure to double-check that none of the files are in use before deleting them.
On Mac:
Step 1. Open Finder and navigate to your SD card. Hit "Command+Shift+G" to bring up "Go To Folder".
Step 2. Type"~/Library/Caches" and click "Go".
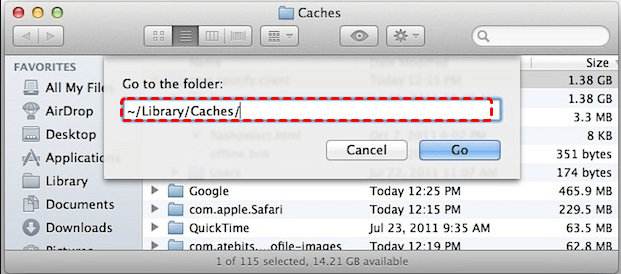
Step 3. This will open the folder containing system and application caches.
Delete any unnecessary or large cache files. Be cautious not to delete important system files, as doing so could affect system performance.
Method 3. Check and Fix File System Errors
If it is the file system errors that cause "deleted files from SD card but still full" issue, you can use the chkdsk tool on Windows or Disk Utility on Mac to check for and fix errors on your SD card.
On Windows:
Step 1. Open File Explorer and navigate to your SD card. Right-click on the SD card and select "Properties".
Step 2. Click on the Tools tab in the properties window. Under the "Error Checking" section, click on "Check".
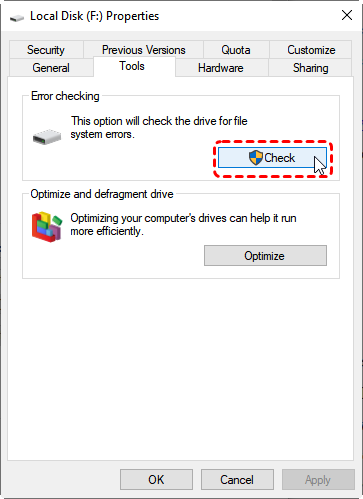
Windows will scan the SD card for errors. If any errors are found, you’ll be given the option to Fix the drive. Click Repair drive to start the repair process. Alternatively, you can also use the Command Prompt to fix file system errors: open Command Prompt as admin and type chkdsk X: /f /r (replace X with your SD card drive letter).

On Mac:
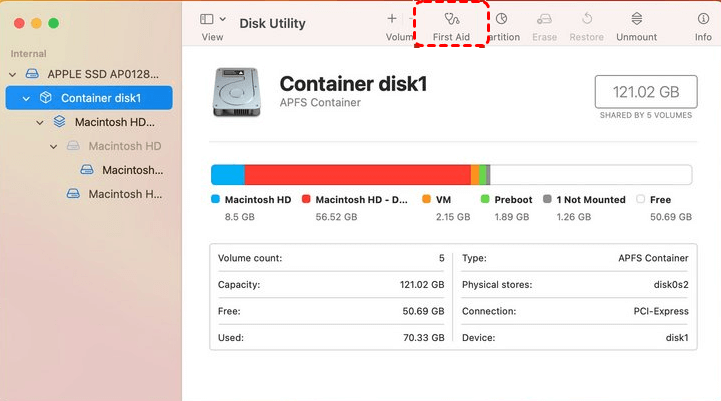
Step 1. Open Disk Utility, select your SD card from the list on the left.
Step 2. Click the "First Aid" button at the top of the window. This will check the SD card for any errors in the file system.
Step 3. After clicking First Aid, click "Run" to start the process. Disk Utility will scan the SD card for file system errors and attempt to repair any issues it finds.
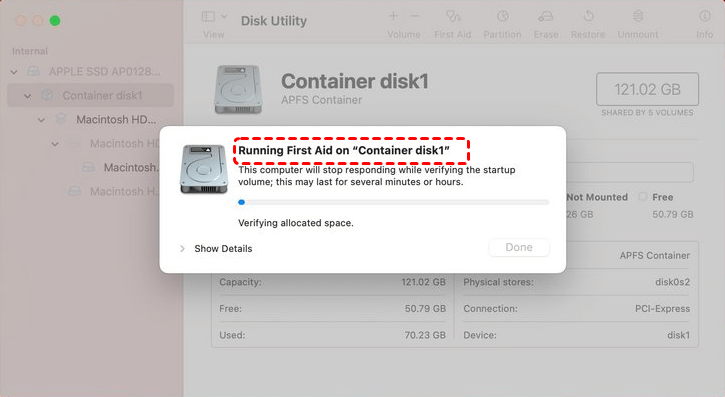
Once the process is complete, Restart your Mac and check if the SD card shows the correct free space.
Method 4. Format the SD Card
Formatting an SD card is a quick and effective way to clear any remaining files, fix issues, and restore the card to its original storage capacity. However, this will erase all data on the card, so make sure to back up any important files before proceeding.
On Windows:
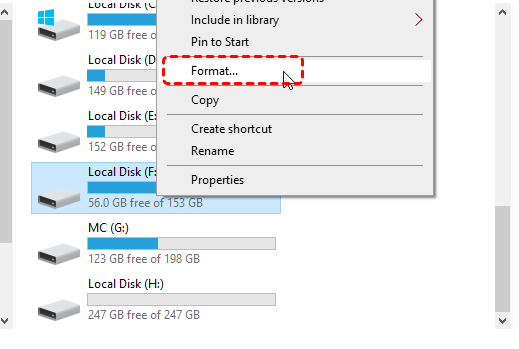
Step 1. Open File Explorer and locate your SD card under This PC. Right-click on the SD card and select "Format".
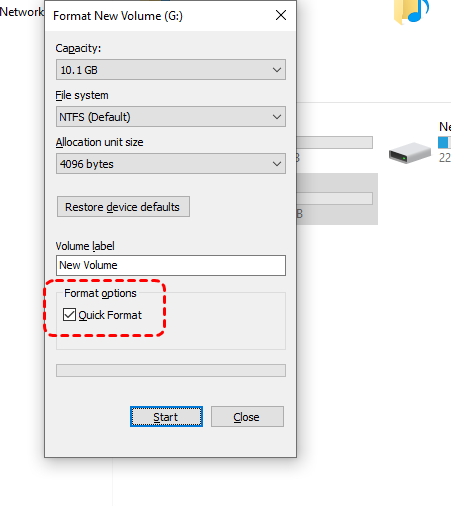
Step 2. In the Format window, make sure to adjust the following settings:
- File system: Select FAT32 (for SD cards 32GB or smaller) or exFAT (for SD cards larger than 32GB).
- Allocation unit size: Leave this as Default.
- Volume label: You can give your SD card a name (optional).
- Quick Format: If you want a faster format, check the "Quick Format" box. If you want a deeper scan for bad sectors, leave it unchecked to perform a full format (Quick format vs. Full format).
Step 3. Once you've configured the options, click "Start". A warning will pop up, letting you know that all data will be erased. Click "OK" to continue.
Wait for the formatting process to finish. Once complete, your SD card should be restored to its original storage capacity.
On Mac:
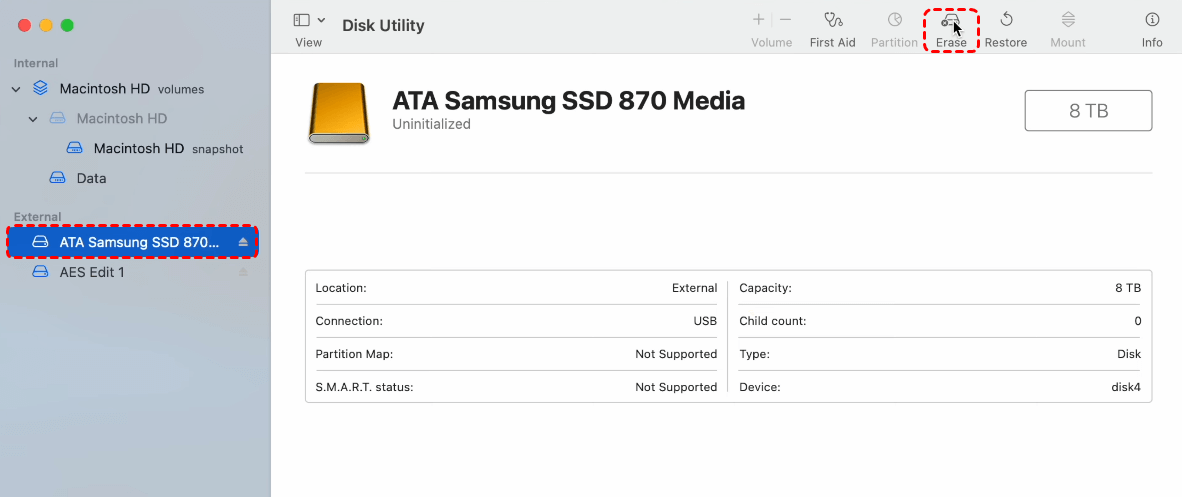
Step 1. Select your SD card from the left-hand column of Disk Utility.
Step 2. Click the "Erase" button at the top of the window.
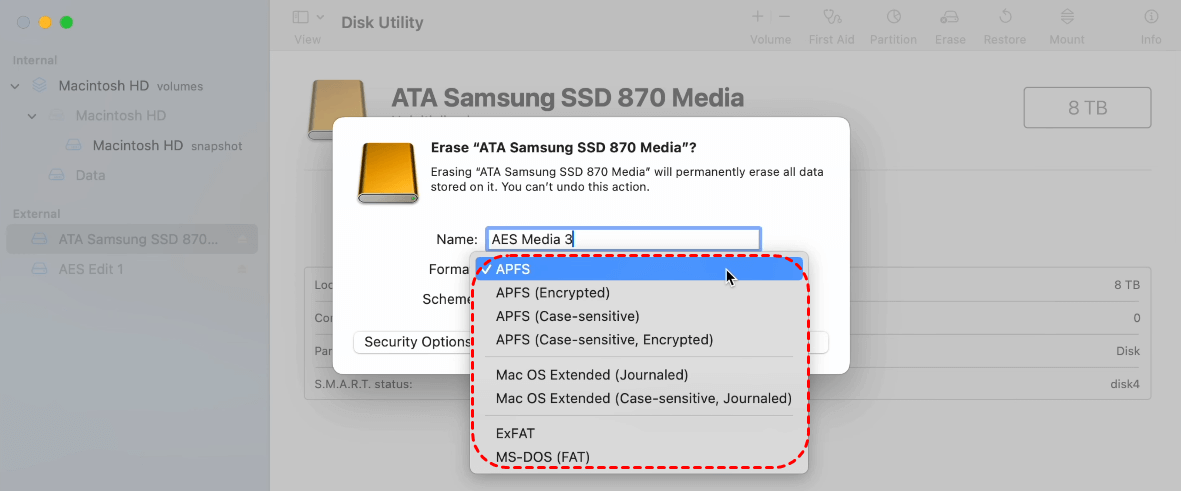
Step 3. In the Erase dialog box, configure the following options:
- Name: You can assign a name to the SD card (optional).
- Format: Choose exFAT (recommended for cards larger than 32GB) or MS-DOS (FAT) (for cards 32GB or smaller).
- Scheme: Select GUID Partition Map for compatibility with both macOS and Windows (unless you need a specific partition scheme).
Step 4. Click "Erase" to begin the formatting process.
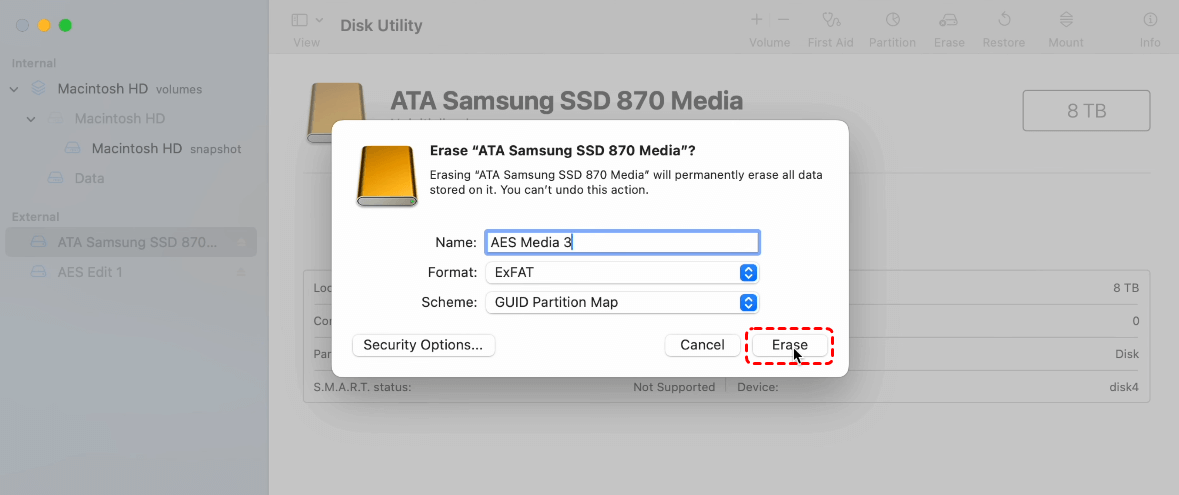
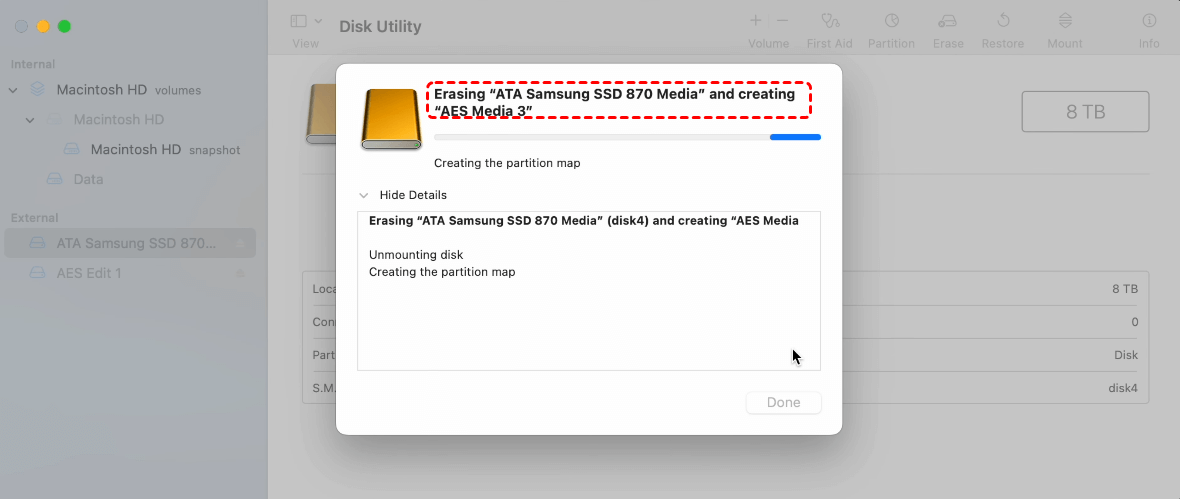
After the formatting process is complete, your SD card will be restored to its original size, and you can begin using it again.
Method 5. Delete All SD Card Partitions Completely
When an SD card has multiple partitions or a corrupted partition table, it can cause issues where space isn’t properly allocated or displayed. Deleting all partitions will completely remove any existing partitions and allow you to create a fresh, single partition on the SD card. This method is ideal for fixing deep partitioning or formatting issues.
On Windows:
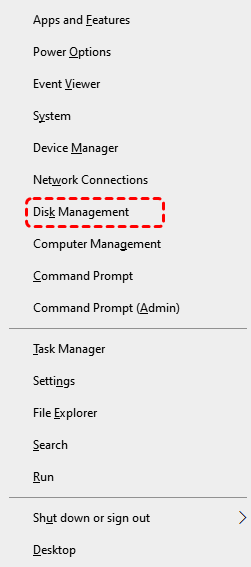
Step 1. Press "Win + X" and select "Disk Management"from the menu, or press "Win + R", type "diskmgmt.msc", and press Enter to open the Disk Management tool.
Step 2. In the Disk Management window, find your SD card under Volume or Disk. Be very careful to identify the correct disk because selecting the wrong disk can lead to data loss on your other drives.
Step 3. Right-click on each partition listed for your SD card and select "Delete Volume". Confirm the deletion by clicking "Yes" in the prompt that appears.
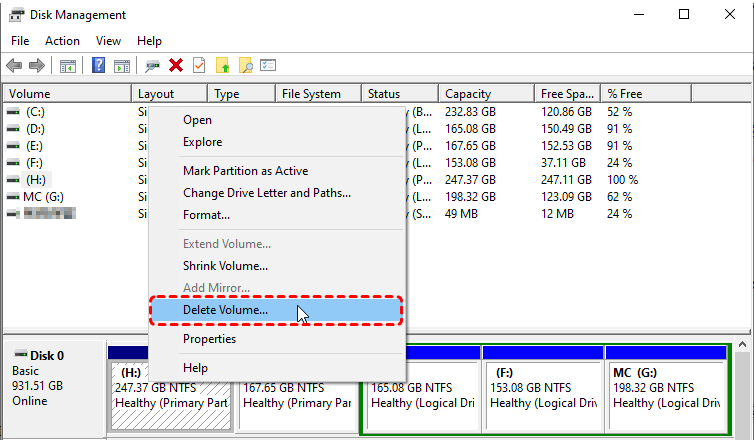
Repeat this process for each partition on the SD card until there are no partitions listed for it. This will leave the SD card as Unallocated space.
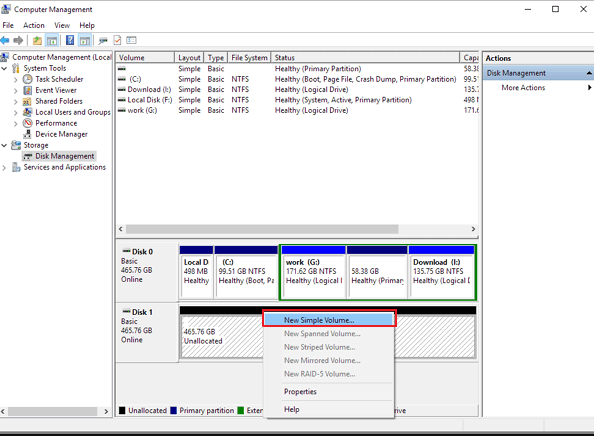
After deleting the partitions, right-click on the Unallocated space and choose "New Simple Volume". Follow the New Simple Volume Wizard to create a single new partition.
Once the process is complete, go to File Explorer and check if the SD card shows the correct available space.
On Mac:
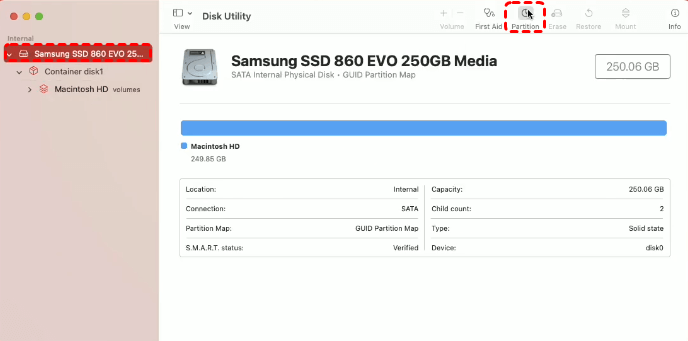
Step 1. Open Disk Utility, andselectyour SD card in the left-hand column.
Step 2. Click the "Partition" button at the top of the window.
Step 3. In the partition layout section, select each partition on the SD card and click the minus (-) button to delete them.You should be left with 1 unallocated partition.

Once all partitions have been deleted, select the Unallocated space and click the "Apply" button to create a new partition.
(Optional) Recover Data After Fixing "Deleted Files from SD Card But Still Full" Issue
If you accidentally deleted important files while troubleshooting "SD card says full but nothing on it"—or if the SD card was formatted, repartitioned, or repaired—there is still a chance to recover your lost data. As long as the deleted data has not been overwritten, you can use data recovery software to restore photos, videos, documents, and more.
On Windows
For recovering data from SD card on Windows operating systems, the most convenient way is to make use of MyRecover, a professional and powerful Windows data recovery tool. Whether your SD card was deleted, formatted, corrupted, inaccessible, or infected by a virus, MyRecover can scan it thoroughly and retrieve lost files with ease.

- 🌟Recover Without Backup: Restore lost files even if no Windows backup exists.
- 🌟Supports all data loss scenarios: accidental deletion, formatting, virus attack, corruption, RAW file system, partition loss, etc.
- 🌟Two scanning modes: Quick Scan + Deep Scan to find as many files as possible.
- 🌟Compatible with all SD cards: SanDisk, Samsung, Lexar, Kingston, Transcend, etc.
- 🌟Restores 1000+ file types, including JPG, PNG, MP4, MOV, DOCX, PDF, ZIP, and more.
Step 1. Install the software on your computer, not the SD card, to avoid overwriting data. Launch MyRecover, locate your SD card from the drive list andclick "Scan".
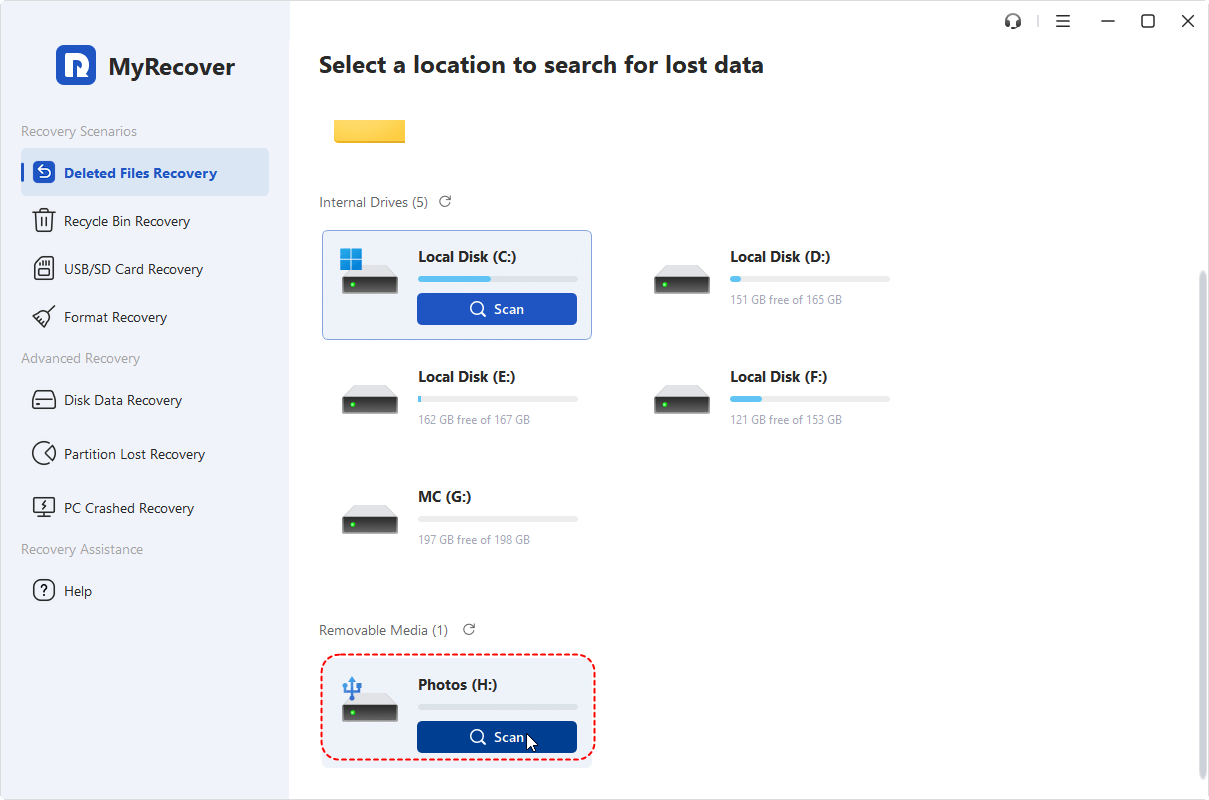
Step 2. MyRecover will scan the SD card and search for all recoverable files. Once done, you can select and preview files.
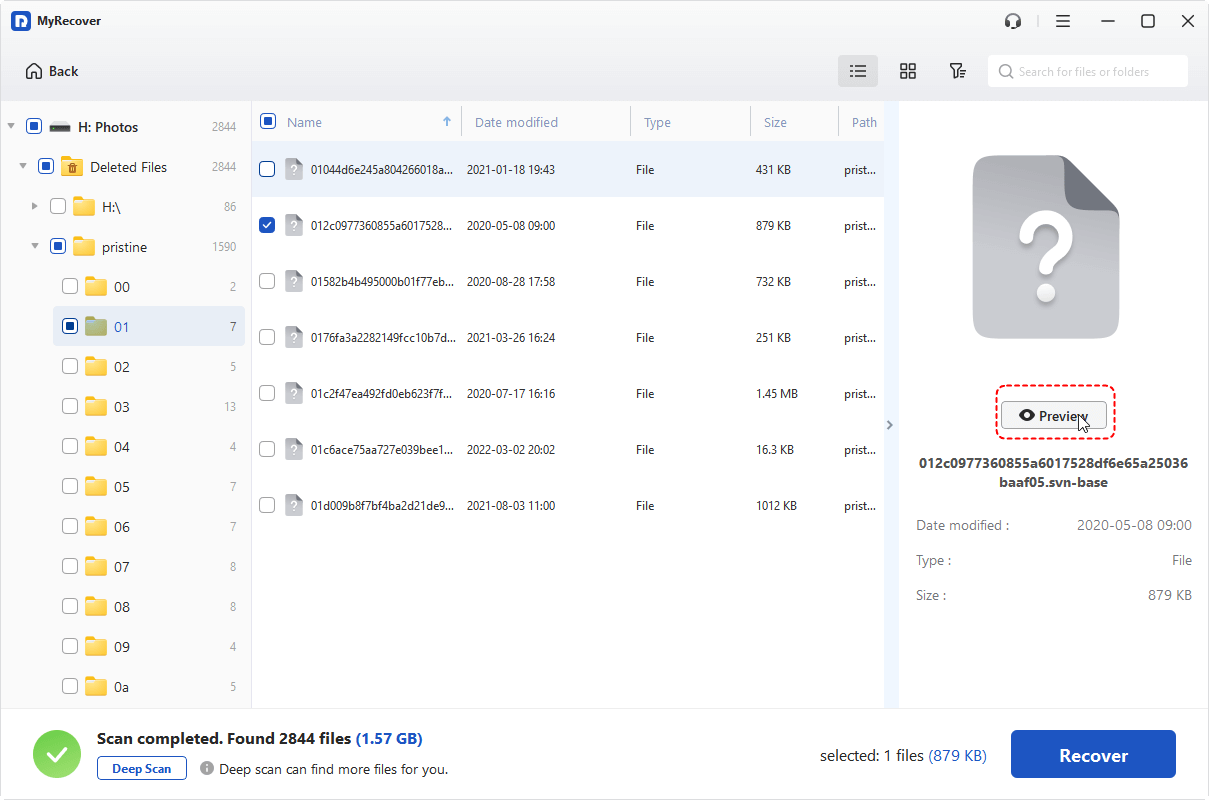
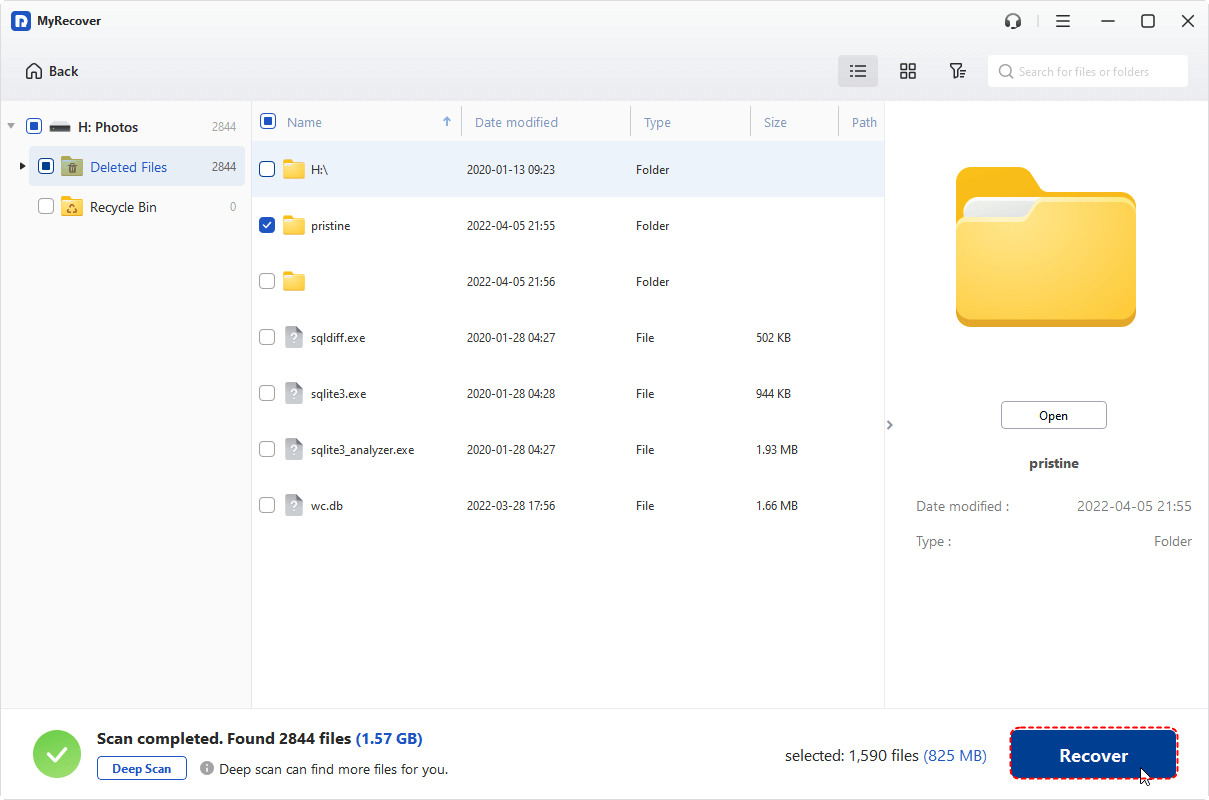
Step 3. Select the photos, videos, documents or other files you want to restore. Click "Recover" button.
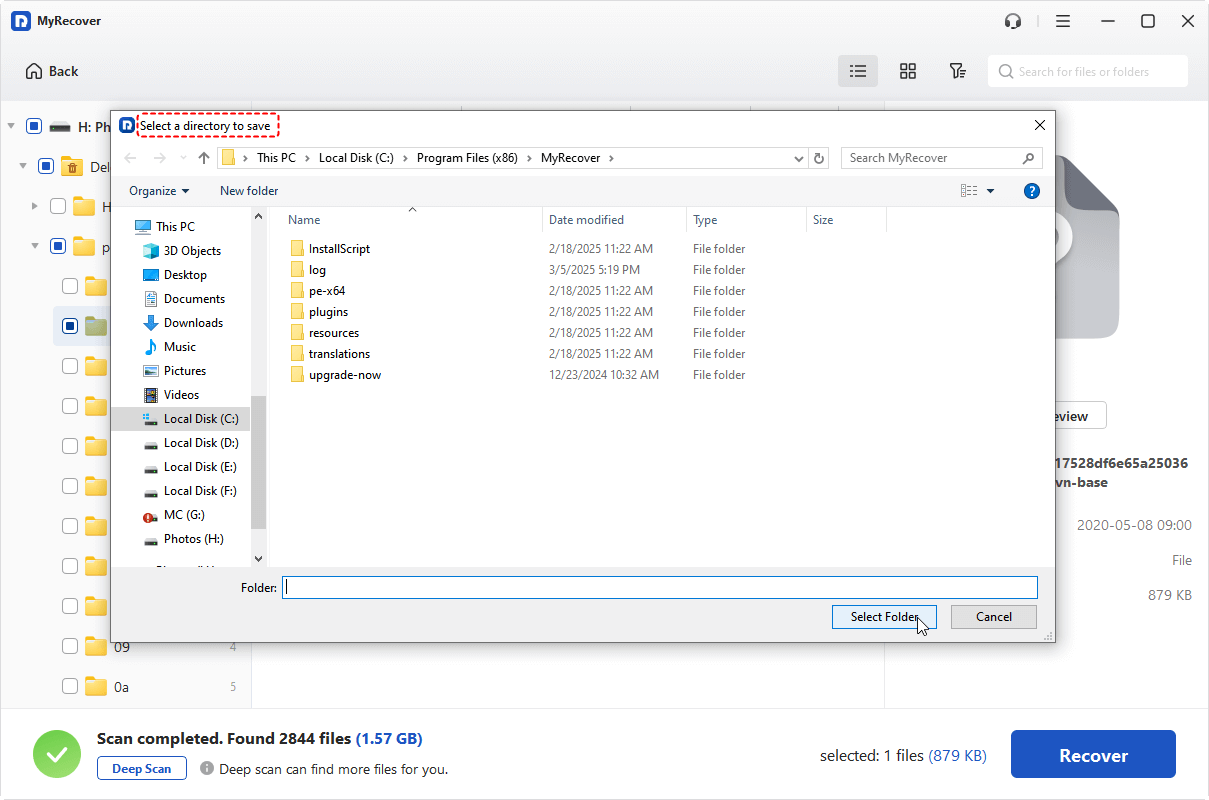
Step 4. Save them to a safe location on your PC, not back on the SD card.
On Mac
To recover files on Mac computers, you can use various third-party data recovery tools, or opt for PhotoRec, a powerful open-source recovery utility.
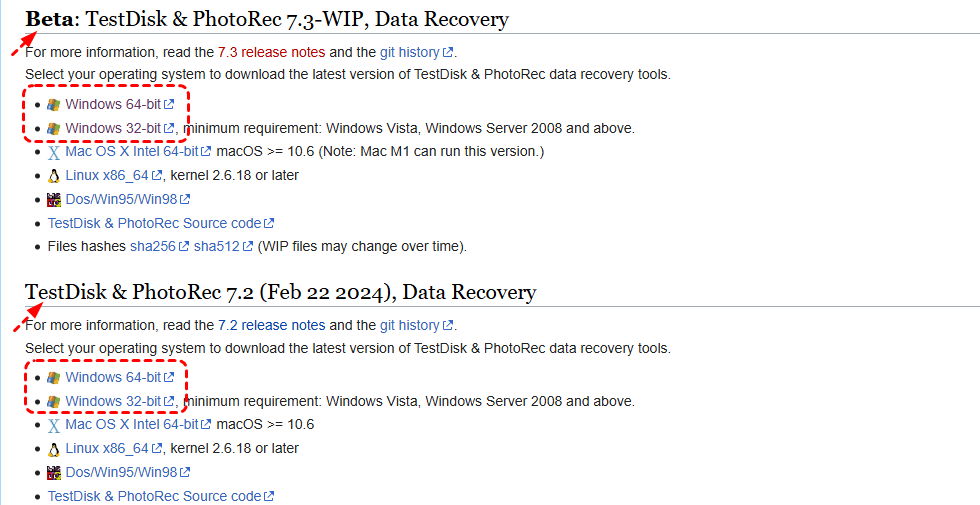
Step 1: Download and extract PhotoRec from the official TestDisk website, then connect your SD card to your Mac.
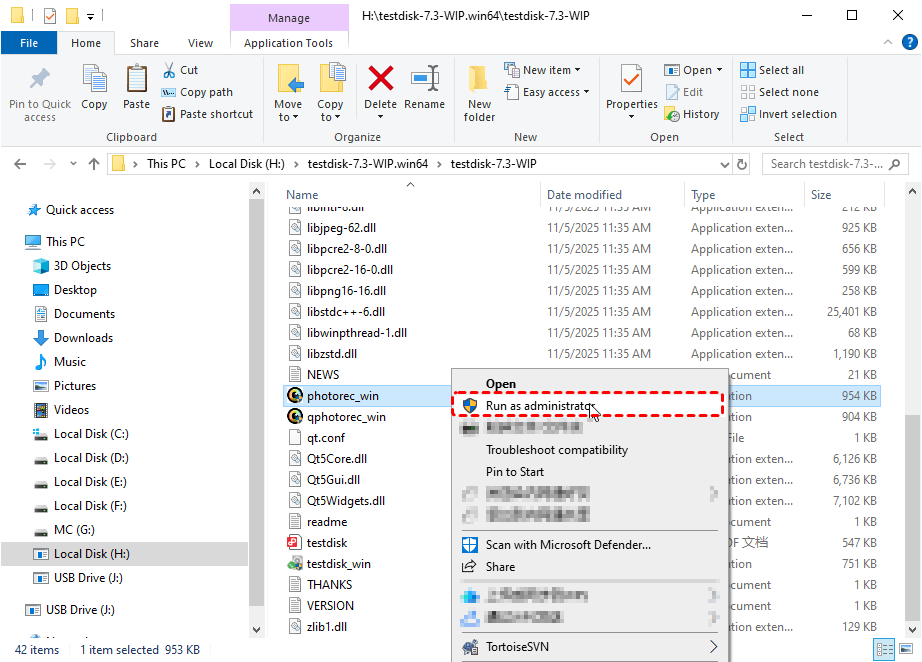
Step 2: Open the PhotoRec executable from the extracted folder to launch it in Terminal.
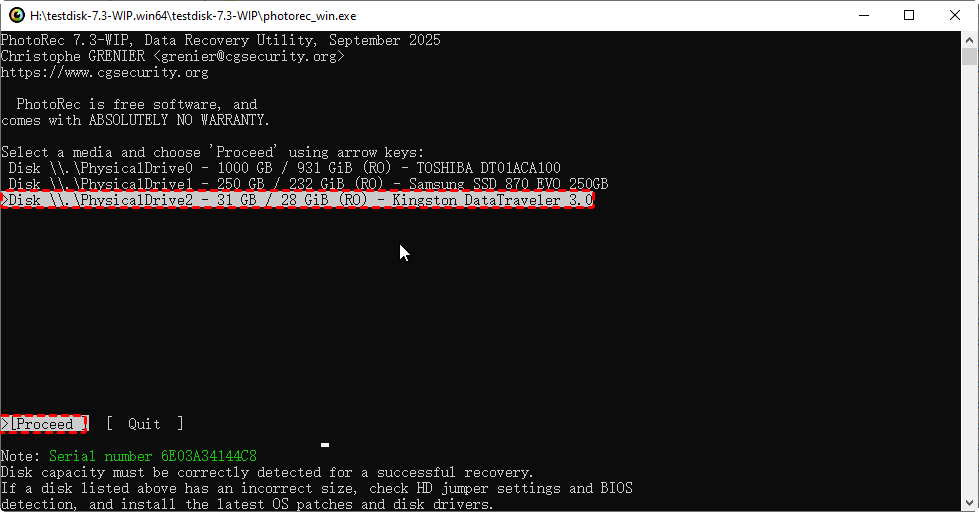
Step 3: Select your SD card from the device list and choose to scan the whole disk for better recovery results.
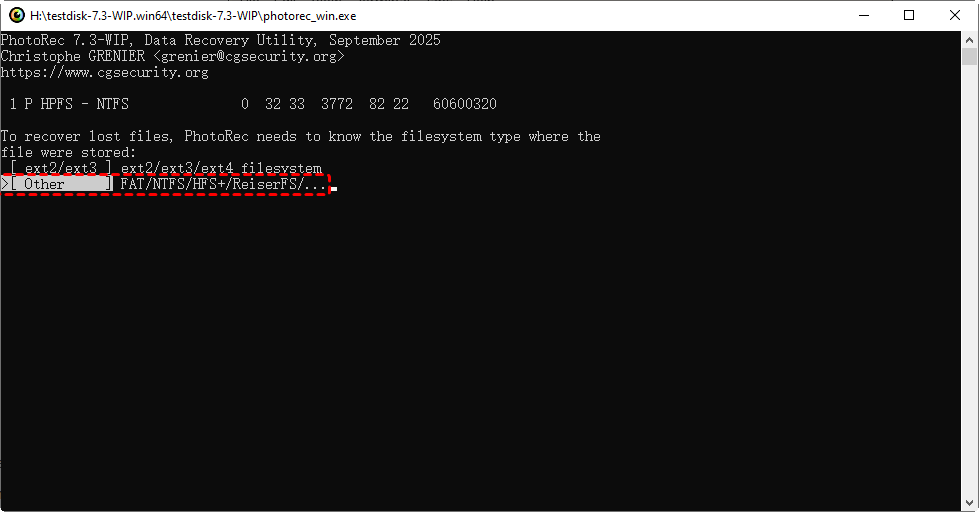
Step 4: When prompted for the filesystem type, choose "Other," which works for FAT/exFAT SD cards.
Step 5: Select a folder on your Mac (not the SD card) to save recovered files, then press C to start scanning.

Step 6: Wait for the recovery process to complete; all recoverable files will be saved to the selected folder.

To Conclude
Are you experiencing an SD card that appears full even after deleting filesor photos? Then follow the methods outlined to restore your SD card’s full capacity. Additionally, if important files were lost during the "deleted files from SD card but still full" troubleshooting process, reliable recovery tools like MyRecover or PhotoRec provide a safe way to retrieve permanently deleted data.


Stay Updated With Our
Latest Tips
Add us as a preferred source on Google to never miss helpful guides.