
Diskpart Clean vs. Clean All: Which Command Securely Erases Your Drive?
This guide explains diskpart clean vs clean all, detailing what each command does to your storage drive. We cover the critical security difference, when to use each, and crucially, how long does diskpart clean all take for a complete sanitization?
By Delores / Updated on December 19, 2025
DiskPart Clean vs. Clean all
Clean vs Clean all in DiskPart
I just wanted to delete the MBR and repartition the HDD, that's why I want to use DiskPart to do this.
So, which one to choose? I know that "clean all" writes zero to the entire drive, but it takes too much time. Then what does the "clean" command do? IS it the same as manually deleting all the drives and re-partitioning, or does it write zero to a little space on the drive?
I searched a lot about clean and clean all commands. I understand what clean all does to the drive, but I don't understand what the clean command does. So I came to this place to ask it my way.
- Question from forums.tomshardware.com
If you’ve ever found yourself knee-deep in Windows troubleshooting, prepping a new drive, or—more critically—trying to ensure your old data is truly gone for good, you’ve likely stumbled upon the DiskPart utility. It’s a powerful, no-nonsense tool that gets the job done, but it can also be a bit of a minefield if you don’t know what you’re doing.
There might be a problem while using the diskpart command: clean, or clean all. Picking the wrong one isn’t just a minor oopsie; it can be the difference between a quick format and permanently deleting your sensitive files.
This guide will walk you through exactly what happens when you issue each command, breaking down the Windows DiskPart clean vs clean all conundrum into plain English. We’ll explore what diskpart clean all does that makes it so secure, demystify how long diskpart clean all takes, and provide clear guidance on when you should use diskpart clean or clean all. By the end, you’ll be equipped to make an informed choice, ensuring your data management is both effective and secure.
What Does the Diskpart Clean Command Do?
When you use the DiskPart clean command, it doesn’t touch your actual data—the photos, documents, and videos sitting in the ones and zeros on the platters or memory cells. What it does is completely obliterate the drive’s partition table and any file system information (all partitions or volume formatting). The operating system has no idea how to find it. The drive appears as completely unallocated, raw space.
If you want to open a disk that shows unallocated, you might encounter errors like “You need to format the disk in the drive H: before you use it", or "Location is not available. H:\ is not accessible. The volume does not contain a recognized file system. Please make sure that all required file system drivers are loaded and that the volume is not corrupted", etc. Then you can use DiskPart Create Partition Primary to create a partition on it. Then format the disk. Also, you can right-click the disk in Disk Management, then tap New Simple Volume, and format it.
This command is incredibly fast, often taking just a second or two. It’s your go-to tool when you want to wipe the slate clean to install a fresh operating system, combine partitions, or resolve serious disk errors. It’s a logical cleanup, not a physical one. Because the original data remains, it’s potentially recoverable with specialized file recovery software. So, while clean is perfect for a quick repurposing of a drive you’re keeping, it’s a terrible choice if privacy is a concern.
What Does Diskpart Clean All Do?
What does DiskPart clean all do? This command performs the same logical cleanup as clean, but then it goes several steps further. It writes zeros on every single sector of the drive. Every bit of data—every forgotten tax document, every old email, every photo—is systematically overwritten with zeros.
The result is a drive that is not just logically empty, but physically scrubbed. Common file recovery software is rendered useless because there’s no latent magnetic signature or residual charge to detect; it’s all just zeros.
This is the command you use when the drive is leaving your possession—being sold, donated, or recycled. It’s the only way to be reasonably certain your personal information can’t be resurrected by the next owner. Of course, this thoroughness comes at a cost: time. "How long does DiskPart clean all take?" is a common and very practical question, which we’ll delve into with specifics later.
Key Difference Between Diskpart Clean and Clean All
Let's look at the real difference between diskpart clean vs clean all. It all comes down to leftover data. This is the residual physical representation of data that remains after a deletion or format.
The clean command does nothing about this leftover data. It's a quick reset. It just tells the computer the drive is empty, but the old files can often be recovered with the right software.
The clean all command is made to destroy this leftover data. It writes over every part of the drive with blank information, making the old files completely unrecoverable.
So, your choice in the DiskPart clean or clean all decision is simple: speed versus safety.
- Use clean for quick fixes on a drive you will keep.
- Use clean all when you are selling, recycling, or giving away a drive. It is the only safe choice for protecting your old information.
When Should You Use Diskpart Clean or Clean All
Navigating the Windows DiskPart clean vs clean all decision is easier once you have clear scenarios in mind. Let’s break down the practical applications for each.
Choose Clean for Basic Drive Preparation
Use the clean command when you need a fast, logical wipe. Classic examples include wiping a drive before a clean Windows installation, clearing up partition errors that Disk Management can’t fix, or removing OEM recovery partitions to claim all the space for yourself. It’s also perfectly fine for preparing a brand-new drive that has never held your data.
The key here is that you are the one who will continue to use the drive afterward. You’re not concerned about someone else recovering the old data because you’re simply reorganizing it for your own continued use.
Opt for Clean All for Secure Data Sanitization
This is the command for departure. Always, without exception, use Clean All when you are selling, donating, returning (like an RMA), or discarding a drive or computer. Corporate asset disposal needs to prevent data breaches. If the drive contained sensitive personal, financial, or business information, Clean all is your fiduciary duty.
Even if you’re just a privacy-conscious individual, using it on an old laptop before giving it to a family member is a wise and responsible habit. The peace of mind is worth the wait.
How to Use DiskPart Clean or Clean All?
Let’s walk through how you’d actually perform these operations. The initial steps are identical for both, highlighting the crucial moment where you must choose your path.
Part 1. Step-by-Step Guide for the Clean Command
1. First, open an Administrator Command Prompt.
2. Type diskpart and hit Enter.
3. Then, type list disk to see all connected drives. This is the most critical step—identify the correct disk number! Selecting the wrong disk will lead to catastrophic data loss.
4. Once sure, type select disk X (replace X with your disk number). Confirm you have the right disk with "detail disk".
5. Finally, type the command clean.
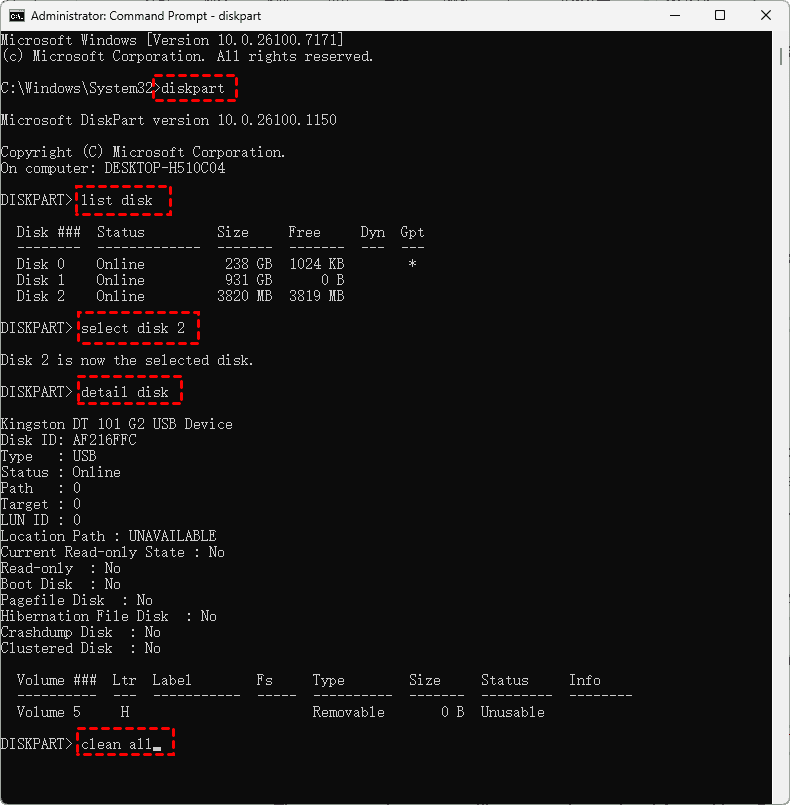
You’ll see a success message in seconds. The drive is now raw space. You can exit Diskpart and use Disk Management to initialize it and create new partitions.
Part 2. Step-by-Step Guide for the Clean All Command
The process starts the same: Admin Command Prompt, diskpart, list disk, select disk X with extreme caution. This is where the paths diverge. Instead of clean, you type clean all. And then you wait.
The command prompt will seem to hang, but it’s working. Do not interrupt this process. It will run until completion, at which point it will report success. The drive is now not just logically clean, but securely sanitized.
How Long Does Diskpart Clean All Take?
How long does DiskPart clean all take? The answer is not simple, because the time needed depends on two main things: your drive's total size and whether it's an HDD or an SSD.
What Affects the "Clean All" Duration?
- For HDDs (Hard Disk Drives): Time depends on the drive's size and its physical write speed. A full wipe is a slow, physical process. A bigger drive means more time. The connection type (like SATA) matters less than the drive's own internal speed.
- For SSDs (Solid State Drives): The process is different. Most new SSDs have a fast, built-in erase command, but DiskPart's clean all doesn't use it. Instead, it does a slower manual overwrite, which can sometimes take even longer than on an HDD. The age and health of the SSD also change the speed.
Rough Time Estimates for HDDs and SSDs
As a general guide, you can expect:
- 500GB HDD: 1 to 3 hours
- 1TB HDD: 2 to 6 hours
- 2TB HDD: 4 to 12 hours or more
- SSDs: Times vary widely but are often similar to, or longer than, the times for an HDD of the same size.
Always start the clean all command when you won't need your computer for many hours—overnight is best. Most importantly, never stop the process once it has begun.
FAQs on Diskpart Sanitization
Q: Can data be recovered after a Diskpart clean command?
A: Yes. The clean command only erases the drive's index, not the actual files. The old data remains until new files overwrite it, so recovery software can often restore it. This is why clean is not safe for drive disposal.
Q: Is Diskpart's "clean all" enough to stop forensic data recovery?
A: For almost all users, yes. A single clean all pass meets common security standards and prevents standard recovery. Only advanced, lab-based methods might find traces, so it's secure enough for individuals and businesses.
Q: Does cleaning all work on SSD drives the same way as on HDDs?
A: The process is different. On SSDs, clean all overwrites data, but may not reach every memory cell due to how SSDs manage storage. For complete SSD erasure, use the manufacturer's secure erase tool or the ATA Secure Erase command instead. Clean all is still much safer than clean for SSDs.
Q: What is the difference between "clean all" and formatting a drive?
A: Formatting (quick or full) only deletes the file index, leaving data recoverable. Clean all physically overwrites every part of the drive with zeros, making data unrecoverable. It is far more secure than any format.
Q: I accidentally ran "clean all" on the wrong drive. Can I get my data back?
A: Almost certainly not. Clean all replaces your data with zeros. Once complete, recovery is impossible. This is why you must always verify the correct disk number with the list disk command before running the command.
Q: Are there any alternatives to Diskpart for securely wiping a drive?
A: Yes. DBAN (Darik's Boot and Nuke) is a popular bootable tool for secure erasure. Drive manufacturers often provide free secure erase utilities. Windows also has a built-in option: go to Settings > Update & Security > Recovery > Reset this PC > Remove everything, which includes a drive wipe.
Recover Important Files If Necessary
If you've accidentally used the clean command in DiskPart and need to recover your deleted files, MyRecover provides a powerful and user-friendly solution. While clean removes partition information, your actual data remains physically on the drive until overwritten. MyRecover is specifically designed to scan for and restore this "lost" data by analyzing raw drive sectors.
Key Advantages of Using MyRecover
- Ease of Use. MyRecover’s intuitive interface makes data recovery accessible even for non-technical users. The process is guided and straightforward—no command-line expertise required.
- High Recovery Rate. It employs advanced algorithms to locate and reconstruct files fragmented by the clean command, offering a strong chance of recovering documents, photos, archives, and more .
- Selective Recovery & Preview. You can browse and preview files before recovery, allowing you to restore only what you need and verify file integrity—saving time and storage space .
- Wide Compatibility. Supports recovery from HDDs, SSDs, USB drives, and SD cards across various file systems (NTFS, FAT32, exFAT, etc.).
- Time Efficiency. Compared to manual or command-line recovery methods, MyRecover automates the complex process, delivering results faster with minimal user effort.
How to Use MyRecover for Recovery After DiskPart Clean
1. Immediately download MyRecover and install it on a different drive than the one you want to recover from. This prevents overwriting deleted data.
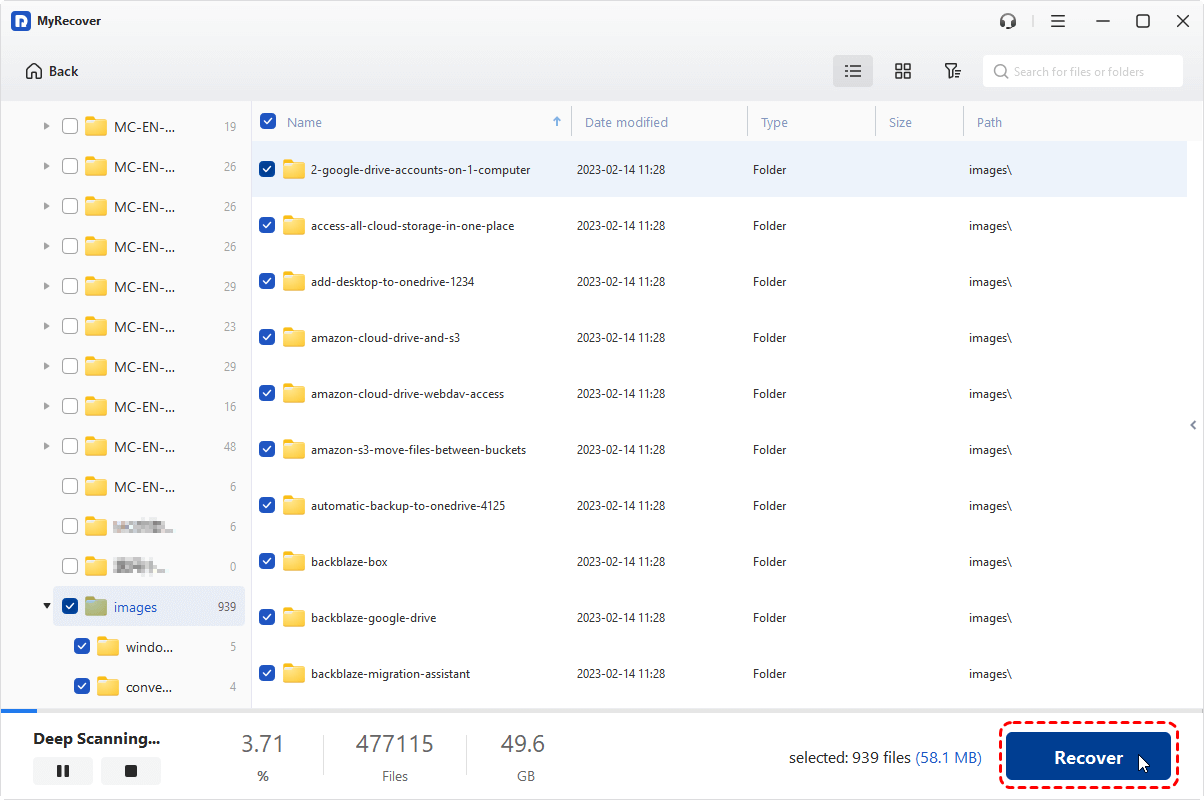
2. Open MyRecover, tap Disk Data Recovery, select the drive that was affected by the clean command, and click "Scan".

3.MyRecover will perform a quick scan, wait for the process to complete, and hit OK.
- Tip:✎...
- You can search for recoverable files based on file path, name, size, type, modified date, etc. The scan time depends on the drive's size. By default, it lists files by file type.
4. Preview and select the files you need, and click "Recover".
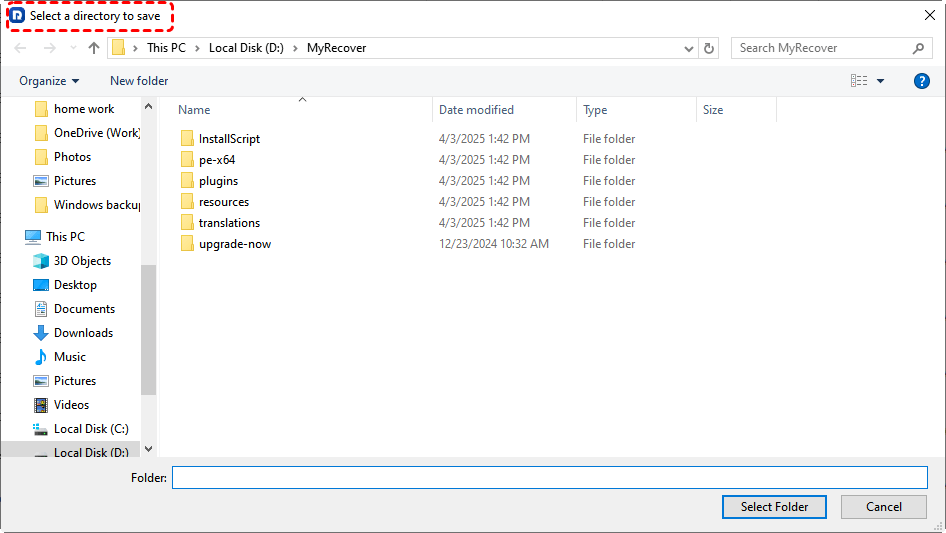
5. Choose another safe location to save the recovered files now. Then check the integrity of these files in the destination.
- Notes:✎...
- You can also recover files from a crashed computer, a corrupted SD card, a formatted SSD, etc.
- To recover files from unlimited computers, you can upgrade to MyRecover Technician to enjoy.

- Recover Deleted Files Easily with Simple Clicks
- 1000+ File Formats Supported
- Support HDD, SSD, External Hard Drive, USB Drive, SD Card, etc.
- Quickly Find Files Using File Types, Name, Size, etc.
- Preview Files Before Recovering
- Recover Unlimited Data


Stay Updated With Our
Latest Tips
Add us as a preferred source on Google to never miss helpful guides.