
How to Initialize Disk Without Losing Data: A Comprehensive Guide
Learn how to initialize a disk without losing data with our detailed instructions. From recovering important files to using safe initialization tools, this guide ensures your data remains intact throughout the process.
By Vera / Updated on May 13, 2026
Introduction
It is a moment of panic for any computer user: you plug in a hard drive, only to see a popup stating, "You must initialize a disk before Logical Disk Manager can access it." Or worse, your Disk Management console shows a drive as "Disk Unknown, Not Initialized."
Many users immediately wonder: Can you initialize a disk without losing data? This is a critical concern, especially for those trying to initialize disk without losing data in Windows 10 or Windows 11, where important backups or personal files might be at stake.
How do I "Initialize disk" without losing my data on it? Because this hard drive has important stuff, and I'm afraid that if I click on "OK" it will erase everything. Can someone tell me how can I make the hard drive work again without losing any of my data inside it?
- Question from Reddit
Good news: you don’t have to choose between using your disk and keeping your data. The trick is simple—use MyRecover to recover important files first, then initialize the disk safely. That way, you keep your data intact while fixing the disk issue.
What Does "Initialize Disk" Really Mean?
To understand the solution, you must understand the problem. Windows requires a "map" to understand how to read and write data on a drive. This map is called a Partition Table (either MBR or GPT).
When a disk is "Uninitialized," it means Windows cannot find this map. This happens for three primary reasons:
- New Hardware: The disk is brand new and has never been assigned a partition style.
- Corruption: The Master Boot Record (MBR) or Partition Table has been corrupted due to an unsafe ejection, power surge, or virus.
- File System Incompatibility: The disk was formatted on a non-Windows system (like macOS or Linux) that Windows doesn't recognize.
The "Safety First" Strategy: Why You Should Use MyRecover Before Initializing Disk
Before touching any system settings, you need a bridge to access the "invisible" data on that uninitialized drive. This is where MyRecover becomes essential.
Unlike standard file explorers, MyRecover is specifically engineered to interact with disks that Windows labels as "Unknown" or "Not Initialized." It bypasses the corrupted partition table to scan the raw sectors of the drive, identifying file headers for documents, photos, and videos that are otherwise inaccessible. When to use it:
- The disk already contains important documents, photos, or videos.
- You can’t access the disk but don’t want to risk losing data.
- You plan to initialize but want peace of mind first.
Why MyRecover is the right tool for this specific issue:
MyRecover is a professional data recovery tool designed to retrieve lost or inaccessible files safely from disks before performing risky operations like initialization. It works with Windows and supports HDDs, SSDs, USB drives, and memory cards.

- ⭐Deep Scan for Unallocated Space: It can scan the "unallocated" or "uninitialized" space where your lost partitions reside.
- ⭐High Recovery Success Rate: Even if the drive’s file system is RAW, MyRecover can reconstruct the file paths and names.
- ⭐Read-Only Operations: It retrieves data without writing anything to the source disk, ensuring you don'taccidentally overwrite your own files during the recovery process.
Step-by-Step Guide: Recovering Data Before Initialization
Let’s get started!
Step 1: Download and Install MyRecover
Visit the official MyRecover website, download the installer, and install it on a safe drive (not the one you’re recovering). This ensures you don’t overwrite any lost data.
Step 2: Scan the Disk
Open MyRecover, select the affected disk, and start a quick scan. The software will search for all recoverable files, including those deleted or hidden due to corruption.

Step 3: Preview and Select Files
After the scan completes, preview the files to confirm which ones you want to recover. This step ensures you recover only the files you need, keeping the process clean and efficient.

Step 4: Recover Files Safely
Choose a secure location on a different disk or external drive to save recovered files. Avoid saving them back to the same disk before initialization—it could overwrite remaining files.

Preparing for a Successful Initialization
Once your data is safely backed up, you can fix the "Not Initialized" error. However, before jumping into the methods, perform these two checks to ensure the disk isn't physically failing:
1. Checking Disk Health Before Initialization
Before initializing, check disk health using tools like CrystalDiskInfo or HD Tune. Healthy disks are much safer to initialize, while damaged ones may require professional attention.
2. Choosing the Right Partition Style (MBR or GPT)
- GPT is recommended for drives larger than 2TB or modern systems with UEFI.
- MBR is older but compatible with legacy BIOS systems. Choosing correctly avoids issues down the road.
3 Proven Methods: Let's Initialize Disk Without Losing Data Now!
After you have successfully extracted your files using MyRecover, you can proceed with the following methods to make your drive usable again.
Method 1: Using Windows Disk Management (The Standard Approach)
This is the most straightforward, built-in Windows utility. It is best for users who want a visual interface and don't want to install third-party partition software. You are manually telling the Windows Logical Disk Manager to write a new partition header to the drive so the OS can start communicating with it.
1. Press Win + X and select Disk Management.

2. Locate the disk labeled "Disk [Number], Unknown, Not Initialized."
3. Right-click the disk name (the gray box on the left) and select Initialize Disk.

4. In the popup, select the disk and choose GPT (recommended) or MBR based on your needs. Click OK.
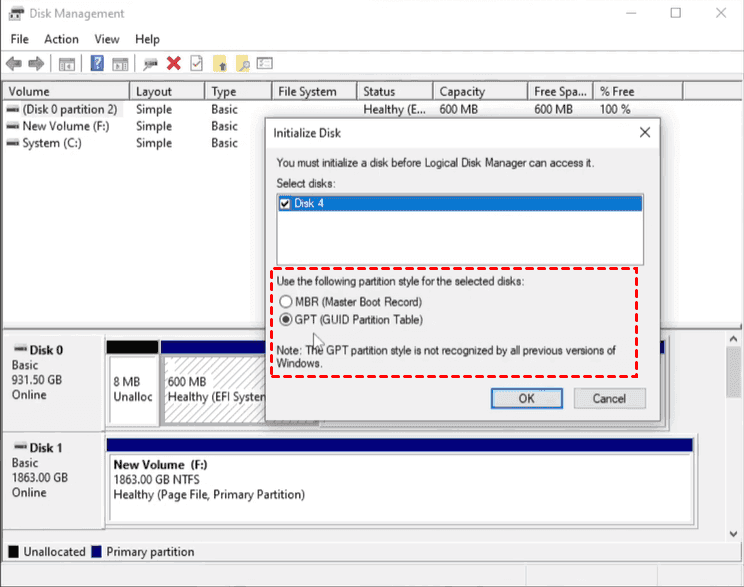
5. The status should change to "Online." You can then right-click the unallocated space to create a "New Simple Volume" to make the drive usable in File Explorer.
Method 2: Using Diskpart via Command Prompt (The Advanced Approach)
If Disk Management fails or throws an error (like "The system cannot find the file specified"), Diskpart is a more powerful command-line tool that can bypass certain OS-level restrictions.
This method uses direct commands to clear disk attributes that might be preventing initialization (like a "read-only" flag) and forces the conversion to a specific partition style.
1. Type cmd in the Windows search bar, right-click, and Run as Administrator.
2. Type diskpart and press Enter.
3. Enter list disk to see all drives. Identify your uninitialized disk by its size.
4. Type select disk X (Replace X with your disk number, e.g., select disk 1). Be extremely careful here.
5. (Optional) Type attributes disk clear readonly to ensure no software locks are on the drive.
6. Type online disk. Then, convert the disk: convert gpt or convert mbr.
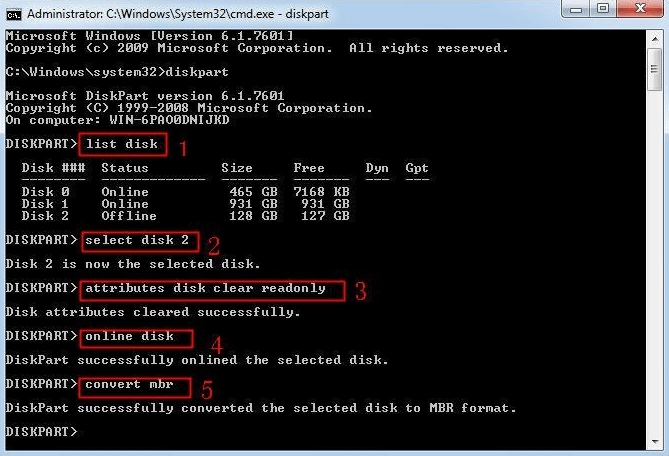
7. Type exit. Your disk is now initialized and ready for formatting.
Method 3: Using AOMEI Partition Assistant (The User-Friendly Third-Party Tool)
Sometimes, Windows built-in tools are too "rigid" and will fail if there are minor bad sectors. Software like AOMEI Partition Assistant can also initialize disks safely without data loss since it can directly convert a disk between MBR and GPT without deleting any existing partitions. They provide intuitive interfaces and reduce human error.
This tool provides a more sophisticated layer between the user and the hardware, allowing for initialization and partition rebuilding without the technical complexity of the command line.
1. Download and launch AOMEI Partition Assistant.
2. Find your uninitialized disk in the main dashboard
3. Right-click the disk and select Initialize Disk.
4. A prompt will ask you to choose between MBR and GPT. Select GPT and click OK.
5. Click Apply in the top left corner to execute the "Pending Operation." This is a safety feature that lets you double-check your choice before the software makes changes.
- Regular Backups: Back up important files weekly or monthly to an external drive or cloud service.
- Monitor Disk Health: Track S.M.A.R.T. data and check for bad sectors early.
- Use Reliable Recovery Tools: Keep MyRecover or similar software ready for emergencies.
Conclusion
Understanding how to initialize a disk without losing data is a vital skill for anyone managing digital storage. By prioritizing data extraction with MyRecover before attempting system fixes, you eliminate the risk of permanent loss. Whether you need to initialize disk MBR or GPT without losing data, the key is always the same: Recover first, fix second.
Frequently Asked Questions (FAQ)
1. Does initializing a disk erase the data on it?
Initialization overwrites the partition table. While the data remains on the platters/chips, Windows loses the ability to find it. This is why you must use MyRecover to extract files first if you want to initialize disk without losing data.
2. Why is my hard drive showing as "Unknown, Not Initialized" and "0 bytes"?
If it shows 0 bytes, it may be a hardware failure. However, if the capacity is correct but it's "Not Initialized," it is usually a logical error that can be fixed using the steps in this guide.
3. Can MyRecover help if the disk is not initialized and says "RAW"?
Yes. MyRecover is designed to recognize file signatures even when the file system is RAW or completely missing.
4. Is it possible to initialize disk MBR or GPT without losing data after a format?
If you have already formatted the drive, data recovery becomes harder but not impossible. MyRecover can still perform a Deep Scan to find data that hasn't been overwritten yet.
5. How can I initialize disk without losing data in Windows 10 if Disk Management fails?
If the standard utility fails, use Method 3 (AOMEI Partition Assistant). It is more powerful at handling stubborn "Not Initialized" errors.
6. Can I use MyRecover on a disk that I already initialized by mistake?
Yes. As long as you haven't started saving new files to that drive, the old data is likely still there. MyRecover can scan the new partition and find the "deleted" files from the previous state.


Stay Updated With Our
Latest Tips
Add us as a preferred source on Google to never miss helpful guides.