
Does a System Image Backup Everything in Windows 11/10/7? What It Includes and What It Doesn’t
A system image backup creates a full snapshot of your Windows system, including the operating system, installed programs, settings, and system files. But does it truly back up everything? This guide breaks down exactly what’s included, what’s not, and how system images work across Windows 7, Windows 10, and Windows 11. Use it to understand your backup limitations and choose the right protection for your data.
By Emma / Updated on March 19, 2026
What Is System Image in Windows 7 Backup and Restore?
In Windows computer, the "Create a system image" tool (in the Backup and Restore Windows 7 control panel) is a built-in feature that allows you to create a full, sector-level backup of your system drive. This backup is called a system image, and it contains everything Windows needs to run—including the operating system, system settings, installed programs, drivers, and all files stored on the system partition.
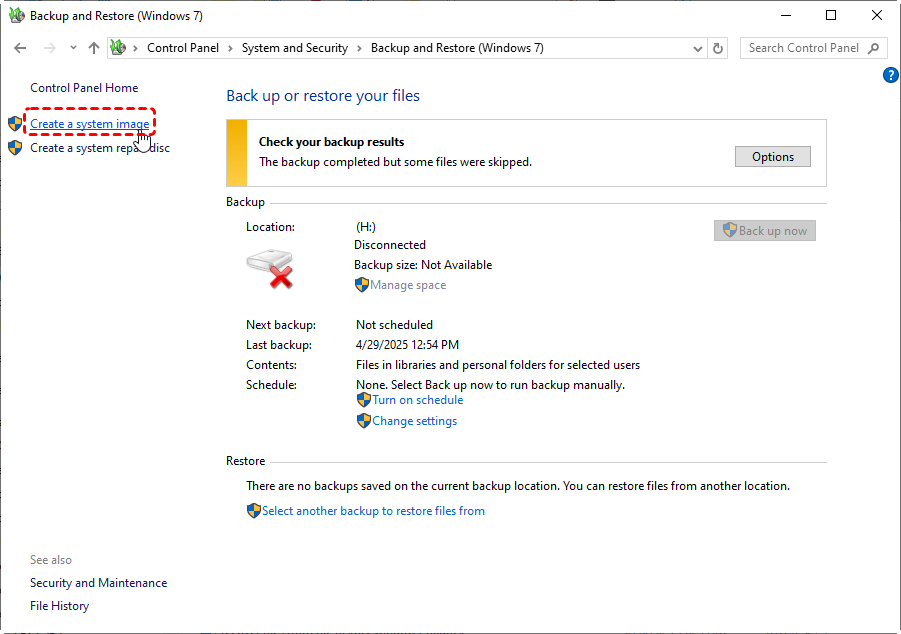
This tool is designed to give you a complete, restorable copy of your Windows computer, which you can use to recover the entire system to a previous working status if Windows becomes unbootable, corrupted, or if the hard drive fails. In this article, we will analyze does a System Image backup everything in detail. Keep reading!
What a System Image Does (and Does Not) Include
A system image created through "Windows 7 Backup and Restore" does not always contain the exact same components for every user. Instead, what the system image includes is determined by two factors:
🏷️What Windows requires by default (system partitions)
🏷️What the user manually chooses to add (optional data drives)
What a System Image "Automatically Includes"?
During the creation process, Windows automatically selects the boot drive and other system-required partitions because these are essential for the operating system to run after restoration. These mandatory components typically include:
- Windows system drive (C:)
- System Reserved / EFI System Partition
- Boot partition
- Recovery partition (if present)
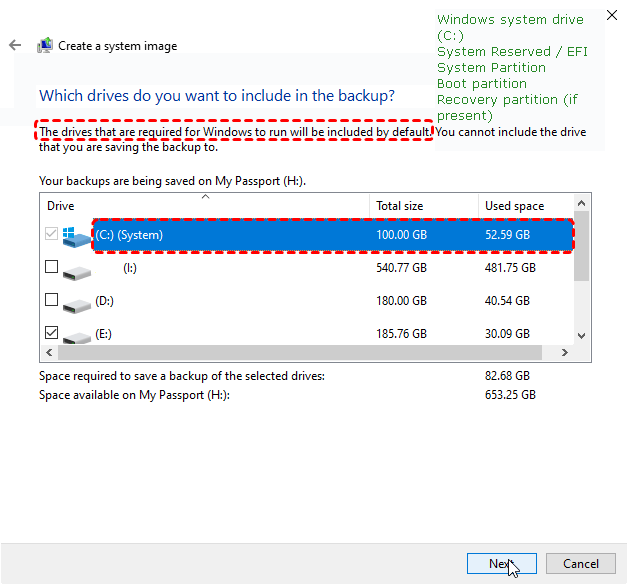
These partitions are always included and cannot be deselected, ensuring the restored system can boot properly.
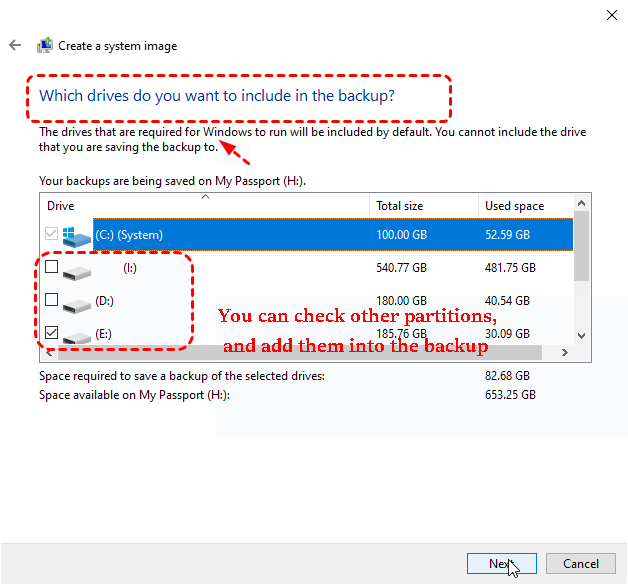
What a System Image "May Include" ? (Depending on User Selection)
However, the tool also gives you flexibility: you can manually add additional drives or partitions to the backup plan if you want to include more data beyond the system drive. This allows you to create a larger, multi-drive image that covers both the operating system and other data disks in your computer.
- Other internal partitions (D:, E:, etc.)
- Secondary internal disks
- Data drives containing documents, photos, videos, project files, etc.
What a System Image Does NOT Include (If Not Selected)?
Anything not selected during the backup setup process is not included in the image. This typically means:
- Data on unselected drives (e.g., D:, E: drives)
- Files stored on external USB drives
- Temporary or automatically excluded files
- Data created after the backup completes
In short: Not selected = not included, even if it's important data.
So, does a System Image backup everything? That depends, since the system image can be:
- System-only (default)
- System + selected data drives (user-defined)
How to Restore Windows or Personal Files from System Image Backup?
From the above, you’ve probably figured out the question: "Does a Windows system image backup everything?" Now, you might be wondering how to actually restore from such an image. Next, we will break down how to perform system and personal file recovery through an existing system image backup.
For System Recovery
Restoring Windows from a system image allows you to recover your entire system—operating system, installed programs, system settings, and all data stored on the backed-up drives. This method is especially useful when Windows cannot boot, your hard drive fails, or the system becomes corrupted.Below is a complete, step-by-step guide on how to restore your PC using a system image.
Step 1: Boot into Windows Recovery Environment
Depending on your PC’s condition, choose one of the methods below:
If Windows Can’t Boot: Turn on your PC → it should boot automatically into "Windows Recovery Environment (WinRE)". Or boot fromWindows installation disc/USB, System Repair Disc, or Recovery drive.
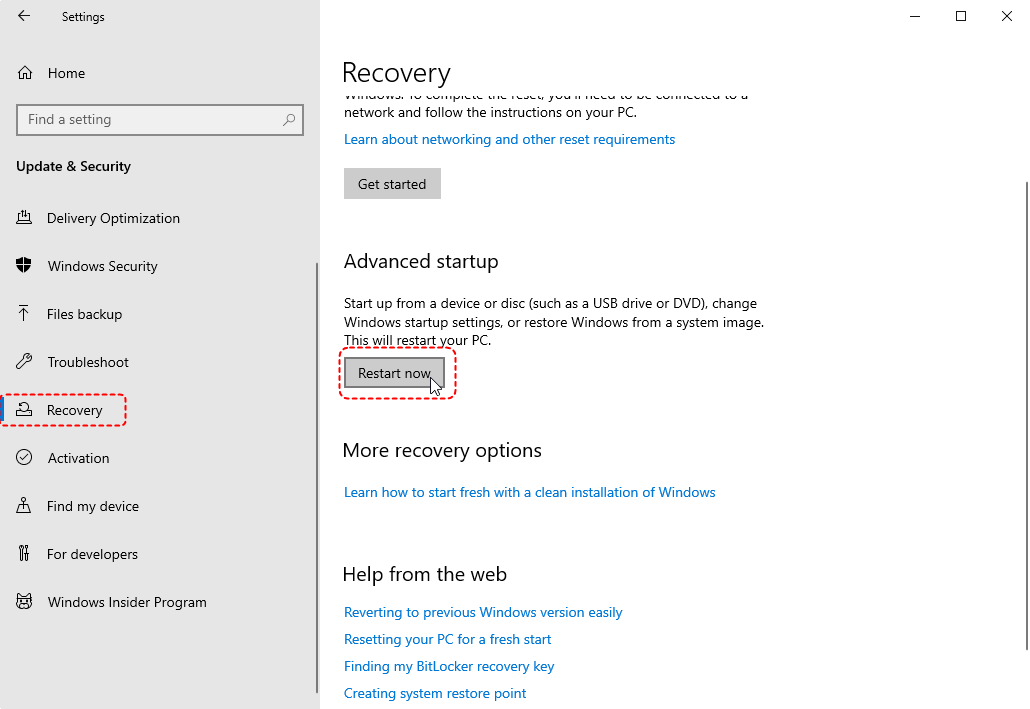
If Windows Can Boot: Go to "Settings → Update & Security → Recovery → Advanced startup → Restart now".
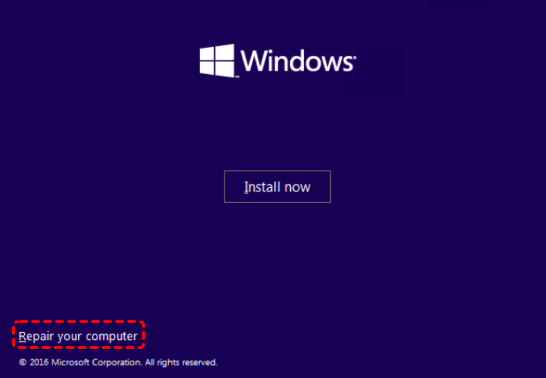
Step 2: Select "Repair your computer"
When the Windows setup or recovery screen appears, click "Repair your computer" (not Install).
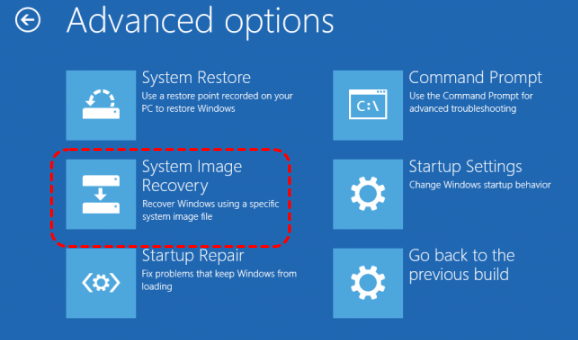
Step 3: Choose Troubleshoot > Advanced options
Navigate "Troubleshoot → Advanced options → System Image Recovery". Windows will search for available system images.
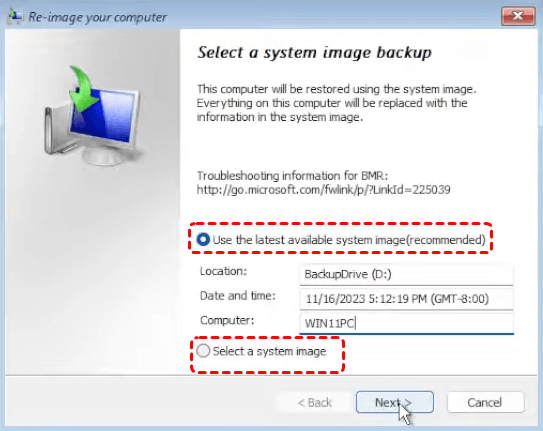
Step 4: Select Target Operating Systemto Restore
Choose the Windows installation you want to restore. Windows will automatically detect the latest system image. You can choose:
- Use the latest available system image (recommended)
- Select a system image (if you have multiple images or versions)
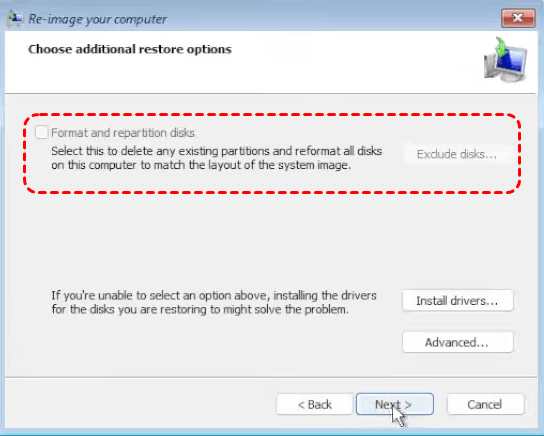
Step 5: Configure Restore Options
Windows offers 2 restore options, choose based on your needs, then click "Next".
- Format and repartition disks: Erases and recreates partitions to match the system image.
- Exclude disks (Windows 11/10): Allows you to prevent overwriting specific disks.
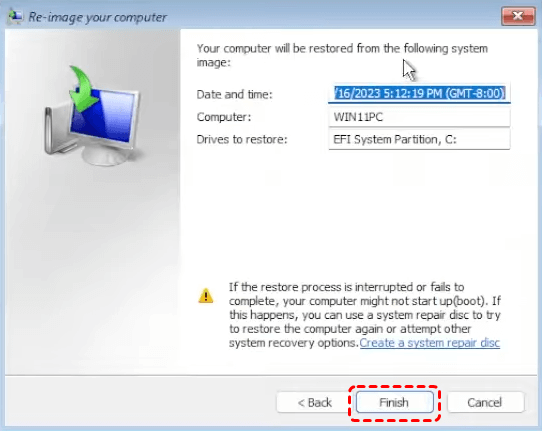
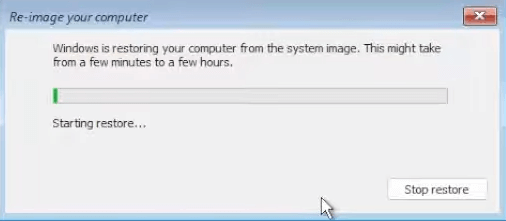
Step 6: Start the Restoration Process
Click "Finish", then confirm with "Yes". Windows will begin the recovery process. Once the restoration completes, your PC will restart automatically.
For Personal Files Recovery
If you have added data partitions into the system image backup, then you can also recover individual personal files from a system image without performing a full system restore. This is especially useful if you only lost documents, photos, or other personal files but do not want to overwrite your current system.
- Notes:✎...
- A system image backup is stored in the folder "WindowsImageBackup" and contains "VHD/VHDX virtual hard disk files".
- You cannot directly double-click a system image to copy files. You need to mount the VHD/VHDX to access the data.
Step 1: Locate Your System Image Backup
Connect the external drive, network location, or secondary drive where your system image is stored.Open the "WindowsImageBackup" folder. Inside, you will see subfolders for your PC and date of the backup.
Step 2: Mount the VHD/VHDX File
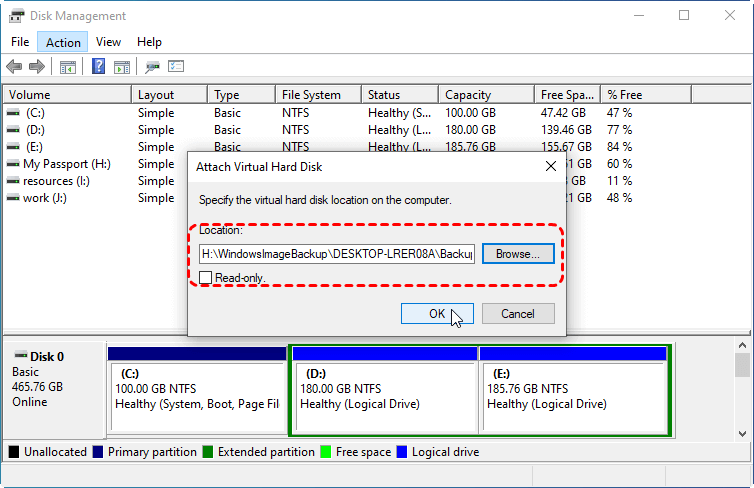
Press "Windows + X", select "Disk Management" to open this Windows built-in disk manager. Click "Action → Attach VHD".
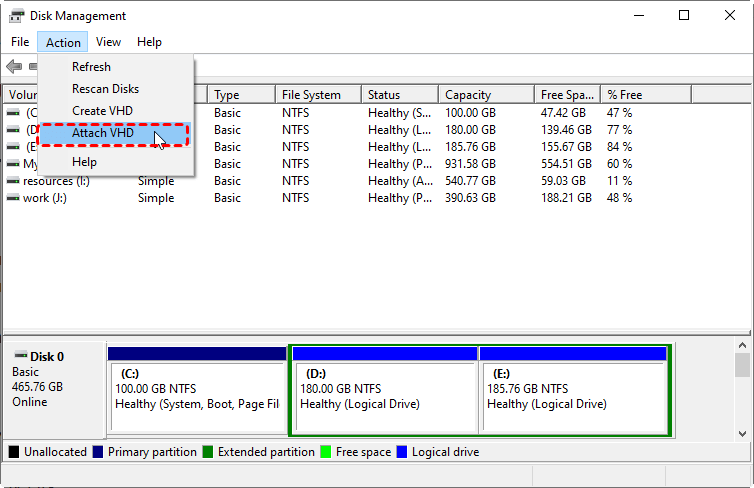
Browse to your system image location: WindowsImageBackup\[PC Name]\Backup [Date]\. Select the ".vhd" or ".vhdx" file that contains your system drive (usually labeled as C:).
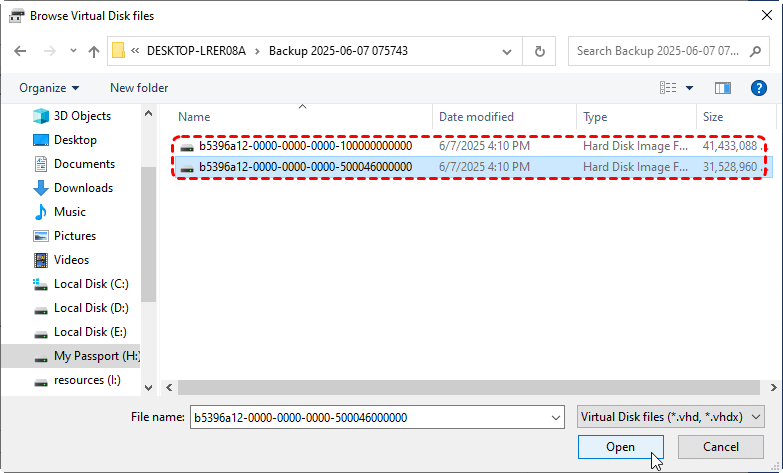
Check "Read-only" to avoid accidental changes. And click "OK".
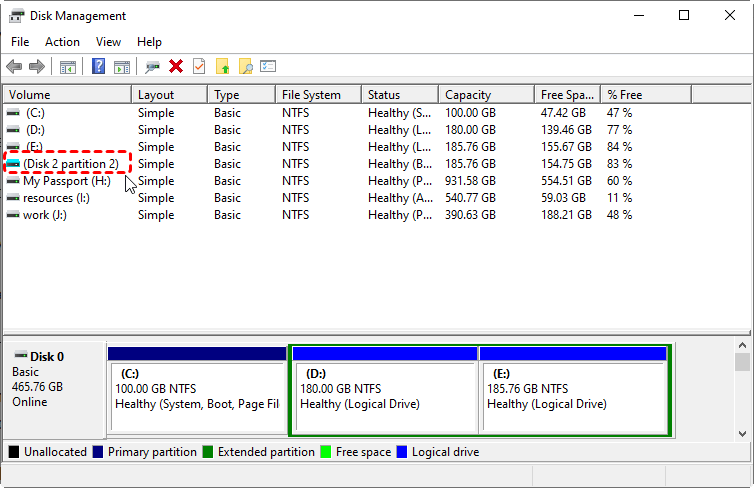
The VHD will now appear as a new drive in Disk Management and File Explorer.
Step 3: Copy Personal Files
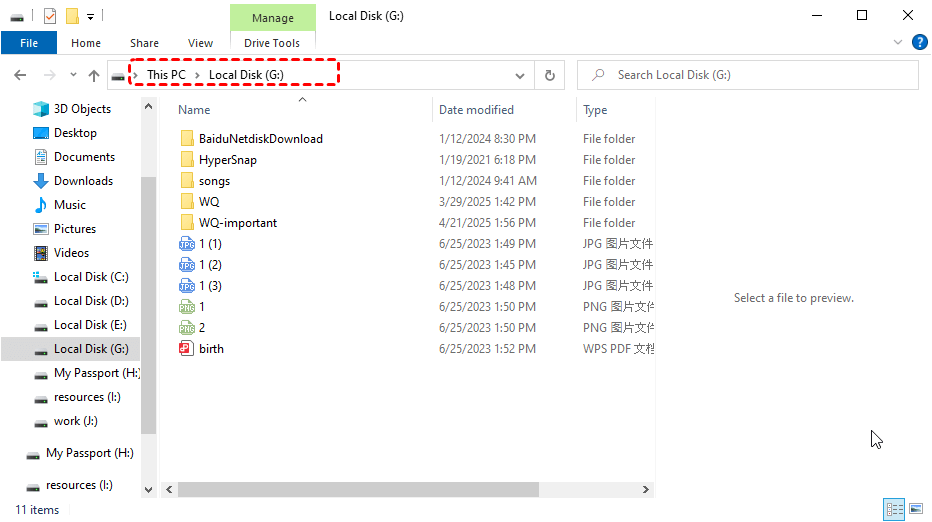
Open the newly mounted drive in File Explorer. Navigate to the folders where your personal files are stored. Copy the files you need to a safe location on your current system (different drive or folder).
Step 4: Detach the VHD After Recovery
Once all required files are copied. Open Disk Management again.Right-click the mounted VHD drive and select Detach VHD. Confirm the action (do not delete the VHD file).
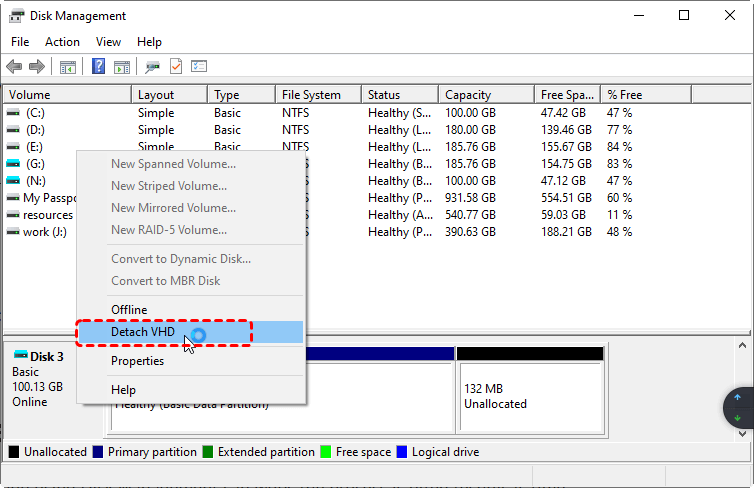
This safely disconnects the backup image from your system.
Easier Way to Recover Personal Files without Backup
Sometimes, personal files are lost due to accidental deletion, formatting, system crashes, or malware, and you don’t have a backup like a system image or File History. In these cases, an easier solution is to use professional data recovery software, such as MyRecover.

- 🌟Recover Without Backup: Restore lost files even if no Windows backup exists.
- 🌟High Success Rate: AI-powered file recognition and recovery algorithms ensure easy use and zero file omission.
- 🌟Wide File Support (1000+): Recover photos, documents, videos, audio, archives, and more.
- 🌟Supports Multiple Devices (500+): Works on HDDs, SSDs, USB drives, SD cards, cameras, and other storage devices.
- 🌟Covers 500+ Data Loss Scenarios: Handles accidental deletion, formatting, system crashes, virus attacks, emptied Recycle Bin, partition loss, and more.
The process is simple and beginner-friendly: just select the target drive, let the software scan, choose the files you want, and click Recover. Unlike system images, you don’t need to restore the entire system—only the personal files you need without extraction steps. Besides, do not require any prior backup.

Summary
A system image is a powerful tool for protecting your Windows PC, as it creates a complete snapshot of the system drive. However, does a system image backup everything? Not entirely. Its coverage depends on what Windows includes by default and what additional drives or partitions you select during the backup process. Files stored on unselected drivesorexternal storage are not included unless you manually add them.
For full system recovery, a system image ensures that your PC can be restored to a previous working state. For individual personal filerecovery, you need to extract them from the system image by mounting the VHD/VHDX. Or use professional recovery software like MyRecover for an easier solution without relying on a prior backup.
FAQs About Windows System Image Backup
1. Does a system image backup include personal files?
Yes, a system image backup includes personal files such as documents, photos, and videos, along with the operating system, installed programs, and system settings.
2. Does a system image backup include all drives?
Not necessarily. By default, it backs up the system drive (usually C:), but you can choose to include additional drives during the backup process.
3. What is NOT included in a system image backup?
Temporary files, recycle bin contents, and some system cache files may not be included. Also, files stored in cloud-only locations (like OneDrive online-only files) may not be fully backed up.
4. Can I restore individual files from a system image backup?
No, a system image is designed for full system recovery. However, you can mount the image as a virtual drive to manually extract specific files.
5. Is a system image backup the same as a file backup?
No. A system image backup creates a complete snapshot of your system, while a file backup only saves selected files and folders. To make a file backup, you can use Windows File History.


Stay Updated With Our
Latest Tips
Add us as a preferred source on Google to never miss helpful guides.