
How Often Does Recycle Bin Empty Itself? Full Windows Guide
This comprehensive guide answers all your questions about the Recycle Bin's auto-emptying settings, how to customize it, what happens to your files, and how you can adjust settings to control when the Recycle Bin empties itself. Whether you’re a beginner or advanced user, this guide will provide you with all the information you need to manage your Recycle Bin and avoid accidental data loss.
By Aria / Updated on November 18, 2025
Understanding the Recycle Bin’s Role in Windows
The Recycle Bin is an essential feature in Windows, acting as a temporary storage location for files that have been deleted. It allows users to easily recover files that were accidentally removed. Rather than deleting files permanently right away, Windows moves them to the Recycle Bin, where they can be restored or permanently deleted later. The Recycle Bin provides an extra layer of protection against accidental file loss.
However, some users may find that the Recycle Bin is sometimes emptied without any manual operation. Does the Windows Recycle Bin empty itself automatically? Let’s start by understanding how and when the Recycle Bin empties itself, and what you can do to control it.
How Often Does Recycle Bin Empty Itself
By default, the Recycle Bin doesn’t automatically empty itself. Files remain in the Recycle Bin until you manually remove or empty it. However, there are certain settings and configurations that might influence its behavior, particularly for insufficient disk space and unintentional manual operations.
Factors That Affect the Recycle Bin’s Automatic Emptying
Understanding these factors which affect Recycle Bin emptying itself is crucial for managing your data effectively and avoiding accidental data loss. Below are the key elements that influence how and when the Recycle Bin empties itself:
🧿Low Disk Space
When disk space is severely insufficient, Windows will automatically remove earlier files placed in the Recycle Bin to allocate space for newly deleted files, thereby maintaining normal system operation.
🔔Disk Cleanup
Running a Disk Cleanup tool may also trigger automatic emptying of the Recycle Bin. This is part of the system’s effort to optimize disk space by removing unneeded temporary files, cached data, and files in the Recycle Bin that haven’t been restored.
💽Storage Sense
In Windows 10 and 11, when your hard drive space is low, the Recycle Bin will automatically clean up temporary files and those stored in it for more than a certain period (e.g., 14 days, 30 days) according to your scheduled settings.
💡Recycle Bin Settings
In Windows, users can customize the behavior of the Recycle Bin through its properties. Here, you can adjust the maximum size of the Recycle Bin or configure to permanently delete files once they're deleted.
How to Stop the Recycle Bin Emptying Itself
If you're facing Windows automatically empties itself, don't worry! There are several ways you can stop it, ensuring that your deleted files remain in the bin until you're ready to permanently delete them.
Change Recycle Bin Settings
If the Recycle Bin’s allocated space is too small, it may prevent newly deleted files from being moved to the Recycle Bin or cause older files to be permanently deleted. Properly configuring the Recycle Bin’s storage space can resolve this issue.
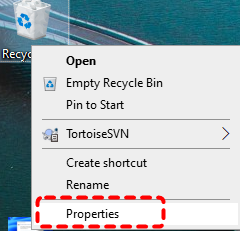
Step 1. Right click the Recycle Bin and select "Properties".
Step 2. Under the General tab, you’ll see the option for Custom size. Here, you can adjust the Recycle Bin's capacity to your preferred size according your needs.
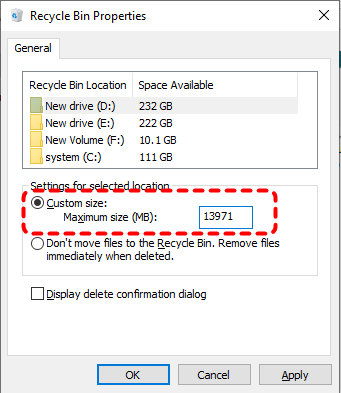
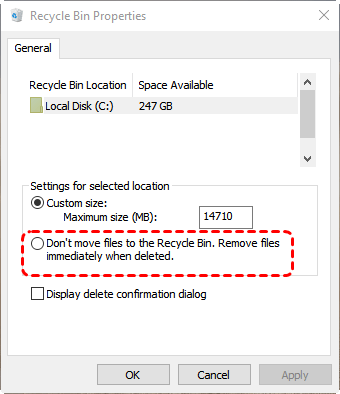
Step 3. Make sure the option "Don’t move files to the Recycle Bin. Remove files immediately when deleted" is unchecked. Otherwise, the deleted files will not go to the Recycle Bin.
Step 4. Click "Apply" and "OK" to save the changes.
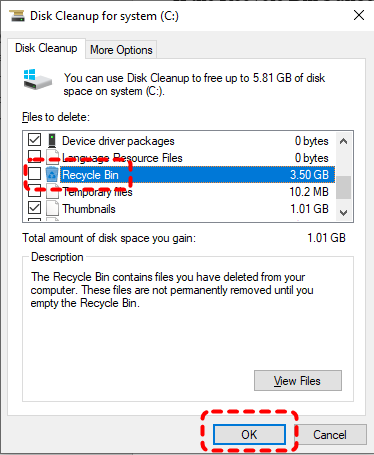
Check Disk Cleanup Settings
Disk Cleanup is a very useful and safe built-in tool in Windows. If you like using it to free up hard drive space, it may accidentally empty the Recycle Bin of that drive without you realizing it. But when performing this operation, simply choose to keep the files in the Recycle Bin.
Step 1. Type "Disk Cleanup" in Search box and open it.
Step 2. Choose which hard drive you want to clean up and click "OK".
Step 3. Uncheck the "Recycle Bin" option to prevent it from being emptied automatically during the cleanup.
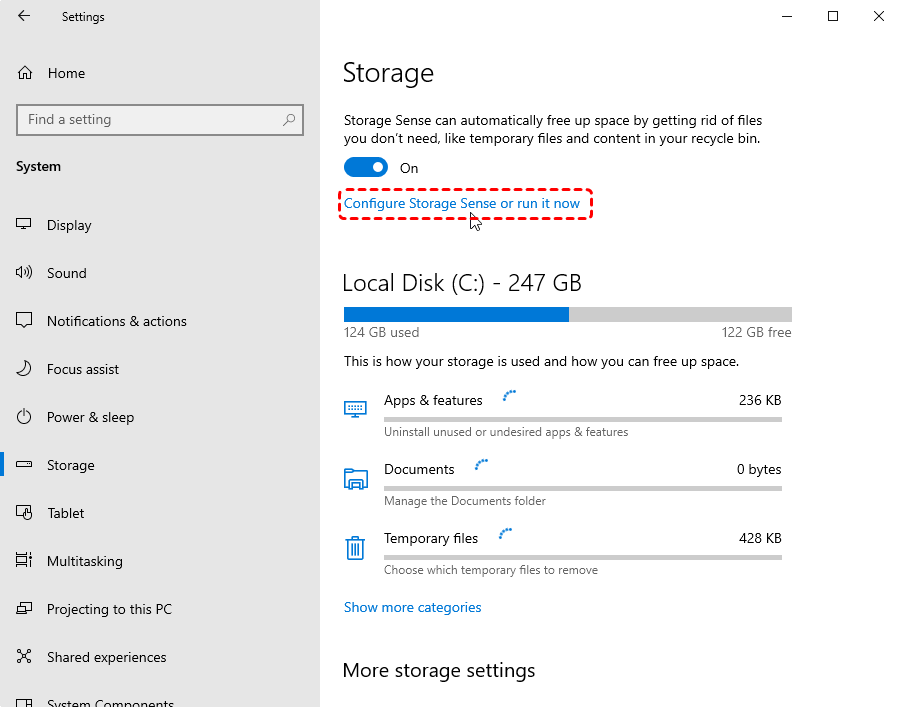
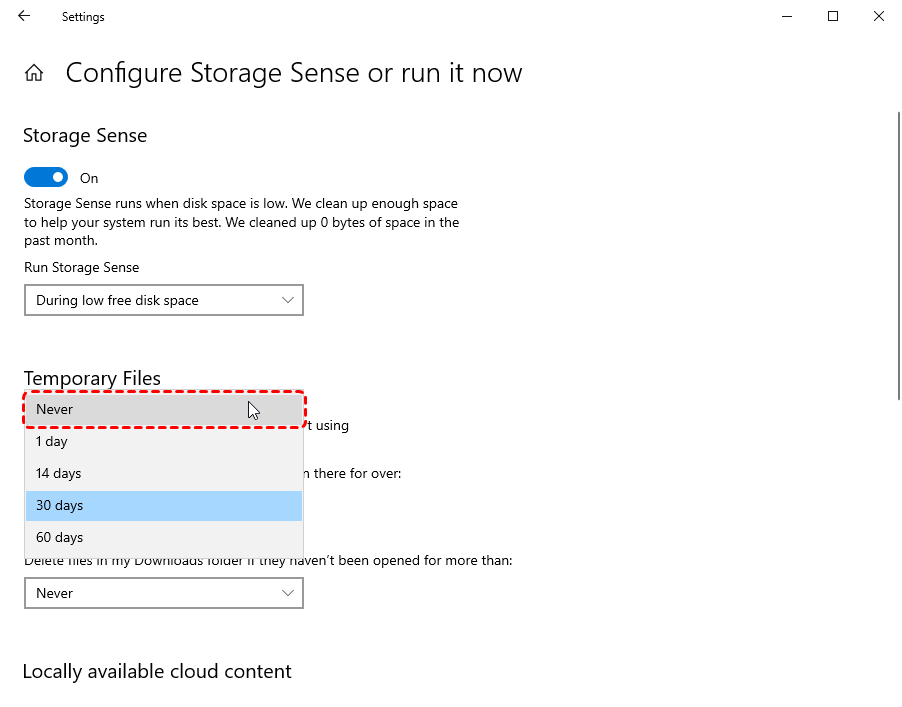
Adjust Windows Storage Sense Settings
Storage Sense automatically frees up space by deleting files in the Recycle Bin after a certain period. If you’ve enabled this feature, follow the steps below to turn it off:
Step 1. Navigate to "Settings" > "System" > "Storage", click on "Configure Storage Sense or run it now".
Step 2. Locate to the "Delete files in my Recycle Bin if they have been there for over:" section, change the time period to "Never" to prevent from the Recycle Bin emptying itself.
How to Recover Files from the Recycle Bin After Emptying
If you've emptied your Recycle Bin and realize you need to recover a file, don't panic. There is still way to recover permanently deleted files. If you’re looking for a more user-friendly data recovery option, MyRecover is a great alternative to Recycle Bin. It is designed to recover lost or deleted files from 500+ data loss scenarios like deleted partition, inaccessible hard drive, uninitialized disk, dead laptop, etc.
Discover the compelling highlights of MyRecover below:
✅Support 1,000+ file types, including documents, images, videos, emails, and more.
✅Dual scan modes: Quick Scan for speed, Deep Scan for thorough recovery.
✅Support NTFS, FAT32, exFAT, ReFS in Windows 11/10/8/7 & Windows Server.
✅Compatible with all storage devices: USB drives, HDDs, SSDs, SD cards, etc.
Step 1. Download and install MyRecover on your computer from Microsoft Store, avoid installing it on the drive where the lost files were stored.
Step 2. Launch the program and select the drive to scan for lost files, then click "Scan".

Step 3. Under the "Type" or "Path" tab, choose the files you attempt to recover based on its original path or type and click "Recover".
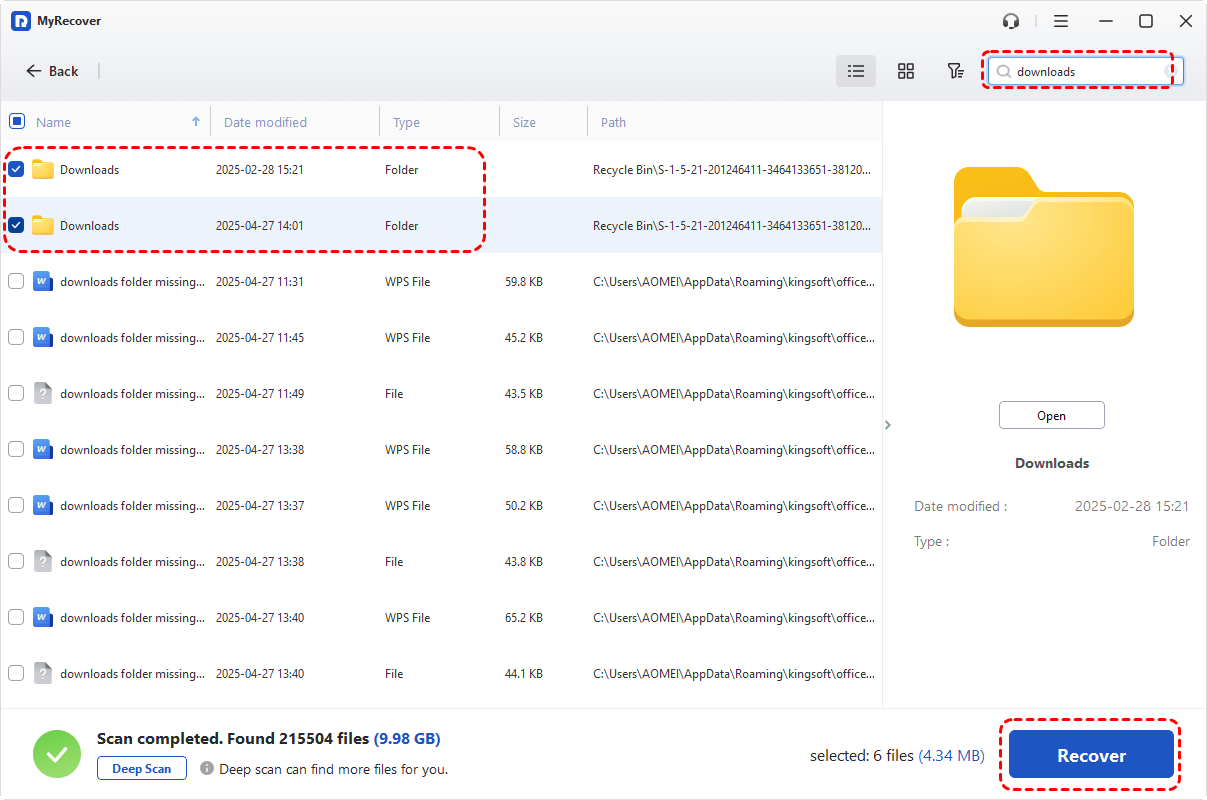
Step 4. Select a safe location to save the recovered files.
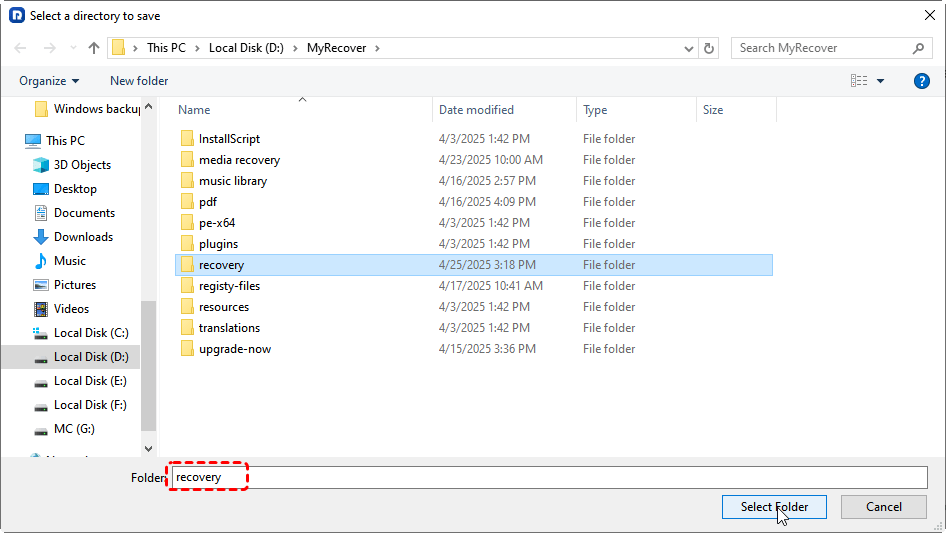
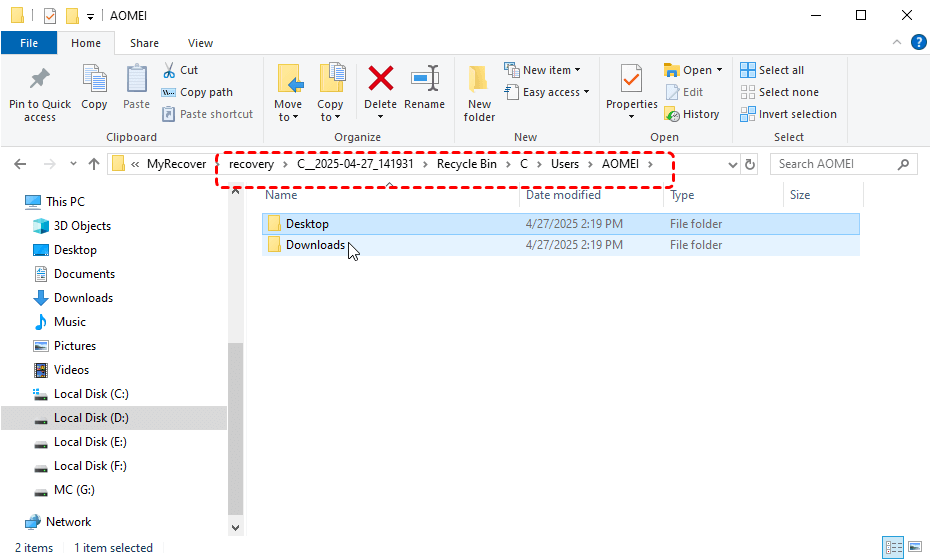
Once the process is done, the message "Files have been recovered successfully recovered" will pop up. Then, you can verify the recovered files in the destination folder path by clicking on the "Browse" button.
The Bottom Line
In short, the Recycle Bin emptying itself automatically is generally caused by disk space issues and Recycle Bin settings. You can resolve this problem using the methods mentioned above. If you've emptied the Recycle Bin and lost important files, data recovery tools like MyRecover can help you recover them.
If you manage a large number of deleted files, upgrading to MyRecover Professional edition unlocks unlimited data recovery capacity and file content preview functionality. Lastly, remember, the sooner you act after a file is deleted, the higher the chances of successful recovery.


Stay Updated With Our
Latest Tips
Add us as a preferred source on Google to never miss helpful guides.