
3 Clicks: Recover Data From Uninitialized Disk Free
Users often encounter the "disk not initialized" error due to partition table corruption, hardware issues, or accidental formatting. The guide explains the causes behind this error and offers step-by-step instructions to recover data from uninitialized disk for free.
By Emma / Updated on May 29, 2025
When the Disk Shows as "Uninitialized"?
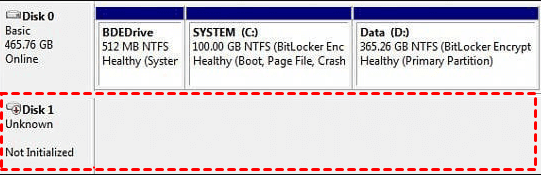
A disk may appear as "uninitialized"when your operating system cannot access its partition table or file system. This typically happens in the following scenarios:
- New Hard Drive or SSD: A brand-new disk that hasn't been formatted or partitioned will show as uninitialized.
- Corrupted Partition Table: Virus attacks, power failures, or improper operations may corrupt the partition table, making the disk unreadable.
- Physical Damage: Bad sectors, hardware failure, or manufacturing defects can lead the system to report the disk as uninitialized.
- Connection Issues: Faulty cables, ports, or external enclosures may cause detection errors, leading to the disk showing as uninitialized.
- Improper Ejection: Removing an external drive without safely ejecting it may result in data corruption and uninitialized status.
When a previously used disk is shown as "Not Initialized" in Disk Management, you may see a prompt like "Initialize Disk". However, clicking it will erase all existing data. Therefore, recovering files from the uninitialized disk first is critical before proceeding with initialization.
[Free] Easily Recover Data From Uninitialized Disk- 3 Clicks Only
To avoid permanent data loss, it's highly recommended to use a professional recovery tool before taking any further action. MyRecoveroffers a fast, user-friendly and free file recovery solution that allows you to recover data from uninitialized disks in just 3 simple clicks, not requiring any technical skills.
- ☀️Beginner-Friendly Interface: No complex steps—just scan, preview, and recover.
- 🌝Supports Over 1,000 File Types: Easily recover documents, photos, videos, audio files, emails, compressed files, and morebeyond.
- 🌞Compatible With 500+ Storage Devices: Recover lost files from internal or external HDD, SSD, USB drive, SD card, or other removable storage media.
- 🪐Covers 500+ Data Loss Scenarios: Restore data from uninitialized or RAW disks, partition table corruption, mistaken deletion or formatting, virus attacks, power failures, system crashes, and device recognition errors.
- ⭐Compatible with Windows 11/10/8/7 and Server 2025/2022/2019/2016/2012: No driver issues or system conflicts.
- 🌟File Preview: Preview files before recovery to ensure you restore exactly what you need.
- 🌌File Filter: Quickly filter file types during scanning for faster and more accurate recovery.
Now you can FREE download the software from the official site and install it on your computer hard drive (not the uninitialized one to avoid data overwriting, which will increase the difficult of data recovery from not initialized disk)
Best free Windows Data Recovery Software
Step 1: Select and Scan the Uninitialized Disk
First, launch the recovery software and carefully select the uninitialized disk from the list of all connected storage devices. Then click on "Scan". The software will perform a deep scan to locate all recoverable files (The Quick Scan is proper for recently deleted files). This scan may take some time depending on the disk size and condition, but it ensures a thorough search for lost data.

Step 2: Choose Target Files to Recover
Once the scan is complete, you will see a detailed list or categorized preview of all recoverable files.You can preview files such as photos, documents, and videos before recovery (for full preview, use Professional edtion instead), helping you confirm which files you really need. Use filtering options to quickly locate specific file types or names. Select the files or folders and click on "Restore".

Step 3: Save Files to a Safe Location
The final step is to save the recovered files. It is crucial to choose a storage location different from the uninitialized disk to avoid overwriting any remaining lost data. Saving to another internal drive, external hard drive, USB flash drive, or network storage is recommended.

After the recovery process is complete, the software will display a summary showing how many files have been successfully restored. You can also view the exact location where the recovered files have been saved. This allows you to quickly verify that your important data has been recovered and access it immediately without confusion.

Further Reading: Fix the Uninitialized Disk
After successfully recovering data from uninitialized disk, the next step is to repair the disk itself to make it usable again. Here are some common methods to fix an uninitialized disk safely:
Check Disk Connection
If your disk shows as uninitialized due to connection problems, try the following steps to resolve the issue:
- Check and Replace Cables
Loose, damaged, or faulty SATA/USB cables are a common cause of disk detection errors. Disconnect and reconnect the cables firmly. If possible, try using a different cable to rule out cable failure.
- Try Different Ports
Sometimes, the USB or SATA port on your computer may be malfunctioning. Connect the disk to another port on your PC or laptop to see if it is recognized properly.
- Use a Different External Enclosure or Adapter
If you are using an external enclosure or adapter (such as a USB-to-SATA converter), it may be defective. Try connecting the disk directly to the motherboard or use another enclosure/adapter to eliminate the possibility of enclosure failure.

- Test on Another Computer
To isolate whether the problem is with your disk or the computer, connect the disk to a different machine. If the disk is detected there, the original computer’s ports or drivers might need troubleshooting.
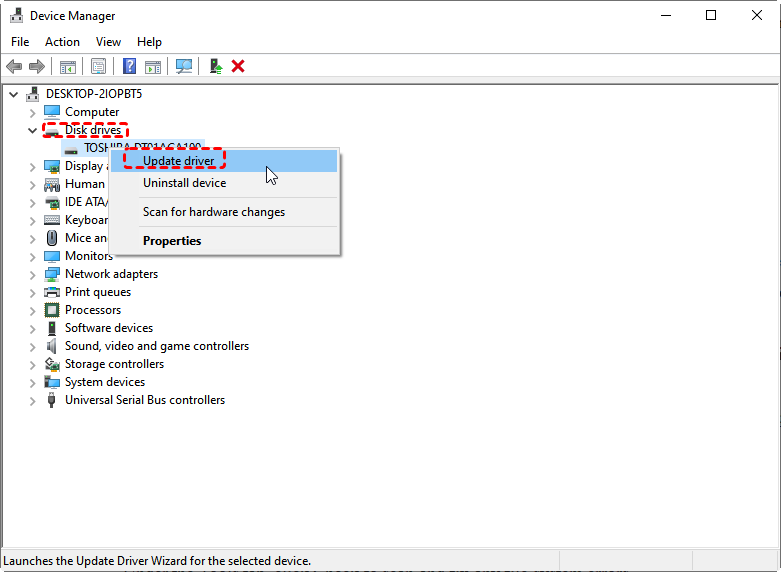
- Update or Reinstall Drivers
Outdated or corrupted storage drivers can cause recognition issues. Open Device Manager, locate your disk under "Disk drives," and update or reinstall the drivers.
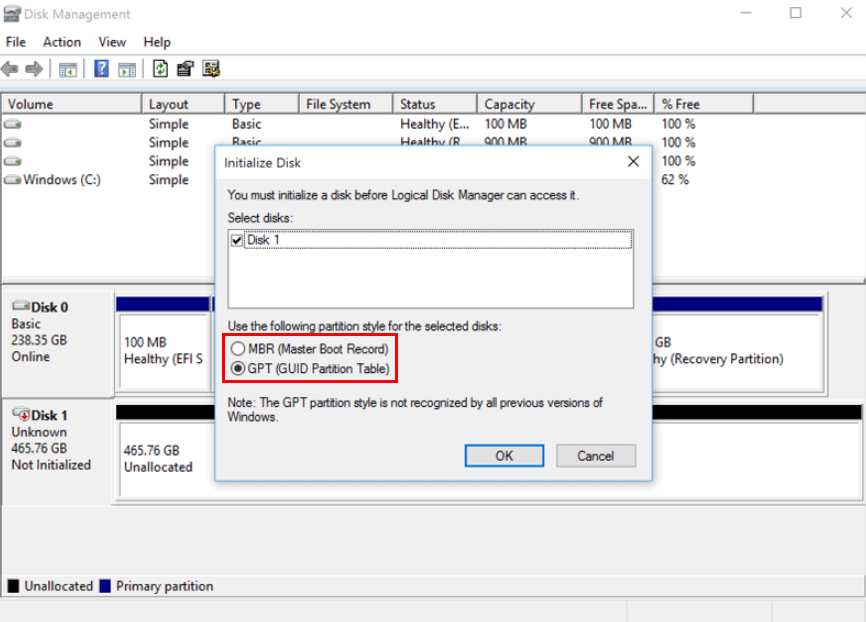
Initialize the Disk in Disk Management
Once you have confirmed that the disk is properly connected and any hardware or driver issues are resolved, the next step is to initialize the disk so it can be used again.
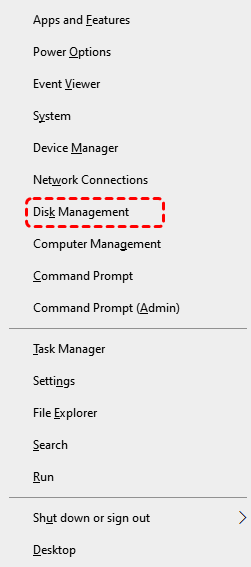
- Press Win+X and select "Disk Management" to open the Windows in-built disk manager.
- Right-click the uninitialized disk, and select "Initialize Disk".

- Choose between "MBR (Master Boot Record)"or "GPT (GUID Partition Table)"partition styles based on your needs. Initializing will prepare the disk for formatting and new partitions.
3. Run Check Disk Utility (chkdsk)
After initialization, use the "chkdsk"command to scan and repair file system errors. Open Command Prompt as administrator and enter: chkdsk g: /f /r

Replace g: withthe drive letter of your disk. This can fix bad sectors and improve disk stability.
Wrap Up
Recovering data from an uninitialized disk may seem daunting, but with the right tools and steps, it can be done quickly and safely. Remember to always recover your important files before attempting any disk repairs or initialization to avoid permanent data loss.
After recovery, follow the proper disk repair methods to restore your drive’s functionality. By taking these precautions, you can effectively protect your valuable data and keep your storage devices running smoothly.If the disk is not showing up or missing, you can turn to the "Partition Lost Recovery" feature of MyRecover, which can help recover data from lost or missing partitions.


Stay Updated With Our
Latest Tips
Add us as a preferred source on Google to never miss helpful guides.