
How to Stop Windows Defender from Deleting Files
If you need to stop Windows Defender from deleting files, this guide shows simple ways to whitelist programs, adjust security settings, and protect critical data from unwanted removals while keeping your PC safe and fully under your control.
By Vera / Updated on December 1, 2025
Understanding Why Windows Defender Deletes Files
Before you start changing settings, it helps to understand what Defender is doing behind the scenes.
Common Reasons Your Files Get Flagged
Windows Defender may delete a file because:
- It thinks the file contains a virus or malware.
- The file’s code resembles a known threat.
- It comes from an unknown or suspicious source.
- It's a cracked program, game mod, or custom script.
- It is a newly released tool not yet recognized by Microsoft.
Sometimes Defender is right. Other times… it's just being overly protective.
When You Should Not Disable Protection
Here’s the rule of thumb:
➡ If you’re not 100% sure the file is safe, don’t disable protection.
➡ If the file comes from a random website, double-check it first.
Your PC’s security comes before convenience.
How to Stop Windows Defender from Deleting Files
This guide walks you through multiple safe and effective ways to stop Windows Defender from deleting files, without putting your entire system at risk.
Method 1: Allow Files Through Windows Security
If Defender already deleted your file, don’t panic—you can restore it.
Step-by-Step: Restore Files from Protection History
1. Open Start Menu. Type Windows Security and open it
2. Go to Virus & threat protection. Click Protection history.
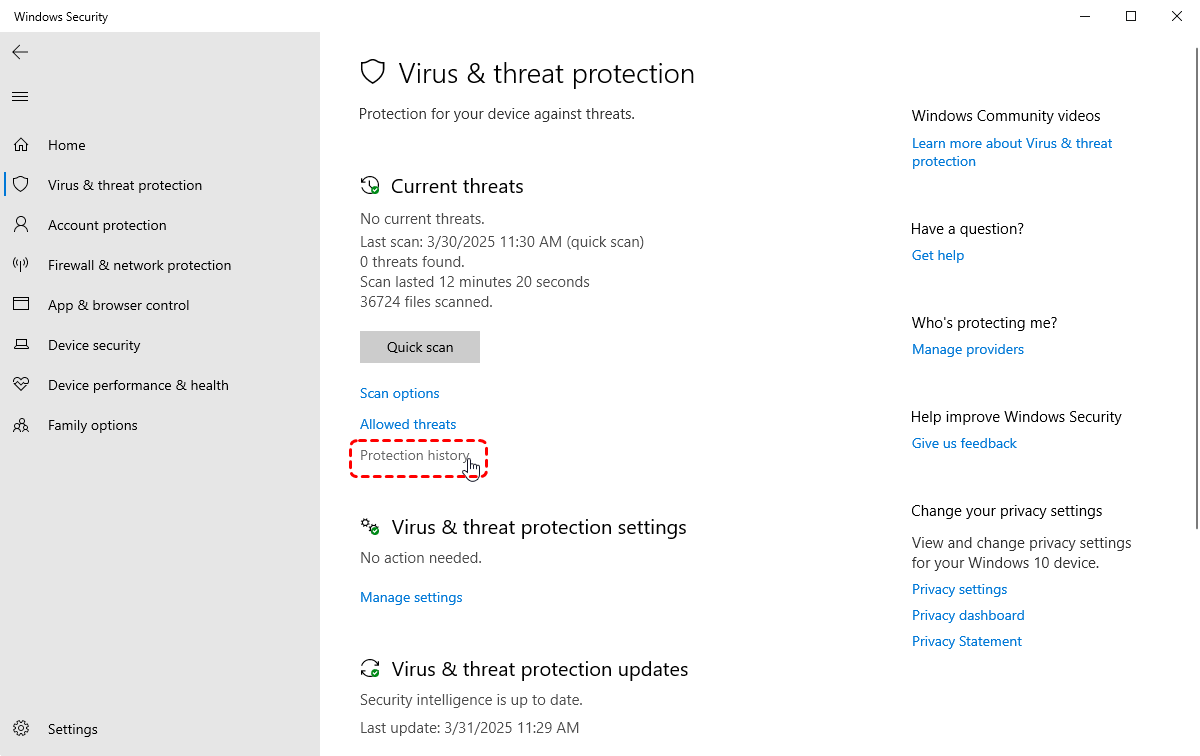
3. Find the blocked or removed file. Select Allow on device.
That’s it! The file will no longer be deleted automatically.
Add an Allowed Threat
If you want Defender to never delete that file again:
1. Go to Windows Security. Choose Virus & threat protection.
2. Click Manage settings under Virus & threat protection settings.
3. Scroll down to Add or remove exclusions. Add your file or folder.
This tells Windows Defender, "Hey, leave this one alone".
Method 2: Exclude Files, Folders, or Programs
This is the safest long-term way to stop Defender from messing with your files.
Step-by-Step: Add Exclusions in Windows Security
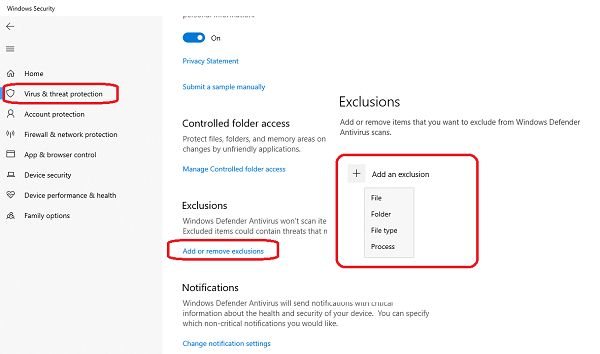
1. Open Windows Security. Go to Virus & threat protection. Click Manage settings.
2. Scroll down to Exclusions. Click Add or remove exclusions.
3. Select File, Folder, File type, or Process.
You can exclude:
- Game folders
- Development environments
- ISO files
- Tools with false flags
- Scripts
What You Can Safely Exclude
Safe items to exclude include:
- Files from trusted software developers.
- Programs you use daily.
- Local projects you wrote yourself.
- Mods from verified creators.
Avoid excluding entire drives or system folders—that’s risky.
Method 3: Turn Off Real-Time Protection (Temporary)
If you need to open one file just once without Defender blocking it, this method works perfectly.
When This Method Is Useful
- Running a program with unusual scripts.
- Installing a modding tool.
- Using a network or developer tool.
- Accessing a file you know is clean.
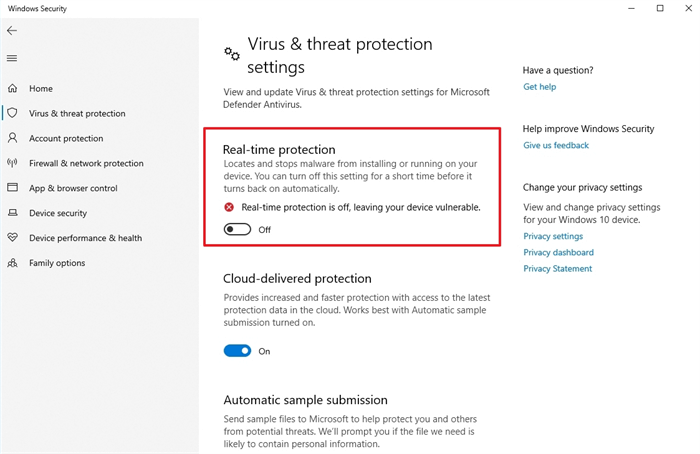
Risks of Turning Off Real-Time Protection
Turning off real-time protection means:
- You’re temporarily vulnerable.
- Malware can run unnoticed.
So only use this method if you fully trust the file.
Method 4: Disable Windows Defender Using Group Policy (Windows Pro/Enterprise)
If you're using Windows 10/11 Pro, this method gives you full control.
Step-by-Step Instructions
1. Open Run (Win + R).
2. Type: gpedit.msc.
3. Navigate to: Computer Configuration → Administrative Templates → Windows Components → Microsoft Defender Antivirus.
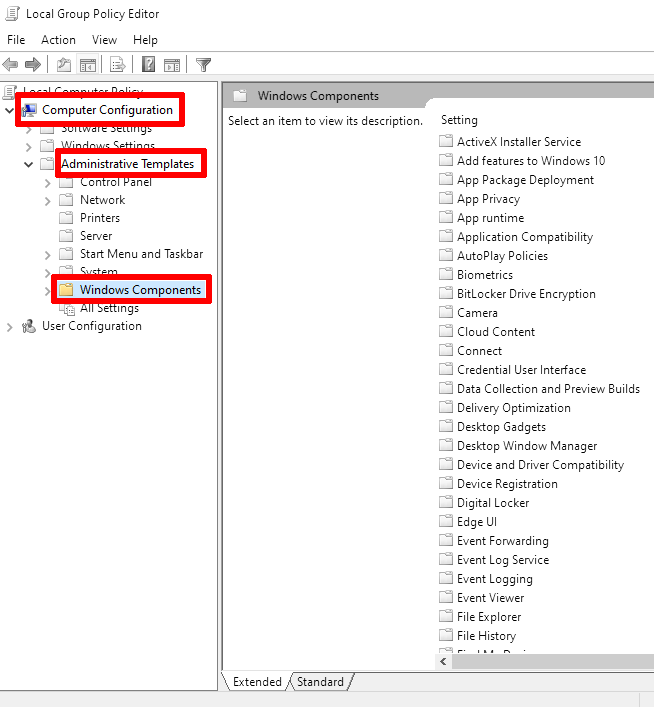
4. Double-click Turn off Microsoft Defender Antivirus. Select Enabled.

5. Click Apply → OK. Restart your PC.
Done!
What If Group Policy Is Missing?
If you're using Windows Home, Group Policy isn’t included by default. But don’t worry—there’s another solution.
Method 5: Disable Windows Defender Using Registry Editor (Windows Home)
Warning: Editing the Registry can break Windows if you’re careless. Follow the steps EXACTLY.
Step-by-Step Instructions
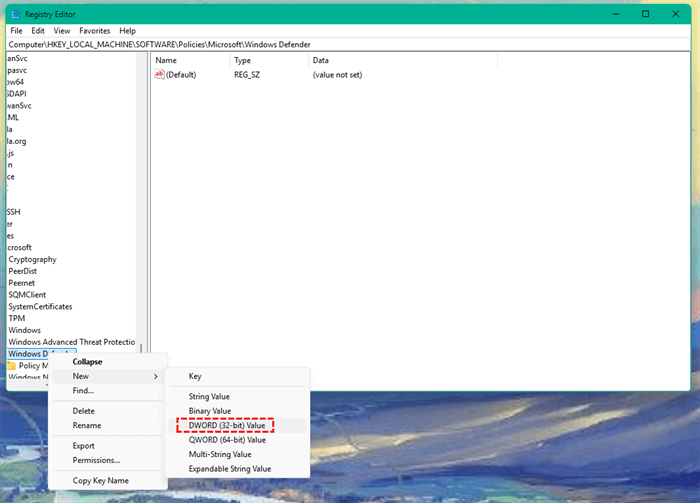
1. Press Win + R. Type regedit.
2. Navigate to: HKEY_LOCAL_MACHINE\SOFTWARE\Policies\Microsoft\Windows Defender.
3. Right-click → New → DWORD (32-bit) Value. Name it: DisableAntiSpyware.
4. Double-click it. Set value to 1. Restart your PC.
Windows Defender should now be disabled.
How to Undo Registry Changes
Just delete the DisableAntiSpyware entry and reboot your system.
What to Do When Windows Defender Deletes Files Permanently?
Sometimes Defender permanently deletes files, especially if they're quarantined too long. That’s where MyRecover, a professional Windows data recovery tool, saves the day. You may need it when:
- The file never appears in Protection History.
- It was auto-removed.
- Quarantine was emptied.
- Real-time protection instantly deleted the file.
How MyRecover Helps Recover Files Easily
MyRecover can:
- Scan for files Windows Defender removed.
- Recover deleted files with high success rates.
- Restore documents, programs, installers, and more.
- Work on Windows 11/10/8/7 & Server.
1. Install MyRecover – Download and open the program.
2. Select Drive – Pick the drive where the file was deleted.
3. Scan – Click Scan to search for deleted files.

4. Find File – Browse or search for the file you want.
5. Recover – Select it and click Recover, saving it to a safe location.

Additional Tips to Prevent Future File Deletions
1. Check Files with VirusTotal
If you’re unsure whether a file is safe:
1. Go to virustotal.com.
2. Upload your file.
3. Read the report.
If only 1 or 2 engines flag it, it’s likely a false positive.
2. Keep Backups on External or Cloud Drives
A deleted file is only a problem if you don’t have a backup. Use:
- OneDrive
- Google Drive
- External hard drives
- NAS
A quick backup can save you hours of frustration.
Conclusion
Stopping Windows Defender from deleting your files doesn’t have to be complicated. Whether you want to temporarily disable protection, permanently exclude trusted items, or restore files already deleted, you now have multiple effective methods to choose from.
Just remember: keep security in mind, exclude only trusted files or folders, and use tools like MyRecover if Defender wipes something important.
Windows Defender is powerful—but now you have the power to control it.


Stay Updated With Our
Latest Tips
Add us as a preferred source on Google to never miss helpful guides.