
How to Recover Data from HP Laptop Hard Drive: Expert Solutions
Accidentally lost data on HP laptop hard drive? Fear not! This guide shares expert solutions to retrieve lost data from your HP laptop hard drive. Whether you’re a professional or a beginner, you’ll find methods that satisfy you.
By Aria / Updated on August 18, 2025
Can You Recover Data from a HP Laptop Hard Drive?
Renowned globally, HP computers are extensively used across the world. Its laptops are embraced by billions of users in diverse sectors such as business, education, and entertainment. However, like most other computer brands like Lenovo, Dell, and Toshiba, HP laptops are not immune to data loss.
The good news is, in many cases, you can recover your data from HP laptop hard drive, sometimes without even leaving your desk. In this article, based on the situations most users encounter, we roughly categorize HP laptop into two types:
One is the hard drive and laptop that can work normally,
The other is the HP laptop that fails to boot or hard drive cannot be recognized by the computer.
How to Recover Data from HP Laptop Hard Drive [For Functional Hard Drive]
This section will delve into how to recover data from a functional HP laptop hard drive. If you have backed up relevant files using Windows' built-in backup tools, they allow you to restore lost files directly from the backup. If no backup is available, professional data recovery tools can also help you retrieve the lost files from laptop hard drive.
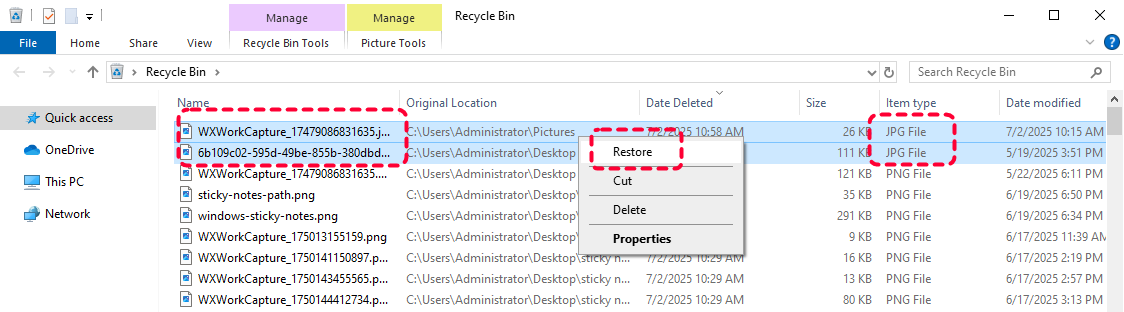
Method 1. Check the Recycle Bin
When files are deleted (not permanently deleted) in Windows, they often go to the Recycle Bin first and allow you to restore them, making recovery quick and easy.
Step 1. Double click the Recycle Bin icon to open it.
Step 2. Browse through the deleted items and select the file you wish to recover.
Step 3. Right click on it and choose "Restore" to return it to its original location.
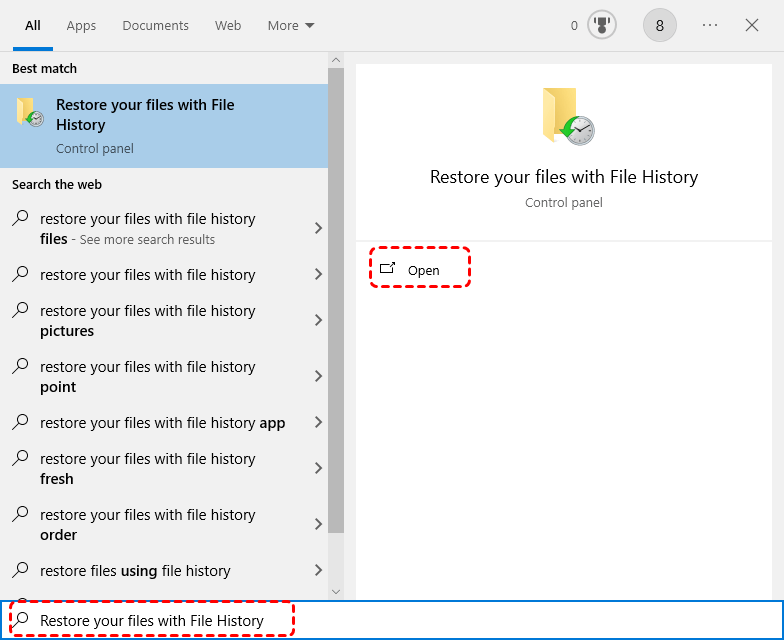
Method 2. Restore Your Files from File History
File History is a Windows built-in backup tool, which can back up your files different versions and allow you to restore desired version when you needed. If you have enabled File History on Windows before data loss, you can follow these steps to recover previous version of your files or folders.
Step 1. Type "Restore your files with File History" in the start menu and open it.
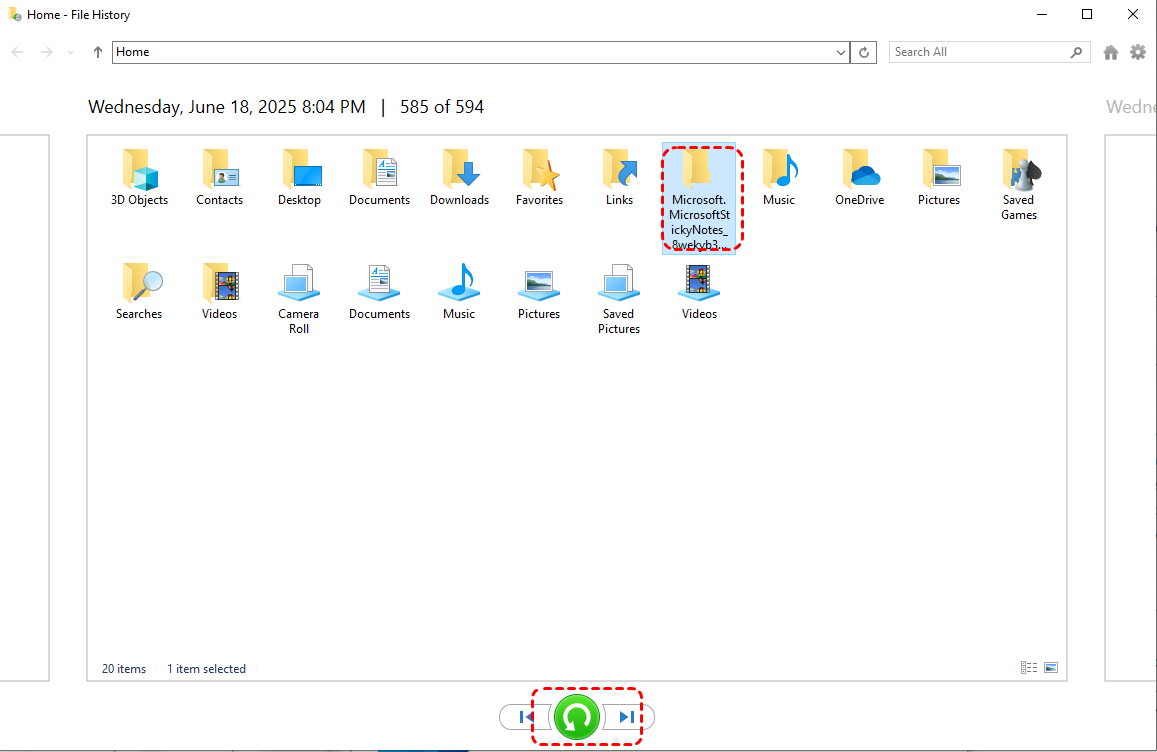
Step 2. Navigate to the folder or file you wish to recover and choose a desired version based on the backup time.
Step 3. Click the green "Restore" button to recover it.
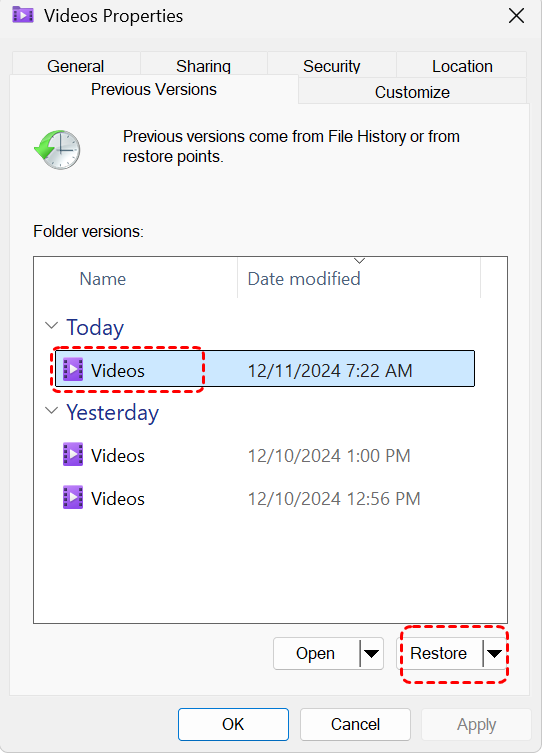
Alternatively, you can restore your files with "Restore previous versions" feature in File Explorer.
Step 1. Locate to the folder where the lost files were originally stored in File Explorer.
Step 2. Right click on it and choose "Restore previous versions" from the context menu.

Step 3. Choose a version from the list of available versions and click "Restore" to recover it.
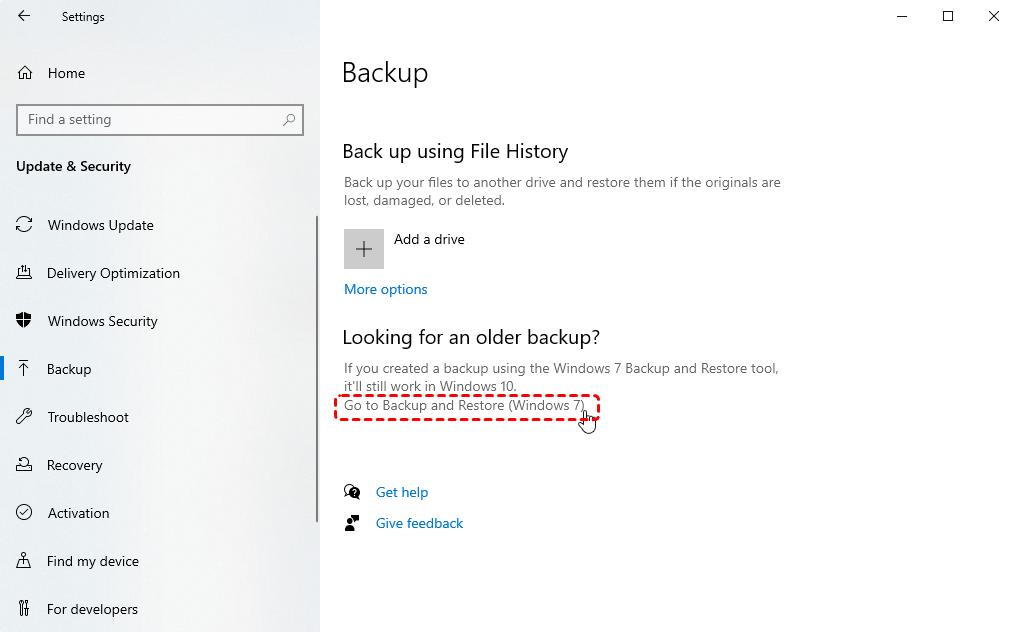
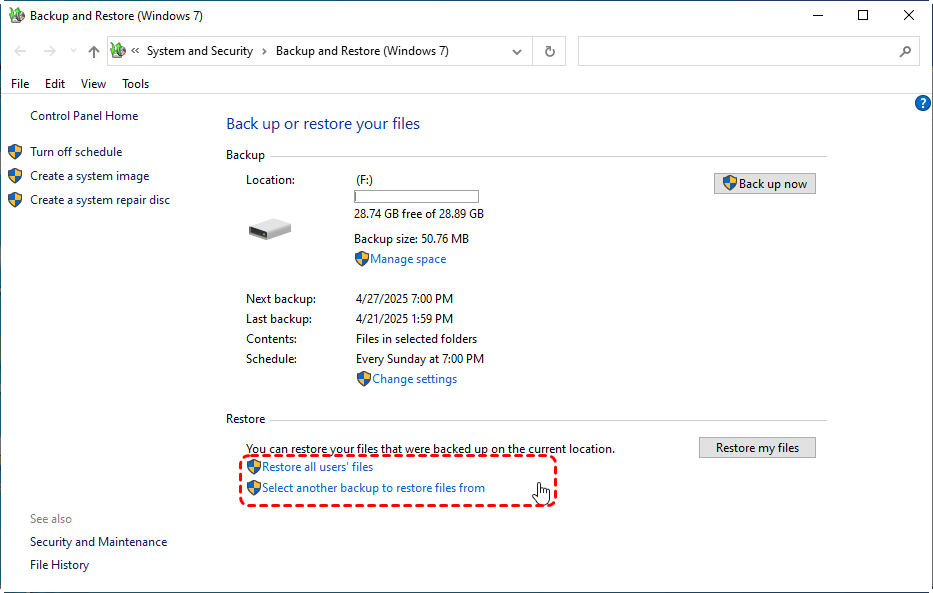
Method 3. Restore from Backup and Restore (Windows 7)
This is a classic Windows backup tool that can create a full system image and let you restore files from the saved backup set including personal files, when something goes wrong. Follow below steps to restore files from Backup and Restore:
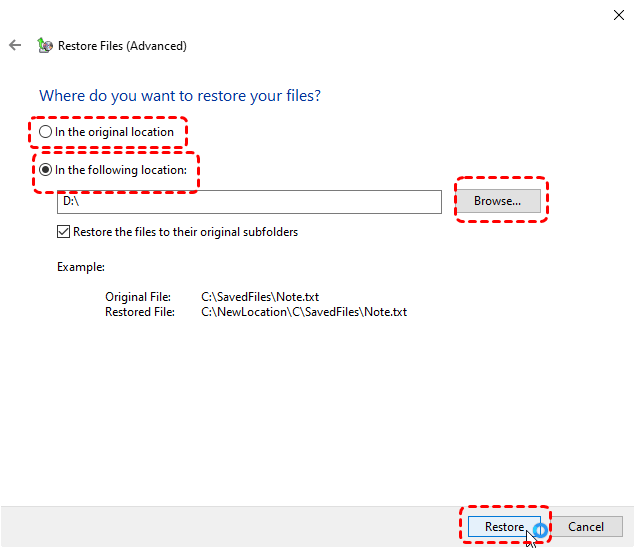
Step 1. Open "Backup Settings" and click "Go to Backup and Restore (Windows 7).
Step 2. Choose "Select another backup to restore files from" and choose a created backup including the lost data.
Step 3. Check the "Select all files from this backup" option to restore all files. You can also select specific file or folder by clicking on "Browse for files/folders".
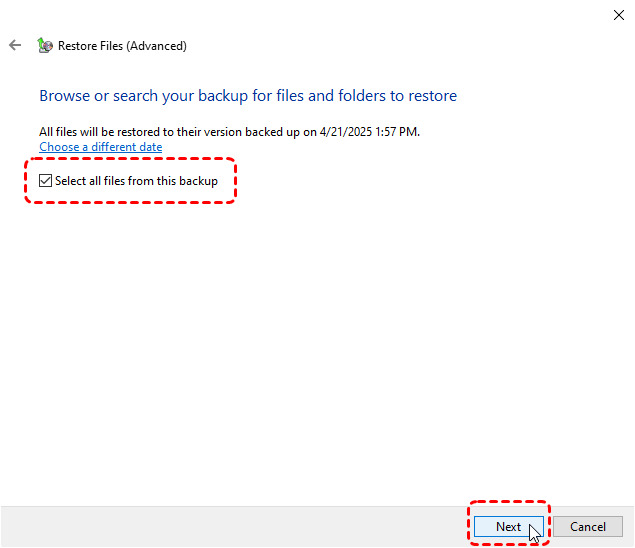
Step 4. Choose a location to save the restored files and click "Restore" to begin the process.
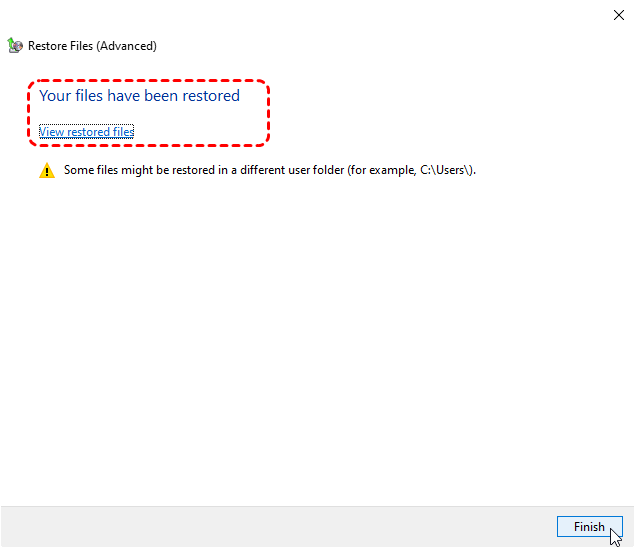
Once the process is finished, the message "Your files have been restored" will pop out. You can check then recovered files by clicking on "View restored files".
- Notes:✎...
- File History and "Backup and Restore" only works when you have created backup before file deletion.
Method 4. Run Windows File Recovery Command (Command-Line Tool)
For advanced users, Microsoft’s free command-line utility, Windows File Recovery, can recover permanently deleted files from local storage devices like USB drives, SD cards, HDDs and more. But it only compatible with Windows 10 and 11.
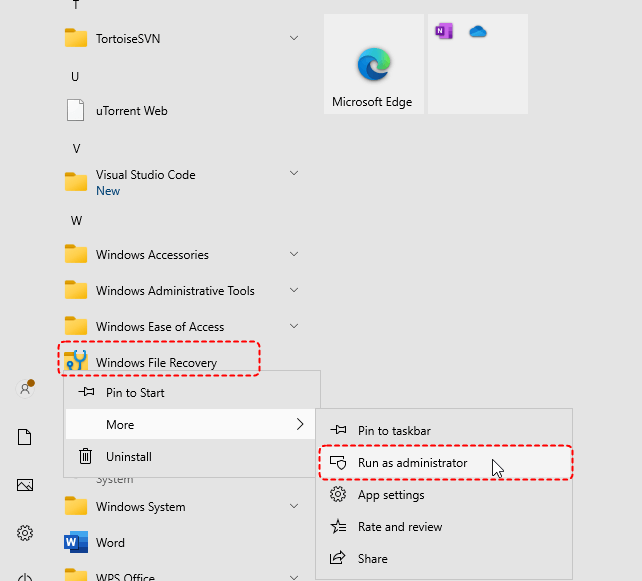
Step 1. Download and install Windows File Recovery on your HP laptop from secure channel.
Step 2. Open Windows File Recovery and run it as administrator.
Step 3. Type the following command "Winfr C: D: /extensive" and press "Enter". Replace the drive letters "C" and "D" with your actual drive letters.
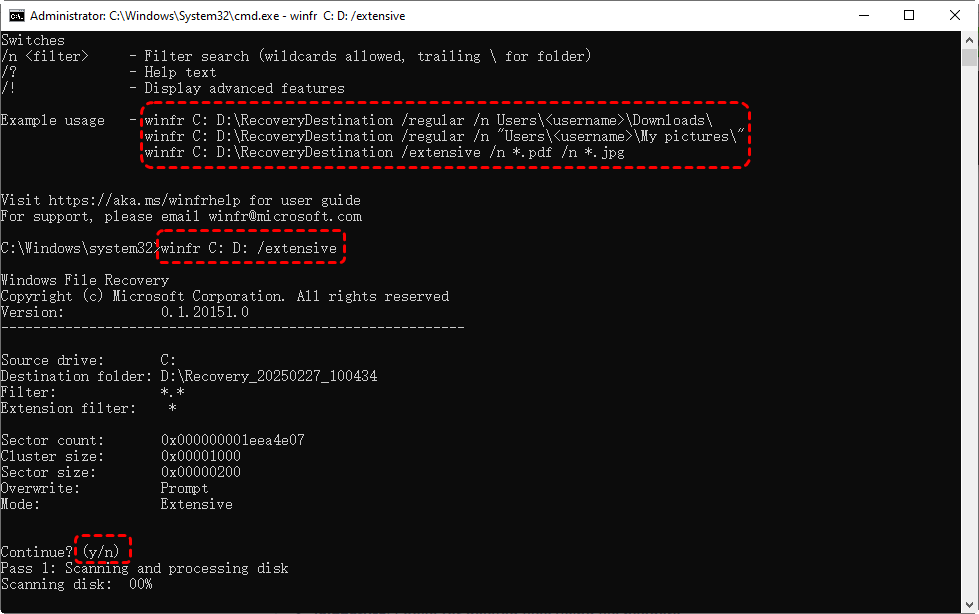
- ★Tips:
- C: the source drive letter (your HP laptop hard drive).
- D: the destination drive letter.
- Extensive: perform a comprehensive scan. If your files were deleted recently, you can switch to "regular" mode to save more scanning time.
You can also recover the specific file, file type or folder with Windows File Recovery command. For instance, to recover all of the ".zip" files, you can enter the command "Winfr C: D: /regular /n *.zip" and press "Enter".
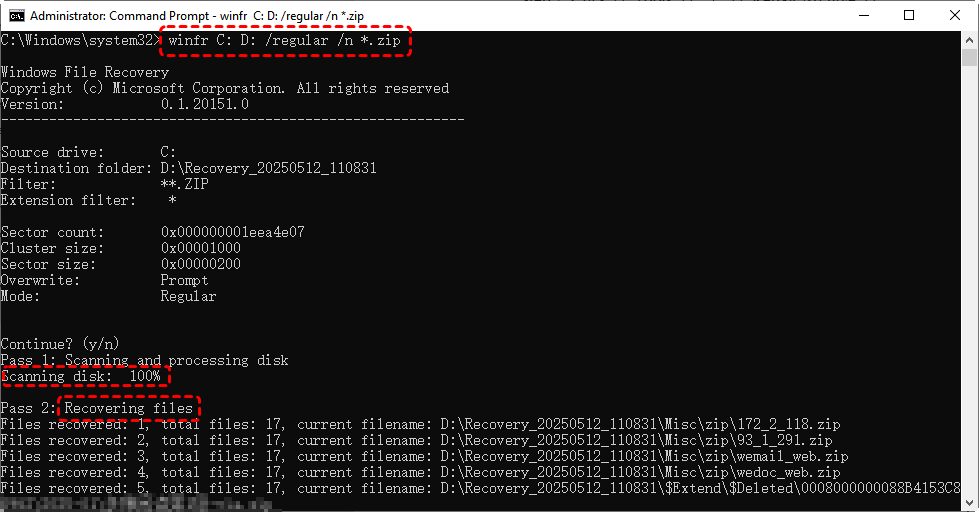
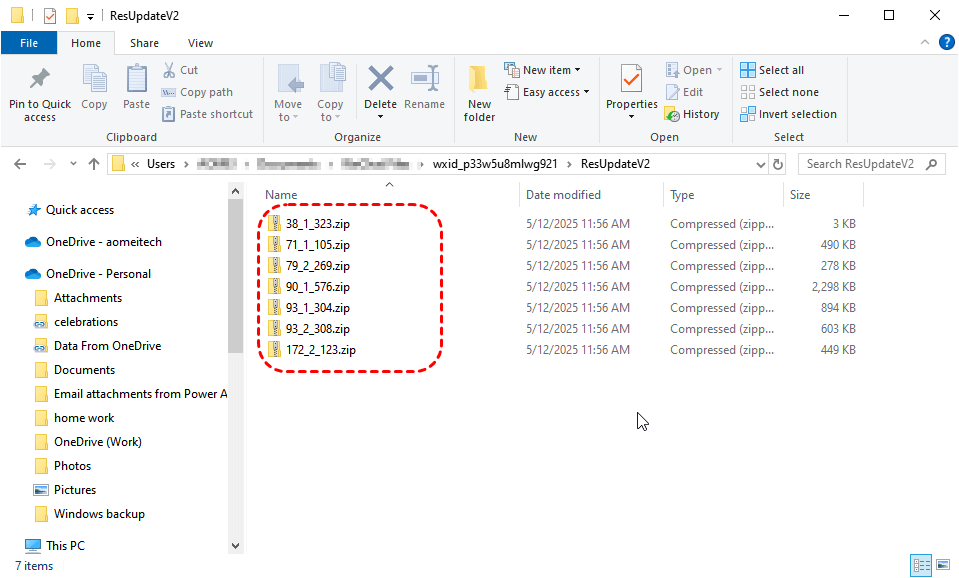
When the process is completed, you can press "y" to check the recovered files in the destination folder.
Method 5. Recover with MyRecover (All-in-One Recovery Solution)
If you don’t have any backups available and aren’t accustomed to using command-line tools, the professional data recovery tool, MyRecover, is tailor-made for you. It features a visual user interface that simplifies the data recovery process, allowing users to recover data with just a few clicks on icons.
It can scan all the drive on your computer and provide a chance to recover deleted files. MyRecover is a dedicated recovery program that works for deleted files, formatted drives, lost partitions, inaccessible hard drives and more.

- Easy to use, no technical skills required.
- "Quick Scan" for recently deleted files while "Deep Scan" for thoroughly searching lost data from formatted, corrupted, or inaccessible drives.
- Works on all modern windows versions like Windows 11, 10, 8, 7 and Server 2025, 2022, 2019, 2016.
- Supports over 1000+ file types recovery, including documents, photos and videos (JPG, PNG, MP4, etc.), emails, compressed files, and more.
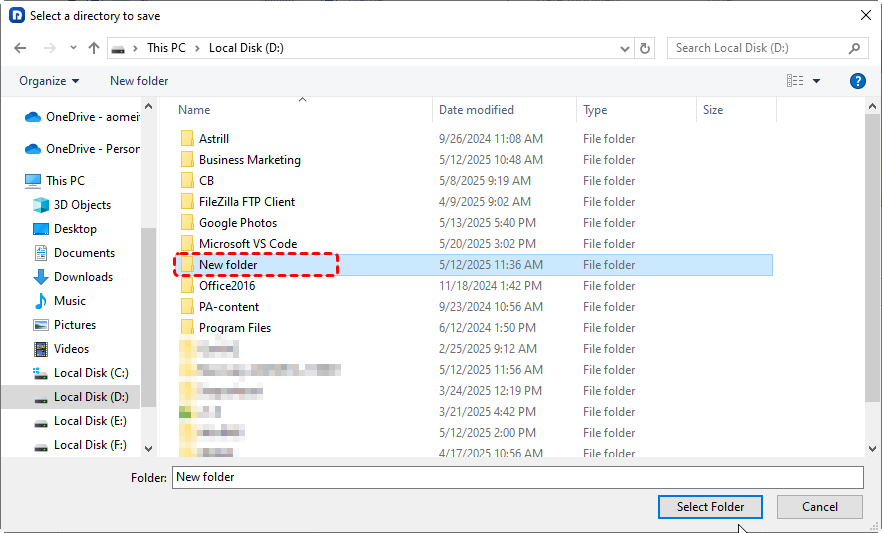
Step 1. Download and install MyRecover on your HP laptop from a secure channel, avoid installing it on the drive with lost files.
Step 2. Launch it and choose a drive where the lost files were saved in, then click "Scan".

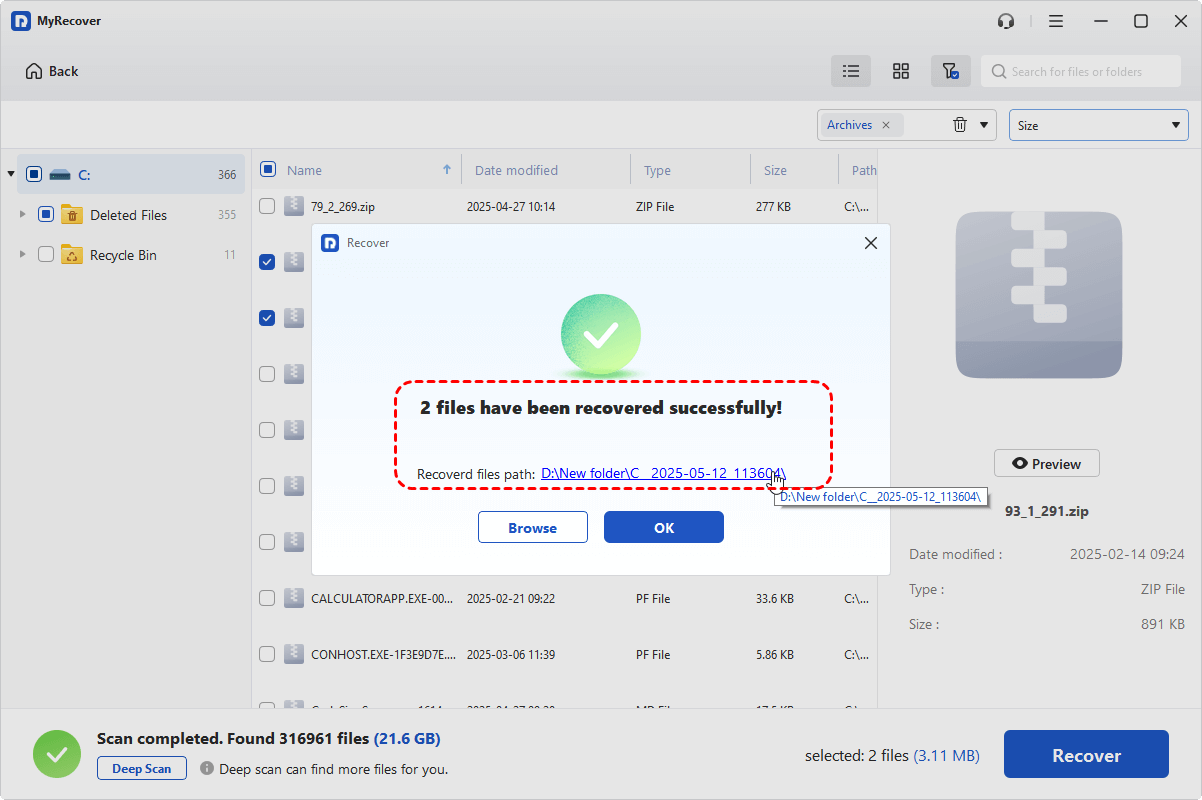
Step 3. Choose the files you intend to recover from the recoverable lists and click "Recover".
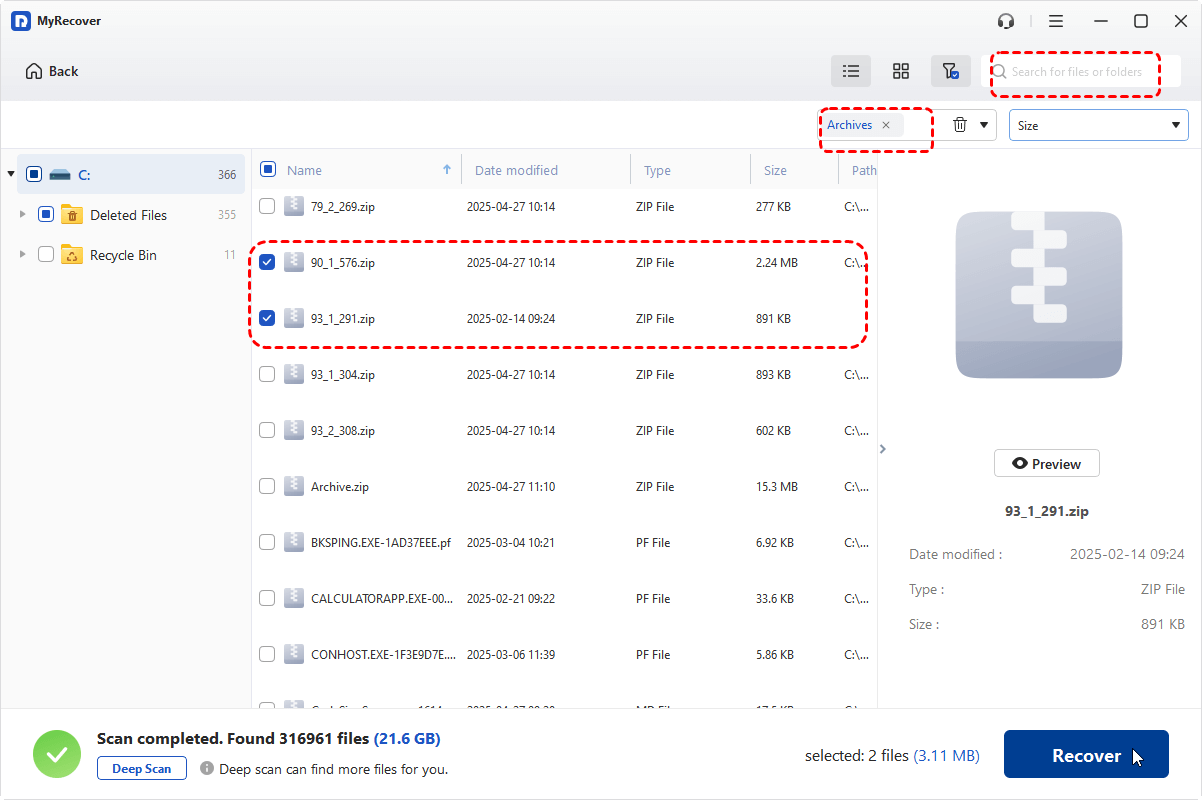
Step 4. Select a safe location to save the recovered files.
Upon completion of the recovery process, the message "Files have been recovered successfully" will pop out. You can access and check the recovered files by clicking on the destination folder path and "Browse" button.
How to Recover Data from HP Laptop Hard Drive That Won't Boot [For Unbootable Hard Drive]
If your HP laptop won’t start, whether due to OS corruption, hardware failure, or a dead motherboard, you can still access the hard drive and recover data from laptop drive with correct methods.
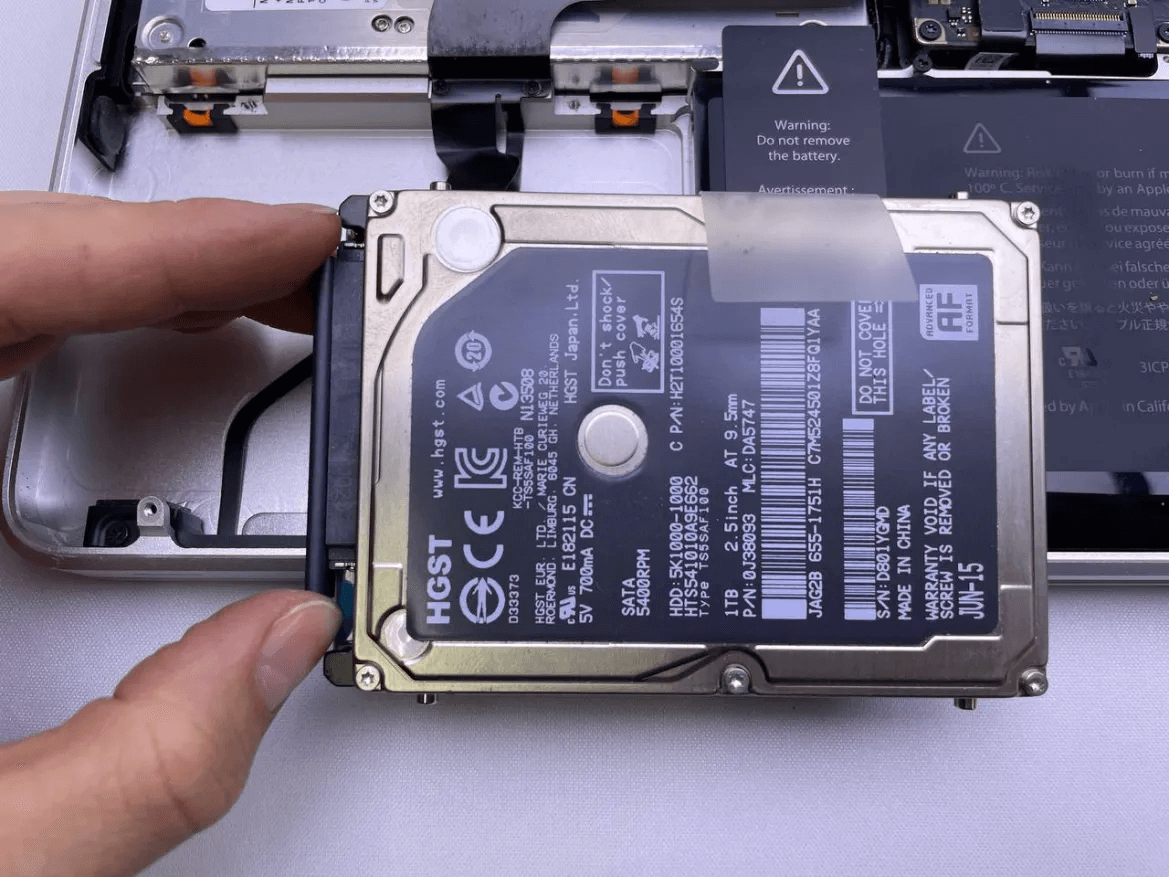
Remove the HP Laptop Hard Drive
If your HP laptop fails to boot entirely, you can remove the HP hard drive from the laptop, connect it to a properly functioning computer, and then you can access and recover data from the old hard drive using File Explorer or a data recovery tool like MyRecover.
Boot Laptop and Recover Data with MyRecover
If you’re worried that unprofessional removal of the hard drive from your HP laptop might cause damage to it, you can also try MyRecover to create a bootable disk to start your HP laptop and recover the data you need. This won’t cause any physical damage to the hard drive, so you can rest assured completely.
Step 1. Download and install MyRecover on a working computer and prepare a blank USB. If there is data on the USB drive, you’d better back up these files first. Otherwise, it may lead to data loss.
Step 2. Launch it and select "PC Crashed Recovery" section, then insert the USB into the working computer.
Step 3. Choose "USB Boot Device" and click "Create" to make a bootable media.
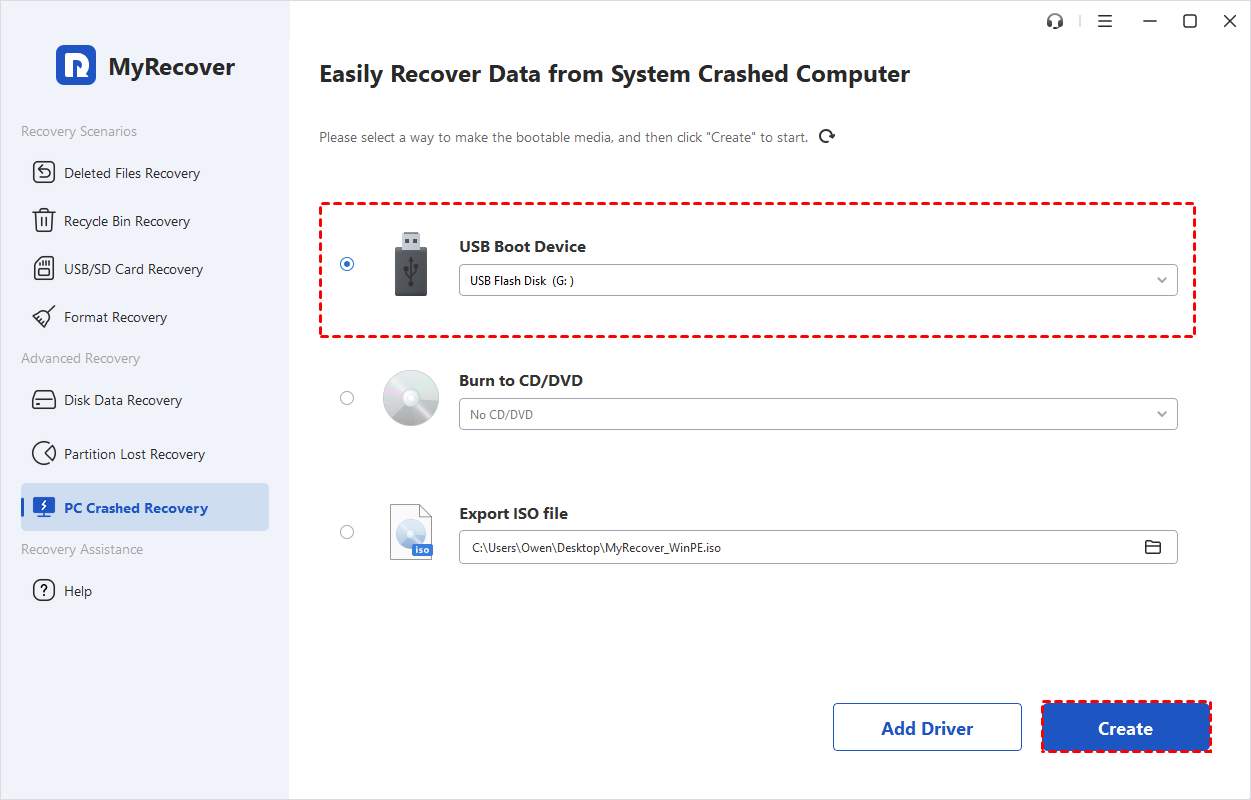
Step 4. Wait several minutes until the bootable media creating successfully.
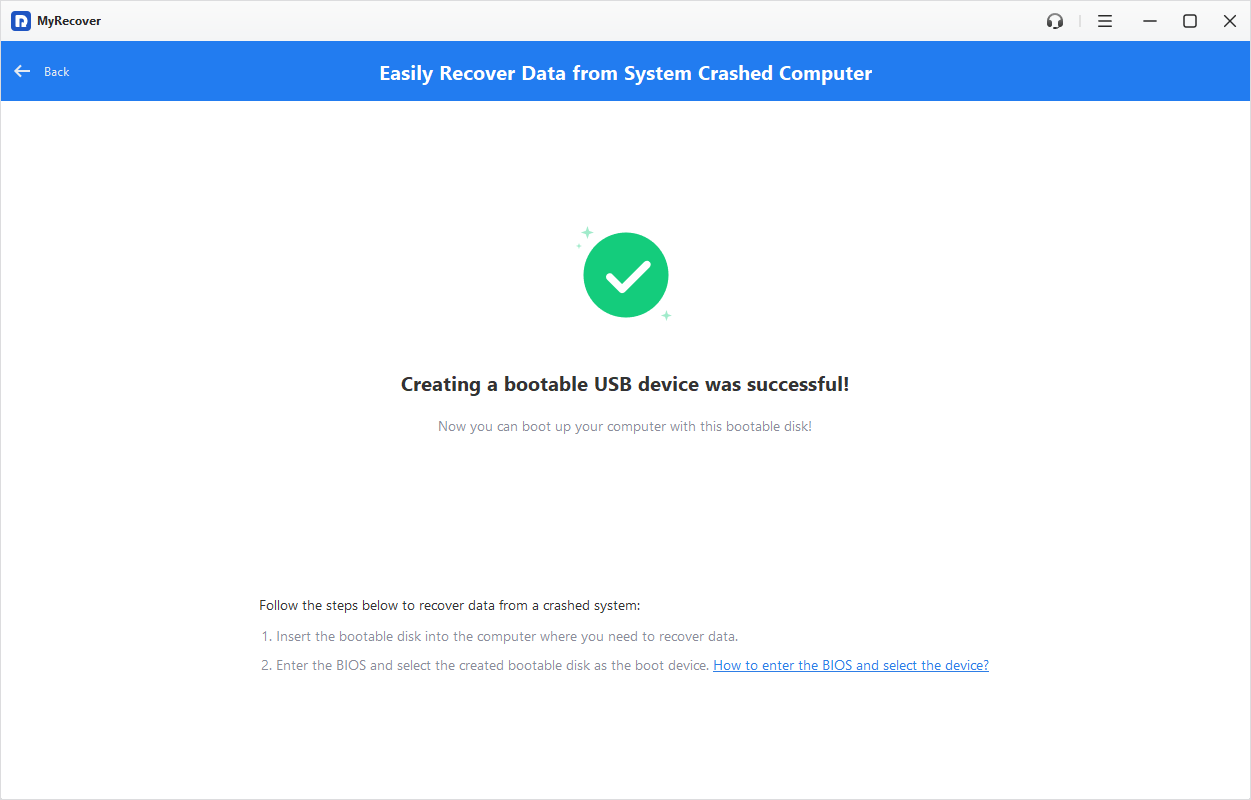
Step 5. Remove the USB bootable media and connect it to the unbootable HP laptop.
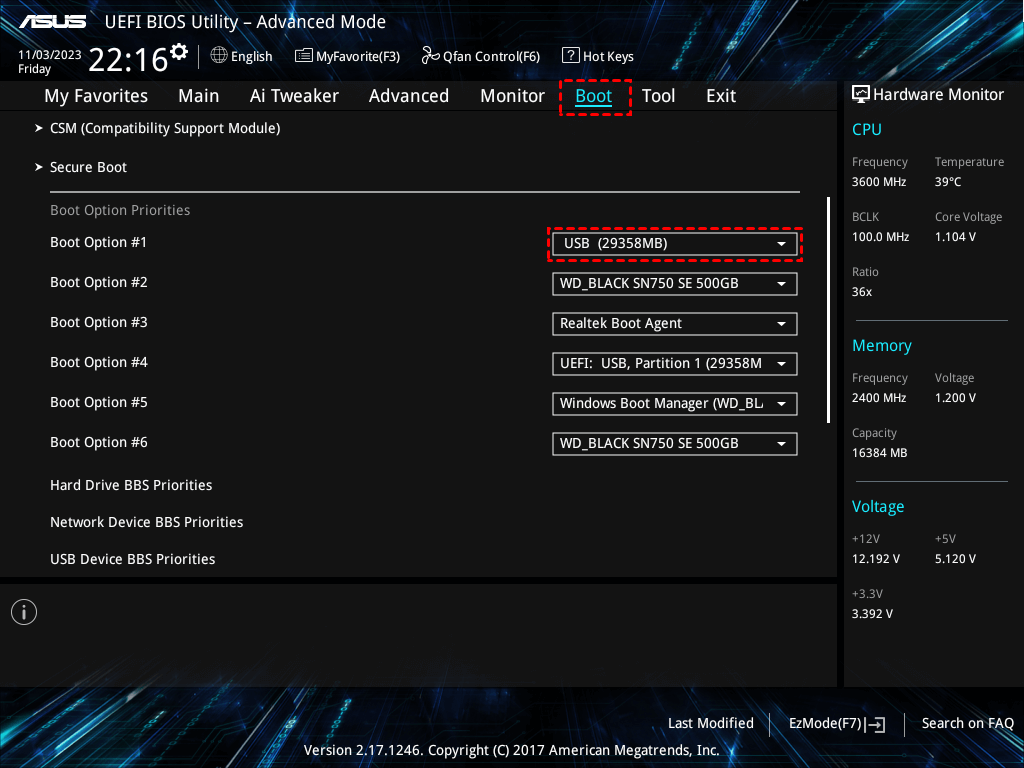
Step 6. Power on the laptop and enter BIOS system (press F10, F2 or Esc).
Step 7. Choose the USB bootable media to boot the HP laptop hard drive.
Then you can follow the steps in Method 5 to recover data from the hard drive of your HP laptop.
Summary
Whether your HP laptop is running fine or completely unbootable, there’s usually a way to recover data from HP laptop hard drive—from quick Recycle Bin restores to advanced scanning with MyRecover. If the laptop won’t boot, you can either remove the drive and connect it to another PC or use MyRecover’s bootable media to run recovery directly.
For IT pros, technicians, or families with multiple devices, MyRecover’s Technician version is especially useful. It lets you perform unlimited recoveries on multiple computers with just one license, making it a cost-effective choice for long-term Windows data recovery.


Stay Updated With Our
Latest Tips
Add us as a preferred source on Google to never miss helpful guides.