
Fixed: SSD Not Showing Up in File Explorer, Disk Management or BIOS
If your SSD is not appearing in File Explorer, Disk Management, or BIOS, you have landed on the right page. This guide explains common causes, from connection problems to drive initialization issues, and provides practical solutions to get your SSD recognized by your system.
By Emma / Updated on October 30, 2025
Installed a New SSD But It's Not Showing Up Anywhere!
I just installed a new SSD drive (Samsung NVMe 2TB) to my computer. However, i cannot see it in my Windows File Explorer, cannot save any data to it. Why my new SSD not showing up? Any one can help? Thanks a lot!

Possible Reasons of SSD Not Showing Up on Windows
If your SSD is visible in the BIOS but doesn’t appear in Windows, it means your computer can detect the hardware at a basic level, but Windows is unable to access or recognize it properly. Several factors could be causing the issue, including:
⭕Loose or Faulty Connection: SATA/NVMe cable or port issues.
⭕Drive Not Initialized: New SSD needs initialization in Disk Management.
⭕No Drive Letter Assigned: The SSD exists but Windows hasn’t assigned it a letter, so it won’t appear in File Explorer.
⭕Incorrect BIOS Settings: SSD disabled, wrong mode (AHCI/RAID), or not detected properly.
⭕Outdated or Missing Drivers: Missing storage controller or NVMe drivers in Windows.
⭕Partition or File System Issues: Unallocated space or unsupported file systems.
⭕Faulty SSD: The drive itself may be defective or damaged.
Solutions: SSD Not Showing Up in Windows File Explorer
If your SSD is detected in Disk Management but doesn’t appear in Windows File Explorer, it means Windows recognizes the hardware but hasn’t assigned it a usable drive letter or formatted partition. This usually can be resolved through the followingsimple tweaks.
1: Initialize and Create a Recognized Partition
If your SSD is brand new or uninitialized, Windows won’t recognize it until you initialize the disk and create a partition:
Step 1. Open Disk Management (Win + X > Disk Management).
Step 2. Find the new SSD labeled Not Initialized. Right-click the drive and select “Initialize Disk”.
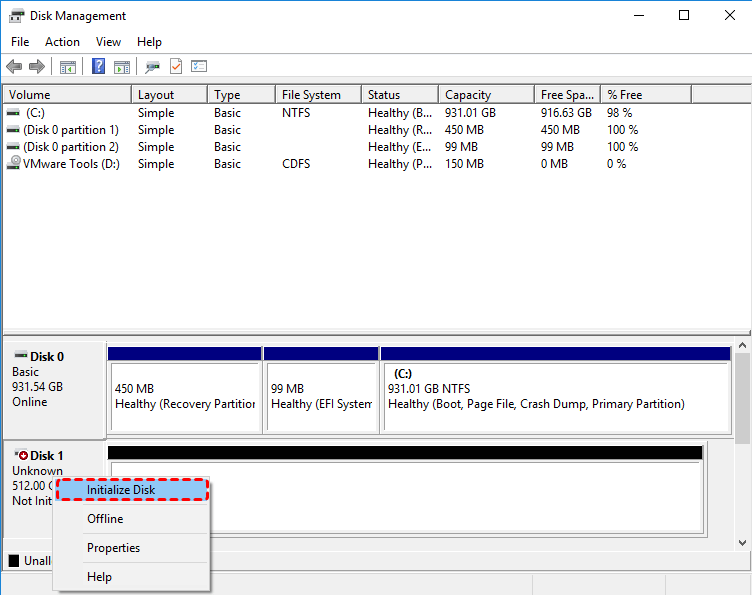
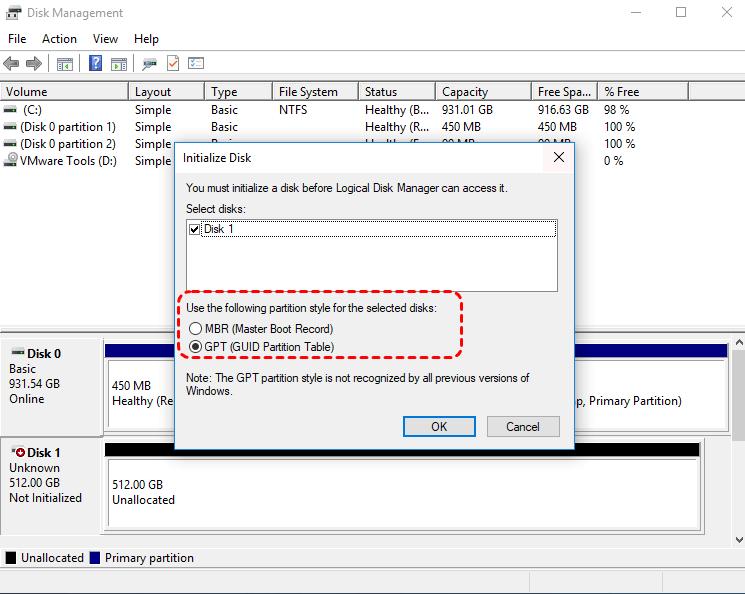
Step 3. Choose GPT (recommended for modern systems) or MBR.
Step 4. After initialization, right-click the unallocated space and select “New Simple Volume”.

Step 5. Follow the wizard to assign a drive letter and format the partition (NTFS is recommended for Windows).

Once completed, the SSD will appear in Windows File Explorer, ready for use.
2: Assign or Change a Drive Letter
Sometimes your SSD may not appear in File Explorer because it either doesn’t have a drive letter assigned or the assigned letter conflicts with another drive. Fortunately, you can easily fix by adding one or changing the current one.
Step 1. Open Disk Management and locate your SSD in the list of drives. Check if it already has a drive letter (e.g., “D:” or “E:”).
Step 2. If it doesn’t, right-click the SSD’s partition and select “Change Drive Letter and Paths”.
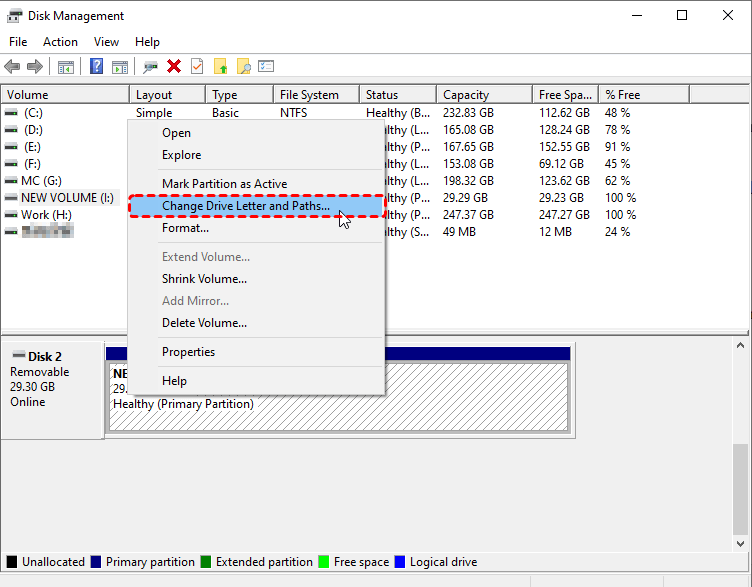
Step 3. Click “Add” to assign a new letter. Choose one from the dropdown list and click “OK”. If a letter is already assigned but conflicts with another, try clicking “Change” and assigning a different one.
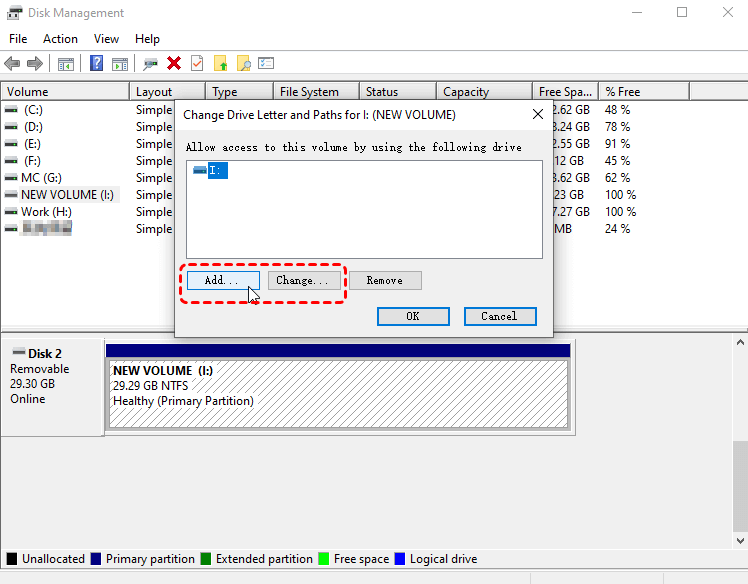
Once the drive letter is assigned, close Disk Management. Your SSD should now show up in Windows File Explorer under the new drive letter.
3: Check and Repair File System Error
If your SSD still doesn’t show up in File Explorer even after assigning a drive letter, the issue may be due to file system errors or corruption. These errors can prevent Windows from mounting the drive properly, even though it’s visible in Disk Management.You can use Windows built-in tools like CHKDSK to scan and repair file system issues.
- Note:✎...
- Use the CHKDSK command with caution, as there is a chance CHDSK may delete files or even overwrite data while repairing file system errors.
Step 1. Press “Win + S”, type cmd, then right-click “Command Prompt” and select “Run as administrator”.

Step 2. In the Command Prompt window, type the following command and press Enter: chkdsk X: /f /r

(Replace X with the drive letter of your SSD.)
Step 3. Wait for Windows to scan and automatically repair any detected file system errors.
Step 4. Once completed, restart your computer and check whether the SSD now appears in File Explorer.
4: Set the Disk Online
In some cases, your SSD may not appear in File Explorer because it’s been set to Offline due to power fluctuations, improper ejection, or unexpected system errors. When a disk is offline, Windows detects it but prevents access until it’s manually brought online.
Step 1. Open Disk Management and check whether the SSD is labeled "Offline". It may appear grayed out.
Step 2. Right-click the SSD and select “Online" from the context menu.
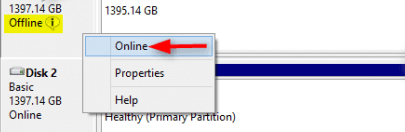
Once the disk status changes to Online, check File Explorer again. Your SSD should now appear normally and be accessible.
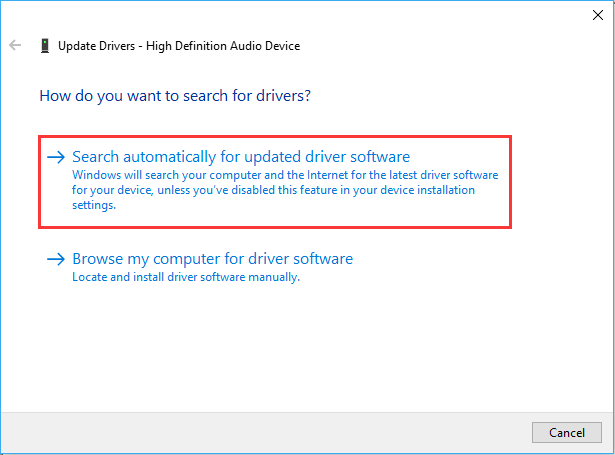
5: Update or Reinstall Disk Driver
If your SSD is recognized in the BIOS and Disk Management but still fails to appear or function correctly in File Explorer, the issue may be caused by outdated, missing, or corrupted disk drivers. Updating or reinstalling the disk driver can help Windows properly detect and mount your SSD.
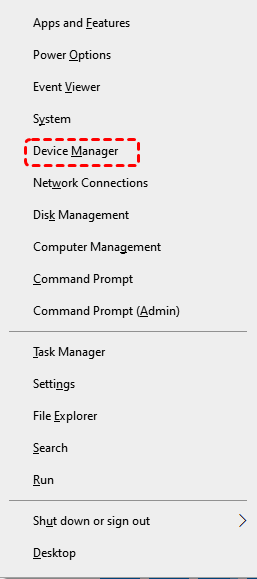
Step 1. Press “Win + X” and select “Device Manager”.
Step 2. Expand Disk drives to view all connected drives. Right-click your SSD and select “Update driver”.
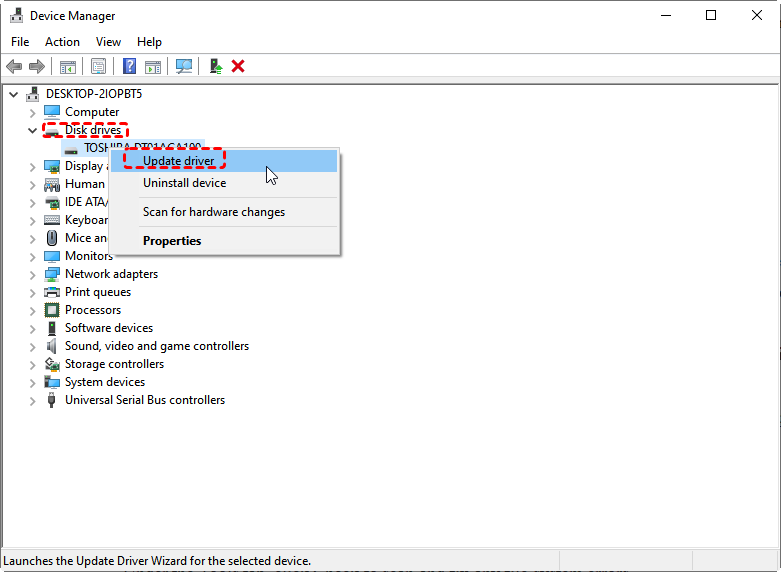
Step 3. Choose “Search automatically for updated driversoftware”. Windows will search for the latest compatible driver and install it automatically.
If no updates are found, try uninstalling the driver instead: Right-click the SSD again and choose “Uninstall device”.
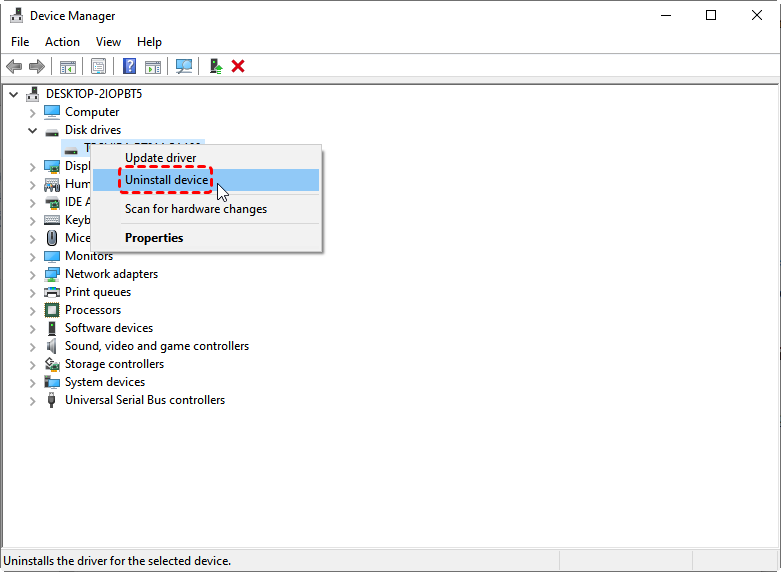
Restart your computer — Windows will automatically reinstall the correct driver on startup.Once the driver is reinstalled, open File Explorer to check if your SSD is now visible and accessible.
Solutions: SSD Not Showing Up in Disk Management
If your SSD appears in the BIOS/UEFI but doesn’t show up in Disk Management, the issue is usually related to connection, driver, or hardware-level problems. BIOS confirms the SSD is physically recognized, but Windows can’t access or communicate with it properly. Here are the most common causes:
- 💡Note:
- Sometimes your SSD may actually appear in Disk Management, but the window is too small or crowded to display it below other drives. Try resizing or scrolling the Disk Management window to check for hidden drives.
1: Check Connection
Even though the BIOS detects the SSD, a loose SATA or power cable can prevent Windows from reading it correctly. This is common with desktop PCs or older systems. A poor connection allows BIOS-level detection but blocks full communication with the operating system.
Step 1. Turn off your computer completely and unplug the power cable. Open the case and check the SSD’s SATA data and power cables.
Step 2. Reseat both cables securely or use another SATA port on the motherboard.
For laptops or NVMe SSDs, remove and reinsert the drive carefully into the M.2 slot.Reboot the computer and check if the SSD now appears in Disk Management.
2: Enable AHCI Mode in BIOS
If your SATA controller mode is incorrectly configured, Windows may fail to recognize the SSD even though the BIOS detects it. This often happens when the SATA mode is set to IDE or RAID instead of AHCI, which is required for most modern SSDs to communicate properly with Windows.
Step 1. Restart your computer and enter the BIOS/UEFI setup (usually by pressing F2, Del, or Esc during startup).
Step 2. Locate the “Storage Configuration" or "SATA Mode" option under the “Advanced” or “Main” tab.
Step 3. Change the mode to AHCI.
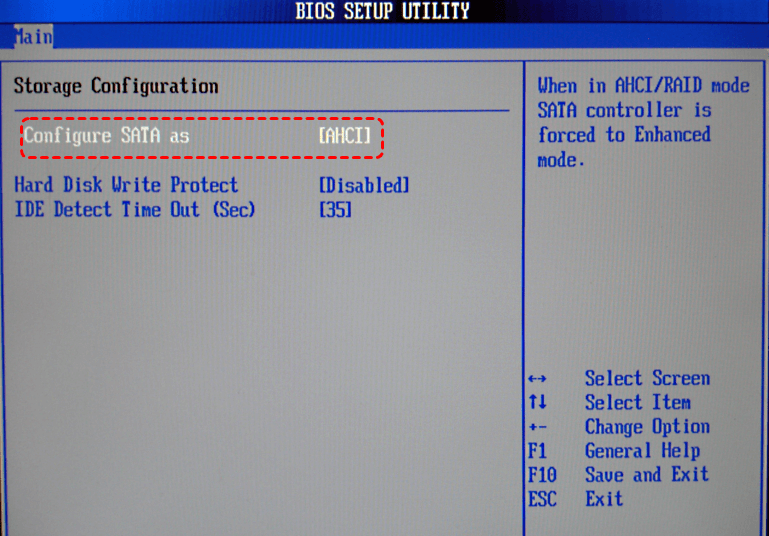
Step 4. Save the changes and exit BIOS (F10 key).
Boot into Windows and check Disk Management again. If the SSD still doesn’t appear, continue to the next solution.
3: Update or Reinstall Storage Controller Driver
Outdated or missing SATA/NVMe controller drivers can prevent Windows from communicating with your SSD, even if BIOS detects it.
Step 1. Press “Win + X” and select “Device Manager”.
Step 2. Look for “IDE ATA/ATAPI controllers” and expand it. Right-click on the controller driver entry and choose “Update driver → Search automatically for drivers”.
Step 3. If that doesn’t work, right-click the same controller again and choose “Uninstall device”, then restart your PC.
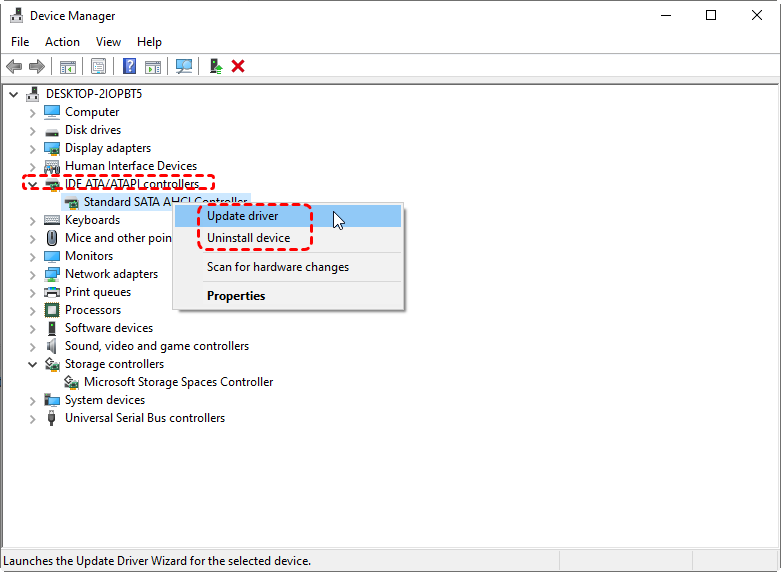
Windows will reinstall the correct driver automatically. After reboot, check Disk Management again.
4: Use DiskPart to Detect the SSD
Sometimes the SSD is missing from Disk Management due to a corrupted partition table. You can use DiskPart, a built-in Windows command-line tool, to check its status.
Step 1. Open Command Prompt as administrator.
Step 2. Type the following commands and press Enter after each one:
diskpart
list disk
List all disks in DiskPart
If your SSD appears in the list, it means Windows recognizes it but can’t manage it in Disk Management.
Step 3. If needed, reinitialize it manually with:
select disk X (Replace X with the SSD number.)
clean
convert mbr
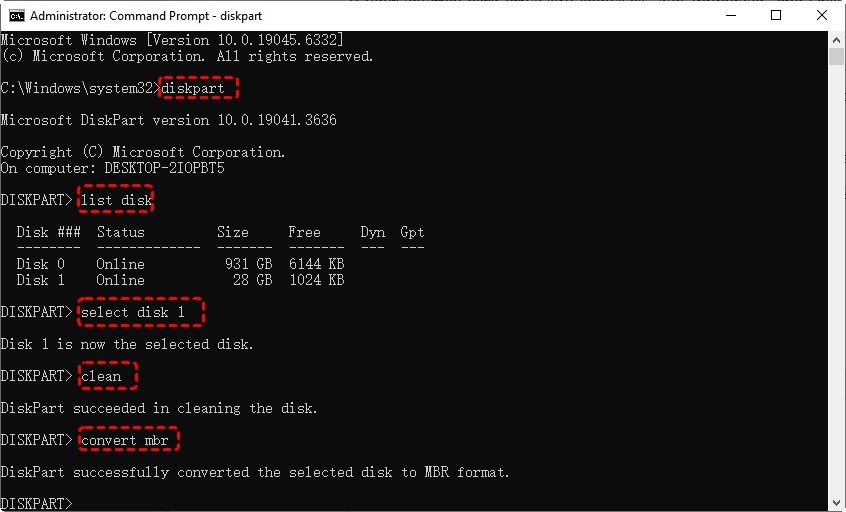
If you can see the SSD drive in Disk Management now, create a compatible partition for your operating system via the “New Simple Volume Wizard”.
Solutions: SSD Not Showing Up in BIOS
If your SSD doesn’t appear in the BIOS/UEFI, it means your computer cannot detect the drive at all — even at the hardware level. This issue is often caused by incorrect settings, faulty connections, or a damaged SSD. Try the following fixes to make your SSD recognizable again:
- Note:✎...
- First of all, you should perform a simple check of the SSD’s physical connections, refer to the last section.
1: Update BIOS/UEFI Firmware
An outdated BIOS may not support newer SSD models or NVMe drives.Visit your motherboard manufacturer’s website. Download and install the latest BIOS/UEFI update following official instructions.Reboot and check if the SSD is detected.
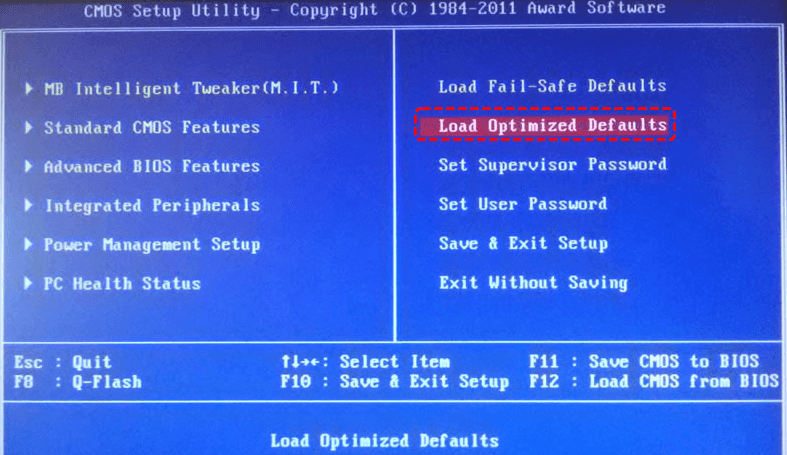
2: Reset BIOS Settings to Default
Misconfigured settings can hide your SSD from BIOS detection. Enter BIOS, look for an option like "Load Setup Defaults," "Load Optimized Defaults," or "Restore Defaults". Select it, save and restart your PC.
If the SSD is still missing in BIOS on all systems. It may have suffered hardware failure. Contact the manufacturer for warranty or replacement service.
Recover Data After SSD Showing Up Normally
If your SSD is now detected in BIOS, Disk Management, and File Explorer, and the issue is not related to a brand-new uninitialized SSD, you may want to recover your filessince the initializing or formatting operation will clean all disk data.
To maximize the chances of retrieving your important files, use a professional data recovery tool like MyRecover is aways recommended. It is able to recover data from formatted partition, initialized disk, corruped or deleted drive. Only 3 steps can get everything important back.

- 👍500+ Devices Supported | SSD, HDD, USB Flash Drive, SD Sard, etc.
- 👍1000+ File Formats Supported | PNG, MP4, MP3, TXT, ZIP, MSG, etc.
- 👍500+ Data Loss Scenarios | Deletion, Format, System Crash, Virus Attack, etc.
Summary
If your SSD is not showing up in File Explorer, Disk Management, or BIOS, it can be caused by a variety of issues. This guide provides step-by-step solutions to make your SSD detectable.
Once the SSD is detected, it is recommended to recover important files immediately, as initializing, formatting, or previous errors may have caused partial data loss. Moreover, if the SSD drive does not show up in Windows File Explorer, but in Disk Management, MyRecover can also detect it and allow you to recover files from SSD drive not recognized.


Stay Updated With Our
Latest Tips
Add us as a preferred source on Google to never miss helpful guides.