
How to Uninstall Windows 10/11 Updates | Expert Guide
Windows updates are designed to improve performance and security, but sometimes they bring unexpected errors or instability. This guide covers several approaches to uninstall windows 10/11 updates and regain system stability.
By Aria / Updated on October 29, 2025
Why You Might Need to Uninstall a Windows Update
While Windows updates are designed to improve system performance, security, and compatibility, not every update works perfectly on every PC. Sometimes, an update can introduce new issues instead of fixing old ones and that’s when uninstalling it becomes necessary. Below are some of the most common reasons users choose to roll back a Windows update.
🧿System Instability or Crashes
After certain updates, your computer might start freezing, crashing, or displaying the Blue Screen of Death. These problems usually occur when a system patch conflicts with existing hardware drivers or third-party software.
🔔Application or Driver Incompatibility
Some updates unintentionally break compatibility with older programs or drivers. You may notice your specific software suddenly stops working after installing a new update.
💽Slow Performance or Boot Problems
If your computer takes longer to boot up, runs slower than usual, or keeps restarting unexpectedly, a problematic update could be the culprit. In these cases, rolling back the update can help restore normal performance.
💽Update Installation Failure
Occasionally, an update might not install properly, getting stuck in a loop or showing errors like "Update failed to complete". Removing the partially installed update can resolve the issue and allow a clean reinstall later.
📌Missing Files or Changed Settings
Some major feature updates may reset user settings or even move personal files to temporary folders. If you notice missing files after an update, uninstalling it might help restore your previous environment.
How to Uninstall Windows 10/11 Updates
There are several methods to uninstall updates, depending on the situation whether your PC is booting normally, stuck in a boot loop, or you want to roll back to a previous Windows version. Let’s go through them step by step.
Method 1. Uninstall Updates from Windows Settings
This is the simplest and safest method if your system still boots normally. You can uninstall these typical Windows updates by following the steps below:
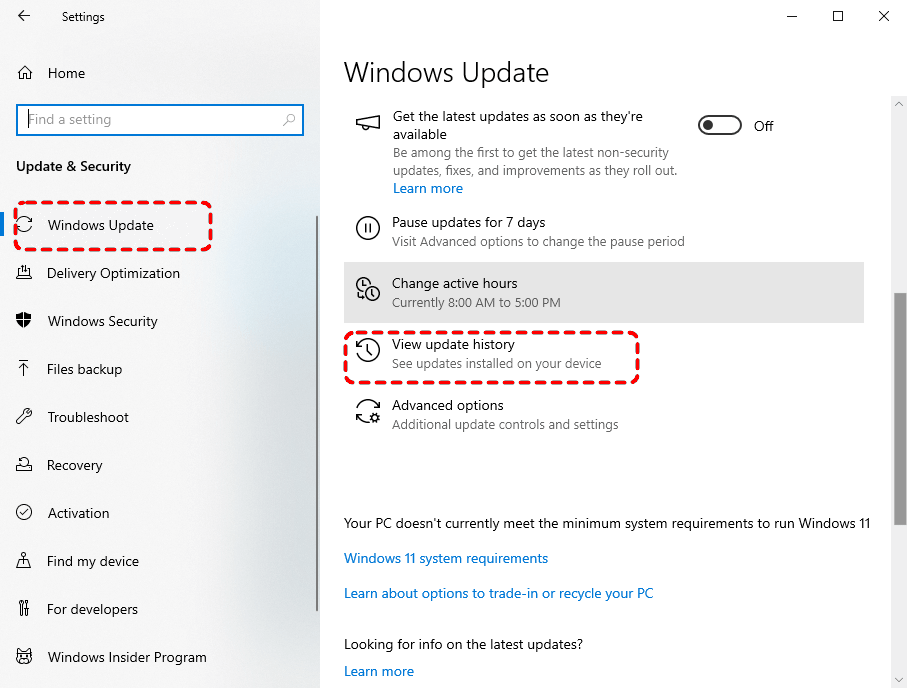
Step 1. Navigate to "Settings" > " Updates & Security" > "Windows Update".
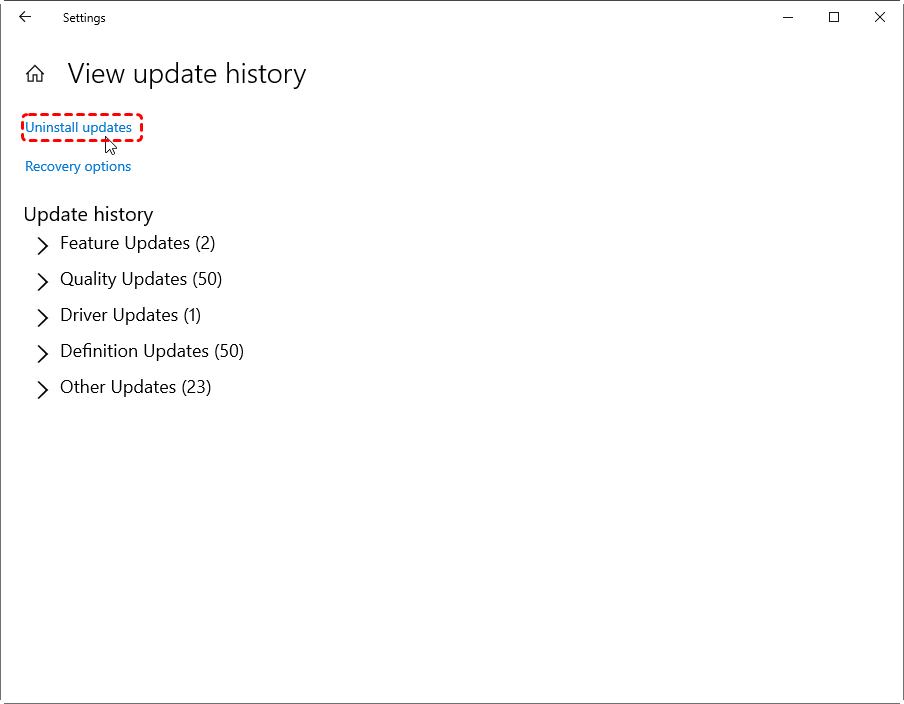
Step 2. In the Windows Update section, select "View update history", then you will see all of your update history.
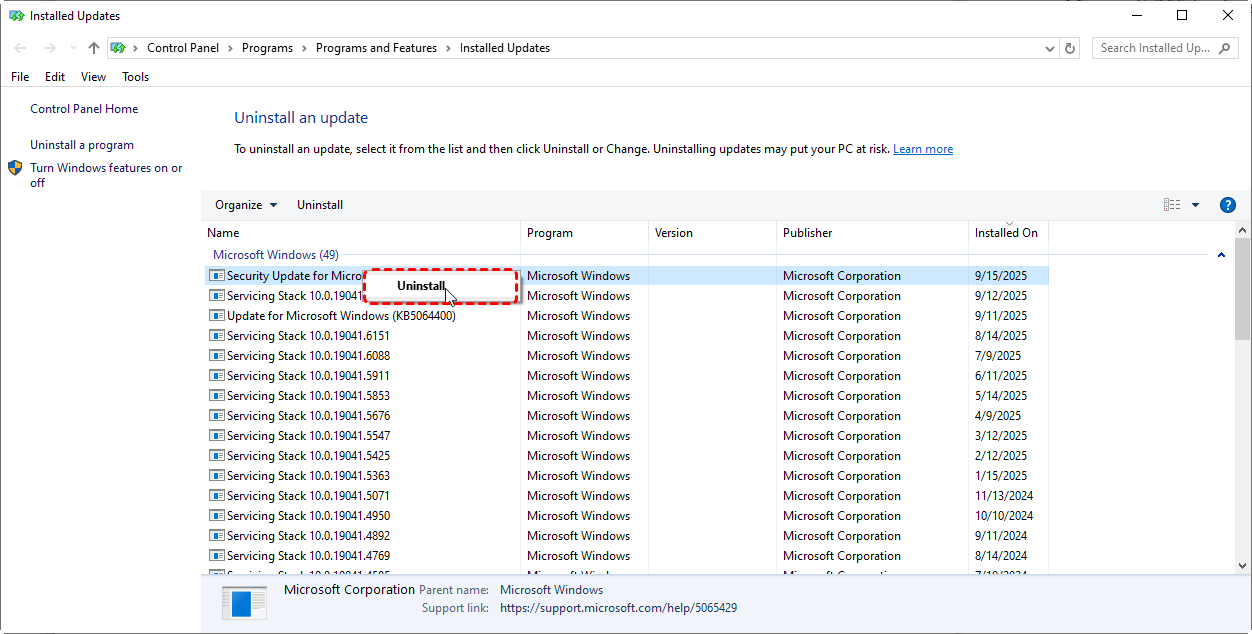
Step 3. Click "Uninstall updates", then all installed updates will be displayed.
Step 4. Choose an installed Windows update you want to remove and right click on it, then click "Uninstall".
Method 2. Uninstall Windows Update via Command Line
If you are a professional and prefer a more direct approach, you can use Command Prompt or PowerShell. It's a quick and effective way to uninstall Windows update when "Settings" fails or is inaccessible.
Step 1. Open Command Prompt and run it as administrator.

Step 2. Type the following command and press "Enter" key:
wmic qfe list brief /format:table: lists all installed updates.
wusa /uninstall /kb:5066791: to remove the update (replace the number "5066791" with the actual update number).
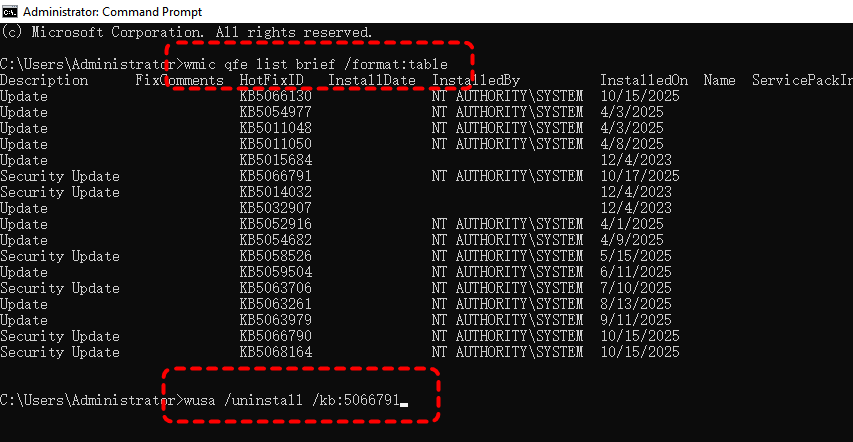
Step 3. Click "Yes" to confirm the uninstallation the Windows Update Standalone Installer.
Method 3. Go Back to the Previous Version
If you recently upgraded from Windows 10 to Windows 11 and want to roll back, Windows provides a built-in feature to go back to the previous version, as long as it’s within 10 days of the upgrade.
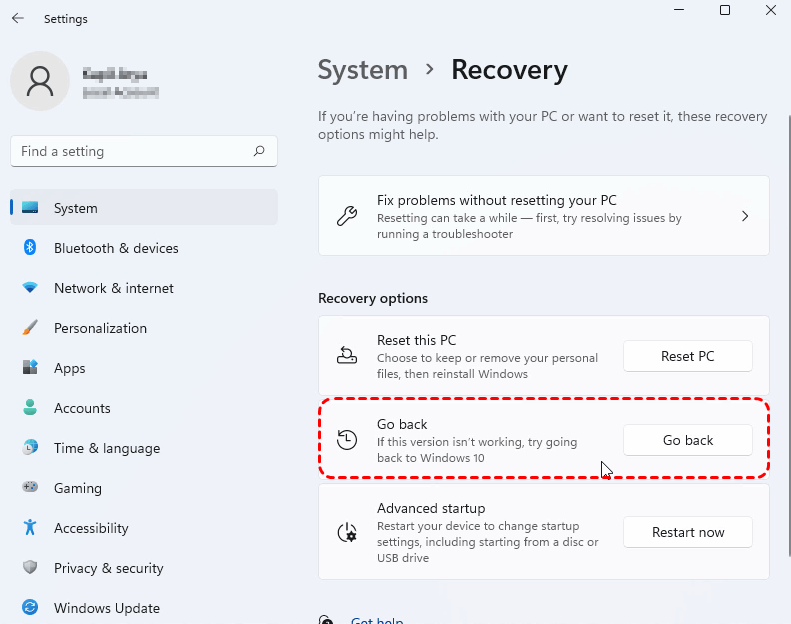
Step 1. Go to "Settings" > "Update & Security" > "Recovery".
Step 2. In the Recovery Window, click "Go back". If this option is unavailable, maybe 10 days have passed.
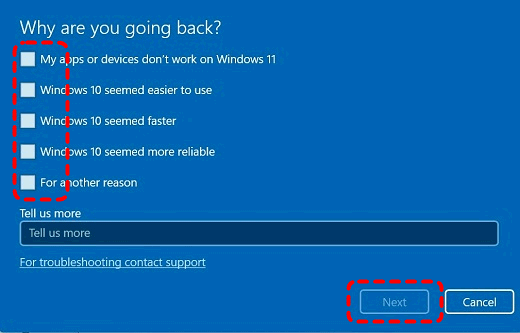
Step 3. Select an answer or type additional reasons, then click "Next".
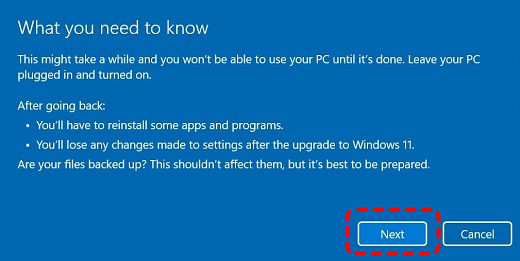
Step 4. Click "No, thanks" to continue the process and you can also check the latest Windows updates. Learn the "What you need to know" and click "Next" to continue the process.
Step 5. Click "Go back to earlier build", your device will start the "Go Back" process.

If your computer fails to start properly, you can also roll back Windows to a previous version in WinRE. Go to "Troubleshoot" > "Advanced options" > "Go back to the previous versions". Then just following the steps mentioned above.
Method 4. Uninstall Updates in WinRE
If your computer can’t boot properly after an update, you can try uninstall the latest update in WinRE. This way can often resolve boot errors caused by problematic system updates.
Step 1. Turn on your PC and interrupt the boot process three times to enter WinRE.
Step 2. Navigate to "Advanced options" > "Troubleshoot" > "Advanced options" > "Uninstall Updates".
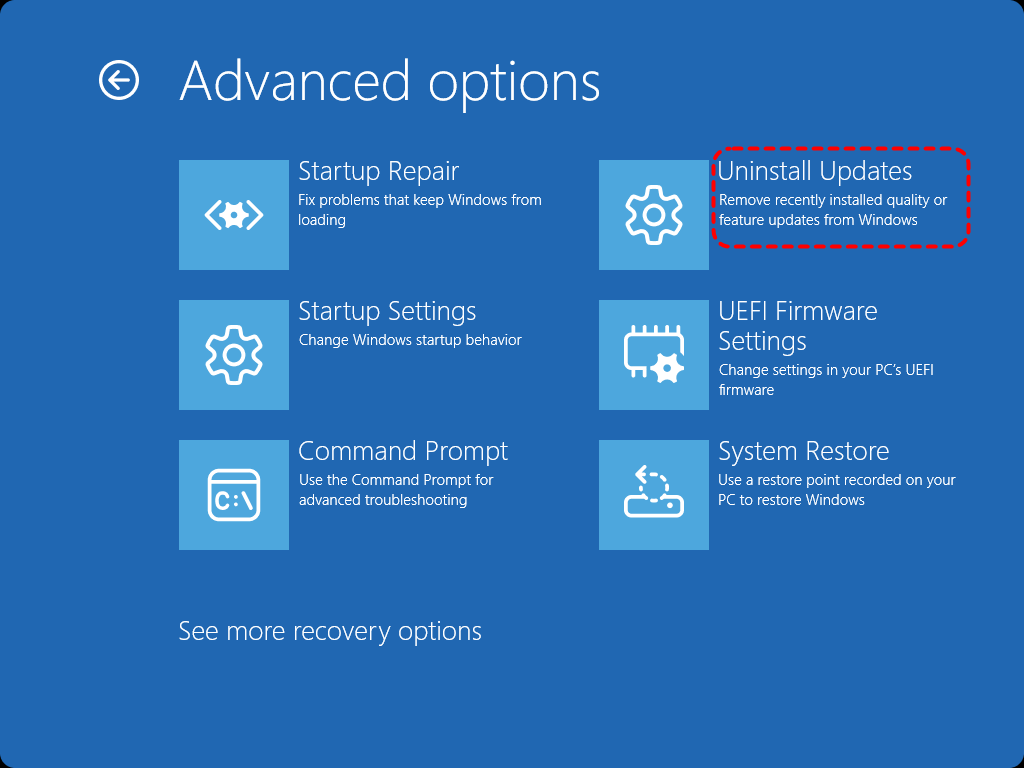
Step 3. You’ll now see an option either "Uninstall latest quality update" or "Uninstall latest feature Update". Uninstall anyone based on your needs and this will likely allow you to boot into Windows.
-
Feature Updates: Major upgrades like moving from Windows 10 to 11. You have a 10-day window to "Go back to the previous version" if problems occur. It’s your "undo" button for big updates.
-
Feature Updates: Monthly security and bug fixes. They’re essential and can’t be removed, let them install to keep your PC safe.
Method 5. Uninstall Windows 10 Update via Reset This PC
If uninstalling updates doesn’t fix your problem, you can perform a Reset this PC. This reinstalls Windows while preserving your files. This method removes problematic updates, system settings, and apps, while reinstalls a system without losing files.
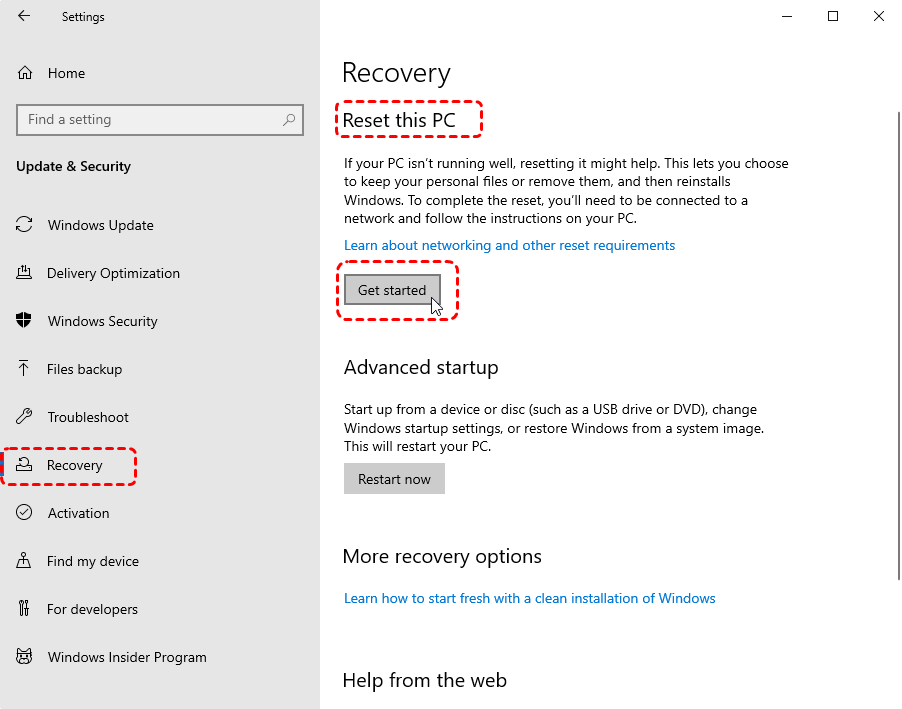
Step 1. Navigate to "Settings" > "Update & Security" > "Recovery".
Step 2. Under the "Reset this PC" section, click "Get started".
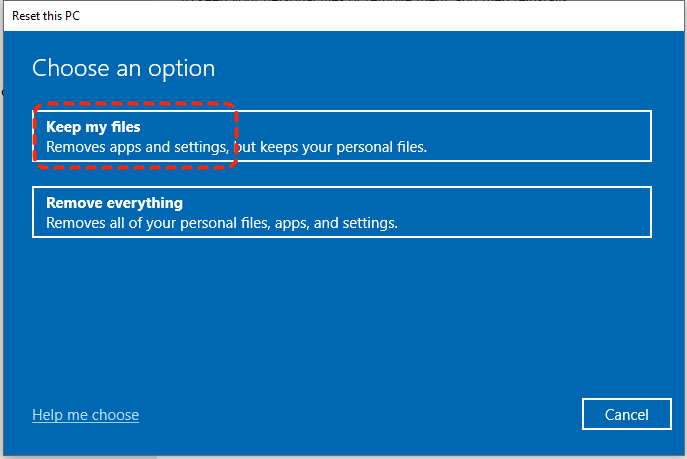
Step 3. Choose "Keep my files" to reserve your personal files in the C: drive. All installed software and updates will be uninstalled.
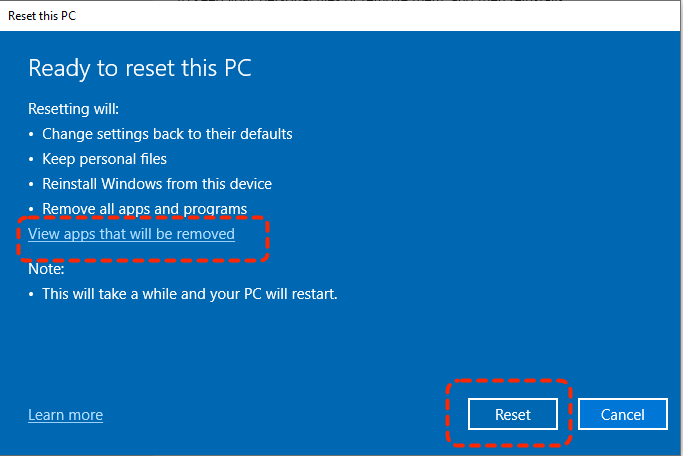
Step 4. Choose a reinstallation method and confirm the reset settings, then click "Reset" to start the process.
What Happens to Your Data When Uninstalling Updates?
When you uninstall Windows 10/11 updates, most of your personal files, installed programs, and settings remain intact. However, in some cases, especially when rolling back a major Windows version (for example, uninstalling Windows 11 to return to Windows 10), certain configurations or temporary data may be lost. If you’ve already lost data after a recent update, don’t worry. It can often be recovered using a professional data recovery tool like MyRecover.
How to Recover Lost Files After a Windows Update or Uninstall
Occasionally, users find that personal files like project folders or desktop documents disappear after an update or rollback. Don’t panic; they may just be hidden or moved to the Recycle Bin directory. You can use MyRecover to perform a full drive scan and restore lost data efficiently. MyRecover supports data recovery from various storage devices.

- Recover Without Backup: Restore lost files even if no Windows backup exists.
- Wide File Support (1000+): Recover photos, documents, videos, audio, archives, and more.
- Supports Multiple Devices (500+): Works on HDDs, SSDs, USB drives, SD cards, cameras, and other storage devices.
- High Success Rate: AI-powered file recognition and recovery algorithms ensure easy use and zero file omission.
Step 1. Download and install MyRecover on your computer from Microsoft Store, avoid installing it on the drive with lost files.
Step 2. Run the program and select the drive including lost data, then click "Scan".

Step 3. Choose the files you would like to recover from the recovered lists, then click "Recover".
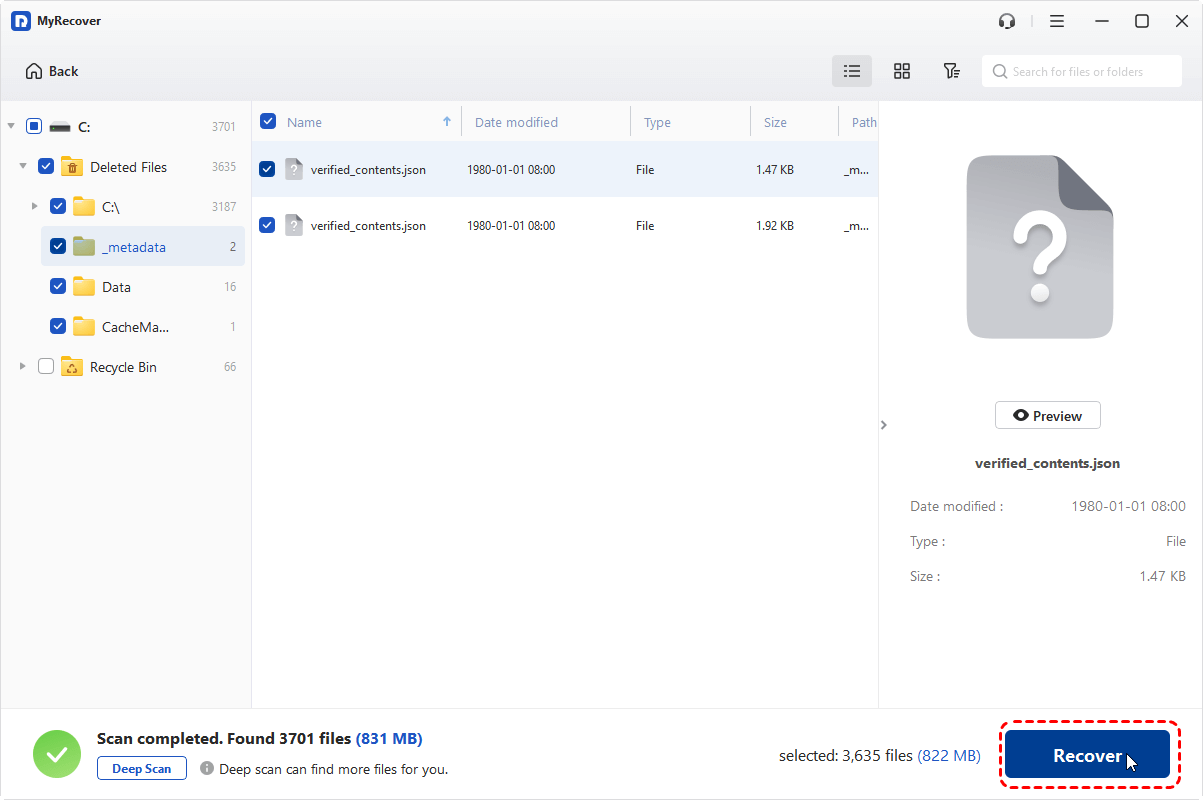
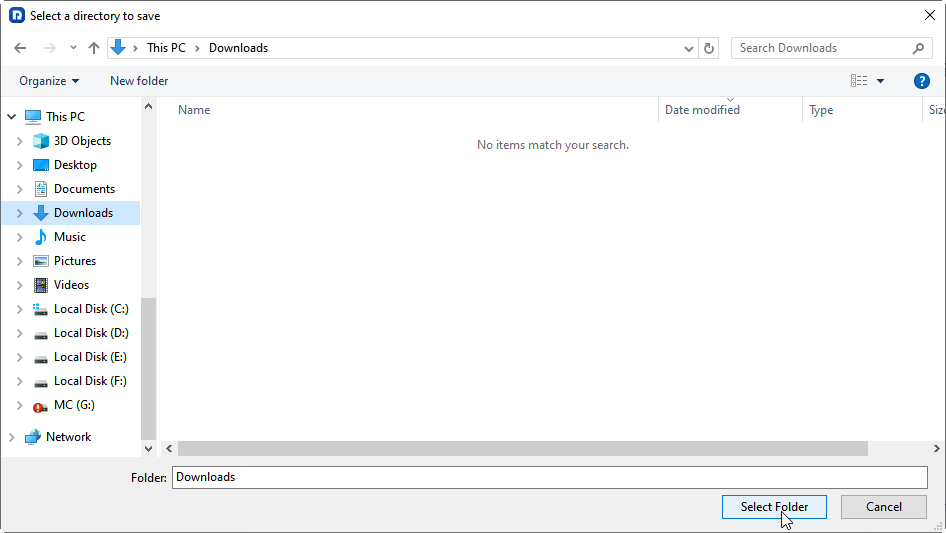
Step 4. Select a safe location different from the original one to save the recovered files.
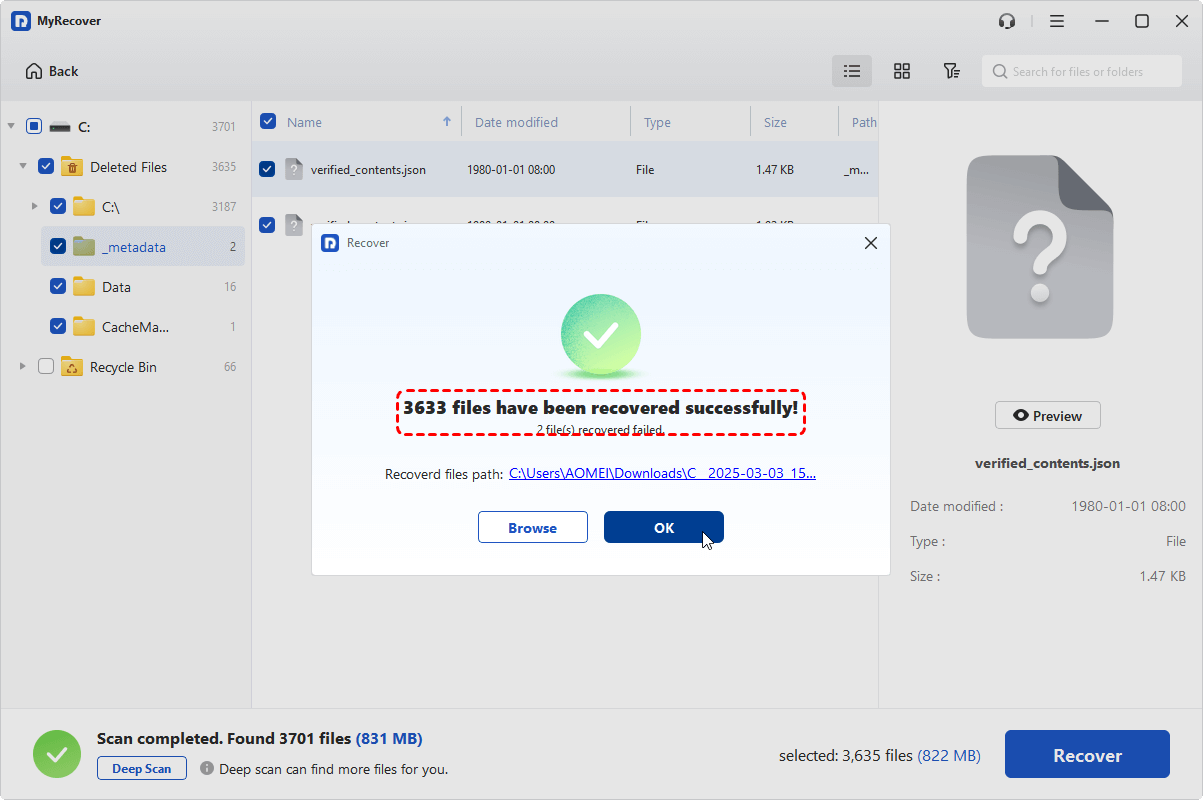
Once the process is completed, you'll see the message "Files have been recovered successfully" will pop up. You can check them in the destination folder path by clicking on the "Browse" button.
Conclusion
Uninstalling a Windows update can be an effective fix when performance issues or system instability arise. Whether you uninstall Windows update in Windows 11 via Settings, command line, or recovery mode, always recover your important files first before making major changes. If data loss has already occurred, MyRecover can help you retrieve it quickly and safely.
The Professional Edition offers unlimited recovery and file preview before restoration, which is a complete solution trusted by professionals and everyday Windows users alike.


Stay Updated With Our
Latest Tips
Add us as a preferred source on Google to never miss helpful guides.