
Windows Resource Protection Could Not Start the Repair Service: Complete Fix Guide
When the System File Checker refuses to run and throws the 'Windows Resource Protection could not start the repair service' error, it’s a sign that Windows’ self-healing mechanism itself is compromised. Whether the issue appears after a failed update, system tweak, or unexpected shutdown, this guide helps you regain control over SFC with confidence.
By Aria / Updated on February 3, 2026
Introduction
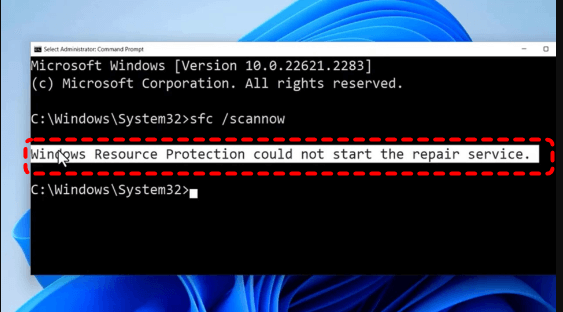
I've been trying to do "sfc /scannow" because my USB isn't working, but every time I type it into the admin command prompt is tells me that Windows Resource Protection could not start the repair service even when I'm in safe mode.
- Question from Bruno
When you run the System File Checker (SFC) command to fix corrupted system files, you expect Windows to automatically scan and repair issues. However, sometimes, the SFC command will be stopped by the error message "Windows Resource Protection could not start the repair service". This error indicates that Windows is unable to launch the core service required for SFC to function properly, meaning system integrity checks cannot proceed at all.
In most cases, Windows resource protection could not start the repair service appears when essential Windows services are disabled, system components are damaged, or permission-related registry entries are missing. Because SFC plays a critical role in maintaining Windows stability, this error can indirectly lead to crashes, failed updates, or even data loss if left unresolved.
Common Causes Behind the SFC Error
Before attempting repairs, it’s important to understand what typically triggers the "Windows resource protection could not start the repair service" error. It does not usually occur occur randomly, but is often the result of deeper system misconfigurations. Common causes include:
- The Windows Modules Installer (TrustedInstaller) service is disabled,
- Corrupted system files preventing service startup,
- Incorrect registry entries related to TrustedInstaller,
- Running SFC without sufficient system permissions,
- File system errors on the system drive.
How to Fix "Windows Resource Protection Could Not Start the Repair Service" Error
With these causes in mind, let’s move on to practical solutions. This section outlines several effective methods to resolve the "Windows resource protection could not start the repair service" error. You can try them one by one until the issue is completely fixed. Let's dive into the detailed steps.
Try Running SFC in Safe Mode
Sometimes, background services or third-party programs prevent Windows Resource Protection from starting correctly. Running SFC in Safe Mode minimizes interference and allows Windows to load only essential services.
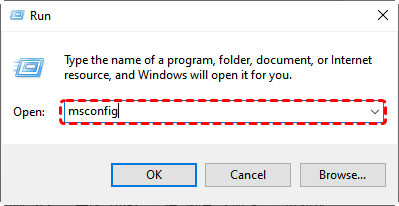
Step 1. Press "Win" + "R" and type "msconfig" in the Run dialog, then press "Enter" to open the System Configuration window.
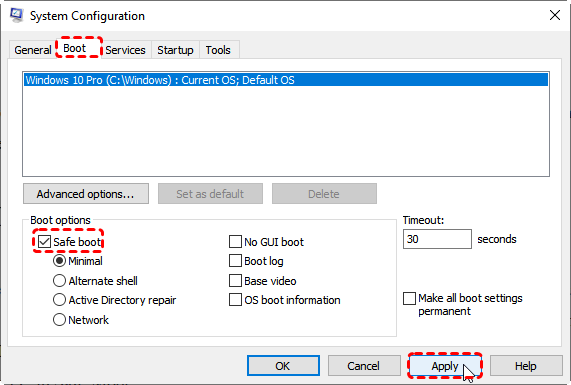
Step 2. Go to the "Boot" tab and check "Safe boot", then click "Apply" and "OK".
Step 3. Click "Restart" button to enter Safe Mode. Then you can try to run SFC command again to check if the error persists.
If the scan runs successfully in Safe Mode, it confirms that conflicts in normal startup mode were blocking the repair service.
Run the DISM Command to Repair the Windows Image
DISM (Deployment Image Servicing and Management) is a Windows built-in tool to service and prepare corrupted or broken Windows images, including the images used in Windows RE and Windows Setup. When system files are too damaged for SFC to function, DISM can restore the Windows image itself.
Step 1. Locate Command Prompt in the Start menu and run it as administrator.

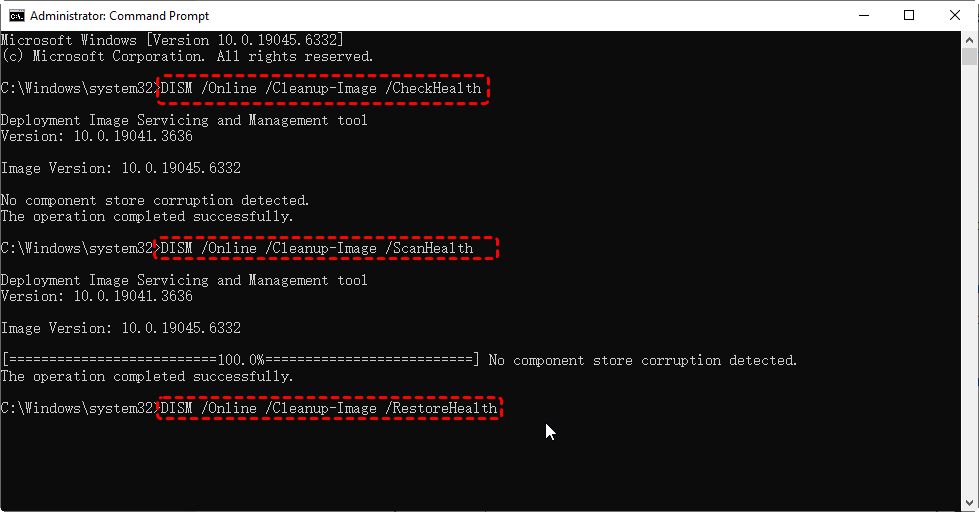
Step 2. Enter the following command one by one:
DISM /Online /Cleanup-Image /CheckHealth
DISM /Online /Cleanup-Image /ScanHealth
DISM /Online /Cleanup-Image /RestoreHealth
Step 3. After the DISM command completes, restart your computer and run SFC again to check if the "Windows resource protection could not start the repair service" error still exists.
Enable Windows Modules Installer via Services
The Windows Modules Installer (TrustedInstaller) service is mandatory for SFC to work. If it’s disabled, the repair service cannot start. You can enable it manually through the Services window. Here's how:
Step 1. Press "Win" + "R" and enter "services.msc" in the Run dialog, then click "OK" to open the Services window.

Step 2. Scroll down and select "Windows Modules Installer" from the lists, then right click on it and choose "Properties".

Step 3. Under the "General" tab, choose "Manual" from the "Startup type" drop menu.
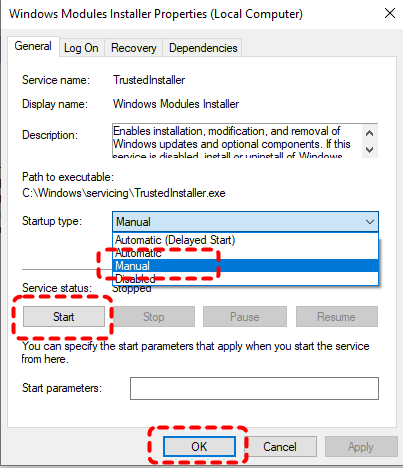
Step 4. Click "Start" and "Apply" to save the changes. Once enabled, retry the SFC command without error.
Run Windows Modules Installer via CMD
Alternatively, you can run TrustedInstaller using Command Prompt. This method directly reactivates the core service required by SFC and is particularly effective when permissions are misconfigured. Follow these steps:
Step 1. Open Command Prompt as administrator.
Step 2. Type the command "sc config trustedinstaller start= auto" and hit the "Enter" key. It will set the Windows Modules Installer service startup type to Automatic. Once done, you will get a message "ChangeServiceConfig SUCCESS".
Step 3. Input "net start trustedinstaller" and press "Enter" to active the service.
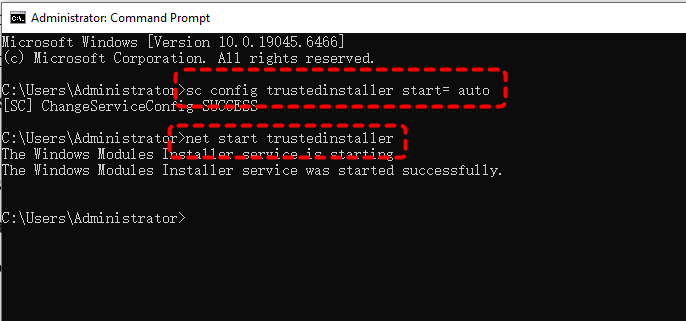
Then, close CMD and rerun sfc /scannow command to check if the "Windows resource protection could not start the repair service" error is removed.
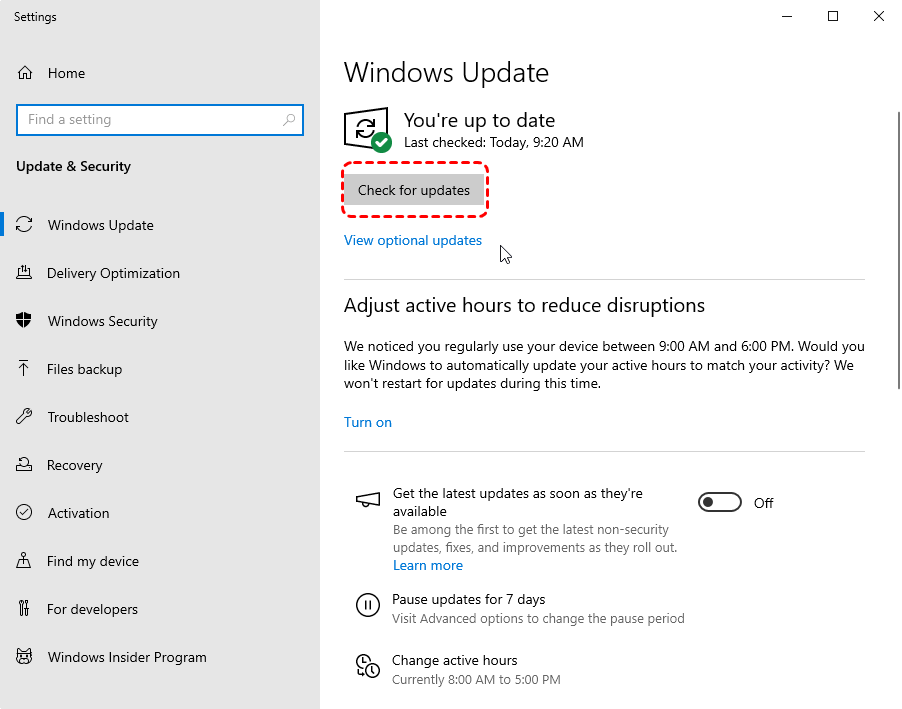
Check for Windows Updates
Outdated or incomplete Windows updates can break system services, including Windows Resource Protection. Keeping Windows fully updated often resolves system-level inconsistencies that cause SFC "Windows resource protection could not start the repair service" error.
Step 1. Go to "Settings" > "Update & Security" > "Windows Update".
Step 2. Click "Check for updates" to install all available updates.
Add a TrustedInstaller Expandable String Value
If the "Windows resource protection could not start the repair service" error persists, advanced users can also attempt to resolve this issue by modifying the Registry files. Before proceeding with the detailed steps, it is highly recommended that you back up the Registry files first.
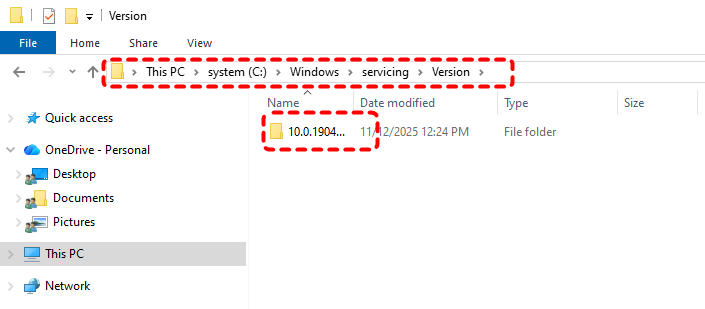
Step 1. Locate C:\Windows\servicing\Version in File Explorer and note your TrustedInstaller ID like 10.0.19041.1XXX.
Step 2. Then, navigate to C:\Windows\WinSxS and find one of these subfolders, then copy the folder name for later usage:
x86_microsoft-windows-servicingstack_31bf3856ad364e35_{TrustedInstaller ID} (32bit Windows)
amd64_microsoft-windows-servicingstack_31bf3856ad364e35_{TrustedInstaller ID} (64bit Windows)

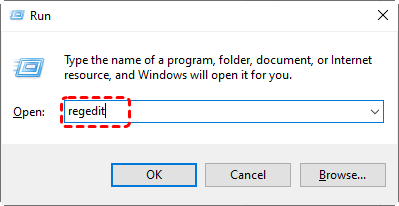
Step 3. Press "Win" + "R" and type "regedit" in the Run dialog, then click "OK" to open the Registry Editor.
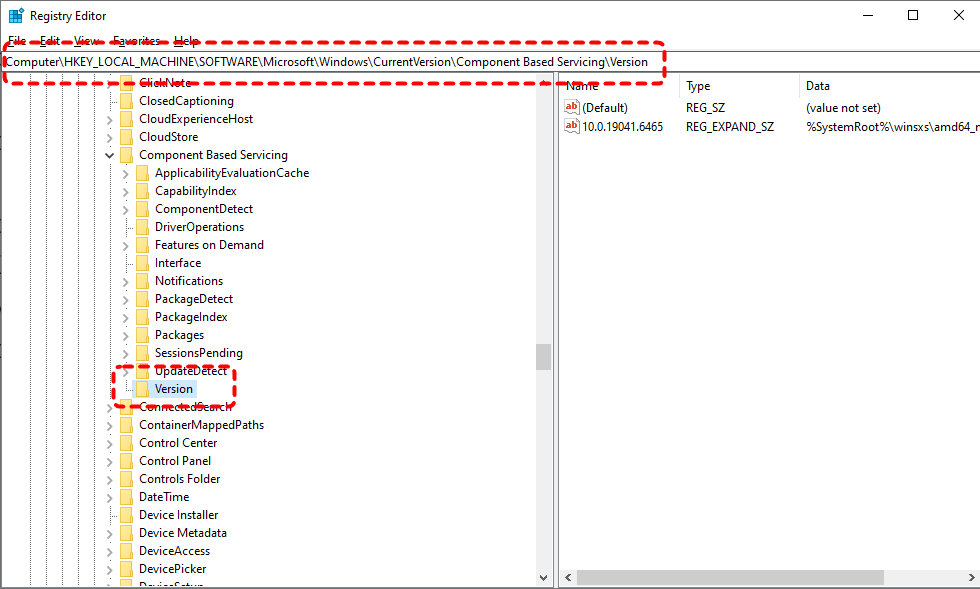
Step 4. In the opened Registry Editor window, navigate to the following path:
HKEY_LOCAL_MACHINE\SOFTWARE\Microsoft\Windows\CurrentVersion\Component Based Servicing\Version
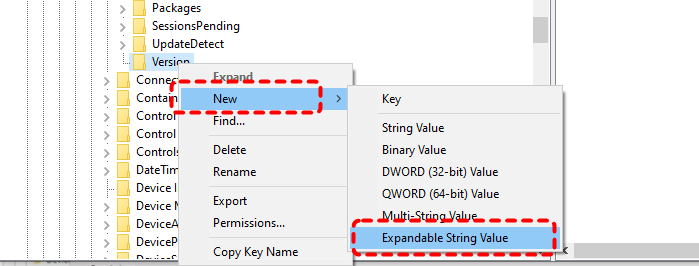
Step 5. Right click on the Version entry and choose "New" > "Expandable String Value".
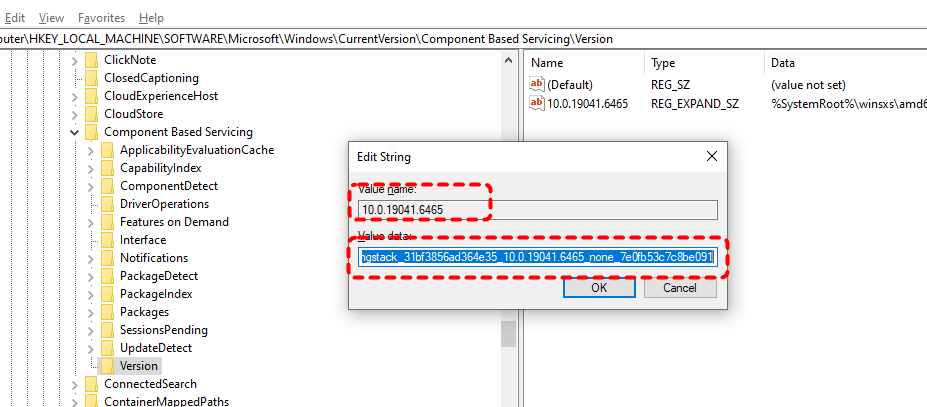
Step 6. Rename the created entry with your TrustedInstaller ID and double click on it.
Step 7. Enter the subfolder name in WinSxS folder in the Value Data field and click "OK" to save the changes.
How to Recover Missing Files After Failed SFC Command
In some cases, failed SFC or DISM operations may lead to file loss, especially system files. Files can become inaccessible or accidentally removed during repair attempts. This is where professional recovery tool like MyRecover become essential. It is designed to recover files lost due to system errors like 0x80004005, failed SFC scans, update issues, or unexpected crashes. Follow these steps to recover the missing files effortlessly:

- 500+ Devices Supported | SSD, HDD, USB Flash Drive, SD Sard, etc.
- 1000+ File Formats Supported | PNG, MP4, MP3, TXT, ZIP, MSG, etc.
- 500+ Data Loss Scenarios | Deletion, Format, System Crash, Virus Attack, etc.
Step 1. Download and install MyRecover on your computer from Microsoft Store, avoid installing it on the drive with lost files.
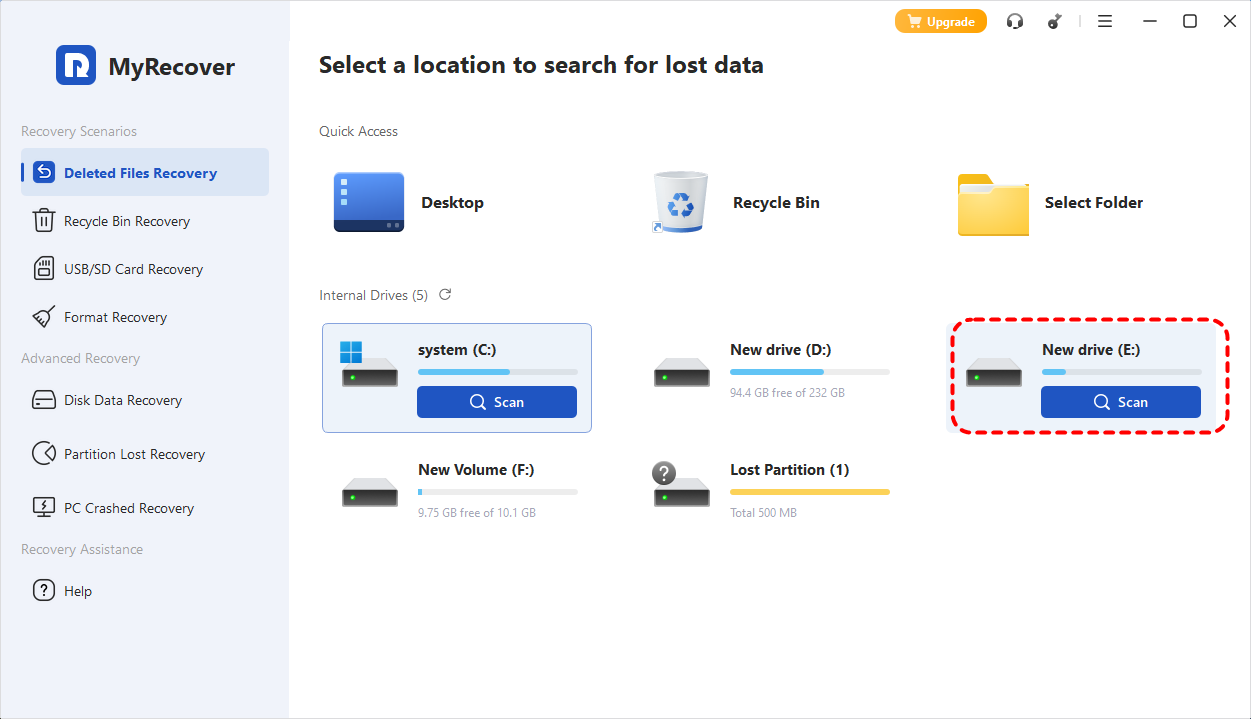
Step 2. Run the app and select the drive to scan, then click "Scan" to search for recoverable files.
Step 3. After the scan is completed, choose files you attempt to recover from the recoverable lists and click "Recover".

Step 4. Select a safe location (different from the original drive) to save the recovered files.

Once the recovery process is done, the message "Files have been recovered successfully" will pop up. Then, you can check the recovered files by clicking on the destination folder path or the "Browse" button.

Summary
The "Windows Resource Protection could not start the repair service" error signals that Windows cannot perform critical self-repair operations. While the message may look alarming, it usually can be fixed with the solutions above and you can restore SFC functionality.
And when repair attempts affect personal data, having a professional recovery option like MyRecover ensures that system repair doesn’t come at the cost of your files. Upgrade to MyRecover Professional edition to enjoy unlimited recovery capacity and data recovery from dead computer.


Stay Updated With Our
Latest Tips
Add us as a preferred source on Google to never miss helpful guides.