
CHKDSK Cannot Lock Current Drive: How to Fix it on Windows 11/10
Encountering the 'CHKDSK cannot lock current drive' error can prevent you from checking and repairing disk issues on your system. This problem often occurs when the drive is in use, write-protected, or restricted by system permissions. This guide explains the common causes behind this error and provides practical methods to fix it on Windows 11 and Windows 10.
By Aria / Updated on April 8, 2026
CHKDSK Command Cannot Lock Drive
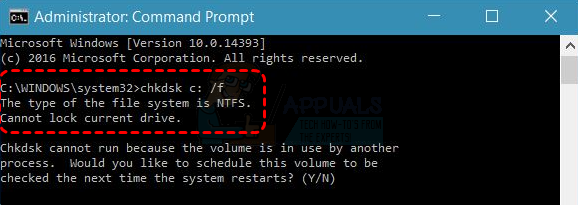
I was trying to see if my memory was compressed but the "get-MMAgent" was not recognized so I tried checking the drive and it showed, "The type of the file system is NTFS. Cannot lock current drive". I ran the command "sfc /scannow" with no integrity problems shown. I am not sure what to do at this point. If anyone can help me, that would be much appreciated.
- Question from Dave
When running CHKDSK on Windows 11 or 10, some users encounter the error "The type of file system is NTFS. Cannot lock current drive", which prevents the scan from proceeding. This usually happens when the drive is in use by the system or other applications, or when it is write-protected and cannot be accessed for repair. As a result, you may be unable to check disk errors, fix file system issues, or ensure the stability of your storage device.
This issue can be especially frustrating when you are trying to resolve disk problems or prevent potential data loss. In this guide, we will explain why this error occurs and walk you through practical methods to fix it, so you can successfully run CHKDSK and restore your drive to a healthy state.
Why the "CHKDSK Cannot Lock Current Drive" Error Occurs?
To fix this issue effectively, it’s important to understand what prevents CHKDSK from locking the drive. In simple terms, CHKDSK needs exclusive access to a disk in order to scan and repair file system errors. If anything blocks that access, the process will fail with this error. Here are the most common causes:
🔉 Drive is currently in use
If you are trying to run CHKDSK on the system drive (usually C:), Windows and background processes are actively using it. This prevents CHKDSK from locking the drive while the system is running.
🖥️ Insufficient permissions
Running CHKDSK without administrator privileges can restrict access to the drive, especially when attempting repairs using commands like chkdsk /f.
📌 Write protection enabled
If the drive is marked as read-only or write-protected, CHKDSK cannot make changes, which is required for fixing errors.
💽 Background programs or services
Antivirus software, disk monitoring tools, or other applications may be accessing the drive in the background, blocking CHKDSK from gaining full control.
📂 Disk or file system inconsistencies
In some cases, underlying disk issues or file system corruption may interfere with the locking process itself.
How to Fix "CHKDSK Cannot Lock Current Drive" on Windows 10/11
After identifying the possible causes, you can apply targeted solutions to resolve the "CHKDSK cannot lock current drive" error. The following solutions are arranged in a logical order, helping you restore CHKDSK functionality step by step without making unnecessary changes.
Method 1. Schedule CHKDSK on Restart
If the drive is currently in use (especially the system drive), CHKDSK cannot lock it while Windows is running. Scheduling the scan at startup allows CHKDSK to run before the system fully loads, ensuring exclusive access to the drive.
Step 1. Open Command Prompt as administrator.
Step 2. Type "chkdsk C: /f /r" and press "Enter".
Step 3. When the error prompted, type "Y" to schedule the scan on restart.
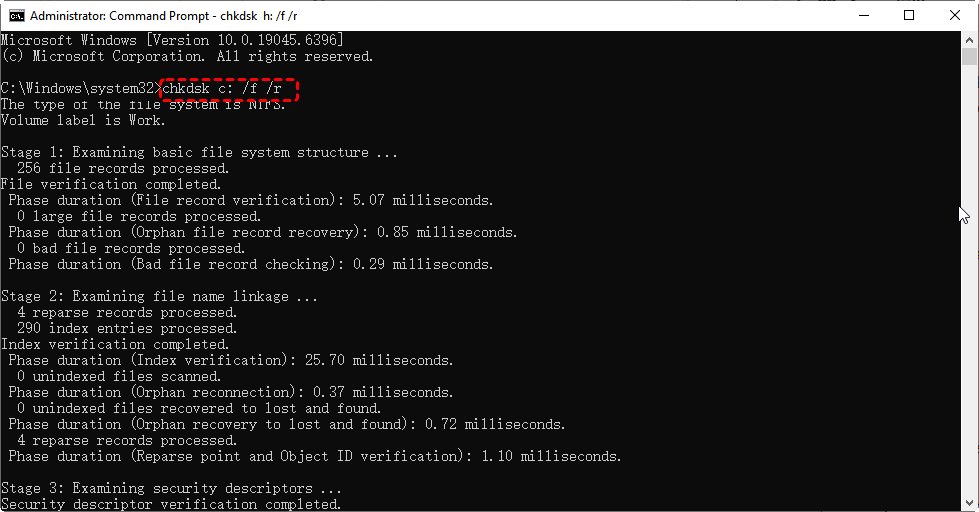
Step 4. Restart your computer to begin the disk check.
Method 2. Close Programs and Files Using the Drive
Background applications or opened files can also prevent CHKDSK from accessing the drive and pops the "cannot lock current drive" error. Closing these programs and files can release the lock and allow the scan to proceed normally.
Step 1. Press "Ctrl" + "Shift" + "Esc" to open Task Manager.
Step 2. End tasks related to file usage, such as editors or disk tools.
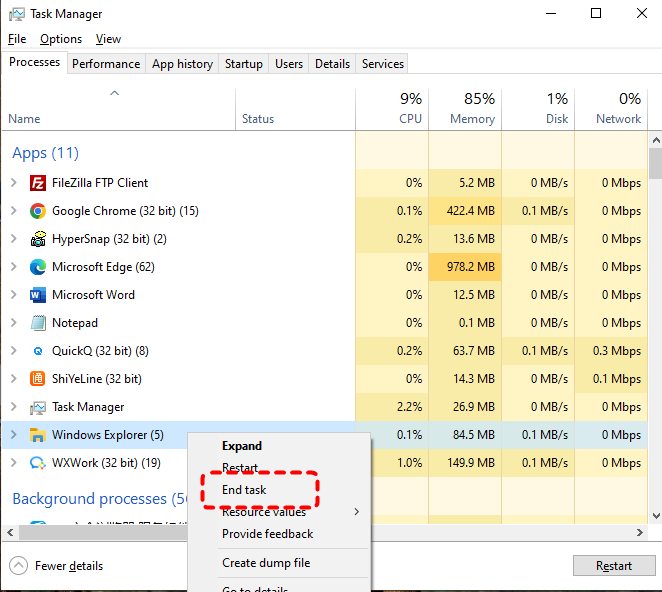
Step 3. Close any files that are using the drive and File Explorer windows accessing the drive.
Step 4. Run the CHKDSK command again to check if the error persists.
Method 3. Force Dismount the Drive
For non-system drives, you can force CHKDSK to dismount the volume and release all the locks on the drive before scanning. This ensures no processes are using the drive during the repair process. Then, you may be able to use the CHKDSK tool normally.
Step 1. Locate Command Prompt in the Start menu and right click on it, then select "Run as administrator".

Step 2. Enter the command "chkdsk F: /f /x" and hit the "Enter" key. (Replace "F:" with your actual drive letter).
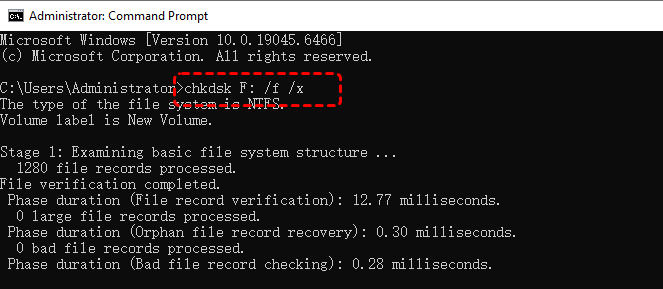
Step 3. Wait for CHKDSK to dismount and scan the drive for errors.
Method 4. Remove Write Protection on the Disk
If the drive is write-protected or set to read-only mode, CHKDSK cannot perform repairs on the disk. Removing write protection using Command Prompt can restore full access and allows disk operations to proceed. Follow these steps:
Step 1. Open Command Prompt and run it as administrator.
Step 2. Type the following command one by one and hit "Enter" after each:
- diskpart
- list disk
- select disk X (replace X with your disk number).
- attributes disk clear readonly
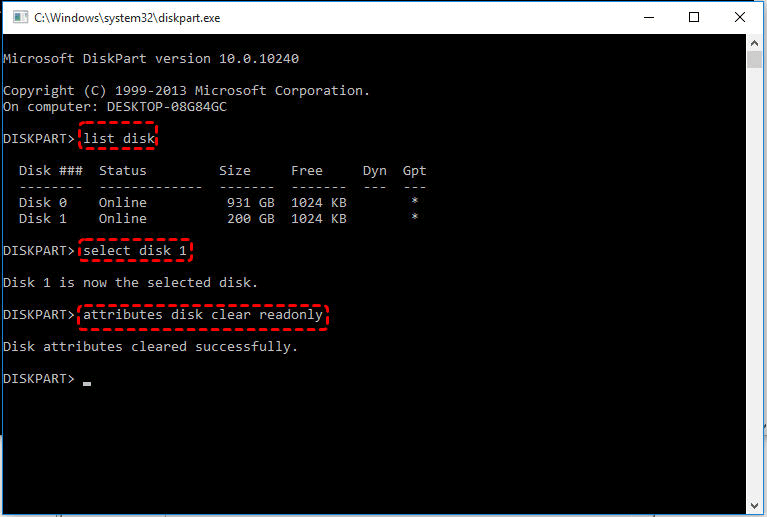
Once the process is done, type "exit" to close the Command Prompt and try running CHKDSK utility again to see if the error is resolved.
Method 5. Run CHKDSK as Administrator
Insufficient privileges can prevent CHKDSK from accessing certain drives and trigger the "Cannot lock current drive" issue. Running the command with elevated permissions ensures full control over disk operations.
Step 1. Type Command Prompt in the search bar.
Step 2. Right-click Command Prompt and select "Run as administrator" to grant the full control.
Step 3. Enter the CHKDSK command and press "Enter".
Method 6. Run CHKDSK in Windows Recovery Environment (WinRE)
The Windows Recovery Environment loads independently from your main system. It relies on its own dedicated drivers and services, so it won’t be interrupted by running applications. This isolated environment allows CHKDSK to gain full control over the drive, resulting in simpler, more reliable disk repairs. Running CHKDSK command in the recovery environment can repair underlying issues without interference.
Step 1. Go to "Settings" > "Update & Security" > "Recovery" > "Advanced startup" and click "Restart now".
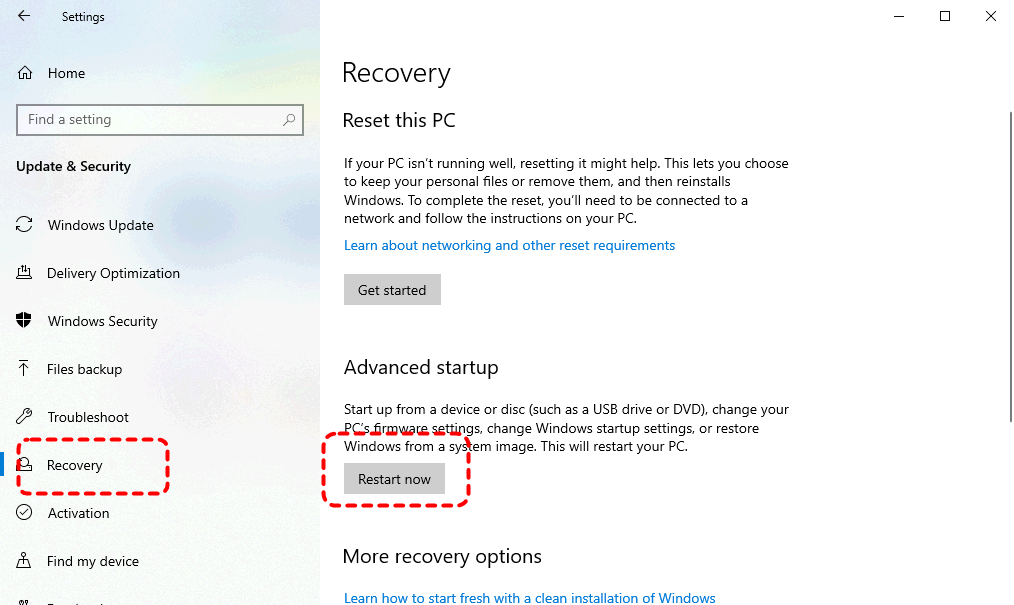
Step 2. Select "Troubleshoot" > "Advanced Options" > "Command Prompt".
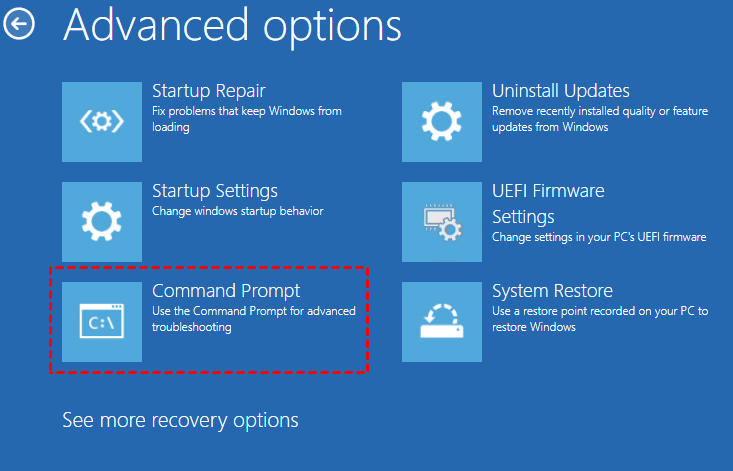
Step 3. Type "chkdsk G: /f /r" and press "Enter".

Step 4. Restart your system after the scan completes to check if the "cannot lock current drive" error continues.
Method 7. Run CHKDSK in Safe Mode
Safe Mode starts Windows with minimal drivers and services, reducing the conflicts of third-party programs that block CHKDSK from locking the drive. You can try running CHKDSK command in Safe Mode.
Step 1. Press "Win" + "R" and type "msconfig", then press "Enter".
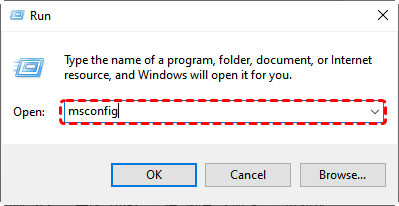
Step 2. Go to the "Boot" tab and check the box of "Safe boot", then click "Apply" and "OK".
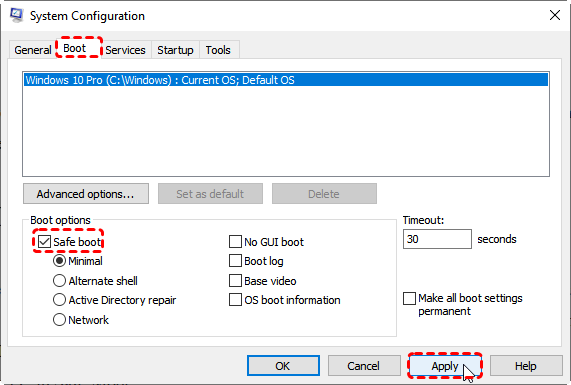
Step 3. Restart your computer and run the CHKDSK command again to check if the error is fixed.
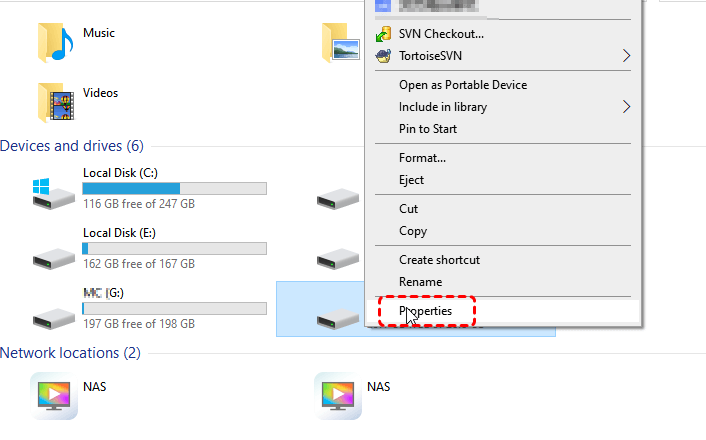
Method 8. Check for Disk Errors Using Error Checking
Besides the CHKDSK tool, Windows also provides a graphical interface error-checking tool for detecting and repairing disk errors. For non-system drives, you can run a scan with Error Checking even if the drive is in use. But for system drives or full repairs, Windows will usually require a restart to complete the process safely.
Step 1. Open File Explorer and right-click the target drive, then choose "Properties" from the context menu.
Step 2. Go to the "Tools" tab and click "Check" under "Error checking".
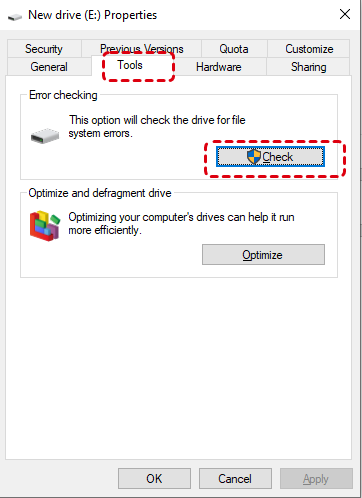
Step 3. Click "Scan Drive" to continue for detecting errors.
Method 9. Disable Antivirus Software Temporarily
Security software can sometimes block CHKDSK from gaining full access to the disk. If none of the above methods resolve the "CHKDSK cannot lock current drive" error, temporarily disabling your antivirus program such as Windows Defender may fix the issue. Remember to re-enable your antivirus software once everything is back to normal. Here we take Windows Defender as an example.
Step 1. Go to "Settings" > "Update & Secuirty" > "Windows Security" > "Virus & threat protection".
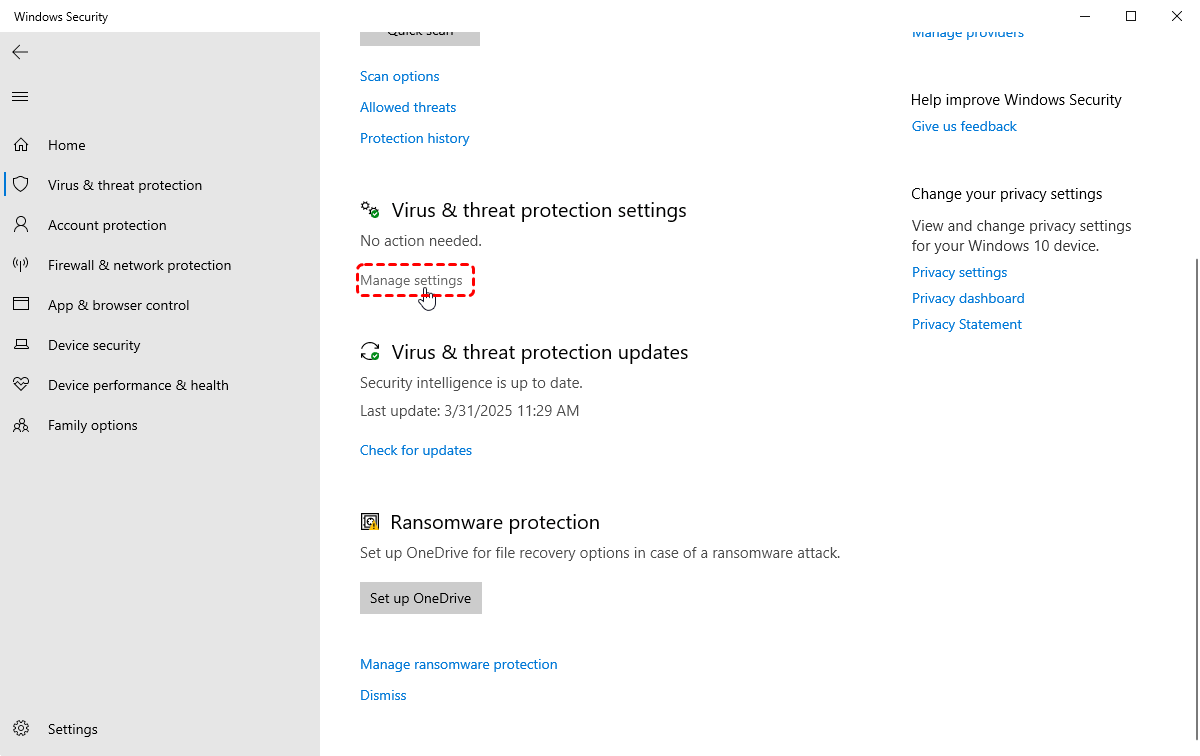
Step 2. Click "Manage settings" and disable real-time protection temporarily.
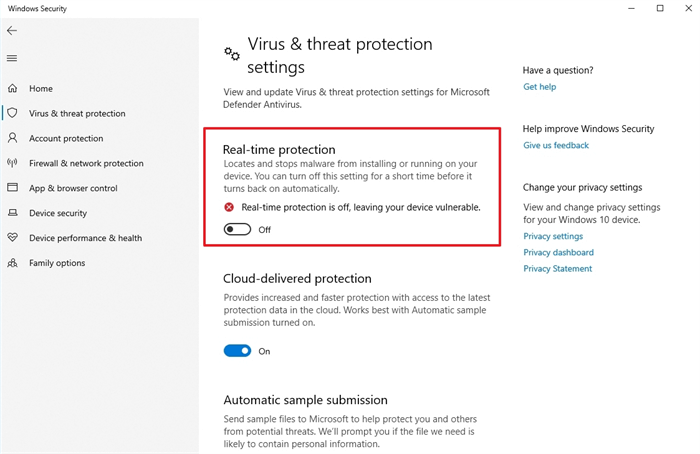
Step 3. Run the CHKDSK command again.
How to Recover Missing Files from Hard Drive
After resolving the "CHKDSK cannot lock current drive" error, you may notice that some files are missing or inaccessible. This can happen because CHKDSK focuses on repairing file system structures, and in the process, certain corrupted files may be removed or relocated. Besides, existing disk problems may have already caused data loss.
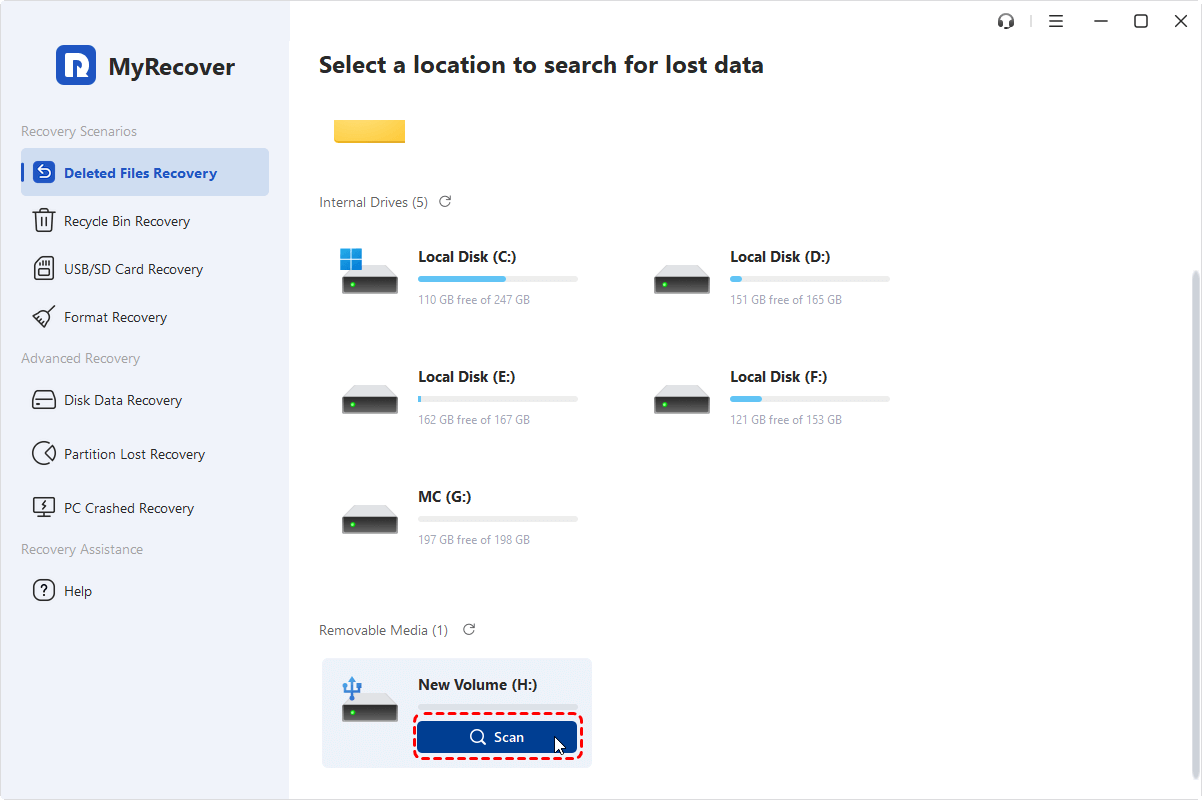
If you cannot find important files after running CHKDSK or fixing disk errors, it’s recommended to use a professional data recovery tool like MyRcover to scan the drive and retrieve lost data safely. It can perform a deep scan of your disk, identify recoverable files, and restore them without requiring advanced technical knowledge.

- Recover deleted & lost files from HDD, SSD, USB, SD card, camera as you need.
- Support 1000+ formats of photos, videos, docs, archives, emails, compressed files, etc.
- Reliable rescue for deletion, formatted disk, emptied Recycle Bin, system crashes and more.
Step 1. Download and install MyRecover on your Windows computer from Microsoft Store.
Step 2. Launch the program and select the drive where your files were lost, then click "Scan" to start searching for recoverable data.
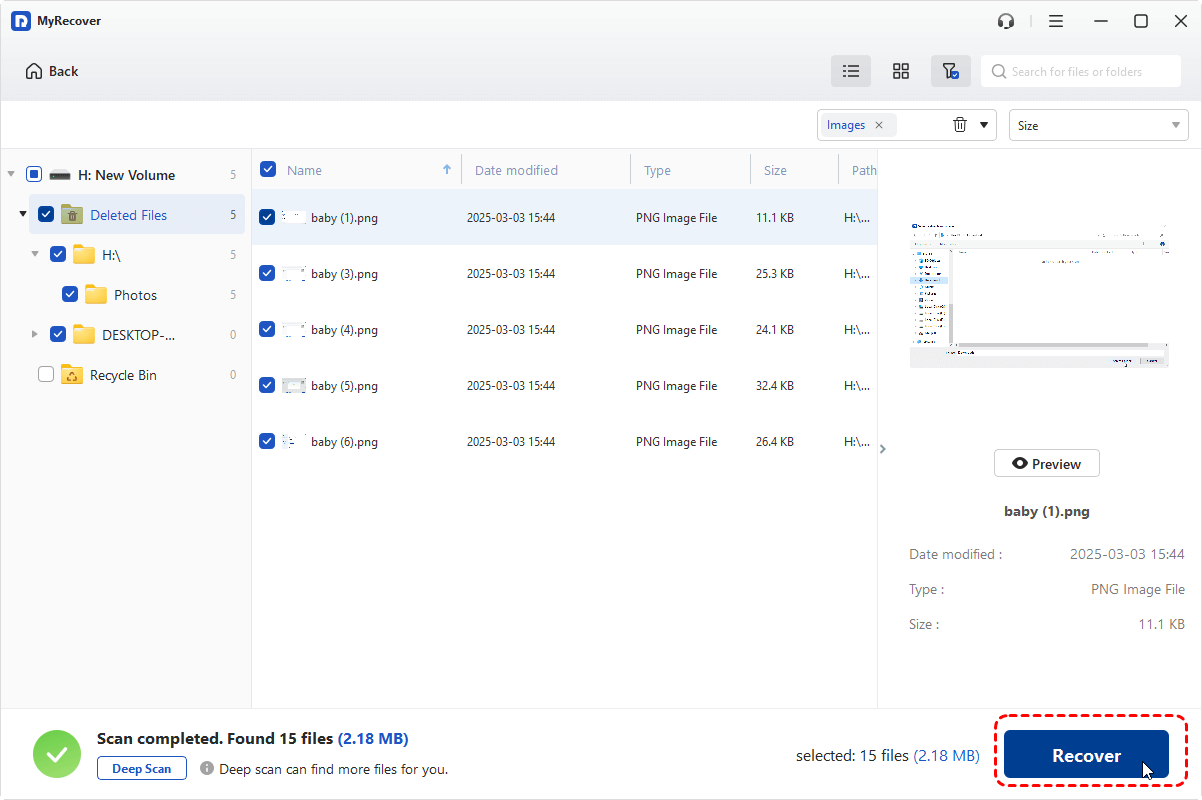
Step 3. After the scan completes, use the "Filter" or search function to quickly locate the missing files.

Step 4. Select the files you want to restore and click "Recover", then choose a different location to save them.
You can upgrade to the MyRecover Professional edition to unlock unlimited data recovery and file content preview. In addition, it includes advanced recovery features that allow you to retrieve files from a computer that won’t boot, helping you recover important data even in serious system failure scenarios.
When the process is finished, the message "Files have been recovered successfully" will pop up. Then, you can verify the recovered files in the destination folder by clicking on the "Browse" button.
Conclusion
The "CHKDSK cannot lock current drive" error is typically caused by access conflicts, insufficient permissions, or system-level restrictions. While the issue may seem complex at first, it can usually be resolved by applying the right method.
By following the step-by-step solutions in this guide, you can successfully run CHKDSK and repair disk errors without unnecessary trial and error. More importantly, if you notice missing files after fixing the issue or running disk repairs, using a reliable recovery tool like MyRecover can help you restore important data quickly and safely.


Stay Updated With Our
Latest Tips
Add us as a preferred source on Google to never miss helpful guides.