
What is the Diskpart Recover Command?
Trying to restore a failed RAID 5 volume? Learn the DiskPart recover command line techniques to refresh disk states. This guide shows how to use DiskPart command options to manage your storage effectively, ensuring your data stays safe while troubleshooting complex partition issues on Windows.
By Vera / Updated on May 7, 2026
Introduce
In the high-stakes world of Windows system administration and data management, the command line is often the last line of defense. Whether you are dealing with a failing RAID array, a drive that has suddenly become "Invalid," or a partition that refuses to show up in File Explorer, the DiskPart recover command is a phrase that often surfaces in troubleshooting forums and technical documentation.
However, there is a significant amount of confusion surrounding this command. Does it bring back deleted photos? Can it undo an accidental format? Or is it a specialized tool for server-grade disk management? Understanding the DiskPart recover command line utility is crucial for anyone who wants to manage their storage without the limitations of a graphical user interface.
In this comprehensive guide, we will dive deep into the mechanics of DiskPart, exploring its syntax, its actual function, and the alternative methods—including professional tools like MyRecover—that you should use if your goal is file recovery rather than simply refreshing a disk's state.
What is the Diskpart Recover Command?
To understand the recover command, we first need to understand DiskPart. DiskPart is a command-line utility that has been a staple of Windows since the Windows 2000 era. It allows users to manage disks, partitions, and volumes in a way that often bypasses the limitations of the "Disk Management" tool.
The Official Definition
According to Microsoft’s documentation, the recover command within the DiskPart environment performs three primary functions:
-
Refreshes the state of all disks in a disk group.
-
Attempts to recover disks in an invalid disk group.
-
Resynchronizes mirrored volumes and RAID-5 volumes that have stale data.
Crucial Distinction: Dynamic Disks vs. Basic Disks
The most important thing to know about the DiskPart recover command line is that it only operates on dynamic disks.
-
Basic Disks: These are the standard disks used by most home users. They use partition tables (MBR or GPT) to manage data. If you use the recover command on a basic disk, DiskPart will return a message stating the disk is not part of a disk group, and no action will be taken.
-
Dynamic Disks: These are often used in servers or advanced workstations to create software-based RAID arrays (like mirrored or striped volumes). When one of these disks fails or goes "offline," the recover command is used to bring the disk group back to a "Healthy" state by re-reading the configuration database.
When Should You Use the DiskPart Recover Command?
If you are a standard PC user with a single SSD or HDD, the recover command likely isn't what you need. However, if you are managing a system with mirrored drives or a RAID-5 setup, this command is a lifesaver in the following scenarios:
✔️1. Fixing "Invalid" Disk Status
Sometimes, when you move a dynamic disk to a new computer or after a system crash, the disk appears in Disk Management as Invalid. This usually means the disk's internal database (which tracks volume information) is out of sync with the OS. Running the recover command tells Windows to re-read the metadata and attempt to re-validate the disk.
✔️2. Resynchronizing Stale Data
In a mirrored (RAID 1) or RAID-5 volume, data is spread across multiple disks. If one disk loses power or is disconnected temporarily, the data on it becomes "stale"—it no longer matches the data on the other disks in the set. The recover command triggers a resynchronization process to ensure all disks in the group are identical again.
✔️3. Recovering Failed Volumes
When a dynamic volume shows a status of "Failed" or "Failed Redundancy," it means one of the underlying disks is having issues. Once you have resolved the physical connection issue, the recover command is the software "nudge" that tells Windows to try using the disk again.
How to Use the DiskPart Recover Command (Step-by-Step)
If you have determined that your disk is a dynamic disk and needs a state refresh, follow these steps.
Step 1: Open Command Prompt as Administrator
1. Press Windows + S and type cmd.
2. Right-click Command Prompt and select Run as Administrator.

Step 2: Launch DiskPart
1. In the command prompt, type diskpart and press Enter.
2. You are now in the diskpart environment. Make sure the window says DISKPART> before proceeding.
Step 3: Identify and Focus on the Target Disk
1. Type list disk to view all physical drives. Identify your disk by size.
2. Type select disk X (Replace X with your disk number, e.g., select disk 1).
Step 4: Refresh the Disk State
1. Type recover.
2. Diskpart will attempt to examine the disks in the group and update the status of the volumes.
Common Misconception: Can DiskPart Recover Deleted Files?
One of the most common reasons people search for the DiskPart recover command line is that they have accidentally deleted a file or formatted a partition.
The short answer is: No.
The DiskPart recover command does not scan the disk for deleted .jpg or .docx files. It only "recovers" the logical state of a disk group database. If you have run the clean command in DiskPart and lost your data, or if you formatted a drive by mistake, the recover command will not help you.
What to Do If You Used DiskPart Clean by Mistake?
The clean command is dangerous because it wipes the partition table (MBR/GPT) and the hidden sector information on a disk. If you find yourself in this situation, follow these steps immediately:
1. Stop using the drive: Every new bit written to the drive could overwrite the data you are trying to save.
2. Use MyRecover: Since DiskPart cannot undo its own clean command, you need professional-grade software. MyRecover is designed specifically for this type of disaster recovery. It can scan the "unallocated space" created by the clean command, identify the original file structures, and restore them to a different drive. Its deep-scan technology is far more effective for file retrieval than any native Windows command-line tool.

- 🎈High Success Rate: It can recover data from formatted, cleaned, or crashed disks.
- 🎈File Support: It supports over 1000+ file types, including images, videos, office documents, and emails.
- 🎈Search and Filter: Unlike the command line, it allows you to filter by file extension or search for specific filenames, saving hours of manual labor.
Steps:
1. Download and install MyRecover from the official website.
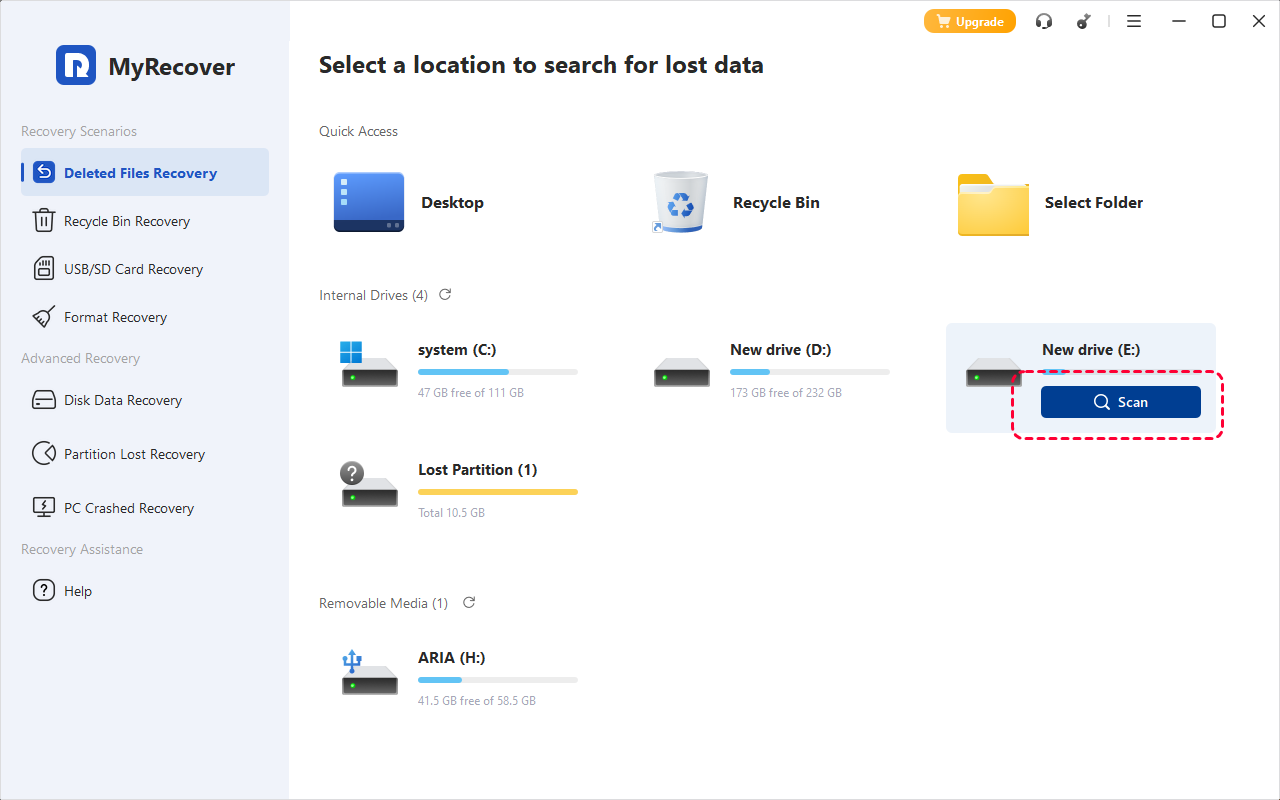
2. Open MyRecover and select the drive where your data was lost.
3. Click Scan to scan for deleted files.
4. Preview files and select what you want to recover.
5. Click Recover and save the files to a different drive.

6. Check your recovered files to make sure everything is intact.
MyRecover makes recovery fast, safe, and beginner-friendly—no command lines needed.
3. Try Partition Recovery Tools: If you want to restore the entire partition structure, tools like TestDisk (open source) can scan the "unallocated space" and attempt to write the partition table back to its original state.
4. Assign a Drive Letter: Sometimes the partition exists, but the drive letter is gone. You can use DiskPart's assign letter=X command to make it visible again if the partition is still intact.
Alternatives: Other DiskPart Commands for "Recovery"
While the literal recover command is niche, other DiskPart commands are frequently used for broader "recovery" tasks that users often confuse with the recover keyword.
1. The rescan Command
If you’ve just plugged in a new drive or fixed a cable and it isn't showing up in Windows, use rescan. It tells Windows to check all I/O buses for new disks or changes in disk configuration.
-
Command: rescan
2. The assign Command
If a partition is "lost" but shows up in DiskPart as a "Volume" with no letter, it simply needs a path. This is a common "recovery" step after a Windows update or disk signature collision.
-
Command: select volume X followed by assign letter=Z
3. The online disk Command
Sometimes a disk is marked as "Offline" because it was moved from another system or due to a policy set by the administrator.
-
Command: select disk X followed by online disk
4. Fixing RAW Drives (Format)
If a drive becomes "RAW," it means the file system is corrupted and Windows can no longer read the NTFS or FAT32 structure. While this isn't data recovery, it is "disk recovery" to make the hardware usable again.
-
Command: format fs=ntfs quick
Conclusion
The DiskPart recover command is a powerful but highly specific tool. It serves as the "reset button" for dynamic disk groups and RAID arrays in Windows. It is not a magic wand for deleted files, nor is it designed for standard Basic disks.
Key Takeaways:
-
Use DiskPart recover only if you are dealing with Dynamic Disks or RAID volumes that are "Invalid" or "Stale."
-
Use MyRecover for the vast majority of data loss situations, such as accidental clean commands, formatted partitions, or deleted files.
-
Verify your disk type using list disk before attempting any DiskPart recover command line operations to ensure you aren't wasting time on an unsupported Basic disk.
By mastering how to use DiskPart command, you gain significant control over your system's storage architecture. However, always remember that command-line tools are for managing structure, while specialized recovery tools like MyRecover are for protecting content. Knowing which one to use in a crisis is the hallmark of a true power user.
Expanded FAQ: Expert Solutions for Disk Recovery Problems
1. What is the difference between diskpart recover and chkdsk?
While both commands are used for "fixing" disks, they operate at completely different layers. DiskPart Recover operates at the Physical/Logical Disk Group layer. It is specifically for Dynamic Disks to refresh their LDM database. Chkdsk (Check Disk), on the other hand, operates at the File System layer. It scans for errors in the NTFS or FAT32 structure, fixes cross-linked files, and repairs directory errors. Use chkdsk /f if your drive is visible but you are getting "File system error" pop-ups.
2. I accidentally ran the clean command in DiskPart. Can I get my data back?
The clean command wipes the partition table, making the disk appear as "Unallocated Space." The recover command will not work here because there is no dynamic disk group left to refresh. In this scenario, you should use MyRecover. This tool performs a sector-by-sector scan of the disk to find the data that still exists but is no longer "mapped" by the operating system. It is the most reliable way to reverse the effects of a DiskPart clean or format operation.
3. Why do I get the error "The disk is not part of a disk group" when using recover?
This error is the most common result when users attempt to use the diskpart recover command line on a Basic Disk. Because Basic disks do not use the Logical Disk Manager database, there is no "disk group" for the command to refresh. If you are having trouble with a Basic disk, check the physical connections or use the assign command to ensure the drive has a letter.
4. Can DiskPart recover a partition that has become "Unallocated"?
If your partition has disappeared, DiskPart can only "recover" it if you manually recreate the partition with the exact same starting and ending offsets—a process that is extremely difficult and prone to error. A much safer solution is to use MyRecover. It has a dedicated "Lost Partition" recovery mode that automatically finds the old partition boundaries and allows you to browse the files within them as if the partition were still mounted.
5. How do I fix a disk that shows a status of "RAW"?
A RAW disk means the OS can no longer recognize the file system. While learning how to use DiskPart command, you might be tempted to use recover, but it won't help. A RAW status usually requires fixing the boot sector or the Master File Table (MFT). You should first try to recover your files using a tool like MyRecover, and only then format the drive back to NTFS using DiskPart's format fs=ntfs quick command.
6. Can I use DiskPart to recover data from a formatted USB drive?
No. USB drives are typically "Removable" Basic disks. DiskPart's recover command is incompatible with them. If you have formatted a USB drive and need the files back, skip the command line entirely and use file recovery software that can reconstruct files based on their digital signatures.


Stay Updated With Our
Latest Tips
Add us as a preferred source on Google to never miss helpful guides.