
Solved: Glyph Drive Not Showing Up
Glyph hard drive not showing up? If this issue is disrupting your workflow, this guide explains the most effective solutions. From checking cables to repairing file system problems, discover practical ways to make your drive detectable again and recover access to all stored data.
By Vera / Updated on November 20, 2025
Introduction
Few things are more frustrating than plugging in your external Glyph drive only to find… nothing. No chime, no icon, no pop-up — just a silent drive that refuses to show up on your computer. Whether you're a creative professional working with high-capacity media files or someone who simply relies on external storage, dealing with a Glyph drive not showing up can be a nerve-wracking experience.
The good news? You can fix most of these issues yourself. This guide walks you through the most common causes and step-by-step solutions to get your Glyph hard drive recognized again — even if the problem seems serious.
Common Reasons a Glyph Drive Doesn't Appear

Before diving into solutions, it helps to understand why your Glyph drive may not be showing up. Below are the most frequent causes.
Faulty USB or Thunderbolt Cable
Cables break more often than we think — especially if you’re always on the go. A damaged or low-quality cable can cause intermittent connection or full device detection failure.
Insufficient Power Supply
Some Glyph drives, especially high-capacity models, need external power or a powered hub. If they don’t get enough power, they simply won’t mount.
Drive Letter Conflicts (Windows)
If Windows fails to assign a drive letter, the drive may be connected but invisible in File Explorer.
A brand-new or corrupted disk may appear uninitialized, making it unmountable until fixed.
Outdated or Corrupted Drivers
Drivers tell your computer how to communicate with the drive. If they’re outdated or corrupted, your Glyph drive can vanish from the system.
File System Corruption
Improper ejection, power loss, or malware can corrupt the file system and prevent the drive from showing up.
Physical Drive Failure
All drives eventually fail. Clicking sounds, overheating, or inconsistent connection may point to hardware damage.
How to Fix Glyph Drive Not Showing Up (Step-by-Step)
Now let’s get hands-on. Follow these methods one by one until your drive reappears.
Method 1: Test the Cable and Port
A simple cable swap solves the issue more often than you'd think.
1. Switch USB/Thunderbolt Cables
Try using:
- Another cable
- A shorter or original cable
- A certified Thunderbolt cable (if applicable)
2. Try Different Ports or Computers
Test the drive on:
- Another USB port
- A different computer
- A different operating system (Windows vs macOS)
If it works elsewhere, you’ve already found the culprit.
Method 2: Check Disk Management (Windows)
Disk Management shows drives that don't appear in File Explorer.
1. Assign a Drive Letter
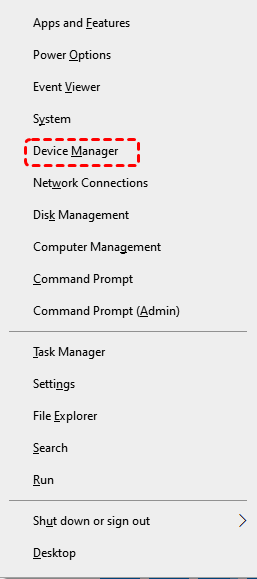
1. Right-click Start > Disk Management.
2. Locate your Glyph drive.
3. Right-click > Change Drive Letter and Paths.
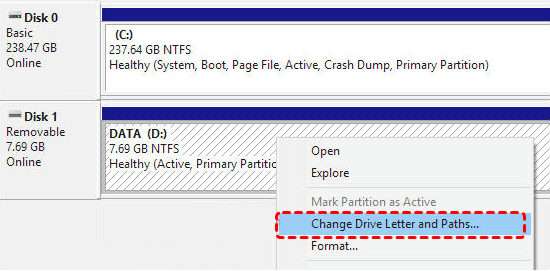
4. Assign a new letter.
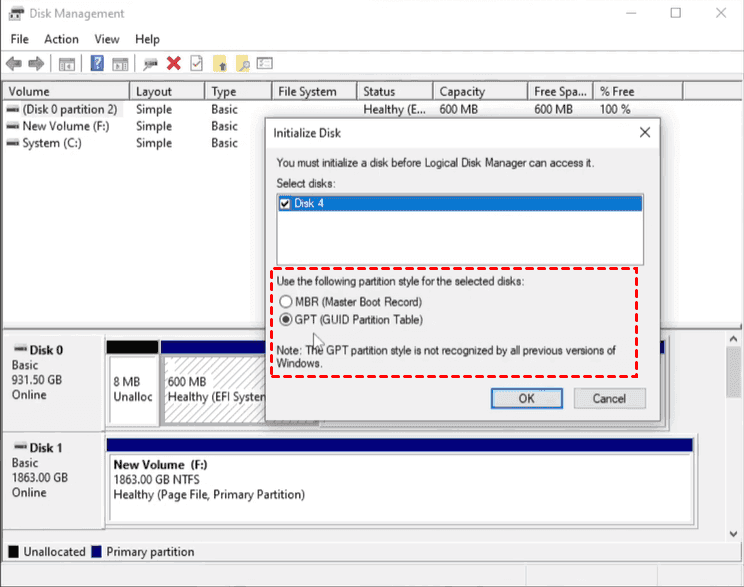
2. Initialize the Disk
If the disk is listed as Not Initialized:
1. Right-click the disk.
2. Select Initialize Disk.
3. Choose GPT (recommended).
Method 3: Use macOS Disk Utility (Mac)
Disk Utility often reveals drives hidden from Finder.
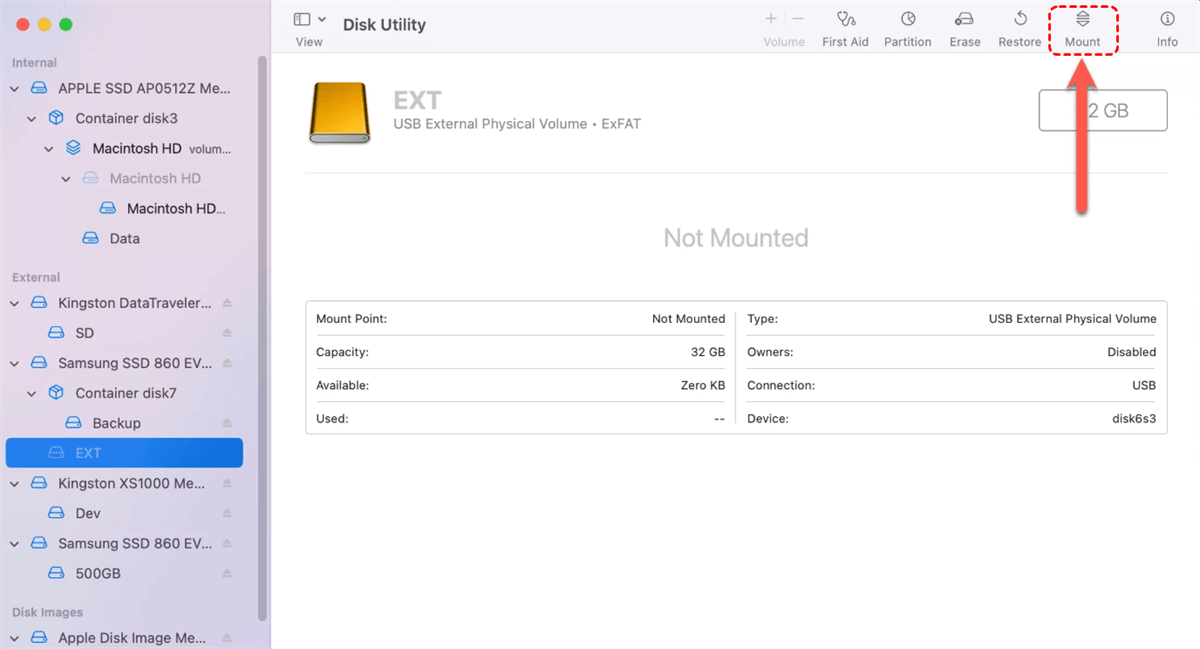
1. Mount the Drive Manually
1. Open Disk Utility.
2. Select your Glyph drive.
3. Click Mount.
2. Run First Aid
First Aid repairs disk structure issues:
1. Select the drive.
2. Click First Aid.
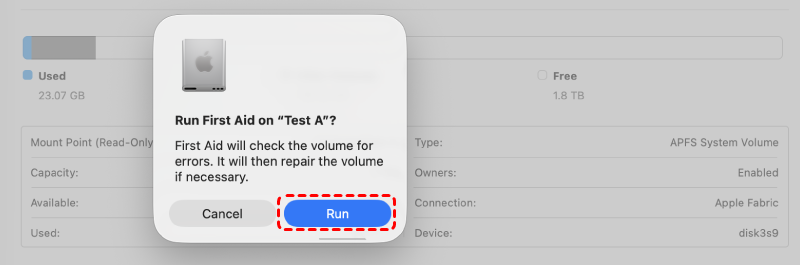
3. Allow macOS to scan and repair.
Method 4: Update or Reinstall Drivers
Update steps:
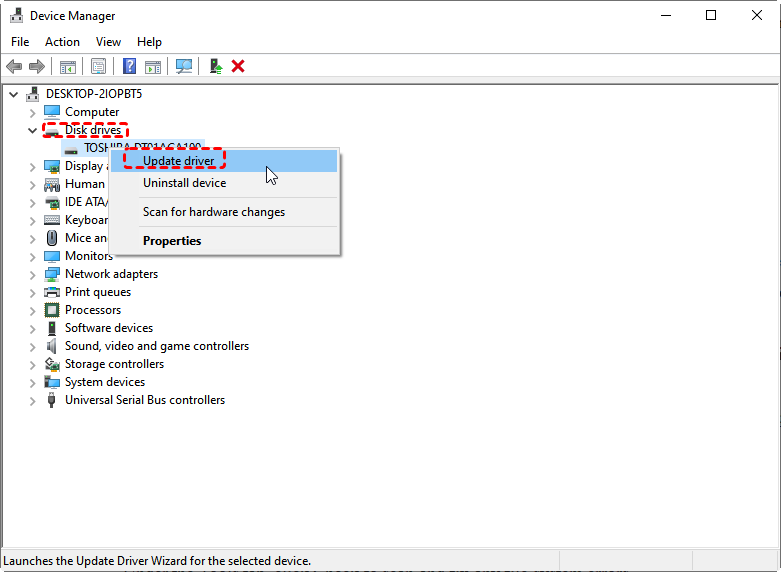
1. Open Device Manager.
2. Expand Disk Drives.
3. Right-click your Glyph drive > Update Driver.
If that fails:
- Uninstall the device
- Restart your system
- Reconnect the drive
Windows will automatically reinstall drivers.
Method 5: Change USB Power Management Settings
Windows may turn off USB ports to save power.
Steps:
1. Open Device Manager.
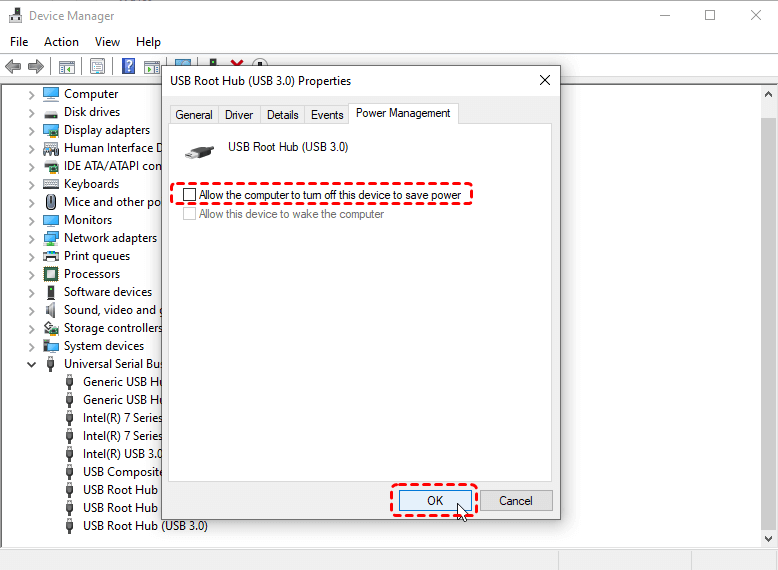
2. Expand Universal Serial Bus Controllers.
3. Right-click each USB Root Hub.
4. Open Properties > Power Management.
5. Uncheck Allow the computer to turn off this device to save power.
This prevents random disconnects.
Method 6: Repair File System Errors
1. On Windows (CHKDSK)
Run: chkdsk X: /f /r. Replace X with your Glyph drive letter.

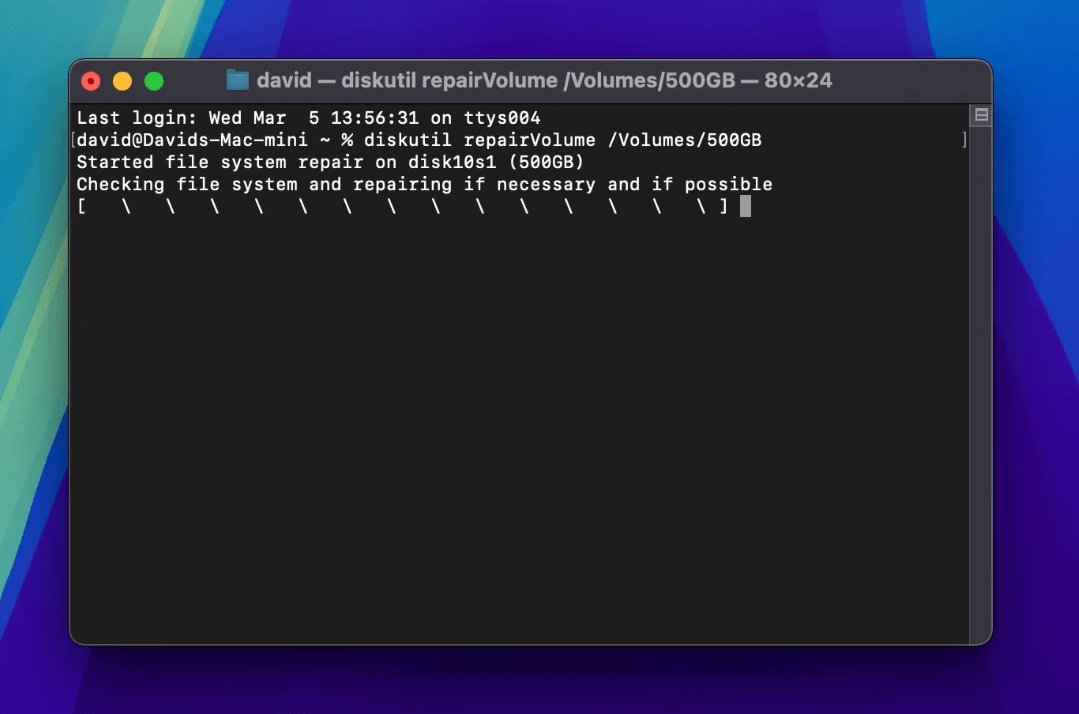
2. On Mac (Terminal Repair Command)
diskutil repairVolume /Volumes/DRIVENAME
Method 7: Test for Hardware Damage
Signs of physical failure:
- Clicking or buzzing noises
- Drive overheating
- Repeated disconnection
If you suspect hardware issues, stop using the drive immediately to avoid data loss.
Bonus Tip: What If Data on the Glyph Drive Is Lost?
If your drive finally shows up but the data is missing — or worse, if the drive becomes corrupted — a powerful data recovery tool can save the day.
MyRecover is one of the most user-friendly and effective tools for recovering data from external drives, including Glyph devices. It supports:
- Deleted file recovery
- Recovery from formatted drives
- Recovery from corrupted file systems
- External HDD and SSD recovery
Simply install MyRecover, scan your Glyph drive, preview files, and recover them with one click. It’s perfect for emergencies when you need to restore important photos, videos, documents, and project files.
1. Install MyRecover on your computer.
2. Connect your Glyph drive to the PC.
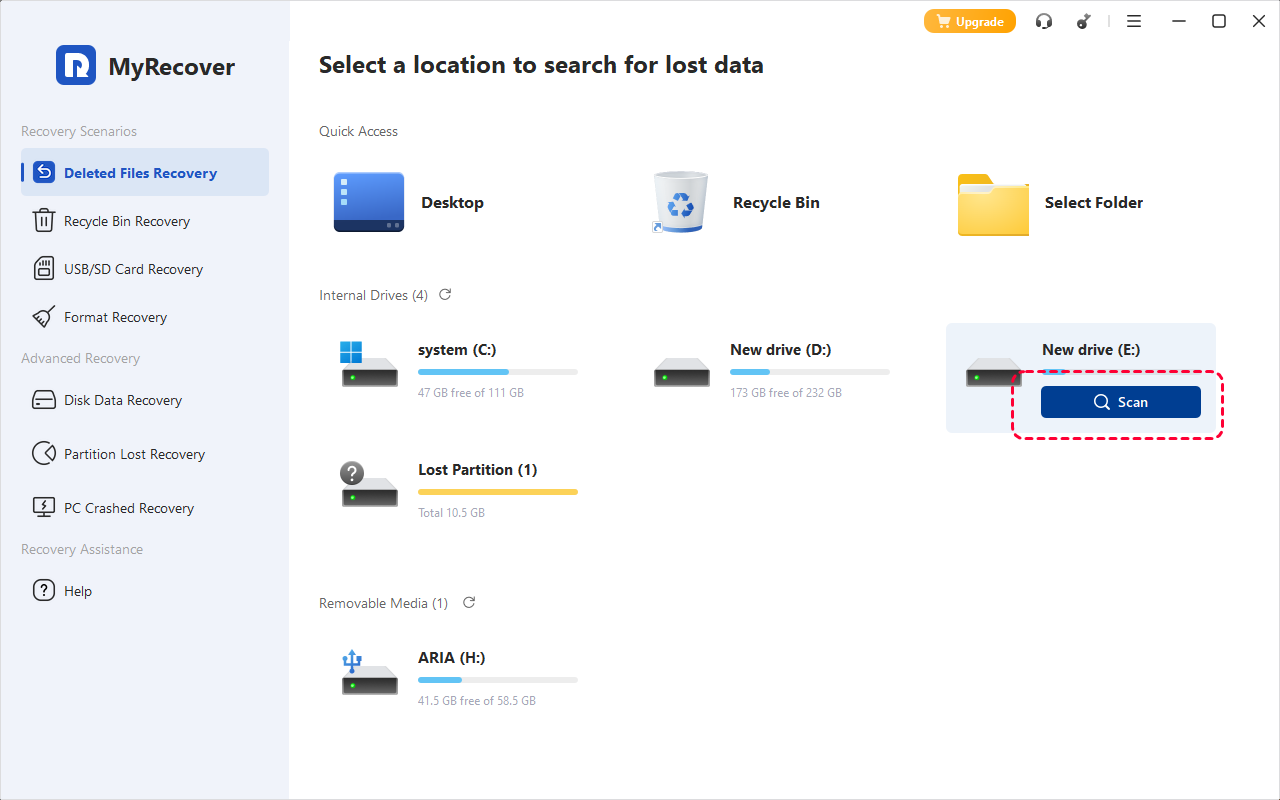
3. Open MyRecover and select the Glyph drive.
4. Click Scan to search for lost files.
5. Preview and select the files you want back.
6. Click Recover and save them to a safe location.

How to Prevent Glyph Drive Not Showing Up Again
A little prevention can save a lot of headaches later.
1. Safely Eject Before Unplugging
Unplugging without ejecting is like pulling a book out of someone’s hand mid-page — it corrupts the story.
2. Avoid Overloading USB Hubs
If too many high-power devices share one hub, your Glyph drive may not get enough juice to run properly.
3. Keep Firmware Updated
Check Glyph’s official website for:
- Firmware updates
- Driver updates
- Compatibility patches
Conclusion
Dealing with a Glyph drive not showing up can feel overwhelming, but don’t panic just yet. In most cases, the issue boils down to something simple like a faulty cable, missing drive letter, outdated driver, or a minor file system glitch. By walking through the troubleshooting steps in this guide, you can bring your Glyph drive back to life and regain access to your important files.
And if the issue results in data loss, remember that tools like MyRecover can help you recover what you thought was gone forever.
With the right steps and a little patience, you can solve the problem quickly and prevent it from happening again.


Stay Updated With Our
Latest Tips
Add us as a preferred source on Google to never miss helpful guides.