
Quick Guide: How to Disable File History Windows 10
Although File History is an effective feature for creating backups on Windows, users may want to turn it off for various reasons. This article will provide four methods to help you disable File History on Windows 10. Additionally, it will introduce a professional tool that can assist you in recovering lost data even without File History enabled.
By Aria / Updated on June 20, 2025
Why do you Want to Turn off File History?
File History is a built-in backup feature in Windows that automatically saves copies of files from your libraries, desktop, contacts, and favorites to an external drive or network location, helping protect your data from loss. This feature allows you to restore previous versions when needed.
However, as File History backs up more and more files, and more convenient and easier-to-manage backup tools or cloud storage continue to emerge, File History seems less necessary. More and more people are disabling File History on Windows 10/11 and choosing more convenient backup tools. There are several reasons why you might want to turn off File History on your system.
- Free Up Storage Space: File History saves multiple versions of your files over time, which can consume significant space on your local storage or external drive.
- Performance Concerns: File History runs in the background and regularly backs up your files. On older or resource-constrained systems, this constant process can slow down performance, particularly when using an external hard drive.
- Using Third-Party Backup Solutions: If you're relying on third-party backup tools or cloud storage like Google Drive or OneDrive, you might prefer to disable File History to avoid redundant backups and streamline your data management.
- Privacy: File History automatically backs up files, including sensitive documents. If you are concerned about privacy or security, disabling File History gives you control over what gets backed up.
How to Disable File History on Windows 10/11
Whatever your reason, knowing how to disable File History on Windows 10 and 11 can help you better manage your system's backup settings. If you've decided to turn off File History, this section provides four ways to do so. You can choose your preferred method and follow the steps to disable it step by step. (If necessary, you can enable File History on Windows again in a similar way.)
Using Backup Settings
If you're looking for the easiest way to disable File History in Windows 10/11, the Settings app provides a simple and user-friendly method.
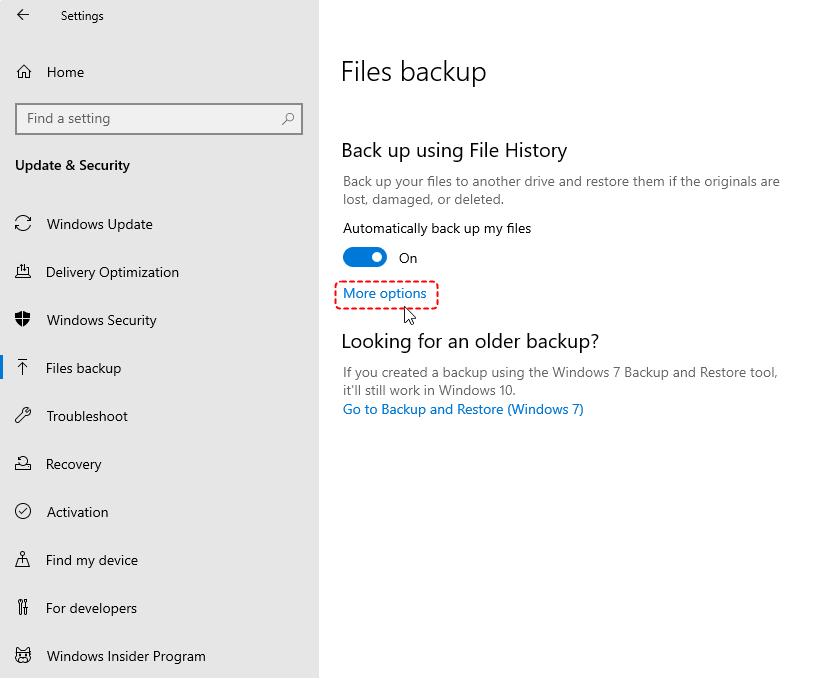
Step 1. Click the Start Bar and choose "Settings", or press "Win + I" to open the "Settings" window directly.
Step 2. Click "Update & Security > Files backup". Under the "Back up using File History" section, click on "More options".
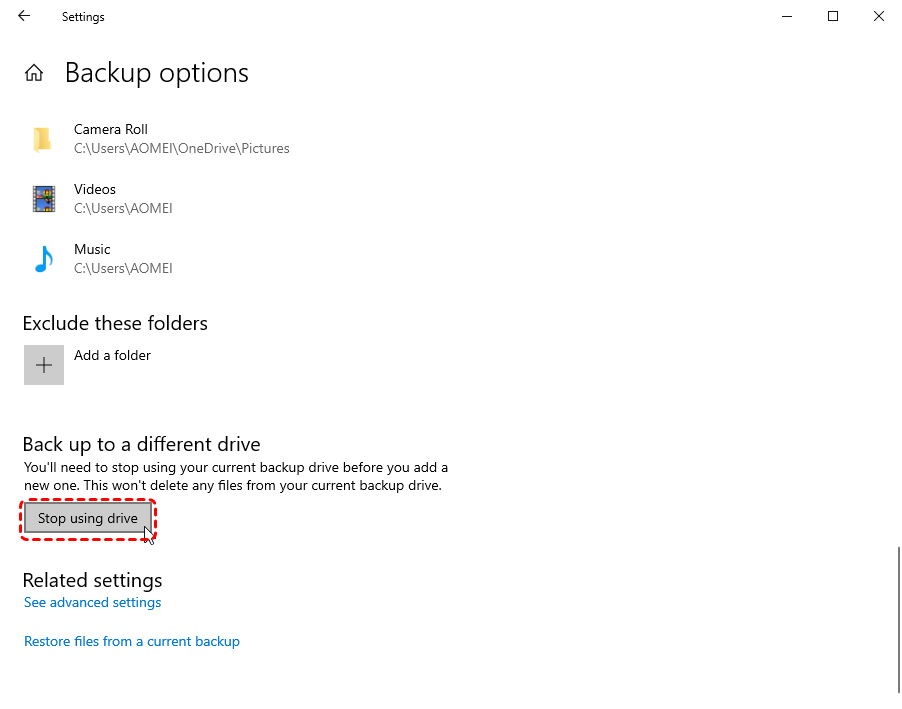
Step 3. Scroll down and click on "Stop using drive". This will disable File History for the selected drive.
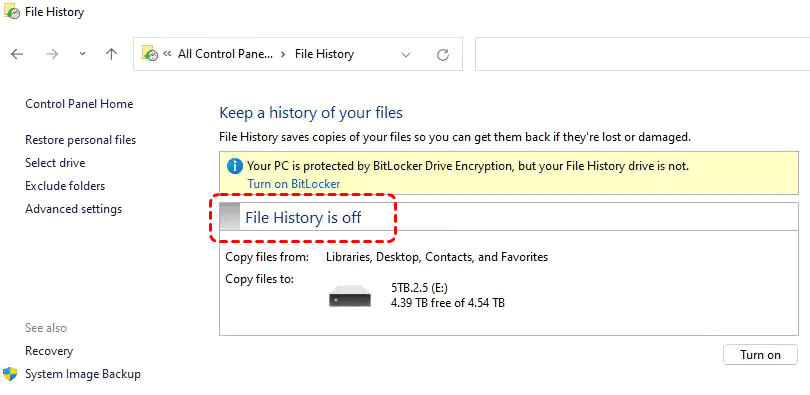
Using Control Panel
In Windows 11, the option to manage File History within the Settings app has been removed. While Microsoft has relocated many settings in Windows 11, you can still access File History through the Control Panel. There, you can disable the feature and manage all related settings.
Step 1. Press "Win + R" to open run dialog window, type "control" and press "Enter" to open Control Panel.
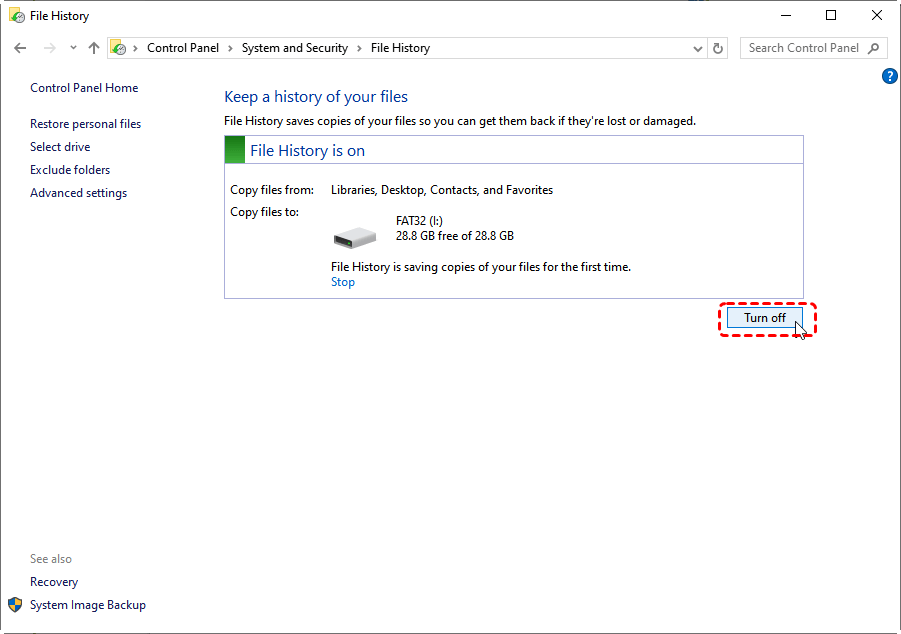
Step 2. Under the "system and security", choose "Save backup copies of your files with File History".

Step 3. On the right sidebar, select "Turn off" to disable File History. This will stop future backups and delete previous versions of files stored by File History.
Using Registry Editor
If you're comfortable working with Windows' Registry Editor, you can disable File History by modifying the registry entries. This method is more technical but can be effective for advanced users who want to disable it across multiple systems.
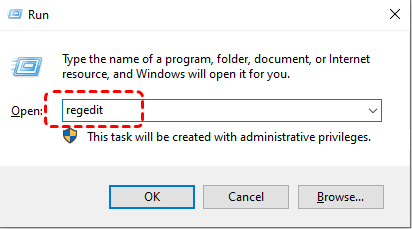
Step 1. Press "Win + R" to open run dialog, then type "regedit" and hit "Enter" to launch the "Registry Editor".
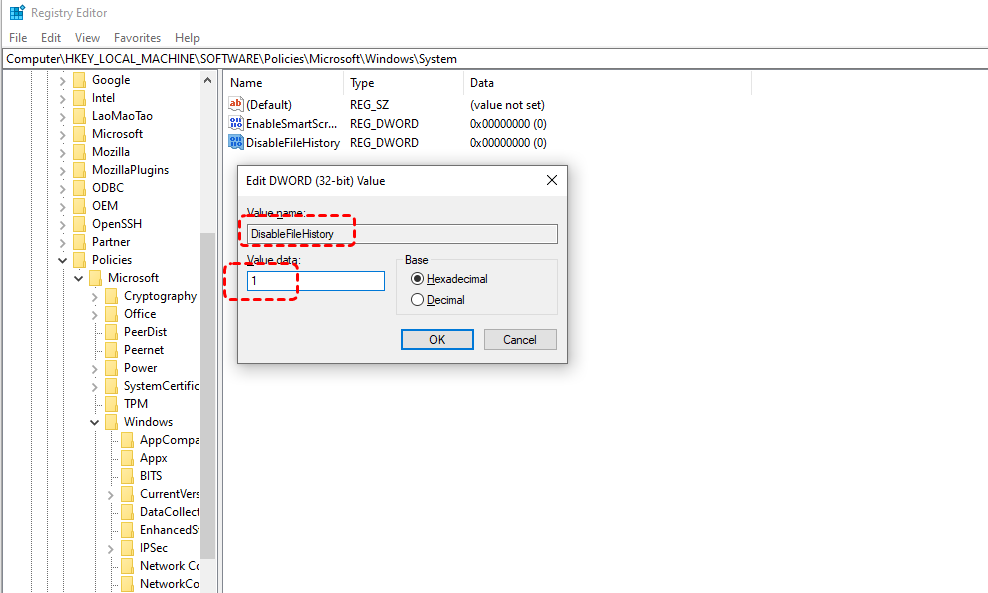
Step 2. Navigate to the following path:
HKEY_LOCAL_MACHINE\SOFTWARE\Policies\Microsoft\Windows\System

Step 3. Right click the empty space and select "New > DWORD (32-bit) Value".

Step 4. Name the DWORD value as "DisableFileHistory", and double click it to set its value to 1.
Step 5. Close "Registry Editor" and restart your computer, the File History has been disabled.
Using Local Group Policy Editor
If you're using Windows 10 Pro or Windows 11 Pro/Enterprise, you can disable File History using the Local Group Policy Editor. This is a quick method to turn off File History on Windows for all users on the system.
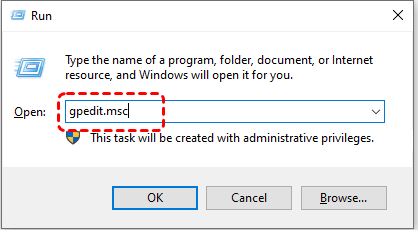
Step 1. Press ”Win + R“, type "gpedit.msc" and hit "Enter" to open the Local Group Policy Editor.
Step 2. Navigate to the following path:
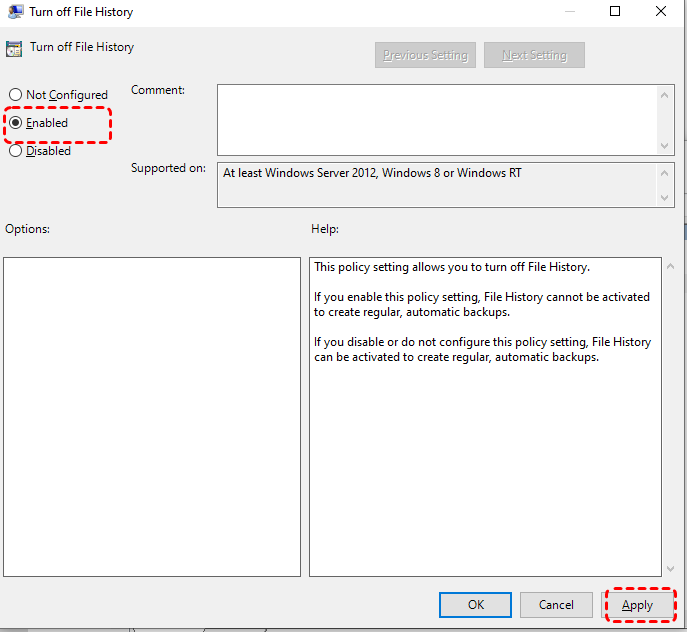
Computer Configuration > Administrative Templates > Windows Components > File History
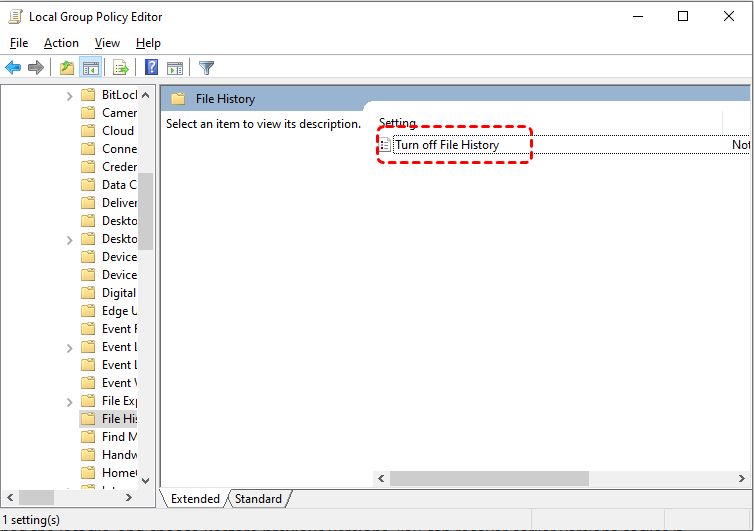
Step 3. On the right side, double-click on "Turn off File History" and set it to "Enabled". Then click "Apply" to turn off File History on Windows.
Bonus: How to Recover Files Without File History on Windows
Although turning off File History can save storage space and protect personal privacy, it also exposes your files to the risk of loss. If you don’t back up important files in time after disabling File History, or if File History does not work, recovering them can become challenging once data loss occurs. This is when you definitely need a professional data recovery software—MyRecover is a top-notch tool that can help you retrieve lost files without any backup.
Here are some stunning points of MyRecover:
- ✅No Command Line Required – Intuitive GUI (Graphical Interface) for effortless file recovery.
- ✅Intelligent Filtering – Precision recovery of files by type, date, or size.
- ✅Extensive Device Compatibility – Recover files from SSDs, HDDs, USB flash drives, SD cards, cameras, and more.
- ✅Versatile Data Loss Solutions – Recover from deleted partitions, emptied Recycle Bins, system crashes (available only in paid versions), virus attacks, and other scenarios.
- ✅Broad OS Compatibility – Works on Windows 11/10, as well as Windows 8.1/8/7 and all Server editions.
4 steps to recover lost files on Windows
Step 1. Download and install MyRecover on your computer from secure channel.
Step 2. Launch it and select the drive with lost files to scan and click "Scan".

Step 3. Choose the files you wish to recover from the recoverable lists and click "Recover".

Step 4. Choose a destination other than the drive where files were lost to avoid overwriting original data and save the recovered files.

When the message "Files have been recovered successfully" pops up, you can click the folder path of the recovered files to check them.

Summary
Disabling File History on Windows 10 and 11 is a simple process, and there are multiple ways to do it, depending on your preference. Disabling it allows you to easily manage File History backups, free up storage and improve system performance. However, if you ever need to recover files, there are still ways to retrieve lost data using MyRecover—even if you’ve turned off File History.
Additionally, MyRecover offers the Professional and Technician editions to meet users' more advanced needs, such as recovering data from crashed Windows. They also support previewing files before recovery to confirm whether they are the ones you need.


Stay Updated With Our
Latest Tips
Add us as a preferred source on Google to never miss helpful guides.