
Why Is My SSD Only Showing Half Capacity? [Causes & Solutions]
When an SSD shows only half its available capacity, it can be due to various factors. This article discusses the potential causes of the problem and offers practical solutions to fix the problem. With this guide, you will be able to identify the cause and restore your SSD to its full storage capacity, ensuring optimal performance.
By Aria / Updated on December 31, 2025
SSD Only Showing Half Capacity!
"I just bought a brand new 1TB NVMe SSD to use as additional storage and when I install it my computer only recognizes it as 465.76GB (the exact same size as my main SSD). I have updated my BIOS to the most recent version and tried reformatting the m.2 drive but I can't figure out how to get it to show its full capacity."
- Question from Jonnybow
If you've recently installed a new SSD and noticed that it's only showing half its expected capacity, you're not alone. Many users have encountered this issue, where an SSD (Solid-State Drive) displays only a fraction of its total capacity in File Explorer or Disk Management, despite being marketed as having a larger storage capacity. This can be quite frustrating, especially if you need to use the full capacity of your drive.
In this article, we will discuss common reasons why your SSD only shows half capacity and provide step-by-step solutions to help you resolve the issue. We'll also guide you on how to recover lost data if any has been lost during the troubleshooting process.
Why is My SSD Only Showing Half Capacity?
There are several reasons why an SSD might show only a fraction of its actual capacity. Understanding these causes can help you avoid this issue as much as possible. Below are some of the most common causes:
💽Partitioning Issues (MBR vs. GPT): If your SSD is partitioned using the MBR (Master Boot Record) partition style, it may not fully recognize drives larger than 2TB. The GPT (GUID Partition Table) partition style, on the other hand, supports drives larger than 2TB.
🧿Hidden Partitions: Sometimes, hidden or unallocated partitions can take up part of the SSD's space. These partitions may be leftover from previous installations or system configurations.
💾Firmware or Driver Problems: Outdated or incompatible firmware/drivers can sometimes cause the operating system to incorrectly report the SSD's capacity.
⚙️System or BIOS Settings: Some systems may have limits imposed by their BIOS or operating system, preventing recognition of the full SSD capacity.
📂File System Errors: Corrupt or incomplete file systems can also cause the operating system to misreport the SSD's storage capacity.
🔋Storage Space Allocation: It's possible that a portion of the drive is reserved for system functions or recovery purposes, reducing the accessible space for the user.
How to Fix the "SSD Only Showing Half Capacity" Issue
Now that you've known the common causes behind this issue. This section will explore several effective methods to fix this problem step-by-step. Let's dive into the detailed steps.
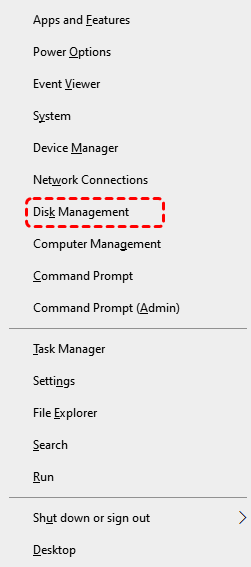
1. Extend Volume
The unallocated space on SSD will not show up in File Explorer but will be visible in Disk Management, and it cannot be used directly. Extending the volume to incorporate the unallocated space on your SSD will help display its full capacity.
Step 1. Press "Win" + "X" and choose "Disk Management" to open it.
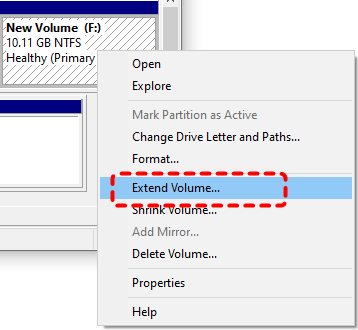
Step 2. Right click on your SSD and select "Extend Volume".
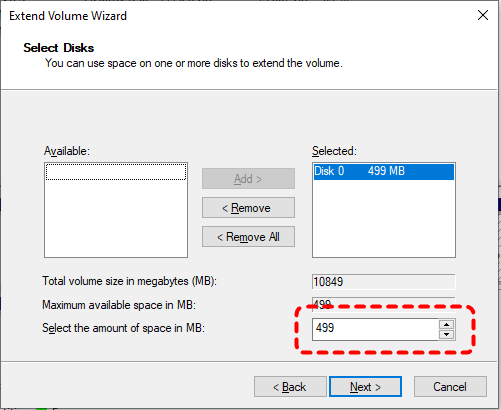
Step 3. Type the unallocated portion of the drive and click "Next" > "Finish" to start the process.
2. Show Hidden Partitions
Besides unallocated space, RAW partitions, partitions without drive letters, and BitLocker-protected partitions will not show up directly in File Explorer either. This results in the SSD only displaying half of its actual capacity. You can use Disk Management or third-party software to show these hidden partitions.
For RAW Partition
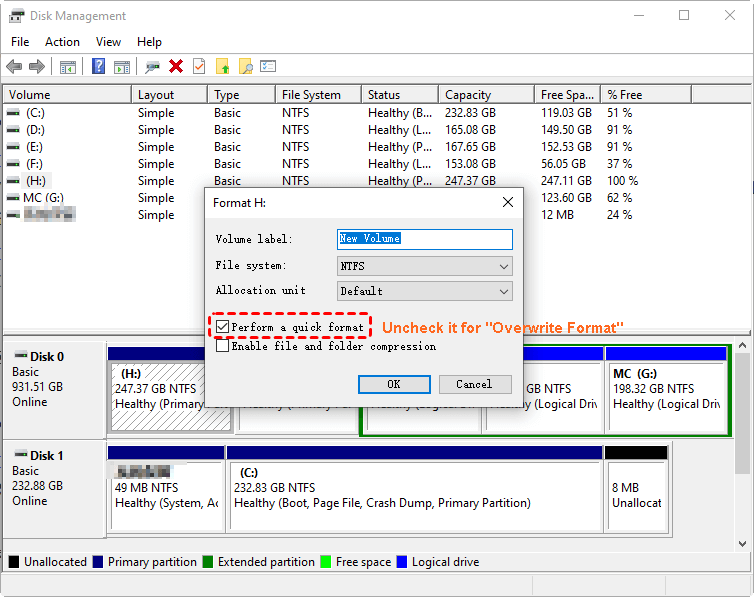
Step 1. Press "Win" + "X" and choose "Disk Management" to open it.
Step 2. Right click on the RAW partition and choose "Format".
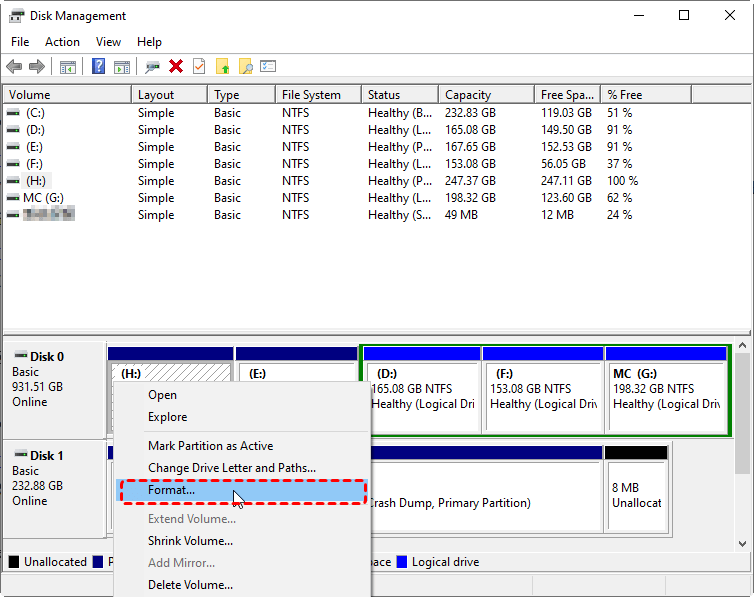
Step 3. Choose a desired file system like NTFS and check the "Perform a quick format" option, then click "OK" to start the process.
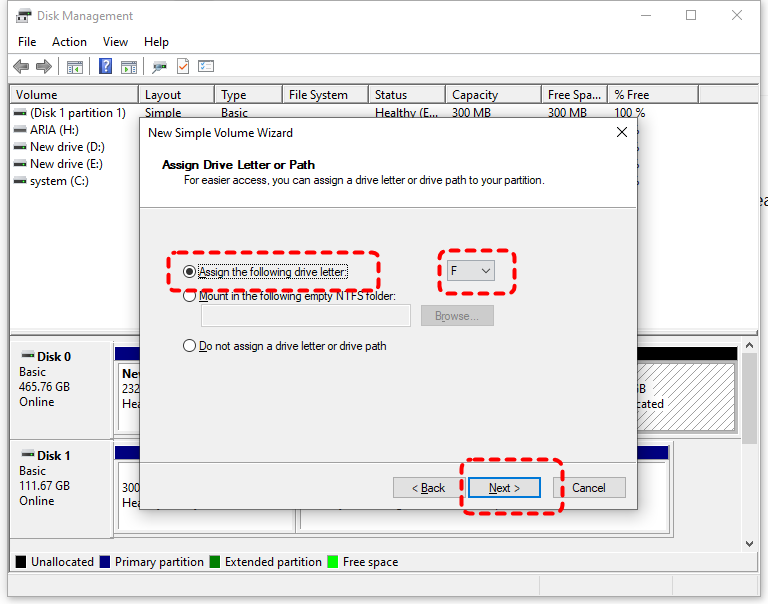
For Partitions without Drive Letter
Step 1. Open Disk Management as described above.
Step 2. Right click on the partition and select "Change Drive Letter and Paths".
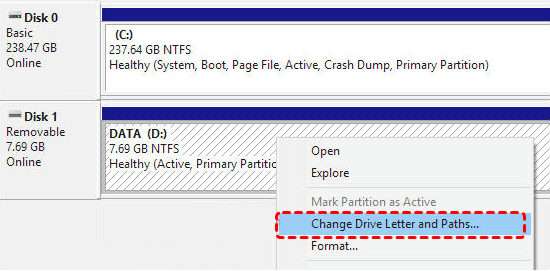
Step 3. Assign a new drive letter for the partition. Then, it will be visible and accessible in File Explorer.
3. Run CHKDSK Command
If your disk structure is corrupted, it may cause the SSD only showing half capacity. Use the CHKDSK utility to check for bad sectors or file system issues. Here's how:
Step 1. Locate Command Prompt in the Start menu and run it as administrator.

Step 2. Type the following command "chkdsk G: /f /r" and hit the "Enter" key. Replace the drive letter "G" you’re your SSD drive letter. This will scan and repair any issues with the file system that may be causing the problem.

Wait for the process to complete. Restart your computer to check if the SSD shows its full capacity.
4. Update Disk Driver
Outdated or incompatible disk drivers can prevent your SSD capacity from being fully recognized by the system. Trying to update the SSD driver in Device Manager might solve the issue.
Step 1. Press "Win"+ "X" and choose "Device Manager" to open it.
Step 2. Expand "Disk drivers" and right click on your SSD, then choose "Update driver".
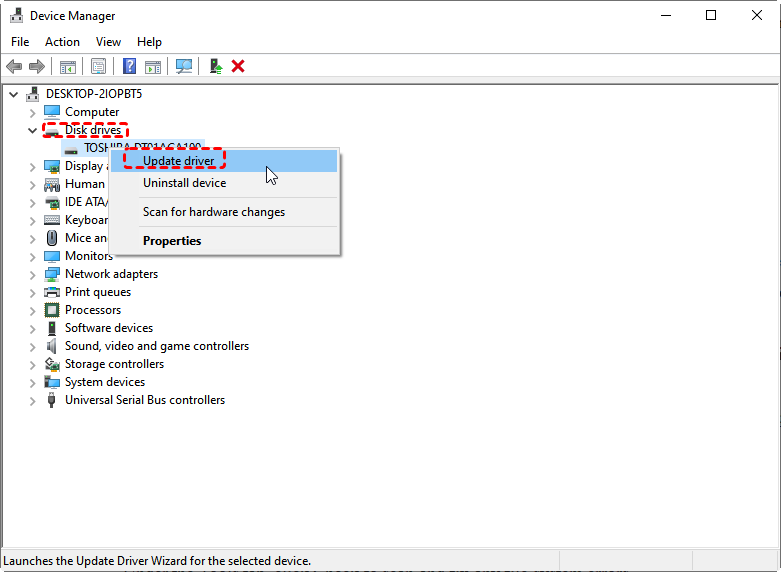
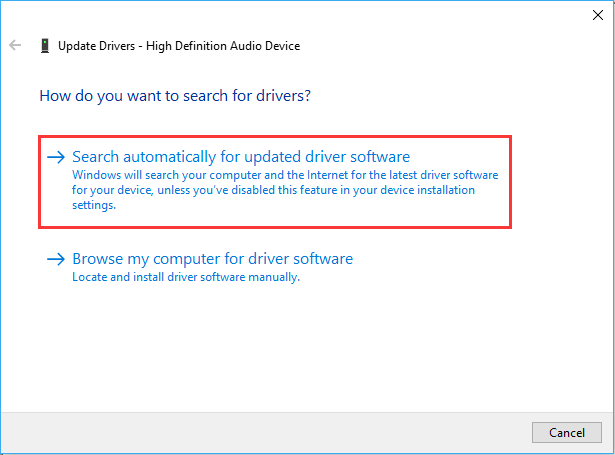
Step 3. Click "Search automatically for updated driver software" to continue the process.
Step 4. Restart your computer and check the SSD capacity again.
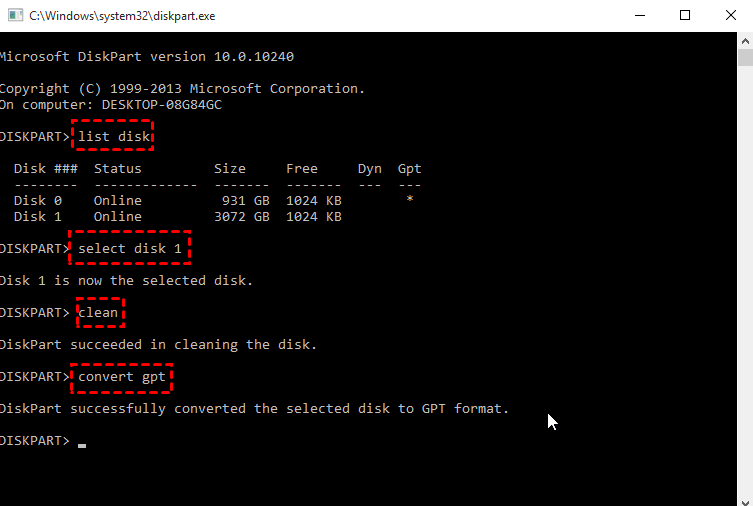
5. Convert from MBR to GPT
If your SSD is using the MBR partition style and is over 2TB in size, the operating system may only recognize the first 2TB. The MBR partition table has a maximum capacity limit of 2TB; any space beyond this limit will not be displayed. Converting to GPT allows the system to recognize the full capacity.
Step 1. Locate Command Prompt and run it as administrator.
Step 2. Enter the following command and press "Enter" after each one:
- diskpart
- list disk
- select disk X
- clean
- convert gpt
-
This will delete all data on the selected disk, so be sure you've backed up anything important.
-
If you are not familiar with command-line operations and do not wish to lose any data, you can use a third-party tool such as AOMEI Partition Assistant. It can convert an MBR partition table to GPT without any data loss.
-
GPT is required for booting from a disk in UEFI mode, while MBR is used with Legacy BIOS mode. Ensure your system is set up to boot in UEFI mode if you are converting the disk to GPT and want to use it for booting.
6. Scan and Remove Virus
Sometimes, malware or viruses can cause abnormal behavior with storage devices. Running a system scan with Windows Defender or any third-party antivirus program can help identify and remove any malicious software that might be affecting your SSD.
Step 1. Find your SSD only showing half capacity in File Explorer and right click on it, then choose "Scan with Windows Defender" from the context menu.
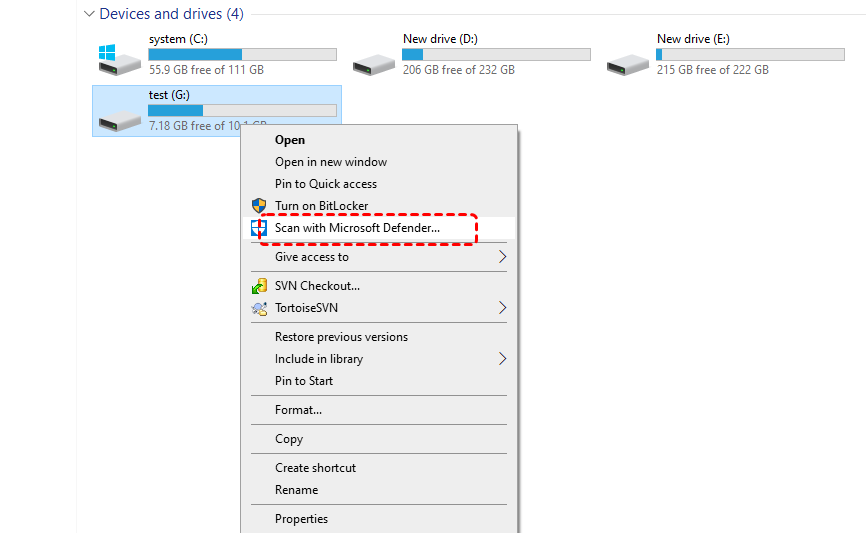
Step 2. This will automatically perform a quick scan for your SSD. If needed, you can perform a more thorough scan by clicking on "Full scan" after quick scan finishes.

Step 3. If any suspicious virus or malware is detected, remove or quarantined it.
7. Reformat the Hard Drive
If none of the above methods resolve the issue of your SSD only showing half its capacity, formatting may be the last resort. It will erase all files and data on the SSD, allowing its full capacity to be displayed. When you attempt to format the SSD in Disk Management, you may find the "Format" option grayed out if the SSD is the disk where your current operating system is installed. In this case, you can use a command-line tool to format it instead.
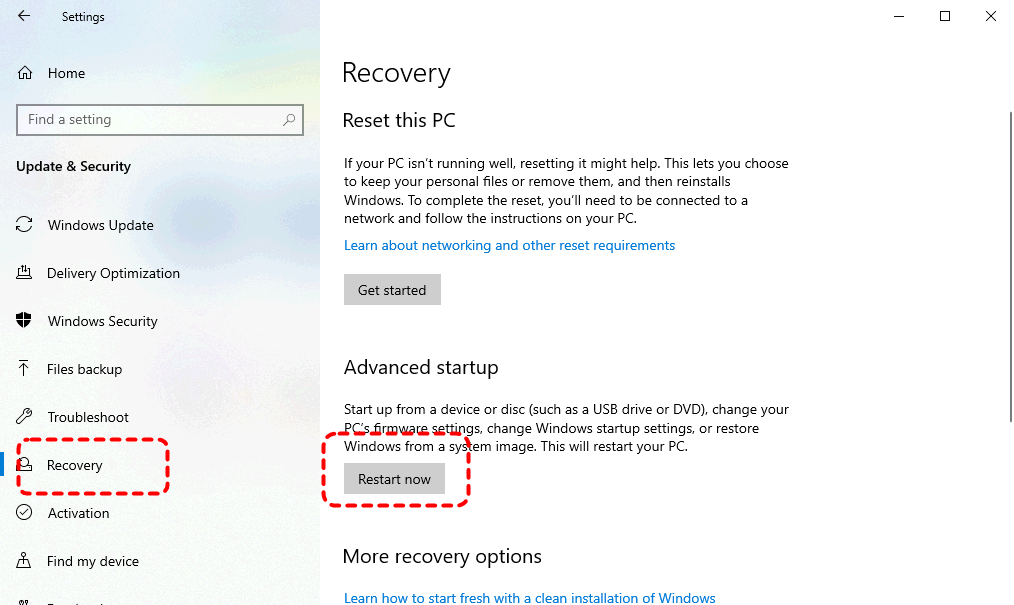
Step 1. Go to "Settings" > "Update & Security" > "Recovery".
Step 2. Under the "Advanced startup" click "Restart now". Your computer will automatically enter WinRE.
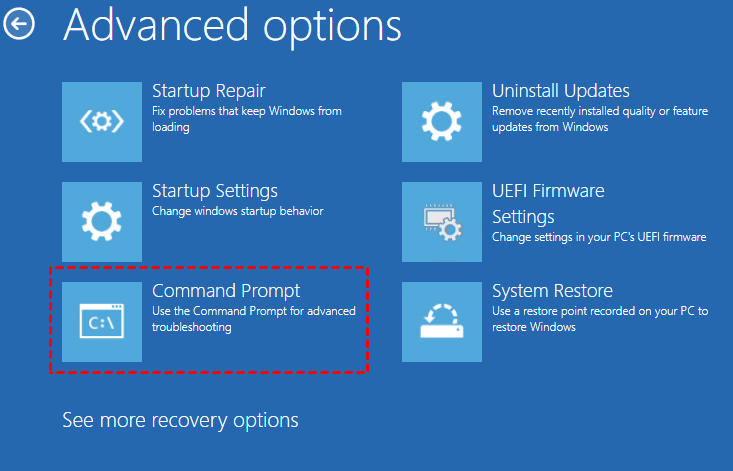
Step 3. Select "Troubleshoot" > "Advanced options" > "Command Prompt".
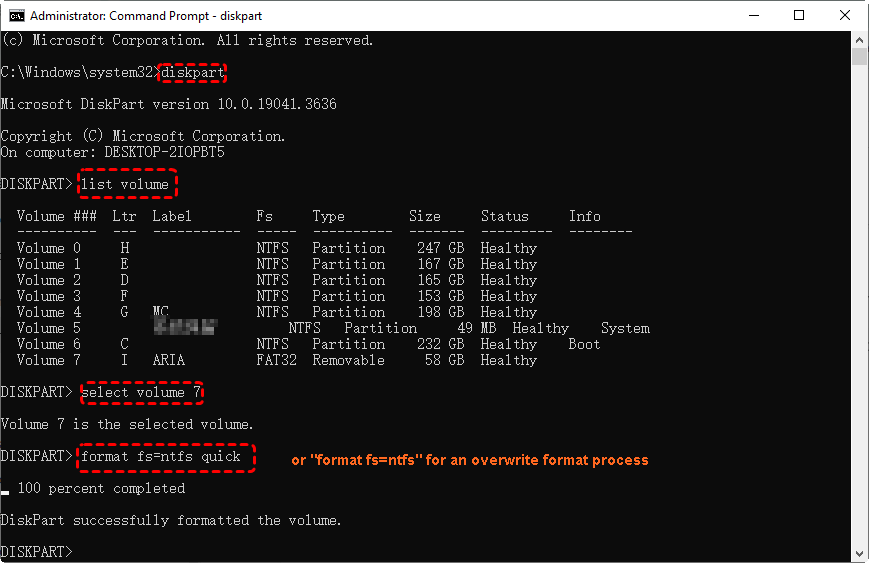
Step 4. Type the following command:
- diskpart
- list volume
- select volume X
- format fs=ntfs quick
- Notes:✎...
- If your operating system is installed on the SSD, never format the SSD while the system is running; this will cause an immediate system crash.
How to Recover Lost Data from the SSD
If you've lost data during troubleshooting or some data on the SSD may get lost due to the incomplete capacity display, MyRecover is a powerful data recovery tool that can help you recover files from an SSD, even if it’s only showing part of its capacity. With MyRecover, you can recover lost documents, photos, videos, and more from formatted, corrupted, or damaged drives.

- Recovering data from formatted HDD/SSD, emptied trash bin, after a virus attack, etc.
- Support HDD, SSD, External Hard Drive, USB Drive, SD Card, etc.
- Scan the missing files from quick scan or deep scan mode.
- Quickly Find Files Using File Types, Name, Size, etc.
Step 1. Download and install MyRecover on your computer from Microsoft Store, avoid installing it on the SSD.
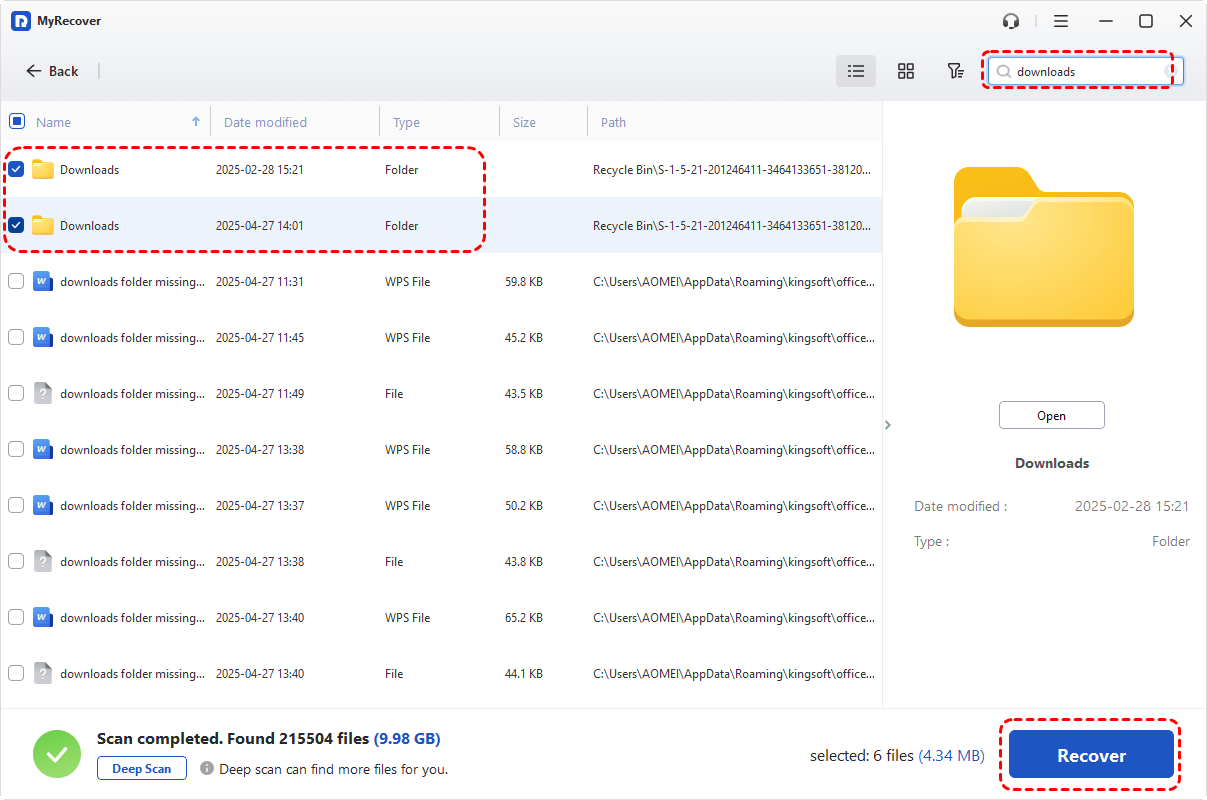
Step 2. Run the app and select the SSD to scan for lost files, then click "Scan".

Step 3. After the scan finishes, you can choose the files you attempt to recover from the recoverable lists and click "Recover".
MyRecover Free offers up to 500MB of data recovery at no charge, perfect for small recoveries. If you're looking for unlimited recovery and real-time file previews, MyRecover Professional edition gives you everything you need to ensure your data is safe.
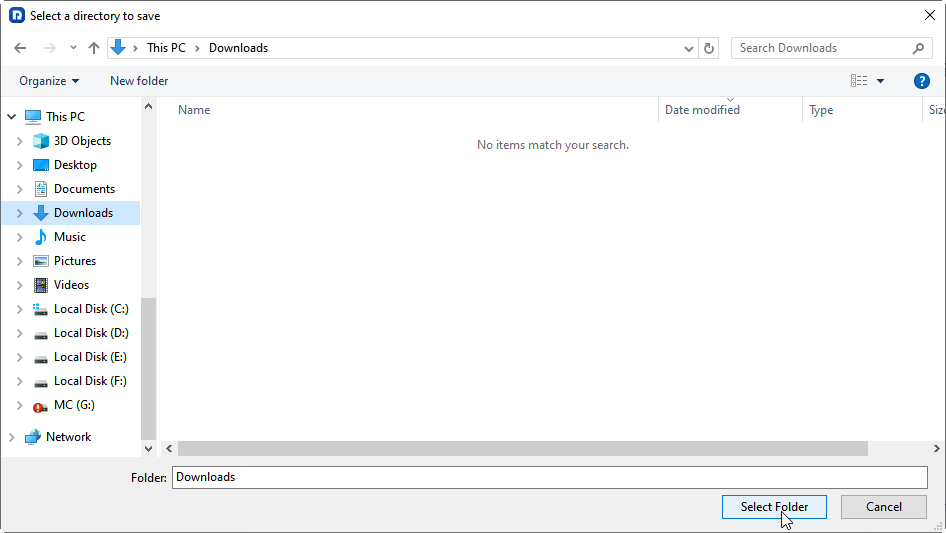
Step 4. Select a safe location to save the recovered files (not the original SSD).
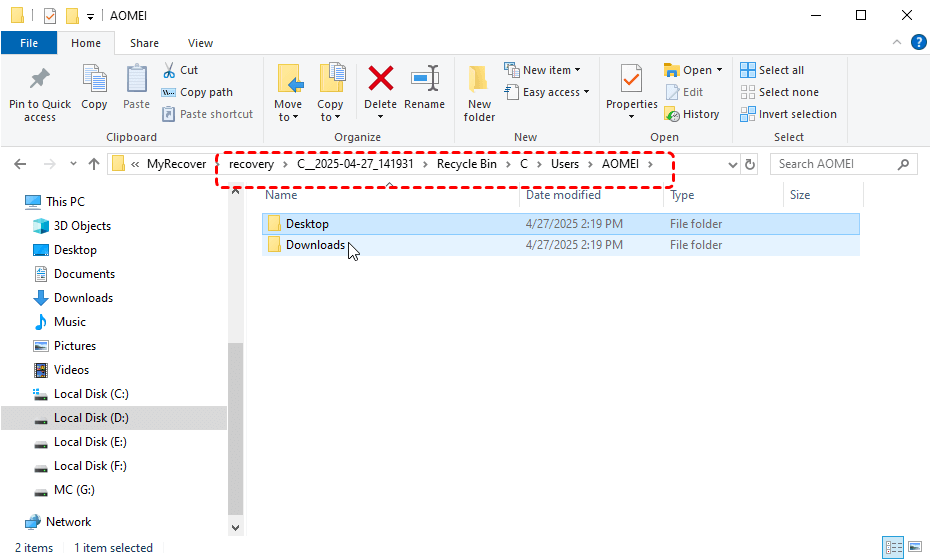
When the process is completed, you'll see the message "Files have been recovered successfully". Then, you can check the recovered files by clicking on the destination folder path or the "Browse" button.
The End
Experiencing an issue with your SSD only showing half its capacity can be frustrating, but it's a problem that can often be fixed with the right tools and techniques. By updating drivers, reformatting the drive, converting to GPT, or fixing partition issues, you can restore your SSD to its full capacity.
If you’ve lost important data in the process, don't worry. MyRecover is here to help. It provides an easy-to-use solution for recovering files from SSDs, hard drives, and other storage devices. It even supports recover data from crashed system.


Stay Updated With Our
Latest Tips
Add us as a preferred source on Google to never miss helpful guides.