
TestDisk Data Recovery: Full Guide to Recover Lost Partitions & Files
TestDisk is a powerful, open-source solution for recovering lost partitions and files from damaged or accidentally deleted disks. Whether you are a beginner or an experienced user, this article provides practical advice for using TestDisk for data recovery efficiently. You will learn how to restore crucial files, recover entire partitions, and safeguard your data against permanent loss.
By Aria / Updated on June 9, 2026
Overview of TestDisk
Data loss is a common challenge for both personal and professional computer users. Accidental deletion, formatting errors, virus attacks, or system crashes can lead to lost files or even entire disk partitions, causing disruption and potential data disaster. Recovering these lost files and partitions often requires reliable and powerful tools.
TestDisk is a widely recognized open-source software designed specifically for data and partition recovery. Known for its robustness, TestDisk can restore lost partitions, repair corrupted file systems, and recover deleted files across a variety of storage devices, including HDDs, SSDs, USB drives, and memory cards. Its versatility makes it a go-to solution for IT professionals and advanced users who are comfortable with command line to recover critical data.
The Key Features of TestDisk
TestDisk offers a comprehensive set of functionalities that make it a reliable solution for recovering lost partitions and files. Its features are designed to handle both common and complex data loss scenarios while providing advanced control for experienced users.
👉 Partition Recovery: TestDisk can detect and restore lost or deleted partitions, including primary and logical partitions, across multiple file systems such as FAT, NTFS, exFAT, ext2/ext3/ext4, and HFS+.
👉 File System Repair: It can repair damaged file system structures, enabling previously inaccessible drives to become readable again without overwriting data.
👉 Deleted File Recovery: Users can recover individual files from FAT, NTFS, and ext2/ext3/ext4 partitions, including accidentally deleted files that have not been overwritten.
👉 Boot Sector Reconstruction: TestDisk can rebuild corrupted boot sectors, helping restore system boot functionality for drives affected by virus attacks or file system corruption.
👉 Cross-Platform Support: The software is compatible with Windows, macOS, Linux, and other Unix-like systems, making it versatile for various environments.
👉 Command-Line Control: While primarily a command-line tool, it provides a clear step-by-step interface for navigating recovery operations, giving advanced users fine-grained control over the process.
How to Perform TestDisk Data Recovery on Windows
Recovering lost partitions and files with TestDisk involves a systematic approach. The steps below guide you through the process, ensuring you minimize the risk of overwriting data while maximizing recovery success.
Step 1. Download and Install
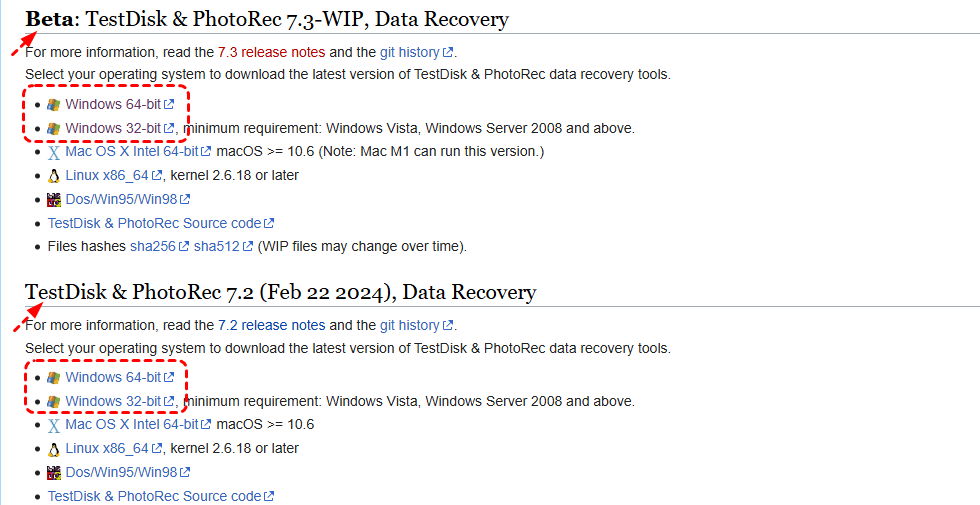
Download TestDisk from its official website. Select the latest version compatible with your operating system for download. Since PhotoRec comes bundled with TestDisk, you will find it downloaded along automatically.
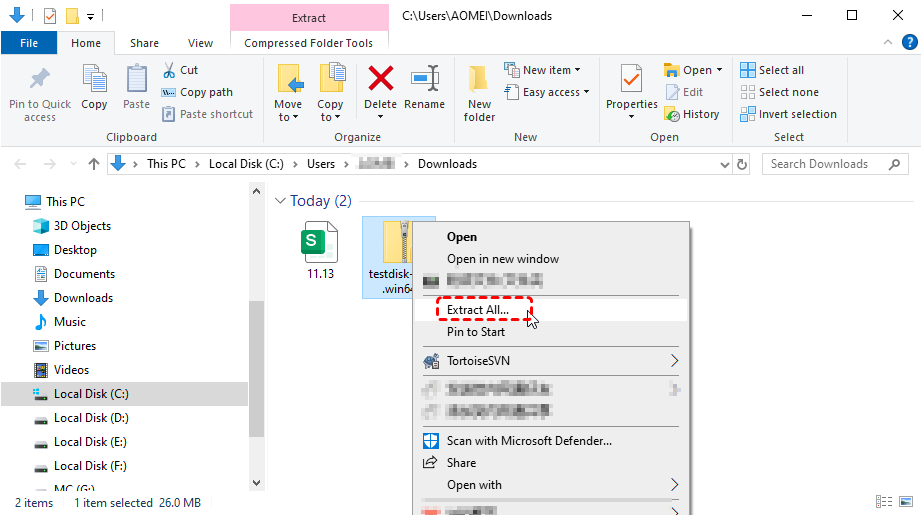
Right click on the downloaded file and choose "Extract All" to unpack it to a folder. Do not place the downloaded archive or extracted program on the hard drive or USB drive you intend to repair or recover.
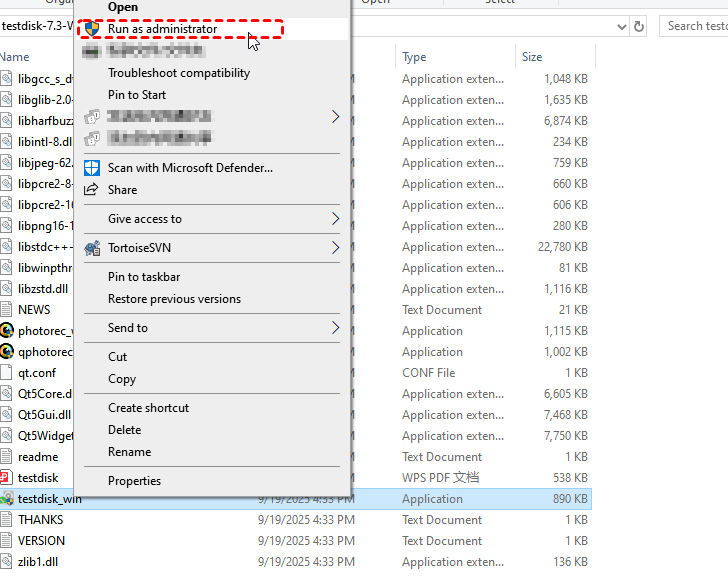
Locate the testdisk_win.exe in the folder and right click on it, then choose "Run as an administrator".
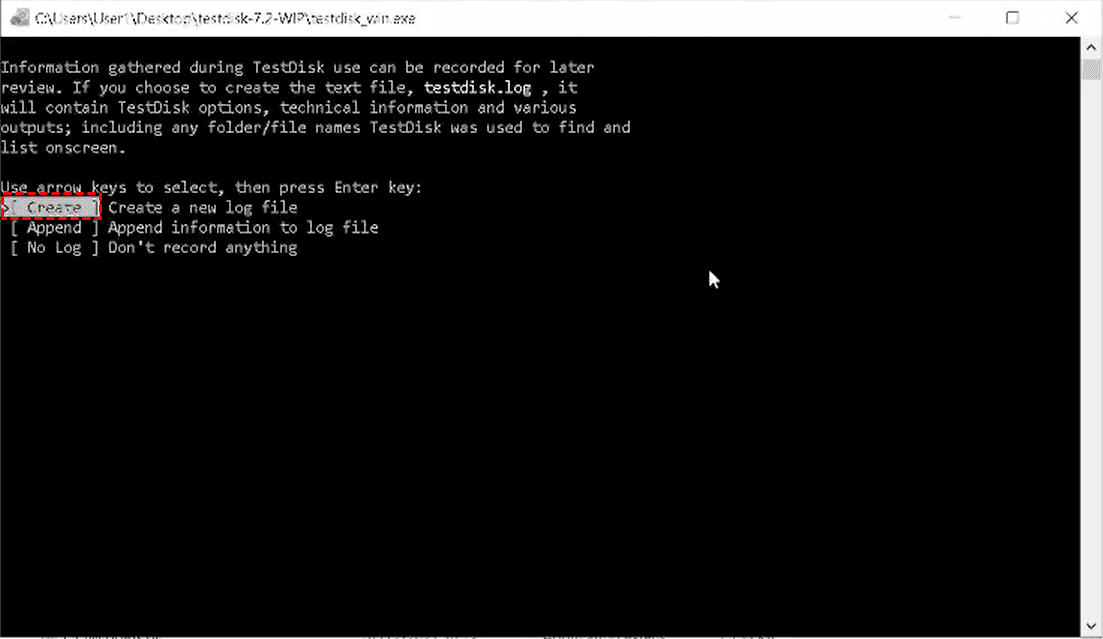
Step 2. Create a Log File
Upon launching, TestDisk prompts you to create a log file which can help track actions and be useful for troubleshooting if recovery fails. Select "Create" to save a log of the recovery process.
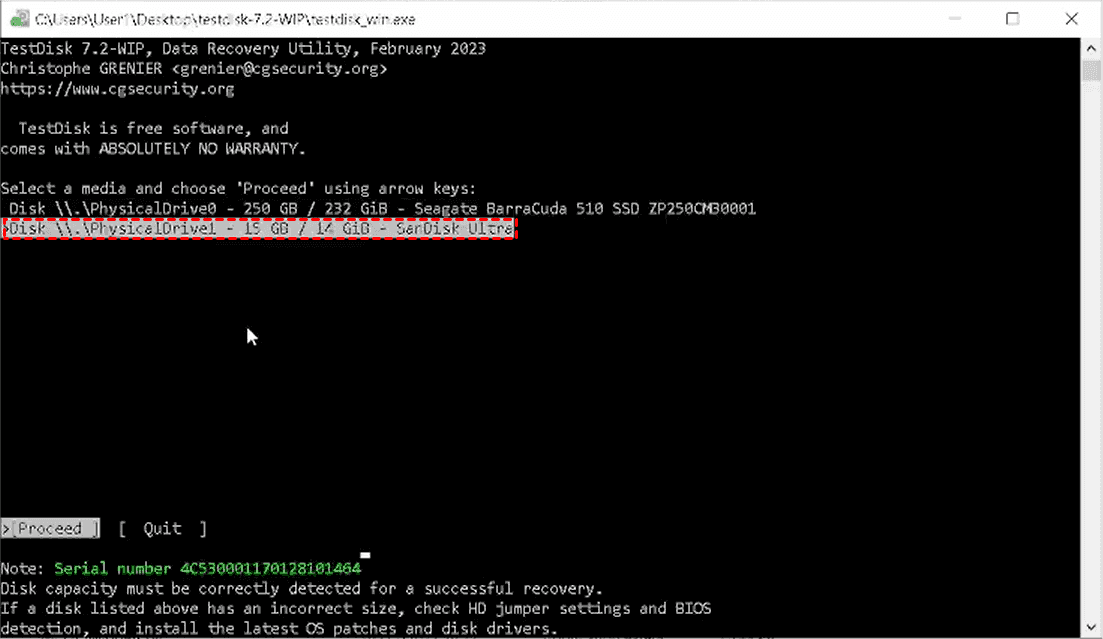
Step 3. Select the Disk
TestDisk will list all available drives connected to your system. You can identify the correct drive by its size and serial. Choose the disk from which you want to recover data using the arrow keys on the keyboard. Highlight the target disk and "Proceed", then press "Enter" to continue the process.
Step 4. Choose Partition Table
TestDisk usually auto-detects the correct partition table (Intel/PC, EFI GPT, etc.). Confirm the selection or choose the appropriate type based on your system. For most Windows systems, the default Intel/PC option (for MBR) is correct; UEFI GPT is common for newer UEFI-based systems.
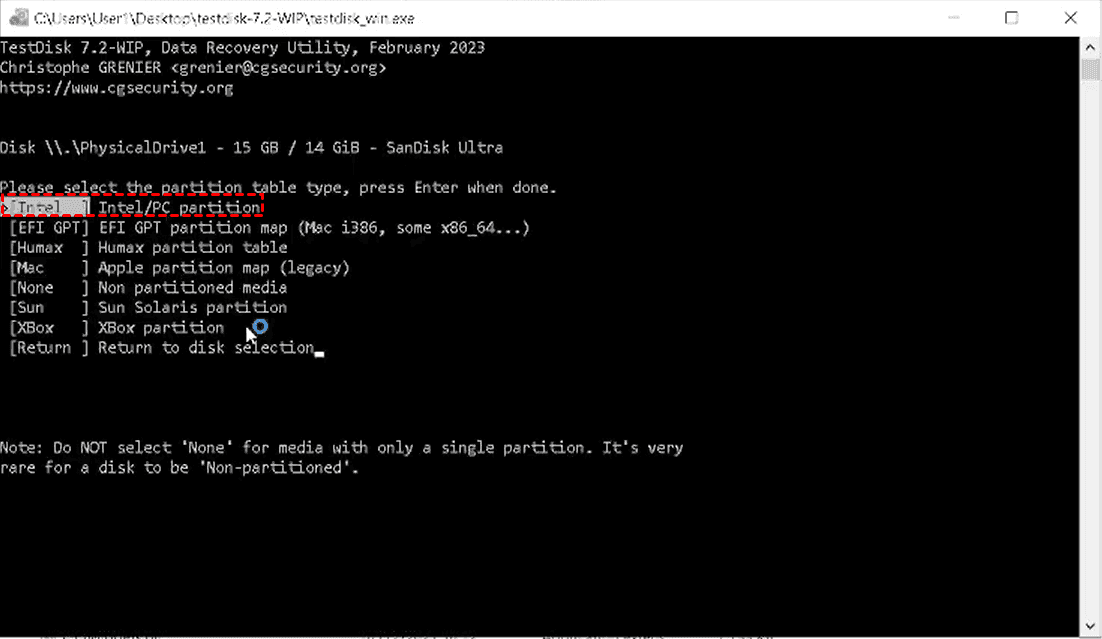
- ★Tips:
- Choosing the wrong type here may result in "Partition: Read error" during the recovery process.
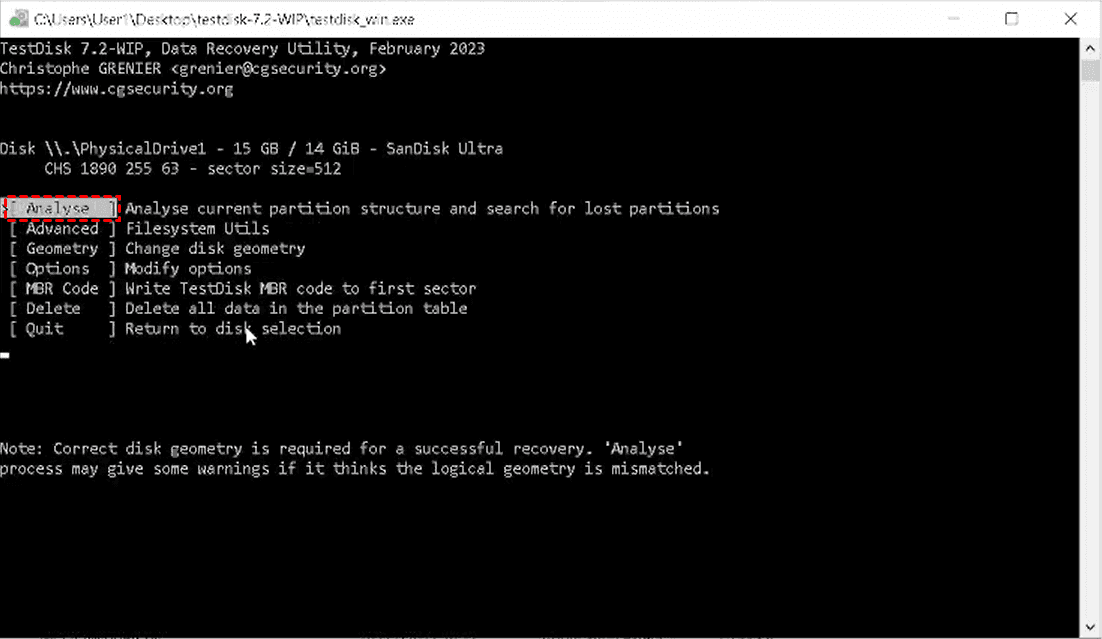
Step 5. Decide "Advanced" Option
You will see several options such as "Analyse", "Advanced", and "Geometry", etc. Select "Advanced". This mode allows you to interact with the file system directly without modifying the partition table, perfect for recovering deleted files from a healthy partition.
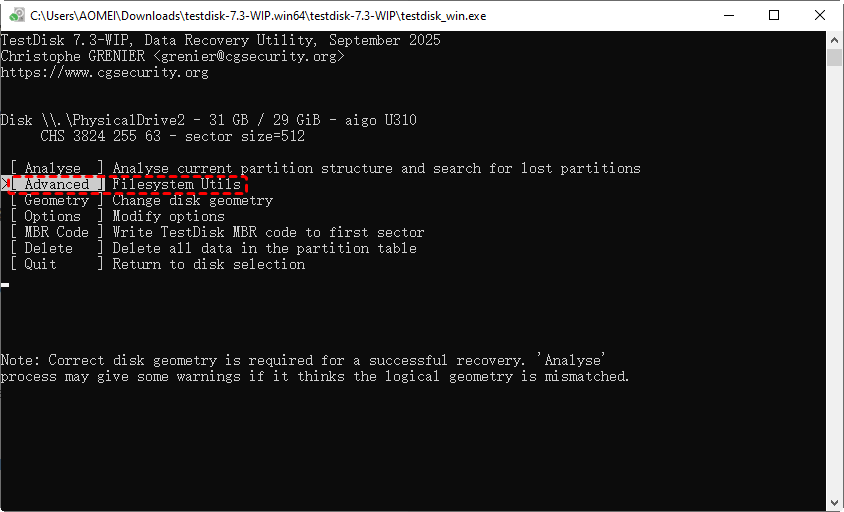
- Notes:✎...
- Analyse: Analyze current partition structure and scan for lost partitions, used to fix corrupted partition tables and retrieve missing partitions.
- Advanced: Advanced file system tool, mainly used to undelete accidentally deleted files from intact partitions, rebuild damaged boot sectors, and modify partition types.
- Geometry: Adjust physical structure parameters of the disk, generally applied to very old hard drives or when TestDisk auto-detected parameters are obviously incorrect.
- Options: Modify general settings of TestDisk, enable or disable expert mode, adjust log file options and more.
- MBR Code: Write Master Boot Record code to the first sector to repair corrupted MBR and restore normal disk boot capability.
- Delete: Delete the entire partition table. This will completely erase all disk partition structures and result in loss of all partitions.
- Quit: Return to disk selection.
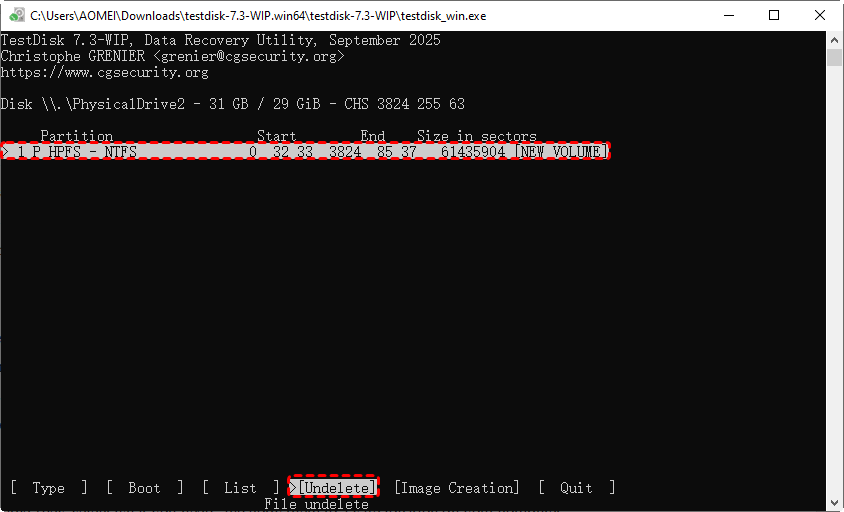
Step 6. Select Partition and Undelete
TestDisk displays detected partitions on the disk. Highlight the partition where data is lost. Click "Undelete" to search for lost files.
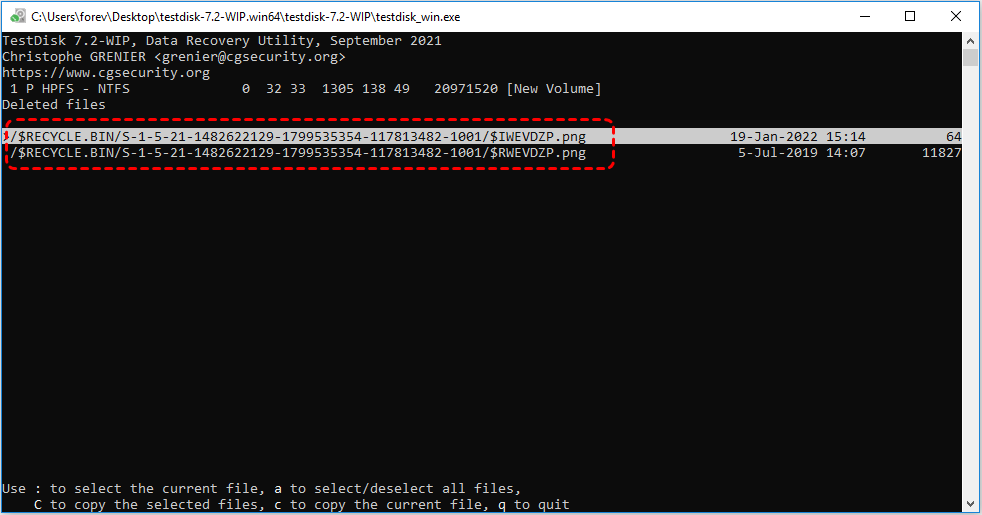
Step 7. Choose Files to Recover
Navigate through the listed files and select the ones you want to restore. You can use ":" to select the current file, "a" to select or deselect all files, "C" to copy the selected files, and "c" to copy the current file.
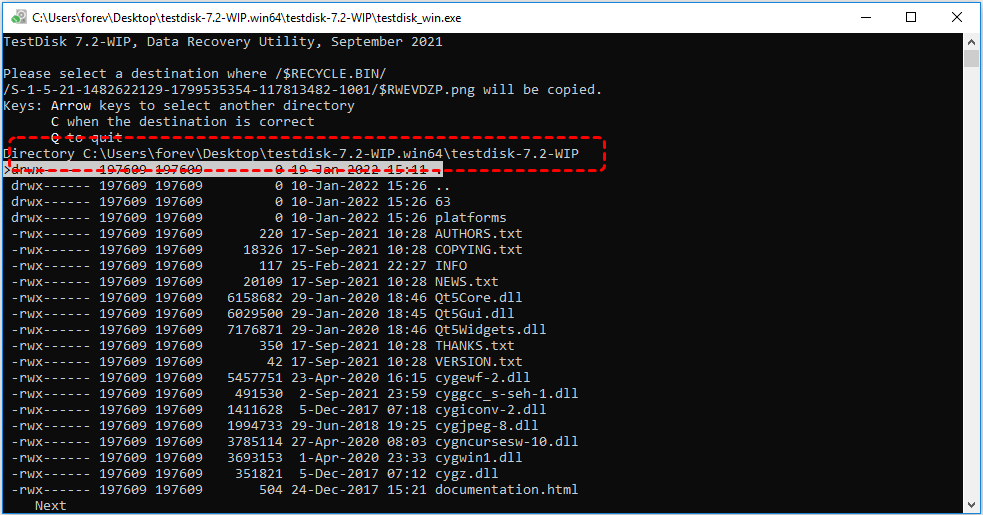
Step 8. Pick a Destination Folder
Specify a destination folder on a different drive to save recovered files. Press C to confirm your correct destination folder. Never save recovered files to the same disk you are recovering from to avoid overwriting lost data.
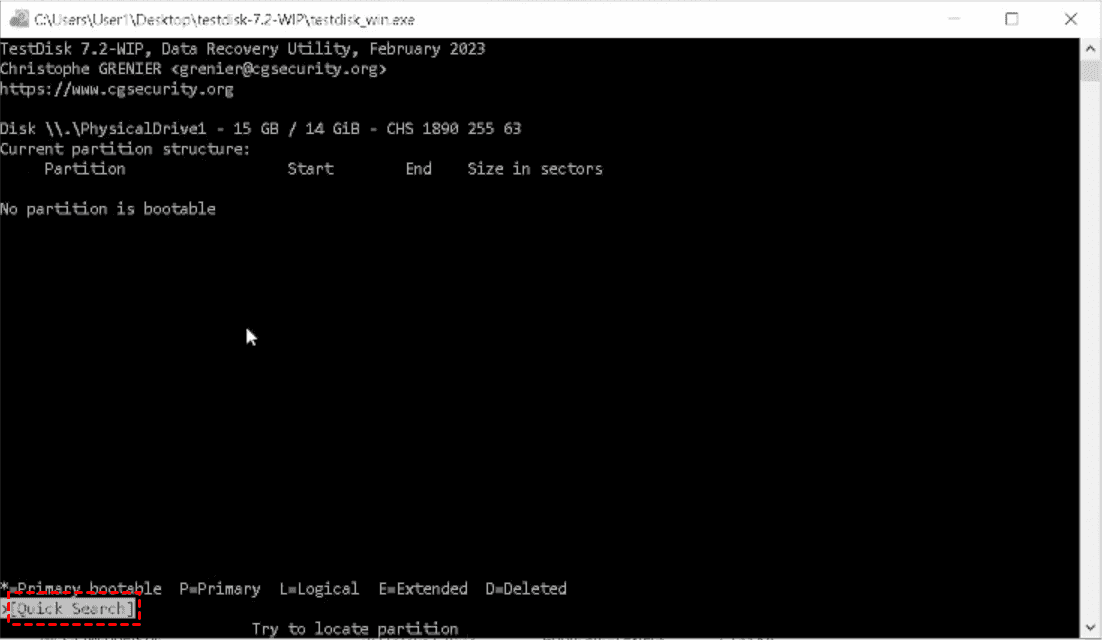
How to Recover Lost Partitions with TestDisk
Besides recovering lost files, TestDisk also supports restoring missing partitions without any data loss by analyzing the disk and restoring the correct partition table. This method is particularly useful when entire partitions disappear due to formatting, accidental deletion, or corrupted partition tables.
The preceding steps are the same as those for TestDisk data recovery. Select "Analyze" option after choosing the partition table.
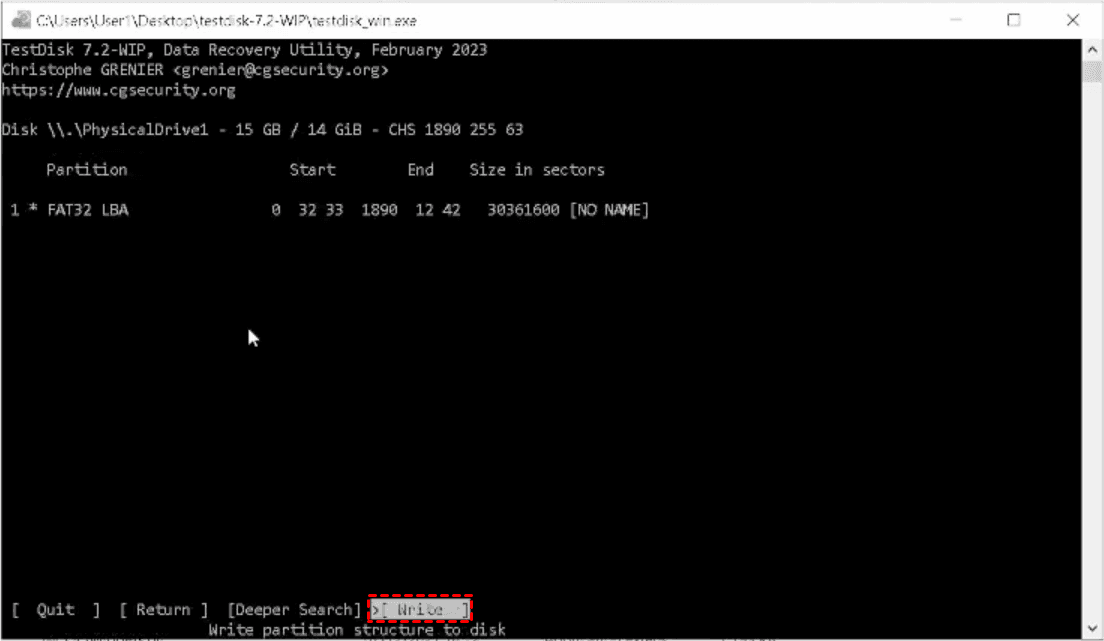
Click "Quick Search" to scan for lost partitions. If it's no found, you can click "Deeper Search".
Once the target partition is founded, select it and the "Write" option to save the partition table to the disk.
The Pros and Cons of TestDisk
While TestDisk is a powerful tool for recovering lost files and partitions, understanding its strengths and limitations can help users make informed decisions before performing recovery operations.
👍 Pros:
- High Recovery Success: TestDisk can recover deleted files, lost partitions, and damaged boot sectors that many other free tools cannot handle.
- Cross-Platform Support: Compatible with Windows, macOS, Linux, and Unix-like systems, making it versatile for different environments.
- Supports Multiple File Systems: Works with FAT, NTFS, exFAT, ext2/ext3/ext4, and HFS+, covering most common storage formats.
- Open Source and Free: TestDisk is completely free to use, and its source code is available for transparency and customization.
- Advanced Recovery Options: The command-line interface allows experienced users to fine-tune recovery operations and perform advanced tasks like rebuilding MBR and repairing boot sectors.
👎 Cons:
- Command-Line Interface: Beginners may find the lack of a graphical interface intimidating, increasing the learning curve.
- Risk of Overwriting Data: Improper use, such as writing recovered files to the same disk, may overwrite lost data, making recovery impossible.
- Limited Guidance for Novices: Although step-by-step options are available, inexperienced users might struggle to interpret options like "Analyse", "Advanced", or "Geometry" correctly.
- No Built-in Preview: Users cannot preview file content before recovery, which may require trial-and-error selection of target files.
The Best Alternative of TestDisk Data Recovery on Windows: MyRecover
While TestDisk is a robust and versatile tool, its command-line interface and advanced options can be challenging for less technical users or for those who need a more guided recovery experience. MyRecover addresses this need by offering a straightforward, GUI-based interface while maintaining high recovery performance.
It supports a wide range of storage devices, including HDDs, SSDs, USB drives, and memory cards, and can handle multiple data loss scenarios such as accidental deletion, formatted drives, partition loss, and virus attacks. MyRecover allows users to preview files before recovery, reducing trial-and-error and helping ensure the right files are restored.

- Recover deleted & lost files from HDD, SSD, USB, SD card, camera as you need.
- Support 1000+ formats of photos, videos, docs, archives, emails, compressed files, etc.
- Reliable rescue for deletion, formatted disk, emptied Recycle Bin, system crashes and more.
Step 1. Download and install MyRecover on your Windows supported computer from Microsoft Store or its official website.
Step 2. Run the program and select the drive with lost data, then click "Scan" to search for recoverable files. If you want to recover data from deleted partition, select the "Lost Partition" based on the partition size.

Step 3. Choose the files you attempt to scan, and preview the file content in the right panel. Select the target files and click "Recover".

Step 4. Select a safe location to save the recovered files to avoid overwriting original data.

When the process is done, the message "Files have been recovered successfully" will pop up. Then, you can access and verify the recovered files in the destination folder.
Which one You Should Choose: TestDisk or MyRecover
After exploring both TestDisk and MyRecover, the choice of tool largely depends on your technical comfort level, recovery scenario, and preference for interface style. TestDisk remains a go-to solution for IT professionals and advanced users who are comfortable with command-line operations and require granular control over recovery processes, including repairing boot sectors and manually restoring lost partitions.
On the other hand, MyRecover is tailored for users who want professional-grade recovery without the steep learning curve. Its GUI-based workflow, file preview capability, and guided steps make it ideal for quickly recovering lost files or entire partitions with minimal risk of user error.
Below is a concise comparison highlighting the key strengths of each tool:
| Feature / Tool | TestDisk | MyRecover |
| Interface | Command-line | Graphical user interface (GUI) |
| Recovery Scope | Deleted files, lost partitions, boot sector repair | Deleted files, lost partitions, formatted drives, virus-affected drives |
| Supported Devices | HDDs, SSDs, USB drives, memory cards | HDDs, SSDs, USB drives, memory cards, digital cameras, etc. |
| File System Support | FAT, NTFS, exFAT, ext2/3/4, HFS+ | FAT, NTFS, exFAT, ReFS, other common file systems |
| Preview Files Before Recovery | ❌ | ✅ |
| Ease of Use | ⭐⭐⭐ Hard | ⭐ Easy |
| Cross-Platform | Windows, macOS, Linux, Unix | Windows only |
| Cost | Free, open-source | Paid, with free option |
Summary
Data loss and lost partitions can occur unexpectedly, disrupting personal and professional workflows. TestDisk and MyRecover are both powerful solutions designed to address these challenges, but they cater to different user needs.TestDisk data recovery excels in advanced users who are comfortable with technical operations. MyRecover, by contrast, provides a user-friendly, GUI-based experience with file preview, making it ideal for less technical users.
In a short, whether you prioritize advanced control or ease of use, both TestDisk and MyRecover ensure reliable recovery solutions, empowering users to address data loss scenarios effectively and securely.
FAQs
Q1: Is TestDisk data recovery free?
Yes, TestDisk is completely free and open-source software. You can download and use it without any cost for personal or professional purposes. It provides advanced partition and file recovery features without requiring a paid license.
Q2: Is a TestDisk safe to use?
Yes, TestDisk is generally safe to use if you follow instructions carefully. Avoid writing recovered files to the drive being repaired to prevent data overwriting. Always create backups when performing critical operations.
Q3: How to recover lost files with TestDisk?
Launch TestDisk, create a log file, select the target disk, choose the correct partition table, and select "Advanced". Use the "Undelete" function to scan and select lost files, then copy them to a separate safe location.
Q4: Is TestDisk completely free?
Yes, TestDisk is fully free and open-source. It does not include trial limitations or hidden fees, and all features, including partition recovery and file restoration, are accessible without payment.
Q5: How to use TestDisk to recover deleted partitions?
Open TestDisk, choose the disk, confirm the partition table, select "Analyse", and perform a "Quick Search". If the partition is not found, run "Deeper Search". Highlight the found partition and use "Write" to restore it.
Q6: How to recover RAW drive using TestDisk?
Select the RAW drive in TestDisk, confirm the partition table, then choose "Analyse". Use "Quick Search" or "Deeper Search" to detect lost partitions. Once found, write the recovered partition table to restore the drive’s accessibility.


Stay Updated With Our
Latest Tips
Add us as a preferred source on Google to never miss helpful guides.