
TestDisk Partition Read Error: How to Fix and Recover Your Data
If you encounter a partition read error in TestDisk, don’t panic. This guide explains why it happens, how to troubleshoot it, and step-by-step ways to recover your lost or damaged partitions safely.
By Vera / Updated on May 7, 2026
Introduction

When you encounter a "Partition Read Error" while using TestDisk, it can feel like your data has hit a dead end. This error typically occurs when the software attempts to access the disk's partition table—the "map" of your drive—but finds it unreadable or corrupted. Because TestDisk operates at a low level (interacting directly with the disk structure), a read error suggests a conflict between the software and the hardware or a severely damaged file system.
What is TestDisk and Why It’s Popular
TestDisk is a powerful, free, open-source tool designed for data recovery. It’s widely trusted by IT professionals because it doesn't just recover files; it can recover lost partitions, repair damaged partition tables (MBR/GPT), and make non-booting disks bootable again.
Why People Use TestDisk for Partition Recovery
Unlike basic file recovery tools that simply scan for deleted "ghost" files, TestDisk goes deeper. If a partition disappears due to a software glitch or a virus, TestDisk can locate the "hidden" boundary and rewrite the partition table to make the drive visible to the OS again. It is the "surgeon" of data recovery tools, capable of structural repairs.
What is a Partition Read Error?
A partition read error is a specific communication failure. When TestDisk displays this message, it means the tool requested data from a specific sector (usually sector 0 where the partition table lives), but the disk returned an error or "nonsense" data. Without being able to read this "table of contents," TestDisk cannot tell where one partition ends and another begins.
Common Causes of Partition Read Errors
- ⭕Corrupted File System: Viruses or improper shutdowns can scramble the metadata, making the partition table look like gibberish to TestDisk.
- ⭕Accidental Deletion or Interrupted Formatting: If a formatting process was killed halfway, the partition structure remains in a "half-baked" state.
- ⭕Disk Hardware Issues: This is the most common "hidden" cause. Bad sectors in the exact location of the partition table will trigger a read error every time.
- ⭕Driver or Connection Conflicts: Faulty USB cables or outdated SATA drivers can cause data packets to drop during the scan.
How to Identify a TestDisk Partition Read Error
If you see the following signs, the software is struggling to communicate with the storage media itself.
- ★Error Messages You Might See:
- "Partition: Read error": Usually appears during the "Quick Search" or "Deeper Search" phase.
- "Cannot open filesystem. Filesystem seems damaged.": Indicates the partition is found, but its internal structure is unreadable.
- "No partition found or selected for recovery": Appears when the read error prevents the initial scan from completing.
If you notice these, act quickly, as delaying recovery increases the risk of permanent data loss.
Step-by-Step Fix for TestDisk Partition Read Error
The following workflow moves from "safest" to "most invasive." We start by protecting the data, then verifying hardware health, and finally using TestDisk’s manual repair functions.
Step 1: Backup Your Disk (Create a Disk Image)
TestDisk is a "write" tool. If you make a mistake while repairing the partition table, the change is permanent. By creating a byte-for-byte image of the drive, you can experiment with TestDisk on the image or have a fallback if the physical drive fails completely during the scan.
Action: Use a tool like AOMEI Backupper Standard or TestDisk’s own "Image Creation" feature to save a copy of the drive to a healthy external HDD.
Step 2: Check Disk Health & Connection
Before asking TestDisk to fix the software map, we must ensure the "paper" it’s written on (the hardware) isn't torn. If there are physical bad sectors, TestDisk will hang or loop. Repairing these sectors at the OS level can sometimes clear the path for TestDisk.
- On Windows: Right-click the Start icon, open Command Prompt as Admin and type chkdsk X: /f (replace X with your drive letter). This attempts to fix file system metadata.
- Hardware Check: If using an external drive, swap the USB cable or port. A low power supply to the drive often causes "Read Errors."
Step 3: Analyze the Disk with TestDisk (The Correct Workflow)
We use the "Analyze" function to see what the OS sees, versus what is actually physically present on the disk.
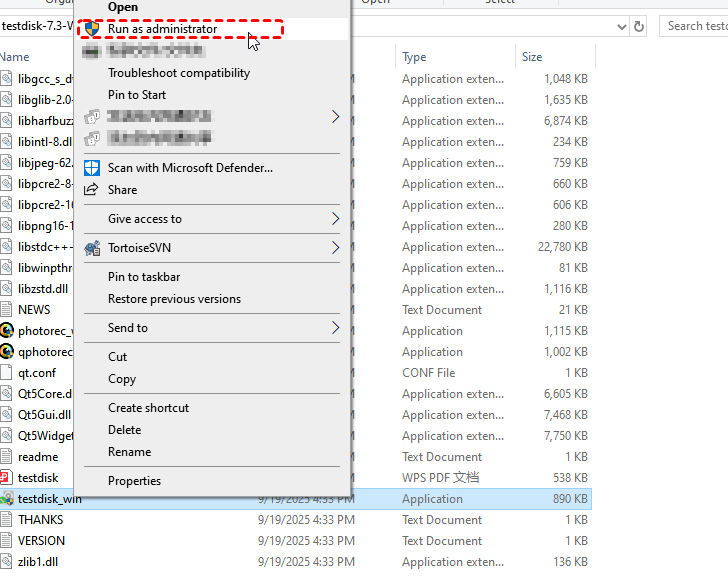
1. Run as Administrator: Right-click testdisk_win.exe and select Run as administrator.
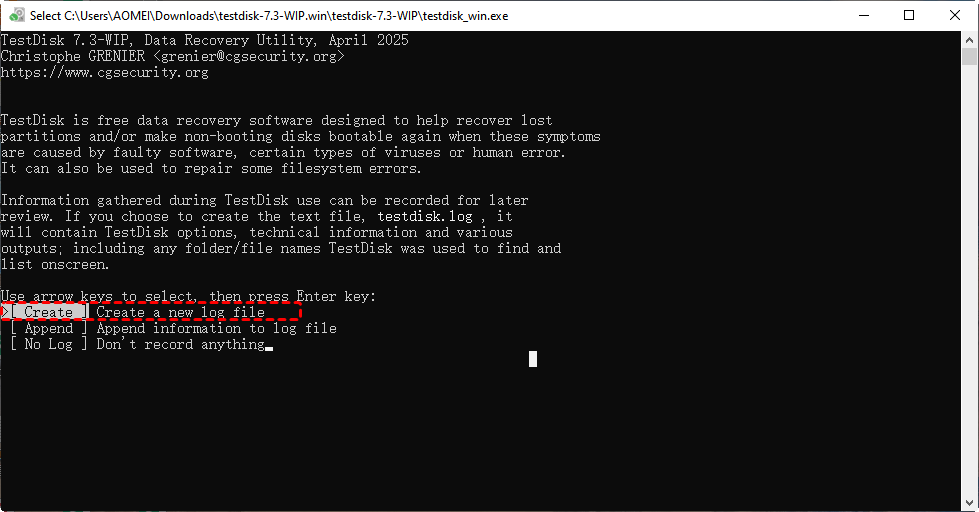
2. Log Creation: Choose [Create]. This helps troubleshoot if the program crashes.
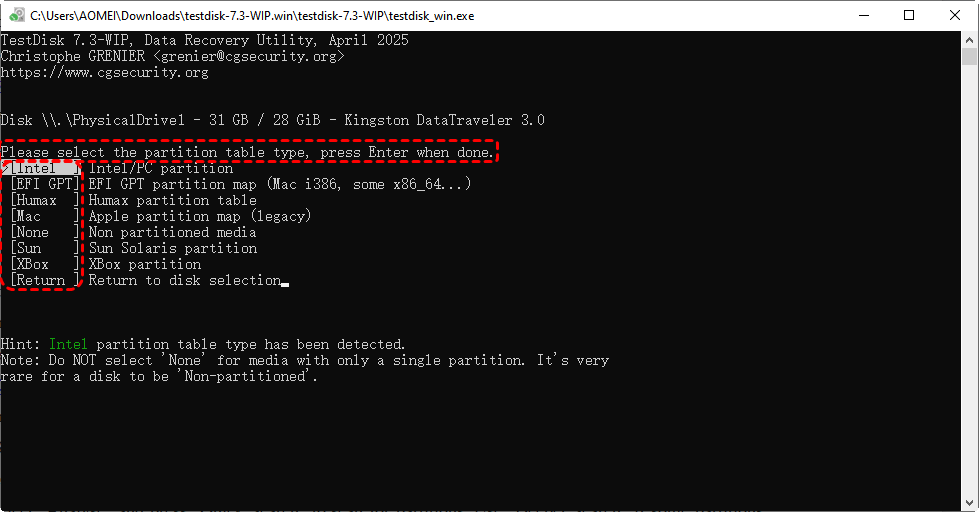
3. Select Drive: Choose the physical drive, not the partition.
4. Partition Table Type: Usually [Intel] for older MBR disks or [EFI GPT] for modern Windows 10/11 disks. TestDisk usually detects this automatically—stick with the hint it provides.
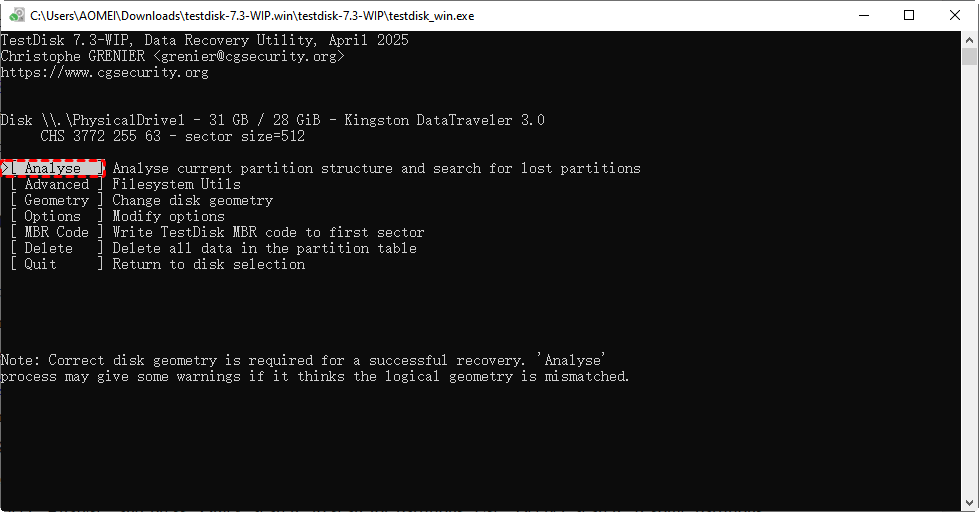
5. Analyze: Select [Analyze] then [Quick Search].
Step 4: Repair or "Write" the Partition Table
This is the actual "Fix" phase. If TestDisk lists your lost partitions in green text and you can preview the files by pressing 'P'.
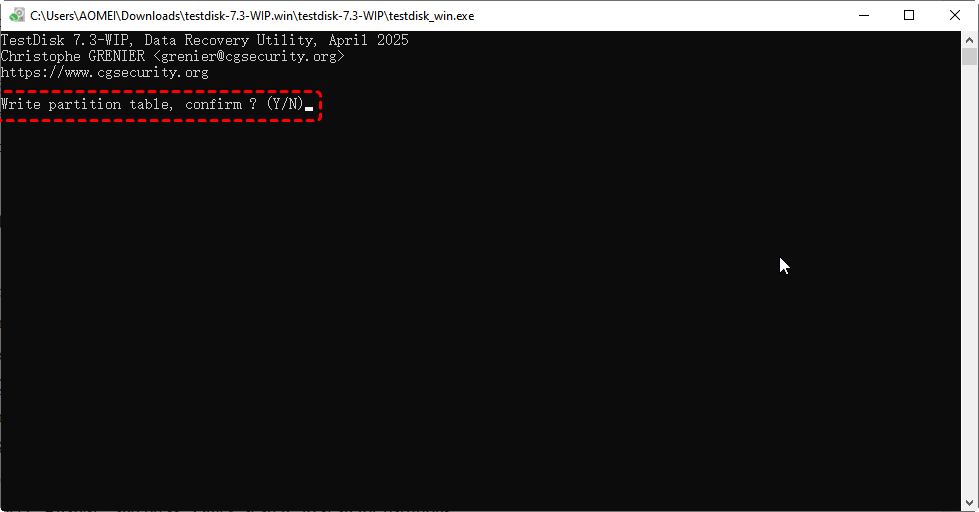
1. If the partitions look correct, select [Write].
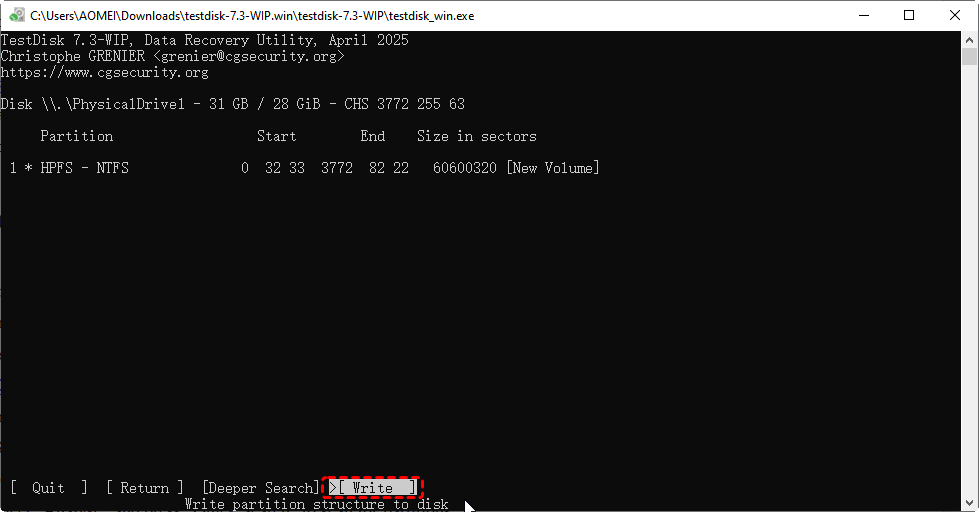
2. Confirm with [Y], TestDisk will ask to reboot so the OS can re-read the updated partition table. And restart your computer.
This often restores access to partitions without deleting your files.
Step 5: Use "Deeper Search" for Stubborn Errors
If Quick Search returns a "Read Error" or finds nothing, the standard backup of the partition table is likely gone. [Deeper Search] scans every single cylinder of the drive looking for "signatures" of lost partitions (like the start of an NTFS or FAT32 header).
1. Select [Deeper Search] in TestDisk.
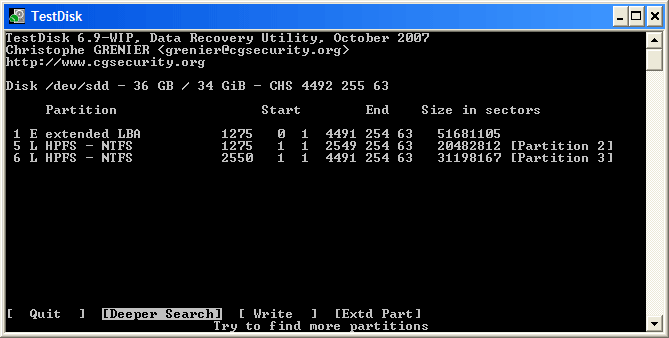
2. Let the scan run—large disks may take hours.
3. Highlight any found partitions and choose [Write] to restore them.
This step is crucial for recovering partitions that were accidentally deleted or corrupted.
Step 6: Verify Recovered Data
Once the partitions are restored, open them and check your files. Ensure everything important is accessible. If some files are still missing, alternative recovery methods may be necessary.
Alternative Recovery Method: When TestDisk Fails
TestDisk is a fantastic tool, but its command-line interface and "all-or-nothing" partition writing can be intimidating or ineffective if the disk's partition table is too damaged to be saved. If you still encounter read errors or find TestDisk’s interface too complex, a specialized GUI-based recovery tool is the next logical step.
MyRecover serves as the perfect professional alternative when TestDisk hits a "Partition Read Error." Unlike TestDisk, which tries to fix the partition, MyRecover focuses on extracting the data regardless of the partition's health.
Why MyRecover excels in this scenario:

- 💙Bypasses Partition Table Errors: Even if the partition table is unreadable (the cause of the TestDisk error), MyRecover’s deep scan technology identifies files based on their unique data signatures.
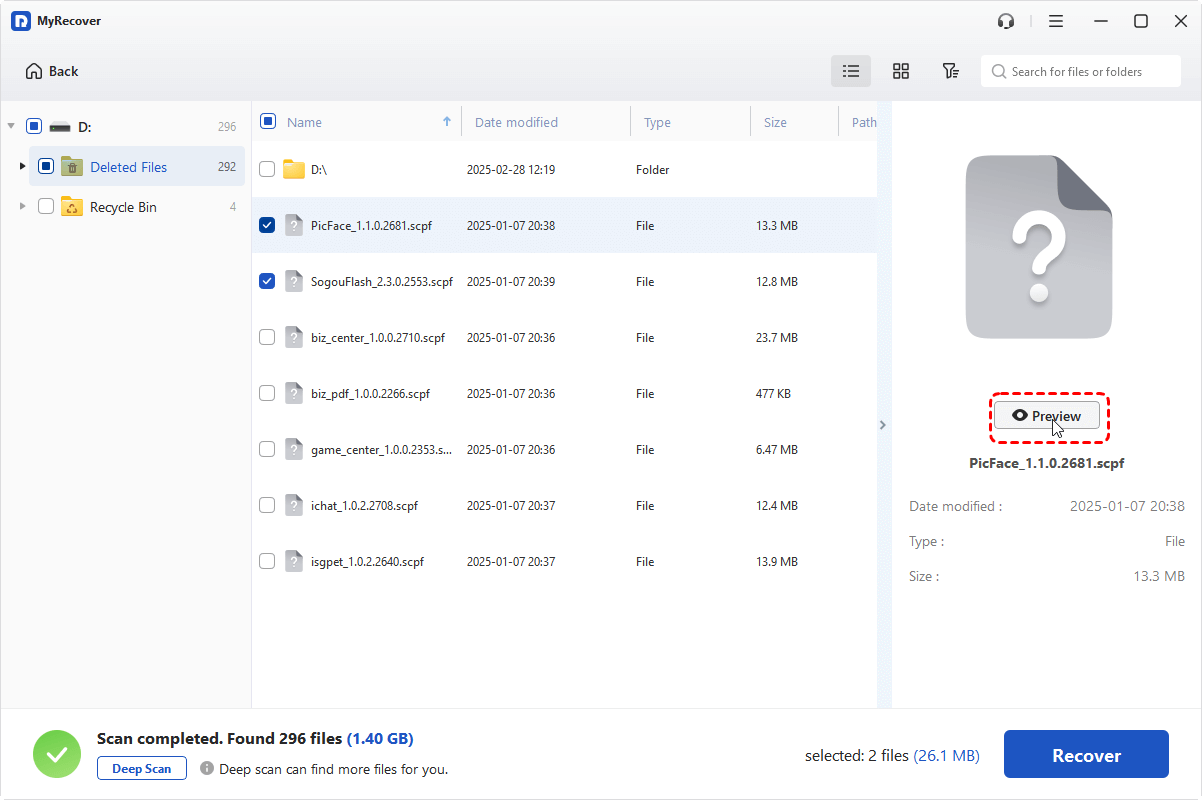
- 💙Visual File Filtering: Instead of the text-heavy "P" preview in TestDisk, MyRecover provides a familiar folder structure with a search bar, allowing you to target specific files (Photos, Docs, Videos) immediately.
- 💙High Success Rate on RAW Drives: If TestDisk shows your drive as "RAW," MyRecover is specifically optimized to parse these unformatted volumes without risking further data corruption.
Here’s a simplified step-by-step guide:
Step 1: Install MyRecover
Download MyRecover from the official website and install it.
Important: Don’t install it on the drive with lost files to avoid overwriting data.
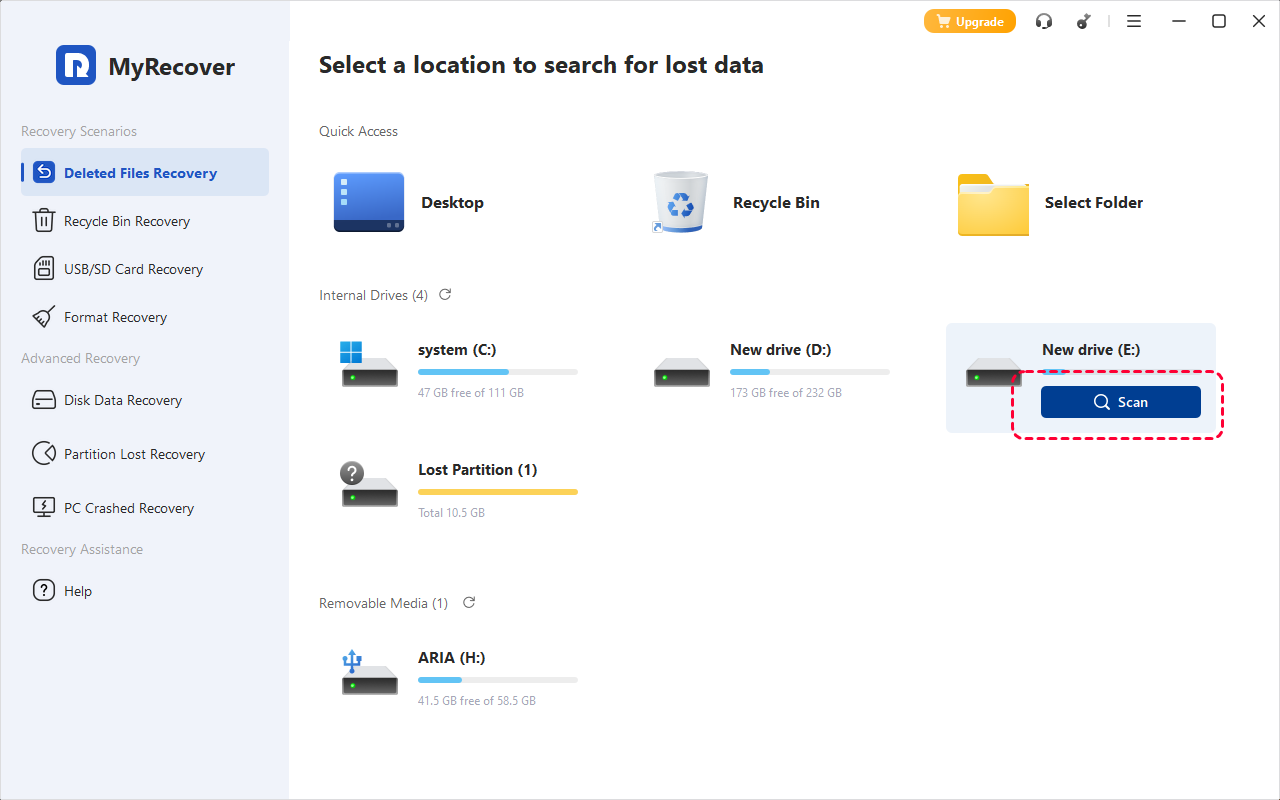
Step 2: Scan the Drive
Open MyRecover and select the drive with lost files. Click "Scan" to let it search for recoverable data.
Step 3: Preview Files
Once the scan finishes, browse the files found. Preview important files to check if they’re intact.
Step 4: Recover Files
Select the files or folders you want to recover. Click "Recover" and save them to a different drive from the original.

Step 5: Verify and Backup
Open the recovered files to make sure they work. Create a backup on an external drive or cloud storage to prevent future loss.
By following these steps, MyRecover becomes a powerful safety net for situations where TestDisk alone can’t fully restore your data. It’s straightforward, effective, and ensures you get your important files back without extra stress.
Conclusion
A TestDisk partition read error can be alarming, but most problems are fixable if you follow the right steps. Start with backups, check your disk health, and use TestDisk’s analysis and repair features. For files that remain inaccessible, MyRecover offers an easy, reliable data recovery solution. Proactive maintenance, careful disk handling, and regular backups are your best defenses against future partition errors.
FAQs
1. What is the difference between "Partition Read Error" and "Disk Not Initialized"?
A read error means the partition exists but is corrupted. "Not Initialized" means the MBR/GPT header is blank. A TestDisk partition read error fix can address both, but you may need to initialize the disk in Disk Management first.
2. TestDisk shows my partition in green, but I still get a read error when I try to list files (P key). What should I do?
This indicates the Master File Table (MFT) is corrupted. Since the partition repair won't help here, you should use MyRecover’s Deep Scan, which extracts files without relying on the MFT.
3. Is it safe to use the "Write" command in TestDisk if I’m not sure?
No. The "Write" command is permanent. Before attempting this TestDisk partition read error fix, use the "Image Creation" feature or use MyRecover, which is a read-only tool that won't modify your original disk.
4. Can I recover data if TestDisk says "No partition found"?
Yes. This means the structure is too damaged to rebuild. MyRecover can ignore the structure and look for unique digital signatures of your files to pull them out of the "unallocated" space.
5. Should I format the drive to fix a read error?
Never format the drive if you need the data. Formatting makes data recovery significantly harder and risks permanent loss of the original file metadata. Always try a TestDisk partition read error fix or MyRecover first.
6. How to prevent future partition errors?
You can follow the points below:
- Regular Backups: Schedule frequent backups to external drives or cloud storage. Losing a partition is stressful, but losing backups is catastrophic.
- Avoid Abrupt Shutdowns: Always shut down your computer properly. Sudden power cuts can corrupt the partition table and trigger read errors.
- Check Disk Health Frequently: Use S.M.A.R.T. tools or built-in utilities to monitor your drives. Early detection of issues can prevent bigger disasters later.


Stay Updated With Our
Latest Tips
Add us as a preferred source on Google to never miss helpful guides.