
[Fixed] TestDisk No Partition Found on Windows/Mac – Complete Recovery Guide
The TestDisk 'no partition found‘ error usually happens when the software fails to detect the target drive due to damaged partition tables, unrecognized file systems, or USB and hard disk issues. Whether you’re dealing with external drives, internal hard disks, or USB storage, this guide ensures that even challenging TestDisk detection errors can be resolved efficiently, helping you regain control over your data without unnecessary risks.
By Aria / Updated on June 2, 2026
Introduction
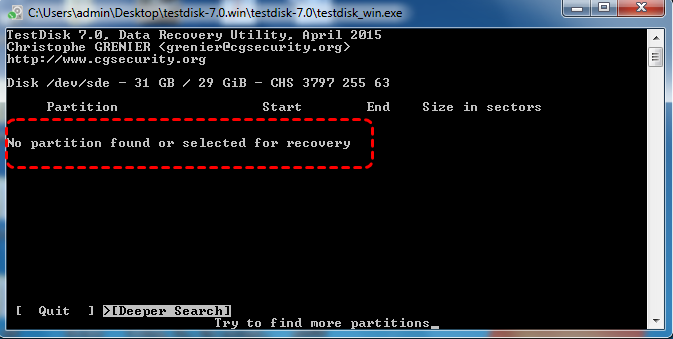
Hello, my hard drive has magically gone from NTFS to RAW, which of course means I can't access the data. I've followed the step by step instructions on TestDisk website, up until Quick Search for Partitions. I have done this stage, but nothing was found (see attached image). I had to manually select the partition type as Intel, as TestDisk couldn't detect a type.
- Question from MTheo
Many users turn to TestDisk to recover lost or deleted partitions on Windows or Mac, expecting a straightforward recovery process. However, a common and frustrating error occurs: TestDisk displays the message "No Partition Found", leaving users unable to proceed and raising concerns about potential data loss.
Encountering TestDisk "No partition found" error is not merely inconvenient, it prevents access to critical files and folders stored on the affected drive. What's worse, it can indicate serious underlying disk issues that, if not addressed properly, may aggravate data corruption or make recovery more difficult. This complete guide explains why TestDisk may fail to detect partitions and provides practical solutions to resolve the issue on both Windows and Mac.
Why TestDisk Shows "No Partition Found" Error
Several factors can trigger the TestDisk "No Partition Found" message, often related to disk corruption, misconfigurations, or compatibility issues. Addressing these causes correctly ensures a higher chance of successful recovery and prevents further data loss. Common reasons include:
🛠️ Corrupted Partition Table: Damage to the Master Boot Record (MBR) or GUID Partition Table (GPT) can make partitions invisible to TestDisk.
📂 File System Changes: The whole disk that have changed from NTFS/FAT32 to RAW, often due to improper shutdowns, malware, or disk errors, may not be recognized automatically.
❌ Incorrect Partition Type Selection: If TestDisk cannot auto-detect the disk’s partition type, selecting the wrong type manually can prevent it from identifying partitions correctly.
💾 Bad Sectors or Hardware Failures: Physical issues with the hard drive or SSD, including bad sectors, can block access to partition metadata.
🔌 External Drive or USB Issues: Unstable connections, faulty USB ports, or insufficient power to external drives may lead TestDisk to report "No partition found" error.
🔒 Unsupported or Encrypted Drives: Certain proprietary or encrypted file systems may not be fully supported by TestDisk, causing detection failures.
How to Fix TestDisk No Partition Found Error on Windows/Mac
After understanding the root causes, now, it's time to systematically address potential software and hardware issues that prevent the program from detecting partitions. The following methods guide you through checking basic connections and applying advanced solutions to help you regain access to lost partition while minimizing the risk of permanent data loss.
Fix 1. Check Connection
Loose or unstable connections between your external hard drive and the computer are a common reason TestDisk cannot detect partitions. Ensuring a stable connection reduces read/write errors and allows TestDisk to access the disk metadata correctly.
Step 1. Power off your computer and disconnect the affected drive.
Step 2. Reconnect the drive using a different SATA/USB port or a known good cable.
Step 3. Power on your system and relaunch TestDisk to see if the drive is detected.
Fix 2. Run a Deeper Search
Sometimes Quick Search in TestDisk cannot locate partitions if the partition table is severely damaged (e.g. after the DiskPart clean command). A Deeper Search scans the disk sector by sector to find lost partitions that are not immediately visible. This takes longer but it ignores the current damaged structure and scans the entire disk more thoroughly to locate any remaining file system metadata. Here's how:
Step 1. Select "Deeper Search" using the arrow keys and allow TestDisk to scan thoroughly.
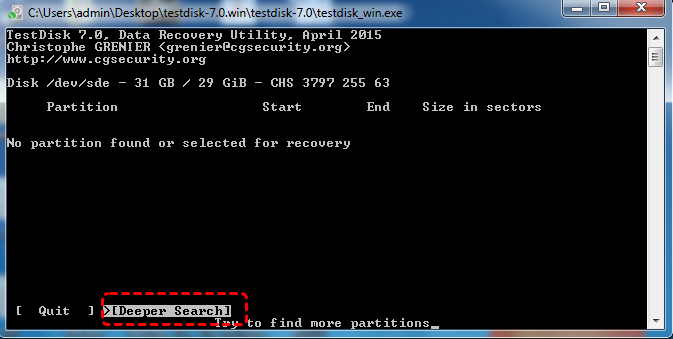
Step 2. Wait for the process to complete, review the results and check if any partitions are detected.
Fix 3. Select the Correct Partition Table
If your disk uses the GPT partition style but you incorrectly select the Intel (MBR) partition table type in TestDisk, the program may fail to properly parse the disk structure and consequently cannot find any partitions. Choose the correct partition and search again to check if the error persists.
Step 1. Use the "Quit" option to go back step by step to the partition table selection screen.
Step 2. Select the correct partition table according your hard disk and continue the process.
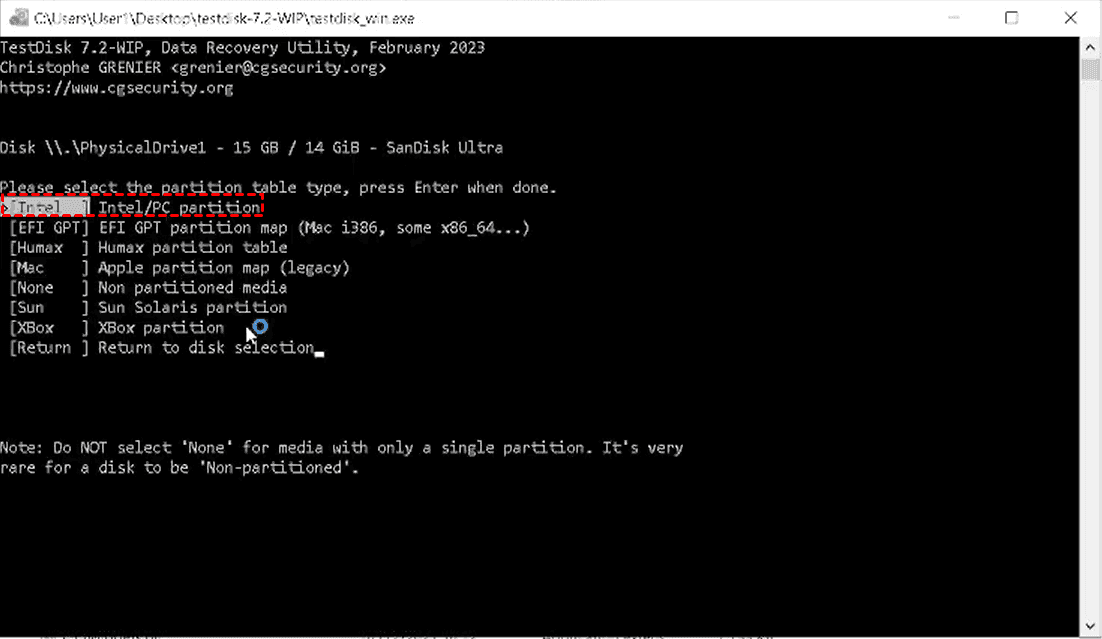
Step 3. Check the search results and view if any partitions are found.
Fix 4. Check Advanced Options
If the quick search only shows a drive letter but no partitions, the partition’s boot sector is likely corrupted, preventing Windows from recognizing it as a valid file system. TestDisk offers advanced options to rebuild the boot sector, which can help detect partitions that remain hidden due to configuration errors.
Step 1. In TestDisk, navigate to "Advanced" after selecting your disk.
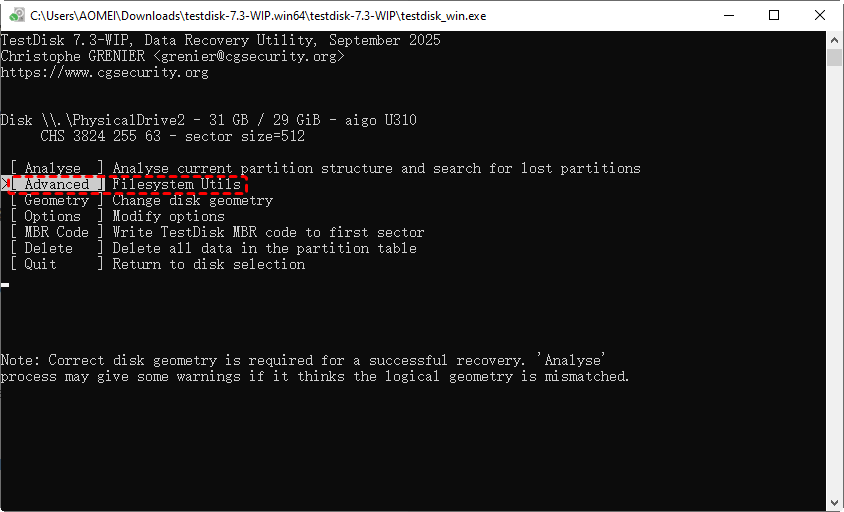
Step 2. Choose "Boot" to inspect the partition boot sector.
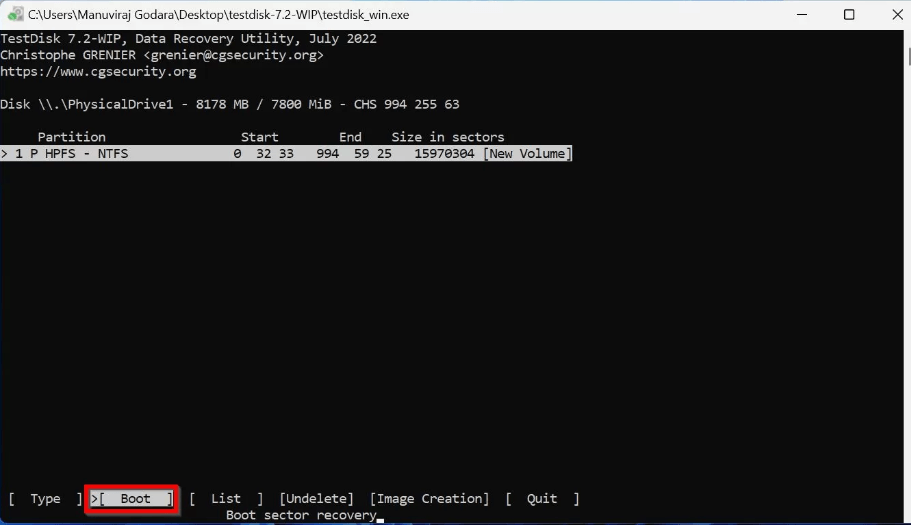
Step 3. If the boot sector shows "Bad" in this window, you can use the "Rebuild BS" option to repair.
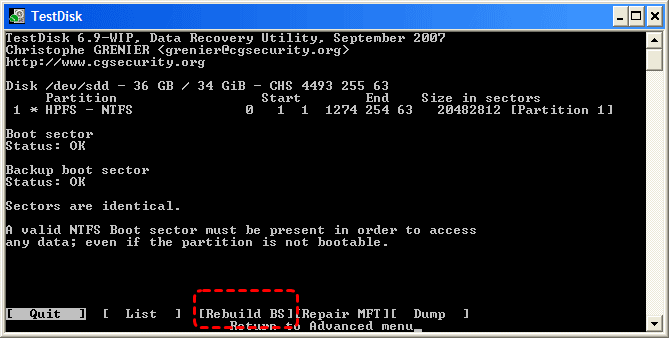
Step 4. Write the corrected information to the disk and reboot your computer for the change to take effect.
Fix 5. Check Hardware Health
In addition, "no partitions found or selected for recovery" error may also result from hardware failure or physical damage to the disk. Checking the drive health can help determine whether the problem is caused by the disk or software.
Step 1. Use the manufacturer’s diagnostic tool (e.g., Seagate SeaTools, WD Kitfox) to run a quick or extended test.
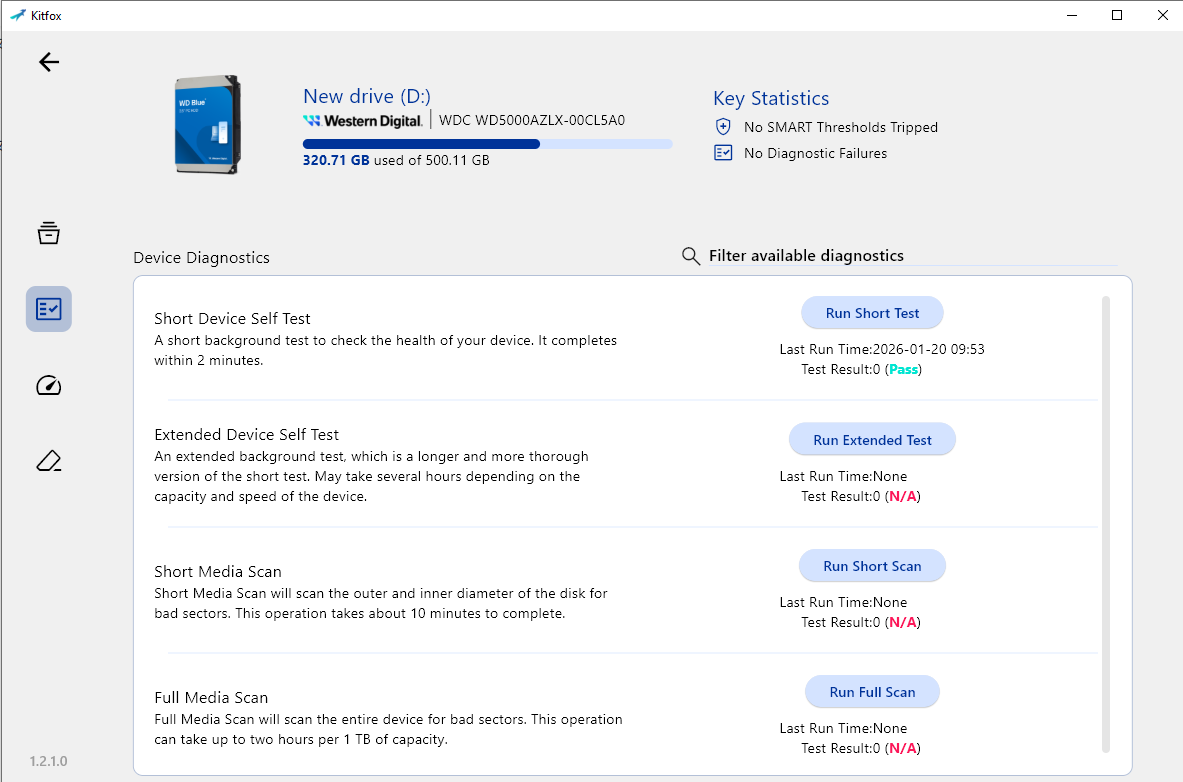
Step 2. Replace or repair the drive if the tool reports bad sectors or failure.
Step 3. Retry TestDisk on a healthy disk and check if partitions are displayed normally.
Fix 6. Use PhotoRec for File Recovery
If TestDisk still shows the "no partition found" error, you can use PhotoRec bundled with TestDisk to recover files on the partitions. It doesn’t rely on partition tables, making it ideal for drives that show as RAW or corrupted. It performs a raw scan of the disk directly, locating and recovering data by identifying each file’s unique signature. For this reason, the recovered files will not retain their original filenames or folder directory structure.
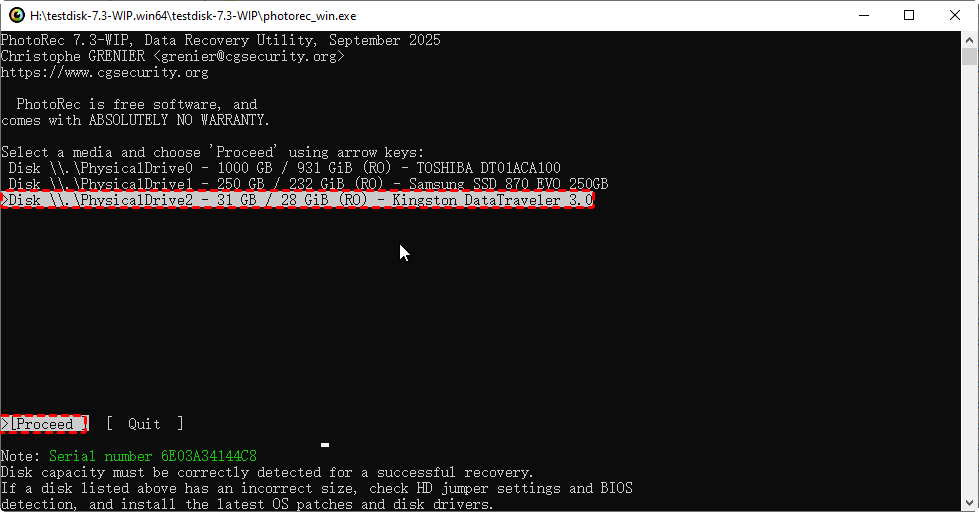
Step 1. Open PhotoRec and select the affected disk using the arrow keys. Then, tap "Proceed" to continue the process.
Step 2. Choose the partition you want to recover files from and press "Enter" to proceed.

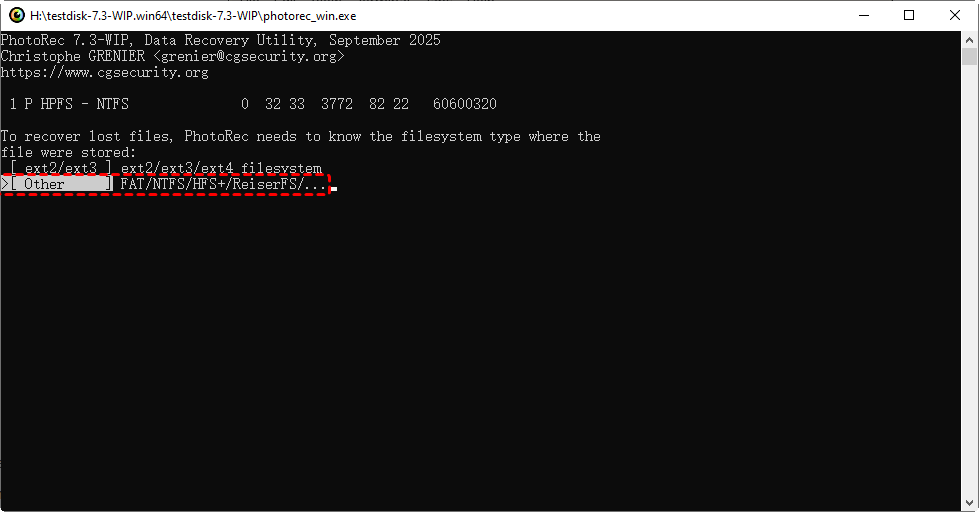
Step 3. Select the file system Ext2/Ext3/Ext4 or Other (FAT/NTFS/HFS+).
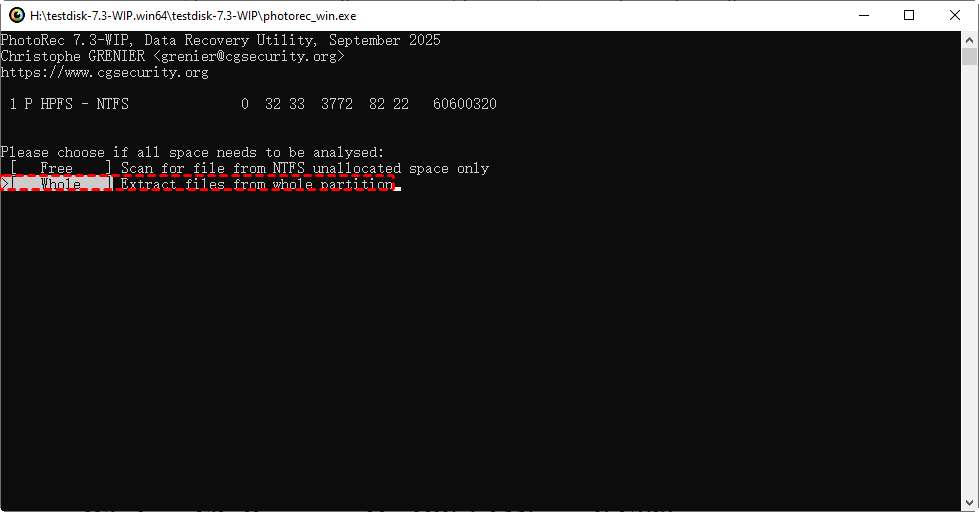
Step 4. Decide the free (unallocated) space or whole space to scan.
Step 5. Select a destination folder on a different drive for recovered files and press C to confirm the destination folder, then start the process.

Fix 7. Use Alternative Software: AOMEI Partition Assistant
If TestDisk fails despite proper connections and deep scanning, you can try alternative recovery tools like AOMEI Partition Assistant, which often can detect partitions more effectively, especially when file systems are complex or partially damaged. It allows you to recover lost partitions, rebuild partition tables, and fix RAW or unallocated drives. More importantly, it features a graphical user interface, making it much easier for beginners to operate.
Step 1. Download and install AOMEI Partition Assistant on your computer.
Step 2. Launch the application and wait a few seconds until your hard drives and partitions are fully loaded.
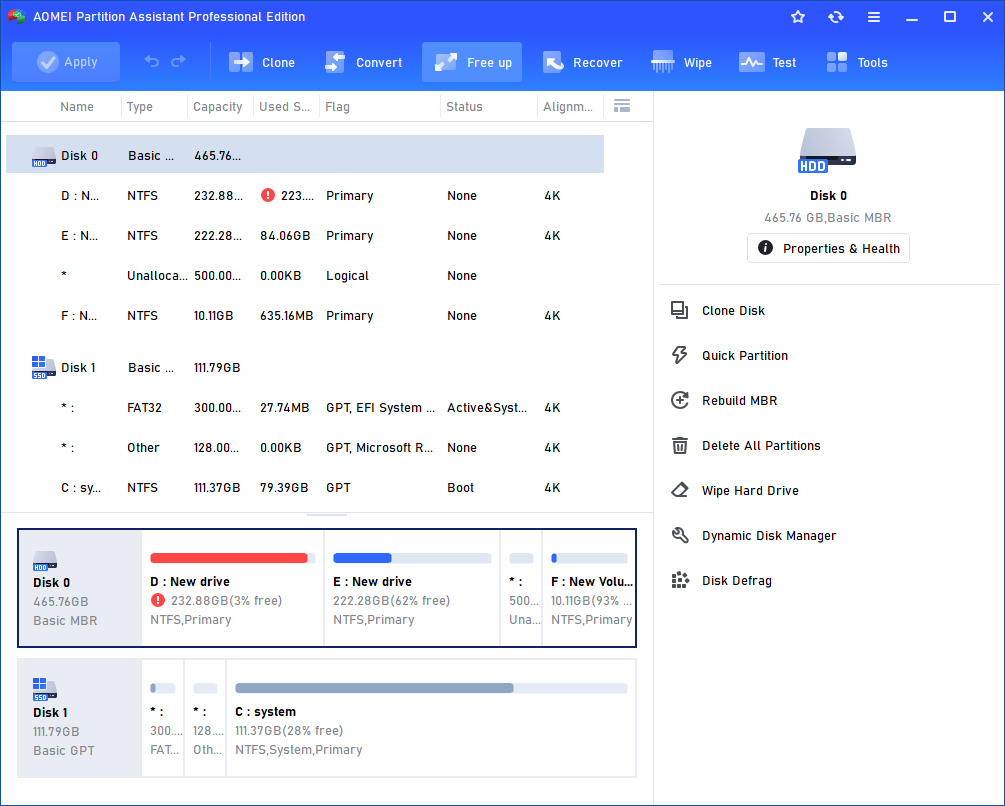
Step 3. Then you can manage, move, wipe, and even analyze partitions according to your needs.
The Best Photorec Alternative Tool for Windows: MyRecover
While PhotoRec is a reliable option for file recovery when TestDisk fails to detect partitions, it also has drawbacks: recovered files lose their original names and folder structure, which can make organizing large datasets challenging. For users who need a more intuitive and efficient solution, MyRecover offers a practical alternative.
MyRecover specializes in recovering lost or deleted files from RAW, formatted, or corrupted drives without requiring advanced technical knowledge. It automatically scans the entire drive, reconstructs file structures, and preserves original filenames and folder hierarchy.

- Recover deleted & lost files from HDD, SSD, USB, SD card, camera as you need.
- Support 1000+ formats of photos, videos, docs, archives, emails, compressed files, etc.
- Reliable rescue for deletion, formatted disk, emptied Recycle Bin, system crashes and more.
Step 1. Download and install MyRecover on a separate drive to avoid overwriting lost data.
Step 2. Launch the program and select the affected disk or partition for scanning, then click "Scan" to start the process and perform a quick or deep scan of the drive.

If you can’t find the partition you need, it may have been deleted. MyRecover will label it as a "Lost Partition", and you can identify your target one by its size.
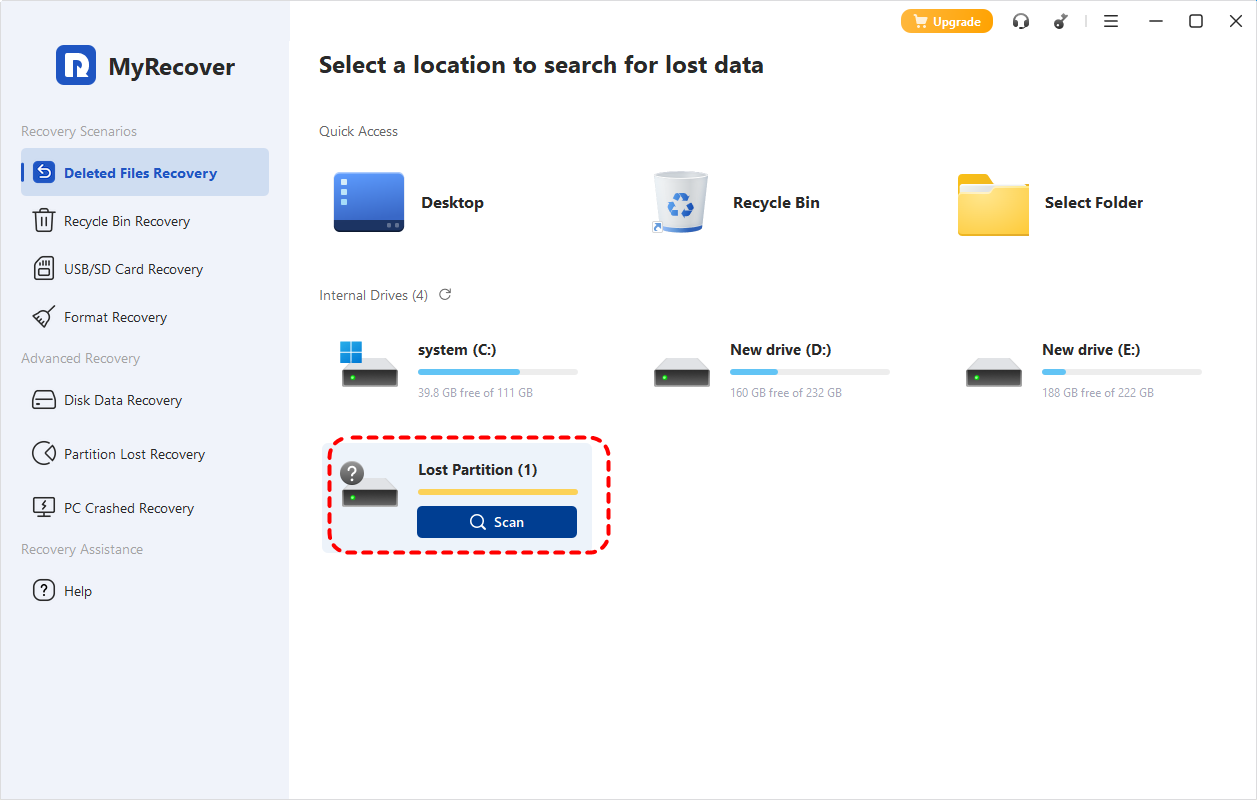
Step 4. Preview recoverable files, select those you need, and click "Recover" to save them to a different location.

Once the process is completed, you'll get a message "Files have been recovered successfully". Then, you can check and access the recovered files in the destination folder by clicking on the "Browse" button.
Final Words
While TestDisk is a powerful utility, it may sometimes throw the "no partition found or selected for recovery" error. With the methods outlined in this guide, you can resolve this issue effortlessly. If you prefer a data recovery tool with a simpler graphical interface, MyRecover is an excellent alternative. It not only lets you preview files before recovery but also preserves the original filenames and folder directory structure.
FAQs
Q1: How to recover lost partition with TestDisk?
To recover lost partition with TestDisk, you follow these steps:
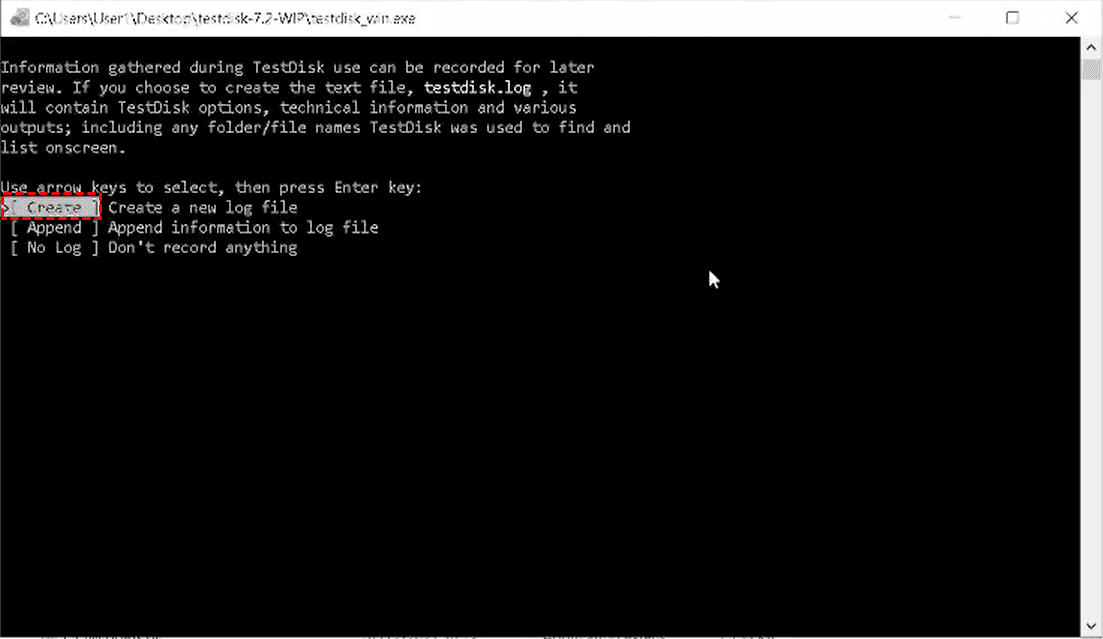
Step 1. Launch TestDisk and click "Create" to make a new log file.
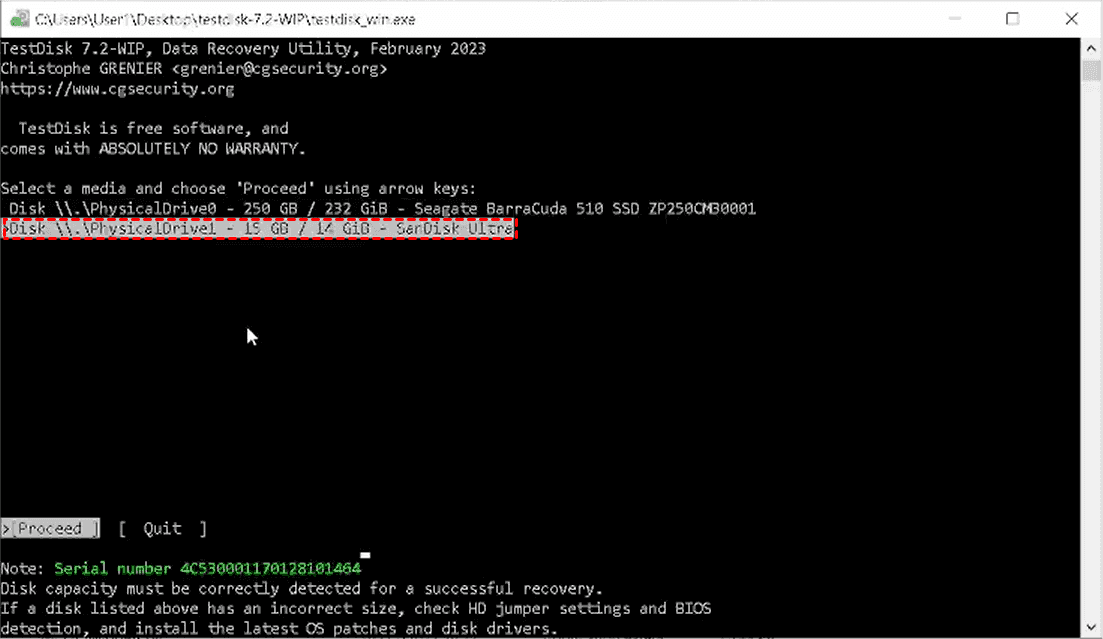
Step 2. Select your disk using the arrow key on your keyboard and click "Proceed" to continue.
Step 3. Choose the correct partition table type "Intel" or "EFI GPT".
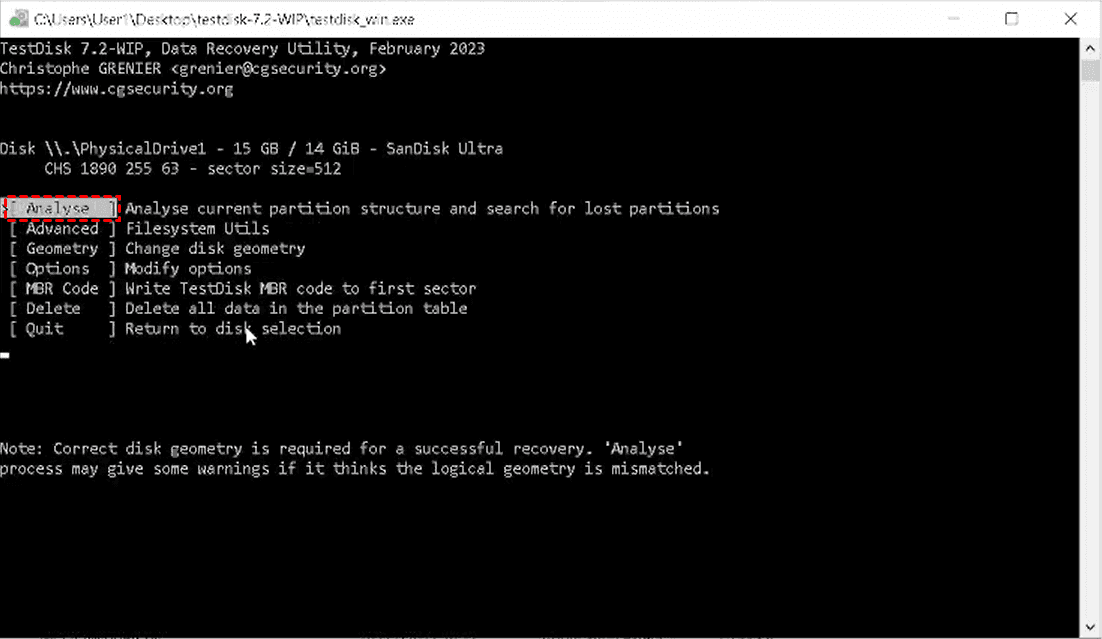
Step 4. Tap "Analyze" to check the current partition structure, then run "Quick Search". If partitions aren’t found, perform a "Deeper Search".
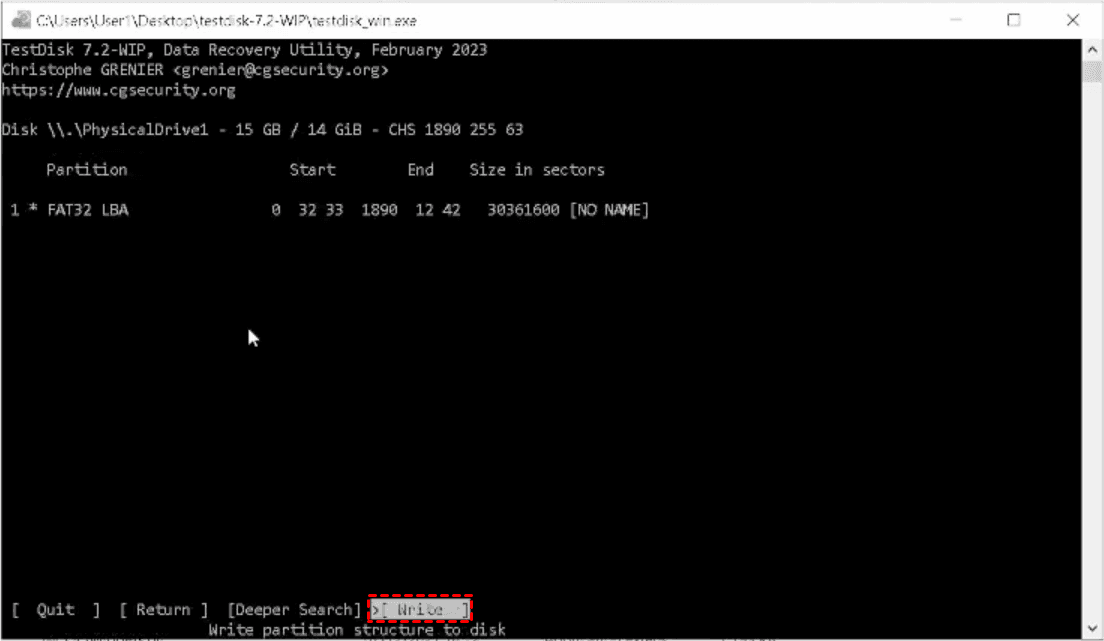
Step 5. Once the lost partition appears, use the "Write" option to save the partition table.
Q2: How to fix disk partition error?
Identify the root cause, corrupted MBR/GPT, file system damage, or hardware issues. Use tools like TestDisk to rebuild partition tables or repair boot sectors, and ensure disk connections are stable before attempting recovery.
Q3: Why is there no partition on my hard drive?
Missing partitions often result from a corrupted partition table, accidental deletion, sudden power loss, malware, or bad sectors. The drive may appear RAW or unallocated, preventing detection by Windows or recovery tools.
Q4: How to recover a lost disk partition?
Use TestDisk or similar recovery software. Scan the disk for lost partitions using Quick or Deeper Search. If detected, restore the partition table or use file recovery tools like PhotoRec or MyRecover for inaccessible data.
Q5: How to repair a corrupted partition?
First, back up accessible data. Then, use TestDisk’s advanced options to repair the boot sector or rebuild the MBR/GPT. For persistent corruption, file recovery software like MyRecover can extract data from the affected partition safely.
Q6: How to recover data when TestDisk finds no partition?
Use PhotoRec, included with TestDisk, to recover files directly from the disk without relying on the partition table. Alternatively, professional software like MyRecover can scan RAW or corrupted drives and restore data with original filenames and folders.


Stay Updated With Our
Latest Tips
Add us as a preferred source on Google to never miss helpful guides.